• Please visit and share your knowledge at our sister communities:
  • If you have not, please join our official Homebrewing Facebook Group!

    Homebrewing Facebook Group

Cheap and easy aeration gadget

Homebrew Talk

Help Support Homebrew Talk:

This site may earn a commission from merchant affiliate links, including eBay, Amazon, and others.
Interesting point, nomorese1. Here's some stuff I cut-and-pasted from Danstar's website.


So, the way I read this is that Danstar says "There are enough lipids in our dry yeast that aeration isn't as important, for 'standard' beer." Interesting. This may also play into the many anecdotal accounts we see here on fast and powerful fermentation starts with Nottingham.

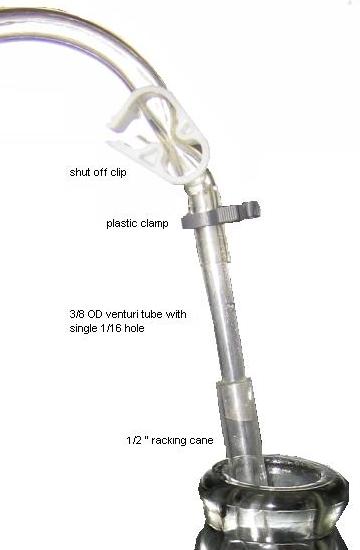
Nevertheless, I aerate the wort no matter what I'm pitching into it. It's an ingrained part of my process -- and, IMO, still necessary to make the best beer one can.

Agreed. I just pitched some Nottingham into a beer with an OG of 1.070 and you can bet I aerated before doing so.
 
The venturi is an awesome idea for brewing and will produce significantly better aeration than shaking and likely better than using an aeration system (air pump etc.).

Joe Camels comments should be taken to heart. Fewer, larger holes will be significantly better.

Also, the higher velocity the flow (the larger the pressure drop) the more air per volume of wort will be drawn into the stream. So a 3/8 cane with two large (relative) holes would be better than a 1/2 cane with a bunch of holes.

Also, the idea of moving the venturi up the line will make a big difference as the contact time between the air and the wort will be increased.

All of this is exactly right. also, it's the difference in the diameters of the siphon in general and the area of the restriction that makes the vacuum work. If you're siphoning in a 1/2" od (3/8" id) racking cane and tubing, using a small piece of 3/8"od (1/4"id) plastic tubing as your restriction will work great. The flow will more than double through this section and the pressure will drop by more than half.

One hole is sufficient as each added hole will divide the pressure drop per hole, too many will reduce the ability for the air to break the surface tension across the hole. In any event, you'll pull the same amount of air in through one hole as two or more.

We've used venturi suction devices to pull vacuums in flasks in our lab. I've seen flasks implode from the vacuum generated by running tap water through a venturi. Pretty neat stuff.

There was one post that questioned why this would work for aeration, in short, the bubbles generated in the venturi are quite small and spin very rapidly in the wort as it goes down the rest of the tubing. Both agitation and tiny bubbles (very large surface area to volume ratio promotes gas transfer) are very important to good aeration. Hopefully when the next round of aeration experiments happens, they look at this technique and quantify it for us, it's very cheap and easy to do and doesn't involve shaking a 50lb carboy.

Cheers
 
Wow, thanks for the information Joe Camel. It sounds like I made myself a winning device then, lol. I still haven't gotten to use it on a batch yet as things keep preventing my brewing. It is hard to believe something "so" simple can be "so" effective. Thank you jds for starting this thread.
 
Will this work? Its a 3/8 od 1/4 id PE tube pressed into my 5/16 id siphon tube. I drilled one 3/32 (.09) dia. hole as shown.

venturi.jpg
 
So for my last batch i made a wand out of a section of 1/4 inch siphon hose that fit into two lengths of 3/8ths inch hosing. I drilled a ~1/32 hole into the smaller hose and ran the wort through my auto siphon into the bucket.

I noticed i was getting the bubbles but i also noticed i was getting a 'fanning' of the wort in the section of hose under the hole. Is that normal? I am wondering if i need to, or even can, make my hole bigger. I know i can't make it too large, but it seemed like the hole wasn't sucking air into the line. Would a larger hole work better?
 
I used mine and it worked awesomely. Donner, I would try making the hole a little bigger or add one or two holes.
 
It doesnt seem like I will be able to get my tubing that far up the racking cane to cover the holes. Is this an issure or am I missing something. Will I able to get the tubing off if I slide it that far up?
 
I'm not sure I follow you here. You don't want the holes covered. My plan (which I still haven't done) was to cut the hose in the middle, and then insert the racking cane between the cut ends.

Honestly, this little gizmo has been working well enough that I haven't bothered. Case in point: I brewed 11 gal. of 1.072 IPA this last weekend. The batch was split into two 5-1/2 gallon batches, with no additional aeration other than the gizmo.

One fermenter was pitched with S-05, and the other was pitched with a 2l stirplated starter of WLP862, which has been reported to be a slow starter. Both beers were krausening and churning away the next morning, less than 12 hours later. For me, that's good enough. I don't seem to have a problem with off-flavors or esters.

Granted, that probably has a lot to do with proper fermentation temps and good yeast management practice, but my process, as a whole, seems to be just fine with the gizmo on the end of the hose.
 
I took a video of mine in action (quality not the greatest). The sound you hear is the air being sucked in through the hole. You can also see the air in the tube. I connected about 2 feet of tubing beyond the device which is supposed to help with aeration.

[ame=http://www.youtube.com/watch?v=XqYYbP6Wqfg&feature=channel_page]YouTube - Aeration device for homebrewing[/ame]
 
Wow - great idea. I'm going to try it on my next brew as well. Any risk of contamination? After watching TH's video, one idea I had was inserting the tube w/ the hole into one of those foam stoppers used for yeast culturing (link) - pretty simple air filter. But it doesn't sound like anyone has had any contamination issues so keeping it simple/stupid may be the way to go.
 
SO what would be ideal for hole size to scale this up to a 1/2" ID silicone tubing coming out of my 1/2 ball valve using a 1/2" OD tube sectioned in 2' before the end?
 
I'm going to use a piece of 1/2" outer diameter copper tube, that way the inside is less than the rest of the system. I'm planning on this being on the end of the tubing and actually recirculating through the whole system (CFC etc) back into the brewpot, I'll just stick the whole end of the tube into the wort to heat sanitize the whole thing. Then I can stop the pump and clip the tube to the carboy and start the transfer.
 
SO what would be ideal for hole size to scale this up to a 1/2" ID silicone tubing coming out of my 1/2 ball valve using a 1/2" OD tube sectioned in 2' before the end?

I would guess that you would not change the hole size but add more holes.
 
Forgive me if this was covered as I did not read all of some of the post but I did read Most of all of them :).

When I transfer my wort to my carboy I always have my BK covered with a lid to keep unwanted wild yeast/bacteria out and I also keep a piece of alum foil over my carboy for the same reason. It seems to me that if I have a tube with hole in it OUTSIDE of my carboy it would draw in what I am trying to keep out?
 
I'm generally seeing fermentation activity from this this method and dry yeast within a few hours of pitching. I normally hydrate the yeast before pitching. I guess it's multiplying for a few hours before I pitch so it's ready you go to work as soon as it hits the aerated wort.
 
Forgive me if this was covered as I did not read all of some of the post but I did read Most of all of them :).

When I transfer my wort to my carboy I always have my BK covered with a lid to keep unwanted wild yeast/bacteria out and I also keep a piece of alum foil over my carboy for the same reason. It seems to me that if I have a tube with hole in it OUTSIDE of my carboy it would draw in what I am trying to keep out?

Yes but it needs to get air from somewhere (or you need to flush your fermenter with Co2 from a tank, use an oxygen tank...) So really if you shake... there's already air in that carboy, if you whisk... same thing.

If you are really worried you could get one of those hepa filters and make a way for it to pull air through that filter before it gets to the wand with a hole.
 
Forgive me if this was covered as I did not read all of some of the post but I did read Most of all of them :).

When I transfer my wort to my carboy I always have my BK covered with a lid to keep unwanted wild yeast/bacteria out and I also keep a piece of alum foil over my carboy for the same reason. It seems to me that if I have a tube with hole in it OUTSIDE of my carboy it would draw in what I am trying to keep out?

As conpewter said, you have a few options, but i would like to add a few things.

Keeping unwanted bacteria and yeast out of your BK is fine, but it's almost impossible to do. The stuff is in the air. Generally, you really need to worry about the stuff that your wort comes into contact with on a surface.

Now, if you are brewing in a room full of mold, then yes, the air will be an issue, but general cleanliness will cut down your chances of infection greatly. You are really just trying to keep the amount of wild yeast to a small enough amount that your concentrated amount of brewers yeast will be able to 'win' any contest between the wild yeast and the brewers yeast.
 
Just thought I would show my take on the aeration gadget;

aeration_gadget_001.jpg


I like having a shutoff clamp at the top of the picture to maintain siphon and switch out carboys. The hose clamp secures the 3/8" inside diameter hose to 3/8" outside diameter venturi tube which connects to standard 1/2 racking cane.

Cheers
BeerCanuck
 
Cool thread. I am just getting into home brewing and I remembered seeing one of these venturi devices at a wine tasting place once.

If anyone doubts the efficacy of this, try it with wine (especially, organic or "young" wine). The difference in taste before and after is quite impressive.

Anyway, a couple of theoretical questions:
- The length of the restricting tube should not matter to the strength of this effect, right?
- Has anyone tried to insert something into the tube after the venturi to break up the flow of wort? From the video above, it looks like you are getting a nice straight line of bubbles. Some turbulent flow might help "mix" them a little better, no?

Thanks!
-D
 
This is a great idea - I'm definitely going to use this on my next batch. One question - is it better to have the end of the hose at the top of the carboy to maximize the distance the wort falls through, so it hits with a nice splash, or to have the end of the hose at the bottom to allow the entrained air bubbles to rise up through the wort?
 
It's best to have the tube at the bottom of the carboy, gravity will keep accelerating the wort down the tube until it leaves the mouth, at that point it's not pulling the wort behind it anymore. The faster the wort is moving, the more air it will pull in through the venturi.

Hope this helps,

Joe
 
It's best to have the tube at the bottom of the carboy, gravity will keep accelerating the wort down the tube until it leaves the mouth, at that point it's not pulling the wort behind it anymore. The faster the wort is moving, the more air it will pull in through the venturi.

Hope this helps,

Joe

When the wort in the tube gets to the level of wort in the carboy, acceleration will stop. That's because the pressure from the wort inside the carboy pushing up into the tube will equal the force gravity is exerting on the wort inside the tube at and below the level of the wort outside the tube.
 
This like a poor man's inline aeration stone. The pros use an oxygen tank to insert oxygen via an air stone into the wort stream while they transfer. This removes the contamination risk.

If you currently shake, stir, or use an aquarium pump, the method in this thread is no more dangerous for infection. I think I might give this a try as well since I currently shake for aeration and I'm a wimp.

Linc
 
One quick question. I usually do the bucket back and forth and then use a funnel with a screen. Do you get a lot of trub into the fermenter using this technique or does the autosiphon restrict that?

I suppose I could always try the whirlpool method.
 
When the wort in the tube gets to the level of wort in the carboy, acceleration will stop. That's because the pressure from the wort inside the carboy pushing up into the tube will equal the force gravity is exerting on the wort inside the tube at and below the level of the wort outside the tube.

I stand corrected, but you will still get better results and a higher flow rate by having the tube at the bottom of the carboy than at the mouth

Cheers
 
Back
Top