• Please visit and share your knowledge at our sister communities:
  • If you have not, please join our official Homebrewing Facebook Group!

    Homebrewing Facebook Group

Avoiding oxidation during dry hopping

Homebrew Talk

Help Support Homebrew Talk:

This site may earn a commission from merchant affiliate links, including eBay, Amazon, and others.
Being a fervent bucket fermenter, I've drilled a 1" access hole in a few bucket lids "opposite" the airlock hole,* using a 1" hole saw and then a piece of very fine sandpaper around a thick dowel to smooth the edge. They fit standard 1" bungs, creating a good seal. I can even pressurize the headspace a bit, the lid will bulge somewhat.
This is an idea that I have wondered about, so I am glad to see that it works for your. It seems like an easy mod for those fermenting in buckets.

I often ferment in Fermonsters, and it is really easy to dry hop through the small opening just by removing the stopper. I also have a couple stainless bucket fermenters. I have dry hopped using a magnet approach so I don't have to open the entire lid. I have thought about adding a TC bulkhead to the top of the fermenter, just so I had a small opening where I could add dry hops.

@worlddivides : my biggest concern with adding sugar is that it will restart fermentation. You then have to add time for the yeast to consume the sugars, absorb fermentation by products, and then settle out. I would just add the hops at the tail end of fermentation to achieve the same results without extending fermentation time.
 
I don't understand why beer brewers are such paranoid about oxygen. Have you ever oxidized anything? If answer to that is no, then continue doing what has worked for you.

Yeasts need oxygen during fermentation.
 
I don't understand why beer brewers are such paranoid about oxygen. Have you ever oxidized anything? If answer to that is no, then continue doing what has worked for you.

Yeasts need oxygen during fermentation.
Yeast only needs oxygen during the early phase of fermentation, to bud, multiply. After that relatively short, initial phase, oxygen in the beer only has negative effects, oxidizing many flavor and aroma components, which is unwanted.

Once active fermentation starts, metabolizing sugars into alcohol, CO2, and a plethora of other components, all residual O2 still present in the beer will be purged by CO2 production.

We want to avoid any O2 exposure, wherever we can during the remainder of fermentation, all the way through packaging.

Even extremely small amounts of oxygen (measured in parts per billion, ppb) can have detrimental effects on flavor and aroma in the packaged beer, especially over longer times.
 
Yeast only needs oxygen during the early phase of fermentation, to bud, multiply. After that relatively short initial phase oxygen in the beer only has negative effects, oxidizing many flavor and aroma components, which is unwanted.

Once active fermentation starts, metabolizing sugars into alcohol, CO2, and a plethora of other components, all residual O2 still present in the beer will be purged by CO2 production.

We want to avoid any O2 exposure, wherever we can during the remainder of fermentation, all the way through packaging.

Even extremely small amounts of oxygen (measured in parts per billion, ppb) can have detrimental effects on flavor and aroma in the packaged beer, especially over longer times.
I don't understand why. Oxygen is never an issue with wine and mead with common sense practices. I don't get why beer is allegedly so easy to ruin with oxygen.
 
I don't understand why beer brewers are such paranoid about oxygen. Have you ever oxidized anything? If answer to that is no, then continue doing what has worked for you.

It is definitely more of an issue with hoppy beers, but it can impact about any style (more so with pale styles). Taking steps to avoid cold side oxidation had a huge impact on even moderately hopped Pale Ales and it was a game changer for IPAs (I only brewed NEIPA style beers after my improvements). Once I was able to recognize the characteristics of staling from oxidation, it really stands out to me now. I notice oxidation flaws often in beers brought to my homebrew club meetings. This includes beers of a variety of styles.

I do think you can go a bit overboard with avoiding oxidation, but I say the OP is correct to worry about taking the lid off a bucket of fermented beer to add dry hops.
 
Oxygen is never an issue with wine and mead with common sense practices.
I don't know about mead and I don't know what you mean by common sense practices, but oxygen can definitely be an issue for wine. Anyway, wort and beer have a lot more compounds that are susceptible to oxidative damage.
 
I don't know about mead and I don't know what you mean by common sense practices, but oxygen can definitely be an issue for wine. Anyway, wort and beer have a lot more compounds that are susceptible to oxidative damage.
Oxygen can be an issue if you really **** up like use your airlocks dry, but doing basic things like opening a fermenter to take a sample is not an issue with wines and meads, while it seems to be for beers.

Those practices include sulfiting your must, and later, the wine when racking. Sulphites are oxygen scavengers, turning them into sulfates.

Many people especially in the mead scene believe in this "appeal to nature" brewing and so they don't use sulfite or sorbate. They either get to the yeast alcohol tolerance or pasteurize.
 
My dad made wine his whole life (or at least well into his eighties) and never used sulfites. But any wine left in a partially filled container would go off in less than a day. Being a microbiologist I realize that's a biological process rather than a chemical one, but it still shows that oxygen is an enemy of wine.
 
mac_1103, I don't like to point to anecdotal evidence, as it's unreliable, but I've had wine left in a wine glass that was still good to drink the next day after surviving the hangover. I've had country wines in half empty carboys for a month or two with no flavor issues. Although the difference is that they weren't in a contained, but in a carboy under an airlock. Sometimes they didn't have sulfites. Partially filled container of homemade wine would probably go off in under a day when you start drinking it and after a while there's non left. Drinking homemade wine is a biological process. Oxygen is the enemy of all, but to what extend. Sometimes oxygen is a good thing as there's such things as port and madeira.

I don't understand how bottled beer not get oxidized when it's transferred from brewery to the store. It would splash like hell during the transfer.
 
I don't understand how bottled beer not get oxidized when it's transferred from brewery to the store. It would splash like hell during the transfer.

It'll only get oxidized if there is oxygen in the package in the first place. Commercial brewers are able to purge O2 during packaging. Splash all you want, there's little or no O2 inside to oxidize the beer.

In addition, commercial brewers do closed-transfers when moving from mash tun to boil kettle to fermenter.

Homebrewers have more challenges keeping O2 ingress to a minimum.
 
@worlddivides : my biggest concern with adding sugar is that it will restart fermentation. You then have to add time for the yeast to consume the sugars, absorb fermentation by products, and then settle out. I would just add the hops at the tail end of fermentation to achieve the same results without extending fermentation time.

It's only about 0.1% ABV worth of sugar, though, so there wouldn't be many fermentation byproducts or much time needed to consume the sugars. I mean, I intend to dry hop for 3 days, and my entire fermentation of around 4.5% ABV only lasted about 3 days (at 17-19C) to begin with. I'm sure it's cleaning up fermentation byproducts right now, but the amount of sugar I would be adding would be about 30-45% of the amount of priming sugar I'd add if I was bottling (since I hadn't settled on exactly how much I'll add).
I wouldn't be so worried about oxidation if this was, say, a stout and I didn't need to open the fermenter until packaging. This is a highly hopped beer with 7 hop additions (assuming I include each different type of hop added in dry hopping as a separate addition too), including around 80 grams of dry hops in a 3.4 gallon batch. I never experienced oxidation from any of the West Coast IPAs I used to make, but I also had a very small opening to put the dry hops in, and the only significant oxygen exposure was when I bottled, but even then, I did everything in my ability to limit oxygen exposure and never tasted any oxidation in the beers. I have tasted oxidation in some past-the-expiration-date commercial beers and some relatively young homebrews by other people. And even if some oxidation still results in a delicious beer, I don't want the hop flavors to be more muted than they would be without that oxidation.
 
Last edited:
It's only about 0.1% ABV worth of sugar, though, so there wouldn't be many fermentation byproducts or much time needed to consume the sugars. I mean, I intend to dry hop for 3 days, and my entire fermentation of around 4.5% ABV only lasted about 3 days (at 17-19C) to begin with. I'm sure it's cleaning up fermentation byproducts right now, but the amount of sugar I would be adding would be about 30-45% of the amount of priming sugar I'd add if I was bottling (since I hadn't settled on exactly how much I'll add).
Also, it seems like just a wild guess that adding a small amount of sugar will even do anything regarding oxygen uptake. With a typical fermentation, it is not so much that the yeast consume oxygen in the headspace of the fermenter, but that they produce plenty of CO2 to purge out all the air in the headspace. It sounds like you are almost forcing hop creep, and diacetyl is one of the big concerns. If you do add sugar, I would recommend giving at least 4 days to finish fermentation and clean up.
 
Also, it seems like just a wild guess that adding a small amount of sugar will even do anything regarding oxygen uptake. With a typical fermentation, it is not so much that the yeast consume oxygen in the headspace of the fermenter, but that they produce plenty of CO2 to purge out all the air in the headspace. It sounds like you are almost forcing hop creep, and diacetyl is one of the big concerns. If you do add sugar, I would recommend giving at least 4 days to finish fermentation and clean up.
I have considered just adding hops through the airlock hole, which is pretty small but should be big enough for all the hops to slowly fit through. The amount of oxygen introduced that way would likely be much less than even partially opening the lid. And my worry about oxidation does have me considering just not opening the lid at all and just dry hopping in the keg (though I would then only put the cryo hops in there and give up on the conventional pellets since that could contribute vegetal character over time). I do think I may be overthinking it, but it is a beer style that is especially affected by oxidation, so better to worry too much than too little.
 
[...] and just dry hopping in the keg (though I would then only put the cryo hops in there and give up on the conventional pellets since that could contribute vegetal character over time). I do think I may be overthinking it, but it is a beer style that is especially affected by oxidation, so better to worry too much than too little.
After the dry hop has completed, you could transfer the finished beer into a serving keg. There a few methods for that procedure too.
 
After the dry hop has completed, you could transfer the finished beer into a serving keg. There a few methods for that procedure too.
A serving keg? Is that something different from the corny keg I already have? Like an even smaller keg or something?

One idea I had to prevent overfilling is just transferring 1 to 1.5 liters from the fermenter to a few sanitized PET bottles that I'd add priming sugar to. Then after that, I'd do a closed transfer from the fermenter to the corny keg. Since I put 3.4 gallons (12.9 liters) of wort in the fermenter, I imagine somewhere around 1.5 liters of that is below the spigot and should mostly be trub, which means the finished beer above the spigot would probably be anywhere from half a liter to 2 liters beyond what should go into the keg, so transferring 1 to 1.5 liters to PET bottles might leave me with just 2.9 gallons or so to transfer into the fermenter. With CO2 already in there, I won't have to worry about oxidation.
 
Just a second keg so yo can get the beer off the hops after the desired number of days.
Ahhhh. Right. Well, I do intend to get a second keg, but I don't think I'll get one until after this beer is kegged and carbed.
 
I often ferment in Fermonsters, and it is really easy to dry hop through the small opening just by removing the stopper. I also have a couple stainless bucket fermenters. I have dry hopped using a magnet approach so I don't have to open the entire lid. I have thought about adding a TC bulkhead to the top of the fermenter, just so I had a small opening where I could add dry hops.

I use Fermonsters as well, I love that you can get lids with and without holes and DIY your own. I have considered, but never tried, a bulkhead in the top of one for dry hopping. I'd lose space for the stopper, temp probe, blow-off, etc. might might make it fit. I thought about doing it on the clear plastic as well, it's not flat but a bulkhead could force it to be quite easily. I don't want it top heavy and tipping though.

Do you purge at all when doing your dry hopping? I've done magnets a few times, but never excited about handling the bag even with sanitized gloves, and not sure how well the bag opens up after it drops. Still trying to think of the best way to chuck them in loose.

So I pulverize the pellets in a Cuisinart and pour that in.

That's silly and genius, I think I will try this. I've attempted to dry hop through the 1/2" blow-off hole I've got but it's just too small to work well. Powdered hops would do it though! Hmm. I'd be tempted to do a little CO2 purging the whole time and have to be sure I didn't simply blow the hops across the room haha.
 
I had not. It's definitely an interesting idea. It won't work for this batch, but I can keep it in mind for the future.
I was going to suggest the magnet drop too. Before doing that I just took off the lid and dumped the hops followed by a CO2 purge. Not elegant but I didn't notice any off flavors or esters weeks later once it his the glass.
 
I use Fermonsters as well, I love that you can get lids with and without holes and DIY your own. I have considered, but never tried, a bulkhead in the top of one for dry hopping. I'd lose space for the stopper, temp probe, blow-off, etc. might might make it fit. I thought about doing it on the clear plastic as well, it's not flat but a bulkhead could force it to be quite easily. I don't want it top heavy and tipping though.

Do you purge at all when doing your dry hopping? I've done magnets a few times, but never excited about handling the bag even with sanitized gloves, and not sure how well the bag opens up after it drops. Still trying to think of the best way to chuck them in loose.


That's silly and genius, I think I will try this. I've attempted to dry hop through the 1/2" blow-off hole I've got but it's just too small to work well. Powdered hops would do it though! Hmm. I'd be tempted to do a little CO2 purging the whole time and have to be sure I didn't simply blow the hops across the room haha.
When I knew I had to get away from glass carboy's, @Dgallo 's excellent thread; https://www.homebrewtalk.com/thread...lete-closed-transfer-system-for-cheap.680992/ inspired me to go with a fermonster but...
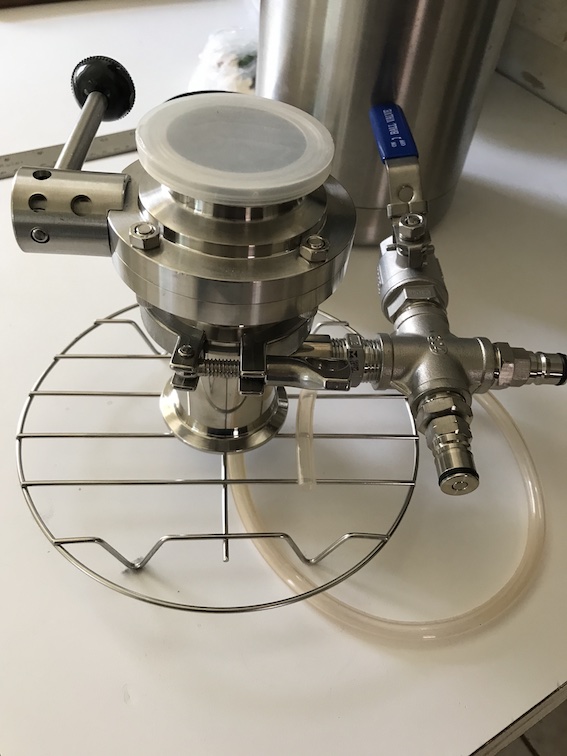
While I wanted a floating diptube, I also wanted to avoid a cracked lid and have the tee to grip while inserting and removing disconnects and I wanted unrestricted blow-off that didn't leave krausen gunking up my gas post and I also wanted something for larger batches; I got a couple sankes and I had my heart set on Norcal's cross-fermenter; https://www.norcalbrewingsolutions.com/store/Sanke-Keg-Cross-Fermenter-Kit.html but again; I wanted a floating diptube. My pondering led be decide to design a 'one-size fits all' solution, blatantly ripping off the above 2 mentioned solutions and I came up with my 'Fermhead' ( https://www.homebrewtalk.com/thread...-fit-it-to-fermonster-sankey-whatever.704064/ ) and it works great but still lacks a dry-hopping provision. Owing to another thread getting me thinking, I came up with this:
IMG_1623.jpg

Has a 2" TC top and bottom and you can attach the Fermzilla hop bong on top and with one of these;
https://www.ebay.com/itm/2842377328...79H8Pjm9tlqtLsJfR4olK7rQ==|tkp:BlBMUIS9vLeiZA
You can have a floating diptube, blow-off that doesn't gunk your gas post. You can put a TC bulkhead https://www.brewhardware.com/product_p/tc2wlf.htm in a Fermonster lid https://www.brewhardware.com/product_p/fermonster-lid.htm and get the whole shebang. You could just as easily add it to a brew bucket, plastic or SS, or with one of these; https://www.brewhardware.com/product_p/tc2gksingle.htm attach it to a sanke.
Dunno if this has any 'inspirational' value, but I hope someone can use it.
:mug:
 
[...]
View attachment 854588
[...]
Dunno if this has any 'inspirational' value, but I hope someone can use it.
:mug:
It's a very good idea! ^

How about all that weight resting on that plastic Fermonster lid! Is that going to hold up without cracking it?
And it doesn't even include the hop bong, which doesn't have to be permanently attached, but only for a few minutes.
 
It's a very good idea! ^

How about all that weight resting on that plastic Fermonster lid! Is that going to hold up without cracking it?
And it doesn't even include the hop bong, which doesn't have to be permanently attached, but only for a few minutes.
Agreed 100% ....wasn't it you in another thread that suggested a peice of plexi-glass on top the lid? ..It got me thinking of trying that (since I have about a 1/4 of a sheet from another project sitting around.) and if that's too thick for the bulkhead, maybe a thick piece of sheet-steel?
:mug:
 
Agreed 100% ....wasn't it you in another thread that suggested a peice of plexi-glass on top the lid? ..It got me thinking of trying that (since I have about a 1/4 of a sheet from another project sitting around.) and if that's too thick for the bulkhead, maybe a thick piece of sheet-steel?
:mug:
Yeah, I suggested a piece of (tough) "plexiglass" (on top of the lid) to help bear all that weight, as well as pressure and torque while working the rig.

Or (stainless) steel, as long as it doesn't flex. Something that transfers all those forces off the center of the thin (and brittle) plastic lid.

Any ideas on how to mount the 4" TC fitting?
 
the thin (and brittle) plastic lid.

Thin, yes, brittle, no. It's a pretty tough material that would take a lot before cracking. In my experience drilling holes in them and such.

Agreed about spreading the weight though, I'm not mounting an argument here.

Hmm, I have something to think about for my Fermonsters now! I'd occasionally pondered something like this but not for very long. It's going to be hard not to get more serious about it.
 
Yeah, I suggested a piece of (tough) "plexiglass" (on top of the lid) to help bear all that weight, as well as pressure and torque while working the rig.

Or (stainless) steel, as long as it doesn't flex. Something that transfers all those forces off the center of the thin (and brittle) plastic lid.

Any ideas on how to mount the 4" TC fitting?
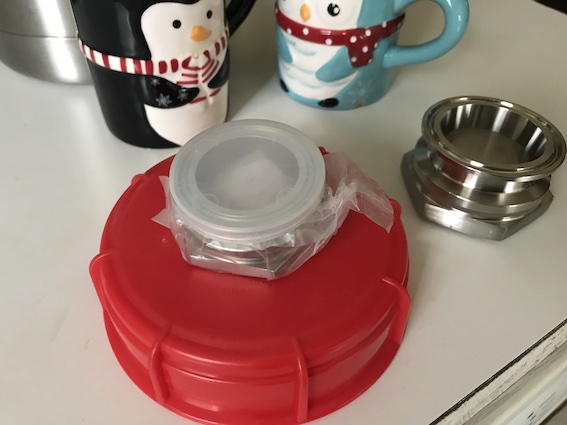
I don't think 4" is possible but I can't be sure. I have 1.5" and 2" on hand and from what I see of the 2", I can't imagine a 4" leaving enough inner room for the nut. Here's 1.5" and 2" on top a Fermonster lid;
IMG_1644.jpg

IMG_1645.jpg

I do really like the 4" idea though...would leave space to throw in a temp probe or totally redesign to include a chilling coil...
Maybe someone on here has a 4" bulkhead they could measure out?
:mug:
 
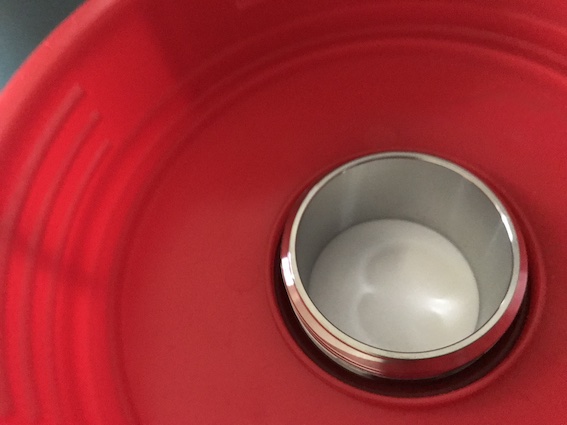
It also *might* thread through the 45mm opening on a standard fermonster lid without further modification.
My sincerest Thanks for that!! Please ignore what follows: 15 minutes after your post I was cursing your name; When I bought my first Fermonster, I bought 2 or 3 solid lids and a few spare o-rings and I set aside the original 'per-holed' lid. It had occurred to me that a bulkhead might fit but I never bothered to find out until your post compelled me to do so... I just got through looking everywhere for the damn original lid I had set aside with no expectation of having a use for...finally found it covered in dust sitting inside one of the funnels I used to use, on top of dusty bottles I used to use near my laundry area. :p
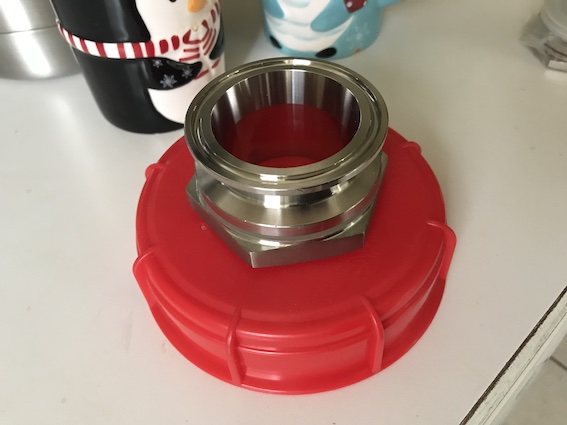
The 2" bulkhead won't fit as is, but the 1.5" fits, albeit with a mm or so space around it, but since the only option is to have the o-ring on the outside, that'd work. Here's the 1.5";
IMG_1646.jpg

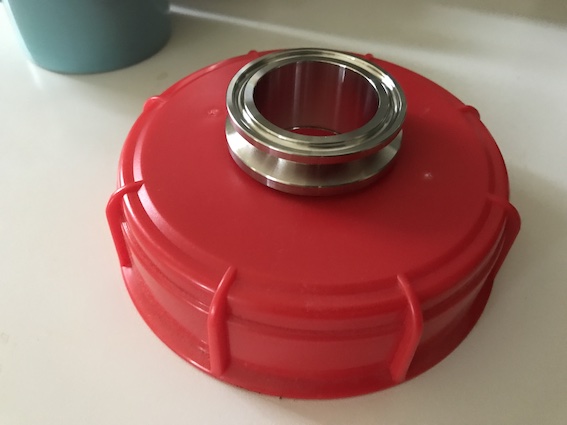
Inside:
IMG_1647.jpg

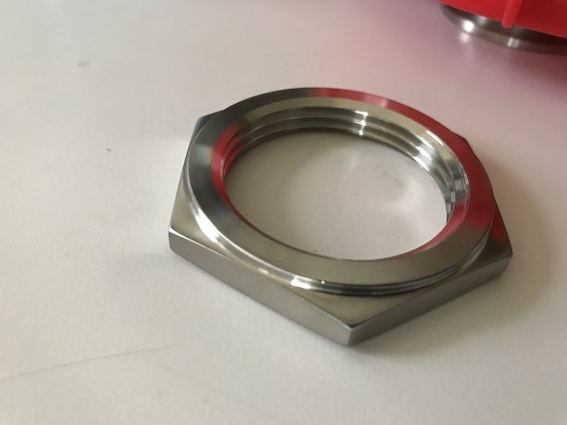
The original lid has a lip around that might limit how thick a 'reinforcment' you can put on top of it... the locknut that came with the bulkhead (which itself probably came from aliexpress https://www.aliexpress.com/item/329...SVOStUYs&utparam-url=scene:search|query_from: ) has a raised rim;
IMG_1648.jpg

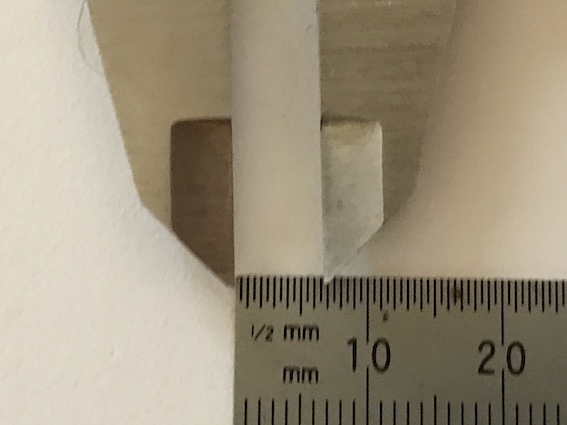
Turning the nut the least amount of times I'm comfortable with, leaves this much space:
IMG_1649.jpg

I have to apologize here and throw in my disclaimer: Owing to brain-injury, I can't accurately read that, but that's how much space is available for the surface of the Fermonster lid and any choice of reinforcment material between it and the bulkhead.
Hope this is useful.
:mug:
 
The 2" bulkhead won't fit as is, but the 1.5" fits, albeit with a mm or so space around it, but since the only option is to have the o-ring on the outside, that'd work.
Go figure. I've got two of the original lids lying around collecting dust as well and I would have guessed that the 1.5 would leave too big a gap for the o-ring to seal.
I can't accurately read that, but that's how much space is available for the surface of the Fermonster lid and any choice of reinforcment material between it and the bulkhead.
6.5 mm
 
Do you purge at all when doing your dry hopping? I've done magnets a few times, but never excited about handling the bag even with sanitized gloves, and not sure how well the bag opens up after it drops. Still trying to think of the best way to chuck them in loose.
I have not been purging. I pull off the stopper, dump the hops in quickly through a small funnel, and hope that not enough oxygen get in to matter during that 10 seconds the stopper is out. I have thought about adding a gas port to a Fermonster lid so that I could run a flow of CO2, but I have not seen any oxidation issues.
 
In my idea about doing a closed transfer of the beer from the fermenter to the CO2 purged keg using the beer quick disconnect to transfer the beer in, while the gas quick disconnect pushes the CO2 out and into the top of the fermenter through the tiny airlock hole, that got me thinking.

The phrase I always heard homebrewers use for more than a decade now is "a blanket of CO2" on top of the wort. While I've long known carbon dioxide is denser (and thus "heavier") than air or more specifically oxygen and nitrogen, it's difficult to imagine CO2 staying in place or just not leaving if there is an exit above for it to leave through. But if it really does fall downward, does that mean I can stick the gas line (with the gas disconnect removed) through the airlock hole and turn the CO2 tank on to, say, something relatively low like 4 or 5psi for... I don't know. 15 or 20 seconds and the CO2 will fall down to the wort at least temporarily? It's a bit difficult to imagine things working so conveniently, but if the "blanket of CO2" phrasing is even partially true, this could be a good alternative to adding CO2 by restarting fermentation with a small amount of sugar. It wouldn't be like purging a keg since it wouldn't be entirely closed off like a keg is, but it would be an extremely small hole, and theoretically when the gas line is removed, the oxygen would leave before the CO2 would.
 
The phrase I always heard homebrewers use for more than a decade now is "a blanket of CO2" on top of the wort. [...]
That's a myth. Gasses mix freely, due to diffusion.
Turbulence increases the speed of mixing, as does temperature (molecules moving at higher speed).
 
That's a myth. Gasses mix freely, due to diffusion.
Turbulence increases the speed of mixing, as does temperature (molecules moving at higher speed).
So putting CO2 in there via the CO2 tank's gas line would be a waste of time, then? On the one hand, putting dry hops through that airlock hole will reduce how much oxygen can get through since it's a small hole. On the other, since it's such a small hole, it will take a lot more time than just opening the lid and throwing in hop bags would or opening the lid and pouring in the contents of the vacuum sealed bags would, so it kind of seems like I'm going to be introducing oxygen no matter what I do. I'm just not sure which will be the least amount of oxygen introduced. Dry hopping in the keg is probably the best solution for reducing oxygen exposure.

I'm definitely seeing the cleverness of the magnet approach. Might want to try that for my next IPA.
 
Last edited:
This thread shows how simple and how complicated keeping oxygen out of our beer can be. Any new brewers reading this please take note - Just accept that oxygen is bad. It is much easier to learn the reasons why if you are not trying to fight it. Yes it is not convenient, but that does not change the flavor and aroma losses. You will most often not "taste" oxidation, it will just degrade your flavor & aroma that will not be there to enjoy!

If you always make oxidized beer, you will not think anything is wrong :) Trust us that things improve a lot once you start improving your process.

1st and foremost, closed transfers from the fermenter are a must. No lid opening, no draining into an open keg, no CO2 blanket etc... These are all homebrew convenience practice from the early days. Things have improved.

2nd - you can perform closed transfers with gravity. You do not need to push the beer with tank CO2. Just create a closed loop where the gas out from the keg returns to the elevated fermenter.

3rd - gas laws are tricky. In the end, if there is oxygen in the headspace, it is or will be in the liquid too. These reactions and interactions happen quite quickly. So it is best to have a proven process to never let it in.

Here is a YouTube video of a guy who made a hop dropper for plastic lids out of common hardware store items. Maybe it can help with your setup.


Also, here is one of my videos showing my closed transfer process. I hope it helps show that it is not that complicated.

 
So putting CO2 in there via the CO2 tank's gas line would be a waste of time, then?
I wouldn't go that far. If it's the best you can do for this batch then do it. You're not going to prevent oxygen ingress or create a protective blanket, but you might reduce the amount of air that gets into the fermenter and/or dilute the oxygen with CO2. But definitely make some of the changes discussed above for future brews.
 
I wouldn't go that far. If it's the best you can do for this batch then do it. You're not going to prevent oxygen ingress or create a protective blanket, but you might reduce the amount of air that gets into the fermenter and/or dilute the oxygen with CO2. But definitely make some of the changes discussed above for future brews.
I think I said earlier in this thread that I've never experienced oxidation in any of the beers I've made, but I think it'd be more accurate to say I've never experienced "immediate" oxidation in any of the beers I've made. I have after 8 or 12 months for some of the darker beers and after 4-5 months for some of the lighter beers. And, while I do plan to consume this beer within 3 months, I want to reduce oxidation as much as possible. Not so much to avoid the "cardboard flavor" of extreme oxidation, but more to prevent the muting of hops and maltiness you get in light to moderate oxidation. Even before I started homebrewing, I had experienced oxidation in wine, and so it is something I've been aware of from the beginning, but it's a difficult process.

I honestly think the magnet idea is the best one to keep in mind for dry hopping in future batches. I have never dry hopped in the keg (as this will be my first time kegging), but I do think I'd like to try it sometime in the future (though I would want a hop tube if I were to try that since I have to imagine that adding hops loose or in hop bags would significantly risk plugging up the dip tube). This also is my first time using a bucket fermenter (after having used glass carboys, HDPE carboys, Speidel fermenters, etc.), which is the cheapest I've ever had, but the huge space of the lid and the tiny size of the airlock hole are serious concerns when it comes to adding anything to the fermenter before packaging. A lot of new things, but it's all a learning experience. Appreciate all the advice and information, guys!
 
So I dry hopped. When I removed the airlock, there was a loud hissing of air, which I assume was the sound of air being sucked through the airlock hole from the vacuum within (from CO2 leaving but nothing staying to replace it). I stuck the gas line in the airlock hole and added CO2, then tossed the hops in, and added a little more CO2, then sealed the airlock back up (maybe 20-30 seconds total). About 90% of the krausen had sunk back to the bottom with just a few white islands of krausen remaining on the top. Cryo hops are pretty intense, because almost immediately afterwards I could smell the hops coming through the vodka-filled airlock.
 
When I knew I had to get away from glass carboy's, @Dgallo 's excellent thread; https://www.homebrewtalk.com/thread...lete-closed-transfer-system-for-cheap.680992/ inspired me to go with a fermonster but...
While I wanted a floating diptube, I also wanted to avoid a cracked lid and have the tee to grip while inserting and removing disconnects and I wanted unrestricted blow-off that didn't leave krausen gunking up my gas post and I also wanted something for larger batches; I got a couple sankes and I had my heart set on Norcal's cross-fermenter; https://www.norcalbrewingsolutions.com/store/Sanke-Keg-Cross-Fermenter-Kit.html but again; I wanted a floating diptube. My pondering led be decide to design a 'one-size fits all' solution, blatantly ripping off the above 2 mentioned solutions and I came up with my 'Fermhead' ( https://www.homebrewtalk.com/thread...-fit-it-to-fermonster-sankey-whatever.704064/ ) and it works great but still lacks a dry-hopping provision. Owing to another thread getting me thinking, I came up with this:
View attachment 854588
Has a 2" TC top and bottom and you can attach the Fermzilla hop bong on top and with one of these;
https://www.ebay.com/itm/284237732865?itmmeta=01J49QF3SWCXGWZGP7444S0DMG&hash=item422de39c01:g:MbcAAOSwFWZgYen~&itmprp=enc:AQAJAAAAwFf0rmKe3mHZVV+USDWXUy/wO+2bIRtPkbt+DL4ailY8DYn4t6ZUQYji9XbxFRhr5l9CFeRnD3cDaYFxquxy/vng4gAZM7PN0eMFR2mpT0wNAtXd0mwxEPOvbT6WUAPBzqUY4FWmo5fjuiuSS49pXXG9qg4xmhFIw/6YnQzZIDwYrujVLJOlEuWFVRTSdSj6Nz6inC8s9nTPzX0ic9CASgyukvcDOqy2NPkasy6Smo79H8Pjm9tlqtLsJfR4olK7rQ==|tkp:BlBMUIS9vLeiZA
You can have a floating diptube, blow-off that doesn't gunk your gas post. You can put a TC bulkhead https://www.brewhardware.com/product_p/tc2wlf.htm in a Fermonster lid https://www.brewhardware.com/product_p/fermonster-lid.htm and get the whole shebang. You could just as easily add it to a brew bucket, plastic or SS, or with one of these; https://www.brewhardware.com/product_p/tc2gksingle.htm attach it to a sanke.
Dunno if this has any 'inspirational' value, but I hope someone can use it.
:mug:
I cannot thank you enough for this beyond inspirational post @Broken Crow !

I have a 32L SS conical. I've just been going down a rabbit hole on the whole thing for the last 3 hours after finding your post - this is the absolute perfect solution for everything I'm trying to achieve at the moment. Living in Indonesia, it's inevitably very difficult to find all the parts but...looks like it's all possible with the exception of the tee, and the SS butterfly valve which is only available in 1.5inch, which is no good because the only TC bulkhead available is 2 inch!

Solution is to get the 2 inch Kegland Hop Bong pressure pack which usually fits on the Fermzilla, comes with it's own butterfly valve. I'm going to fit a 2" bulkhead to my SS conical and stick this thing on top. I think maybe that's even a better solution (kind of), since the Kegland/Fermzilla butterfly valve that comes with it is probably significantly lighter (and plastic...) than the SS. In the meantime, need to find the tri-clamp tee...and find someone to donate the Fermzilla parts to!
 
Well, that was a disaster. Brings me back to when I first started brewing.

Brew day went perfectly. Fermentation went perfectly. Dry hopping went perfectly. Cold crashing went perfectly. Everything went perfectly.

...Except kegging. This experience made me just want to quit kegging altogether and go back to bottling. But I already have the expensive equipment, so that's not really an option.

1. When I wanted to clean my keg, the ratchet wrench adapter I had bought specifically with the exact size everyone online said was for corny keg gas and beer thingies wouldn't work. I think the reason is that the one I bought was for hexagonal shape, but the gas and beer things I have... are octagonal? So it wouldn't connect. Probably should have got a ratcheting box wrench instead. I tried a regular adjustable wrench, but it was too tight and I just gave up, thinking that it was brand new and had never been used, so I'd just thoroughly clean the inside without taking the parts apart, then sanitize it
2. I went through 3 packets of gelatin because each time I tried to add it, it got sprayed out through the beer line. The first time I unfortunately had the gas line connected. The next time I had the gas and beer lines disconnected, but when I reconnected the beer line, it still sprayed gelatin all over everything. The third time I finally managed to do it (because I had made sure there was absolutely zero CO2 in the keg this time after purging out all the oxygen).
3. The coupler I bought off Amazon worked perfectly for the 5mm side but was just a tiny bit too small for the 10mm side. I put a clamp on it and tighten it as much as I could, but the beer leaked at that point as I did the closed transfer. Altogether, of the 11 liters I transferred, it probably leaked around 100ml. I think I only managed to get around 10 liters into the keg (2.6 gallons or so) since the spigot was above maybe 600-700ml of beer (and tilting the beer would just get a ton of trub into the keg).
4. I knew my girlfriend's fridge (that she intended to throw away but I stupidly thought I could use as a keg fridge) was too small to fit 2 kegs. I thought it was just barely big enough to fit 1 three-gallon keg and 1 CO2 tank. I was wrong. They cannot both fit, no matter how I arrange them. So currently I have a three-gallon corny keg in the fridge, not carbing but just being kept cold, and the CO2 tank turned off outside the fridge. I briefly considered carbing the keg at room temperature before I buy a new fridge (I had been meaning to buy a much much larger fridge so I could fit 2 kegs and a CO2 tank, but my girlfriend kept saying "you don't need to buy it now. Buy it in a month or two"), but the chart for PSI and carbonation temperature only went from 30F to 65F and this room is around 77F and gets a lot hotter at night when I turn the AC off (since it's in the high 90s and low 100s outdoors), so I'm thinking of just not carbing the keg until I get a new fridge.

Ugh... Brings me back to the first beer I made 10 years ago that was a disaster. At least this time the beer itself is a massive success. I just need to figure out how to fix these issues for the next batch. And get a new fridge... and a way to dispense beer reliably (I tried the picnic faucet with the Stellar San solution and this would just spray beer all over. Need to find out a way to do this).

It's like kegging is an entirely different universe from brewing altogether -- and I know nothing about it.
 

Latest posts

Back
Top