• Please visit and share your knowledge at our sister communities:
  • If you have not, please join our official Homebrewing Facebook Group!

    Homebrewing Facebook Group

Another TSS2 controller box build

Homebrew Talk

Help Support Homebrew Talk:

This site may earn a commission from merchant affiliate links, including eBay, Amazon, and others.
Joined
Aug 16, 2010
Messages
1,360
Reaction score
37
Location
Lemon Grove, CA
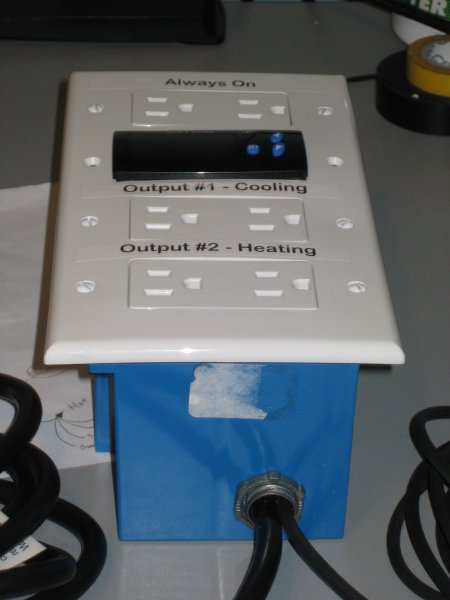
I wanted something I could move around and even let people borrow if needed. I also required an unswitched outlet so I could run a fan/blower or other device if needed.

Finished3.JPG

FinishedBottom.JPG


Here is how I did it...

PartsIsParts.JPG


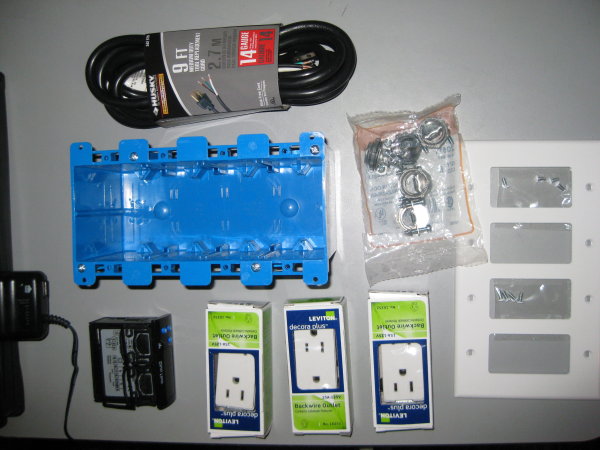
I attached a parts list but if you don't do electrical stuff you will also need some loose wire and wire caps to wire everything together.

Pretty easy setup with a couple caveats...

1) When you trim the cover plate trim it all from one side. Space is tight and you will only be able to use one clip to secure the Love controller. This means you need all your space to be on one side. A Dremel is the easiest way to trim up the cover and it doesn't really need to be cleaned up as it is all behind the controller once everything is installed.
TrimJob.JPG

CloseFit.JPG


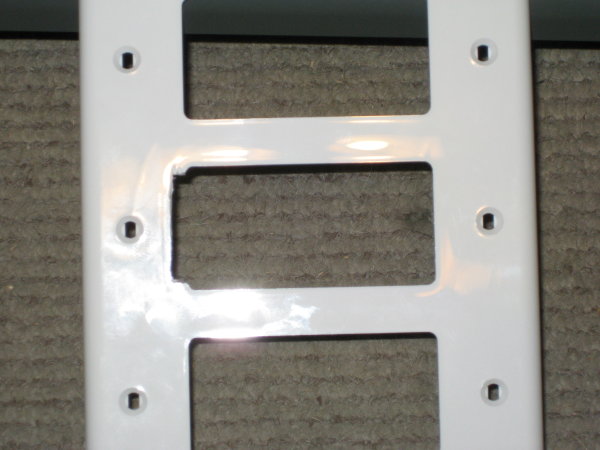
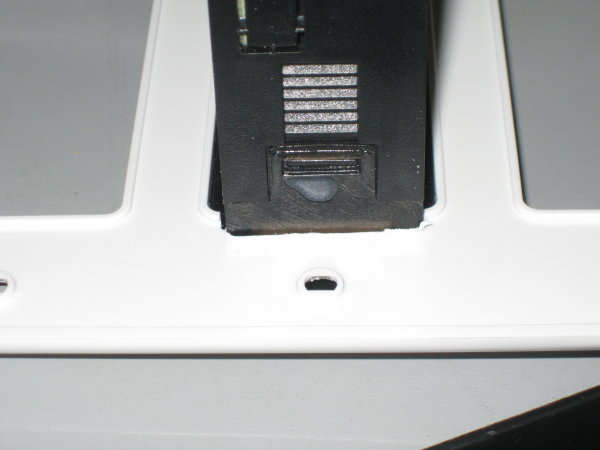
2) Space is so close you'll need to trim the catch release off the clip before assembling or it will just release and loosen up. I didn't snap a pic of it but what needs to come off is pretty obvious and easy to take care of with a Dremel.

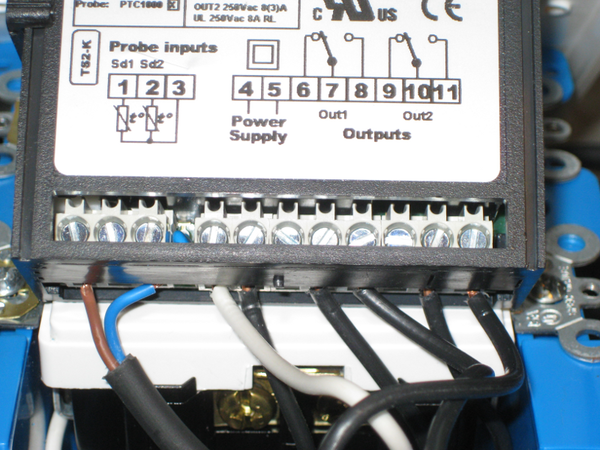
3) Wiring it up is all basic stuff but getting the box closed is a real PITA. There is a lot of wiring and space is tight. This is made worse by the controller being deep so there can't be much packed in behind it. Oh and the controller is attached to the cover plate so the controller has to go in last and you can't jockey the wires very much while it is going in. Really not bad though as long as you fold everything in and pre fold the wiring behind the controller so it falls into place as you push the controller in.
WireSpaghetti.JPG


Here is the wiring diagram I made. It has a lousy back of the napkin look to it but it works so here it is.
LoveWiring3.jpg


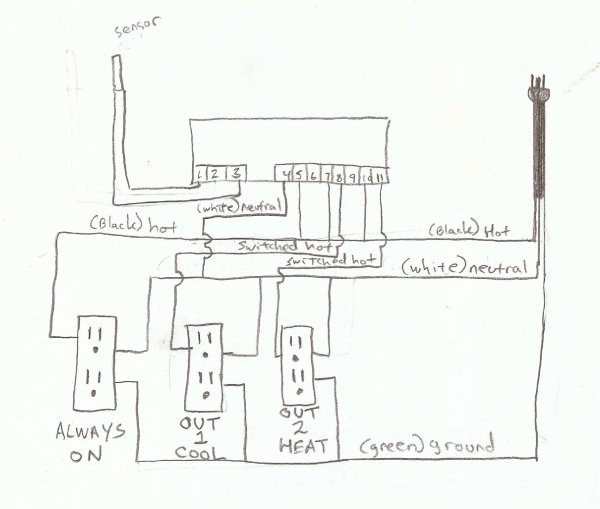
View attachment LoveBox.pdf
 
And now using it I realize I should've run the wires out one side or the top so I could stand it up. Not a big issue though just an annoyance.
You have enough slack in your wiring. All you need to do is flip the outlets and cover plate 180° - mission accomplished.
 
Dang! That's a nice setup.

Could you have used a grey ABS junction box like they mount outside rather than a drywall three-gang electrical box to give yourself a little more room?
 
looks awesome and thanks for the parts list and wiring diagram...I see building something like this in my future...
 
You have enough slack in your wiring. All you need to do is flip the outlets and cover plate 180° - mission accomplished.


I know I'm just dreading pulling it back apart, lol.

Dang! That's a nice setup.

Could you have used a grey ABS junction box like they mount outside rather than a drywall three-gang electrical box to give yourself a little more room?

Not sure... size, mainly depth, was the biggest issue. I went around measuring different boxes before I found this one. Even then it is real close... I can only use one clip and I have to trim it back to keep it from releasing.
 
OK I love this thing. Beats the heck out of the old analog one. Testing it on my keezer and I'm thinking I'll have to build a single stage one for the keezer now too, lol.

ImInLove.JPG
 
Thanks for the great build tutorial - took me a couple hours to throw it together, and it's working great!

lovecontrolbox.jpg
 
Nice! So you ran it out one side?

Yeah, I ran the power and the probe wire out the left side near the base. I went to Home Depot to get the supplies to build this (except the controller of course, that came from Dwyer), and I forgot to bring your parts list so I went by what looked right and still ended up with the exact same parts as you. I was going to go with a 3 gang box and skip the always on circuit, but I took the controller with me to HD and it seemed to fit better in the 4 gang box so I copied your setup exactly. One suggestion I'd make is to buy a box of push in wire connectors - they make it easy to join your wires in the confined space of the gang box. I got the push in connectors like here (about half way down the page):
http://www.homedepot.com/webapp/wcs...ctors&langId=-1&storeId=10051&catalogId=10053
I'm leaving the nails in the gang box for now because I may nail it to a piece of wood to give it more support, although it's pretty stable sitting how it is in the picture.
Thanks again for the great plan - you rock:rockin:
 
I really like the always on for anything from a circulation fan for the fermentor to just plugging in a tool or something. An extra always on outlet is always nice.
 
Totally stoked I came across this thread today because I was planning on wiring up my Christmas gift Love controller to my brew fridge this weekend and I love the portability and simplicity of this setup! Awesome job TomSD!

You used 10 gauge wire for wiring up the inside of the box right?
 
I also used 14 gauge inside mine. I've got it controlling my brand new keezer that was delivered yesterday, and it's working great. :ban:
 
Yeah, I think it took me longer to program it than to build it. I feel like you need a degree from MIT to figure out their instructions. After reading the instructions about 10 times I eventually figured them out, but I don't remember what I did now. All I remember how to do is change the temps for the heating and cooling ranges. Not sure if you read this thread, but maybe it'll help you.

https://www.homebrewtalk.com/f11/love-tss2-2100-programming-help-112303/
 
I'd like to bump this thread and say that my controller has got me through a hot summer here in the South, and has kept my fermentation fridge under control through about 20 batches of beer and mead this year. I'm glad I kept the 'Always On' circuit too, since I've been using that to run my stir plate for starters. If you are thinking about building a controller, try this!
Here's a picture of it in my beer room:

http://littleshedbrewery.files.wordpress.com/2011/07/dscn1990.jpg
 
Awesome to see a followup! Mine is still going strong too. I shorted the heater side out messing around but haven't really needed it living where I do. If it does become an issue I just have to buy another controller and swap them out. The box setup itself though has worked out great. The cables coming out the bottom hasn't been as much of an issue as I thought it would be either since I leave it flat on the top of the freezer or on the counter next to it.
 
OK, I bought almost everything I need -- my local hardware store did not have a 4 gang wallplate so I'll buy it at Lowes. Yuck.

Unfortunately I know nothing about wiring and did not know to ask whether the 14 gauge wire you all used was 2 wire or 3 wire. I assume 3 wire since you have a hot wire, neutral and a ground. Right?
 
Well inside it is all loose wire. I just had some 14/2 Romex laying around so cut it up into sizes I needed. You could've just as easily used wire off a spool or whatever. Keep in mind the designation 14/2 actually means "2 14 gauge wires and a ground" so there are three wires in the cable when you cut it open.

It might be hard to see in the picture but there is actually a bare ground running around in that pile of wires. The wire diagram, even as crudely as I drew it, helps show what goes where though and shouldn't be all that hard to follow.

I'm actually replacing my Love controller this weekend so if you want better pics I can lay things out while it is open and snap some.
 
That would be great if you had some pictures. The diagram made sense to me except for the neutral wires. I think I better read some basic manual on electrical wiring.

If I need to I guess I can just strip out that 14/3 to get what I need as long as I know which wires are hot, ground and neutral.
 
*subscribed* you had me at "portability" and "be able to loan it to a friend"

I realize that was back in 2010 but it's new to me since I just found the thread this morning. :) Thanks! Love DIY!!!
 
That would be great if you had some pictures. The diagram made sense to me except for the neutral wires. I think I better read some basic manual on electrical wiring.

If I need to I guess I can just strip out that 14/3 to get what I need as long as I know which wires are hot, ground and neutral.

I think the part that might be confusing you is in the pictures you can't see the caps as they are already tucked in the box. The wires from the plug come into the box then each one (hot, neutral, ground) goes to caps where they split into four wires, except for the ground which only splits into three.

- For hot it goes to the controller at 5, 7 & 10 and also to the always on outlet.
- For neutral it goes to the controller at 4 and also to all three outlets.
- The ground only goes to the three outlets.

Then from the controller you have a hot wire going from 8 on the controller to the cooling outlet and from 11 on the controller to the heating outlet.

Not that this will help much but here is the spaghetti in action. Notice I used two wire caps for both hot and neutral as it is tight in there and I needed to spread them out some.

LoveWire1.png

LoveWire2.png

LoveWire3.png

LoveWire4.png


I've totally forgotten everything about programming the bastard too, lol. I'll post how I program the new one shortly... after I sort it out.
 
OK got side tracked. Anyway, here is how I program mine...

SP1 67 (varies, see below)
SP2 0
r0 dep
r1 2
r2 2
c0 10
c1 dir (default)
c2 inv
P0 F (documents say C is default but I never remember changing mine)
P4 sd1 (default)
P5 1

OK so these settings result in the following...
  • Range is 65 - 69 F
  • Heat comes on at 65 (SP1+SP2-r2) and kicks off at 67 (SP1+SP2)
  • Cooling comes on at 69 (SP1+r1) and kicks off at 67 (SP1)
  • 10 minute cool-down (c0) to extend life of the freezer

I like this setup since every type of yeast seems to have its own happy place when fermenting. With this setup I push the set button and it flashes the current setting for SP1... from there I can change SP1 to whatever my new target is then hit set to show SP2 and set again to finish it and the new range is all setup +/-2 degrees of whatever I changed SP1 to.

You might need to tweak the ranges though depending on how much swing you have. If it swings too far you'll end up with the heater and cooler fighting each other which isn't a good thing. It is a balance between wanting it to be exactly the temp you want and a viable range that keeps the equipment from working too hard maintaining it.

I attach my probe to the outside of my carboy and leave it to do its thing... though, like an expectant father, I check in on it way more than I should, lol.
 
What sort of heat source are you all using? Just a light bulb with a clip on shade? I am storing this thing in my root cellar in North Carolina. Am I going to get incredible electrical bills during the winter if I set to 70 F to carb my bottles?
 
What sort of heat source are you all using? Just a light bulb with a clip on shade? I am storing this thing in my root cellar in North Carolina. Am I going to get incredible electrical bills during the winter if I set to 70 F to carb my bottles?

I haven't used it yet, but I plan to use a seedling heating pad stretched across the back of my fermentation fridge. I'm also a gardener and use the pad to start my seedlings in the spring - it's mostly waterproof and doesn't get too hot so it should provide gentle heat to the fridge.

You may want to build a small fermentation chamber out of some insulation panels or something, rather than heat your whole cellar to 70.
 
I am building today and when I cut open one of the 14 gauge wires from the 3/14 wire I purchased there are just many strands of what appear to be copper wire. All the wiring diagrams I see online show a single wire inside the insulation. Am I using the wrong type of wire? I feel like this is dangerous b/c it is so tough to get all those little strands of wire connected directly against the outlets.
 
Should be a solid wire. I wouldn't use anything but solid wire for internals like that. What kind of wire is it and were did you get it from? I just have some Romex (14/2 NM-B) laying around that I strip what I need out of. The benefit of that is the wires are all color coded where if you had just a spool of 14 gauge wire it wouldn't be.
 

Latest posts

Back
Top