I am very particular about this aspect and every aspect of my electric brewery. I have used my brewery safely for many batches. Let us know how this holds up to actual brewing. Element rust is addressed here.for us that are very particular about this aspect of the system.
You are using an out of date browser. It may not display this or other websites correctly.
You should upgrade or use an alternative browser.
You should upgrade or use an alternative browser.
Almost Complete (W/Pictures)
- Thread starter rollinred
- Start date

Help Support Homebrew Talk:
This site may earn a commission from merchant affiliate
links, including eBay, Amazon, and others.
- Status
- Not open for further replies.
I like your element mounting upgrades. I have put together a few for myself and a few friends using a similar method.
I never went the extra step of a mounting plate and weather proof box though (just a galvanized handy box). Although, one box I did spray with rubberized coating to seal the knockouts with decent results.
WRT, the grounding issue, I ground the box/element to a lug inside the box and also run an external ground wire from the box to another lug on the kettle. Redundant and even safer.
No disrespect, but I have not been very impressed with many element mounting techniques I have seen here. JB weld and silicone are not substitutes for good design and I may be wrong but I doubt either is listed for electrical use.
Thumbs up for the ingenuity. And for those defending less than perfect methods, keep an open mind. There is ALWAYS a better way.
Edit** The pic was supposed to be at the top. Looks like I'm implying mine is a better way. Well, I guess I think it is")

I never went the extra step of a mounting plate and weather proof box though (just a galvanized handy box). Although, one box I did spray with rubberized coating to seal the knockouts with decent results.
WRT, the grounding issue, I ground the box/element to a lug inside the box and also run an external ground wire from the box to another lug on the kettle. Redundant and even safer.
No disrespect, but I have not been very impressed with many element mounting techniques I have seen here. JB weld and silicone are not substitutes for good design and I may be wrong but I doubt either is listed for electrical use.
Thumbs up for the ingenuity. And for those defending less than perfect methods, keep an open mind. There is ALWAYS a better way.
Edit** The pic was supposed to be at the top. Looks like I'm implying mine is a better way. Well, I guess I think it is
JB weld and silicone are not substitutes for good design

JB Weld is a band aid, only to be used until you can buy the correct part. Not here.
rollinred
Well-Known Member
I like your element mounting upgrades. I have put together a few for myself and a few friends using a similar method.
I never went the extra step of a mounting plate and weather proof box though (just a galvanized handy box). Although, one box I did spray with rubberized coating to seal the knockouts with decent results.
WRT, the grounding issue, I ground the box/element to a lug inside the box and also run an external ground wire from the box to another lug on the kettle. Redundant and even safer.
No disrespect, but I have not been very impressed with many element mounting techniques I have seen here. JB weld and silicone are not substitutes for good design and I may be wrong but I doubt either is listed for electrical use.
Thumbs up for the ingenuity. And for those defending less than perfect methods, keep an open mind. There is ALWAYS a better way.
Edit** The pic was supposed to be at the top. Looks like I'm implying mine is a better way. Well, I guess I think it is
Your element design may have been one that influenced my idea, at least that picture looks familiar. Silicone is a terrible way to seal large voids, but keep in mind that silicone is a rubber like compound that is used for gasket making in MANY different industries as standard practice. But the key is that it should be sandwiched between two surfaces. In that case it is a very effective method. It is when applying it like bath and tile caulk around heating elements to make a seal where there is a good chance of leakage that a problem occurs. I would advocate for using silicone in small voids but never in a situation where large voids or shifts could occur and break the seal unintentionally.
My mind is still open to finding the right way to complete this style of mount. I know how to do it but lack the resources. Not to mention I would prefer to find something off the shelf that everyone could use.
JB weld... that stuff doesn't come close to anything I actually intend to use. Have you guys seen how well JB weld holds when there is heat in the proximity? Different expansion rates really show up with this stuff. Just FYI, I work in the commercial food equipment industry... which means electric dishwashers, steamers, fryers... you name it. I have vast experience with electricity in these environments. Silicone is used all the time in surface to surface mating, never once have I seen JB weld or beads of silicone.
rollinred said:Your element design may have been one that influenced my idea, at least that picture looks familiar. Silicone is a terrible way to seal large voids, but keep in mind that silicone is a rubber like compound that is used for gasket making in MANY different industries as standard practice. But the key is that it should be sandwiched between two surfaces. In that case it is a very effective method. It is when applying it like bath and tile caulk around heating elements to make a seal where there is a good chance of leakage that a problem occurs. I would advocate for using silicone in small voids but never in a situation where large voids or shifts could occur and break the seal unintentionally.
My mind is still open to finding the right way to complete this style of mount. I know how to do it but lack the resources. Not to mention I would prefer to find something off the shelf that everyone could use.
I never am without a tube of silicone (usually several colors). I did not mean to imply that I disagreed with your use of it. You did a good job of describing proper usage above.
The problem I had was finding a reasonably priced and sized steel weather proof box. I cannot weld aluminum to steel or brass. It looks like you had the same issue. I also think off the shelf parts are key for this.
Ultimately, I built mine and abandoned the idea of making the box water tight. It was a simpler build and I felt the safeguards built into the system (proper grounding and GFCI protection) were sufficient.
After running some scenarios, I wonder if a completely water tight enclosure is necessary or even desirable . Although, not likely, I think it is possible that the element itself could leak and possibly fill the box. Maybe the best solution is splash-proof but able to drain?
rollinred
Well-Known Member
After running some scenarios, I wonder if a completely water tight enclosure is necessary or even desirable . Although, not likely, I think it is possible that the element itself could leak and possibly fill the box. Maybe the best solution is splash-proof but able to drain?
Water tight is not necessary in my opinion. I simply have a dream of creating the perfect element system that includes water tight for those who might want to hose stuff down.
In fact, being in the food equipment service industry I have already contacted one of the leading element suppliers about building a custom heating element for the home brew industry. It would be easily possible if only the fitting end of the deal were standard in stainless steel, 1" of thread, going both in to the Kettle and rearward toward the terminals with a sealing surface on half way in between. I have no doubt if I could get one of them to build it that I could stand to make enough to brew a few batches.
You mentioned one thing in there that MAY still get incorporated in my design "splash proof but able to drain". We don't submerge our kettles... We don't hose them off. But we want to be able to clean them without treating them like a piece of glass. Splash proof with a drain hole or two is perfect for this.
Once I find my missing plug I am going to do a submersion test. It won't tell me much other than my lid is leaking but I want to try anyway.
![Craft A Brew - Safale BE-256 Yeast - Fermentis - Belgian Ale Dry Yeast - For Belgian & Strong Ales - Ingredients for Home Brewing - Beer Making Supplies - [3 Pack]](https://m.media-amazon.com/images/I/51bcKEwQmWL._SL500_.jpg)


$7.79 ($7.79 / Count)
Craft A Brew - LalBrew Voss™ - Kveik Ale Yeast - For Craft Lagers - Ingredients for Home Brewing - Beer Making Supplies - (1 Pack)
Craft a Brew

$53.24
1pc Hose Barb/MFL 1.5" Tri Clamp to Ball Lock Post Liquid Gas Homebrew Kegging Fermentation Parts Brewer Hardware SUS304(Liquid MFL)
yunchengshiyanhuqucuichendianzishangwuyouxiangongsi


$22.00 ($623.23 / Ounce)
AMZLMPKNTW Ball Lock Sample Faucet 30cm Reinforced Silicone Hose Secondary Fermentation Homebrew Kegging joyful
无为中南商贸有限公司


$176.97
1pc Commercial Keg Manifold 2" Tri Clamp,Ball Lock Tapping Head,Pressure Gauge/Adjustable PRV for Kegging,Fermentation Control
hanhanbaihuoxiaoshoudian


$33.99 ($17.00 / Count)
$41.99 ($21.00 / Count)
2 Pack 1 Gallon Large Fermentation Jars with 3 Airlocks and 2 SCREW Lids(100% Airtight Heavy Duty Lid w Silicone) - Wide Mouth Glass Jars w Scale Mark - Pickle Jars for Sauerkraut, Sourdough Starter
Qianfenie Direct


$20.94
$29.99
The Brew Your Own Big Book of Clone Recipes: Featuring 300 Homebrew Recipes from Your Favorite Breweries
Amazon.com


$58.16
HUIZHUGS Brewing Equipment Keg Ball Lock Faucet 30cm Reinforced Silicone Hose Secondary Fermentation Homebrew Kegging Brewing Equipment
xiangshuizhenzhanglingfengshop


$10.99 ($31.16 / Ounce)
Hornindal Kveik Yeast for Homebrewing - Mead, Cider, Wine, Beer - 10g Packet - Saccharomyces Cerevisiae - Sold by Shadowhive.com
Shadowhive


$53.24
1pc Hose Barb/MFL 1.5" Tri Clamp to Ball Lock Post Liquid Gas Homebrew Kegging Fermentation Parts Brewer Hardware SUS304(Liquid Hose Barb)
Guangshui Weilu You Trading Co., Ltd


Water tight is not necessary in my opinion. I simply have a dream of creating the perfect element system that includes water tight for those who might want to hose stuff down.
In fact, being in the food equipment service industry I have already contacted one of the leading element suppliers about building a custom heating element for the home brew industry. It would be easily possible if only the fitting end of the deal were standard in stainless steel, 1" of thread, going both in to the Kettle and rearward toward the terminals with a sealing surface on half way in between. I have no doubt if I could get one of them to build it that I could stand to make enough to brew a few batches.
You mentioned one thing in there that MAY still get incorporated in my design "splash proof but able to drain". We don't submerge our kettles... We don't hose them off. But we want to be able to clean them without treating them like a piece of glass. Splash proof with a drain hole or two is perfect for this.
Once I find my missing plug I am going to do a submersion test. It won't tell me much other than my lid is leaking but I want to try anyway.
I think you're on the right track. That would be great if you could convince an element manufacturer to take this on.
I just got on a real computer and noticed you are from Traverse City. I have a good buddy living there now. There is a beerfest sometime next month that we may take a ride down for. Maybe we'll see you there
rollinred
Well-Known Member
I think you're on the right track. That would be great if you could convince an element manufacturer to take this on.
I just got on a real computer and noticed you are from Traverse City. I have a good buddy living there now. There is a beerfest sometime next month that we may take a ride down for. Maybe we'll see you there
Maybe. I don't do a whole lot right now since with job, college, kids, and angry wife. But I have been meaning to get to some of these things.
P.S., Thumbs up for the person who notices mymistake!
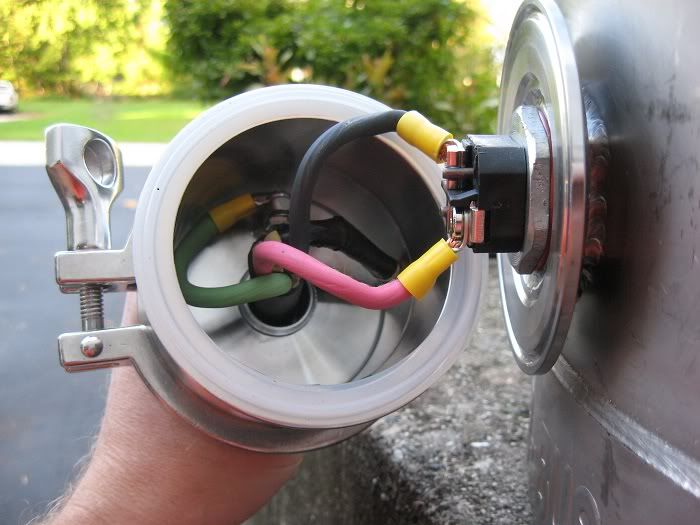
if no one else found it, i think you mismatched the element plug to the socket on the control box. i see an L14 receptacle (4 contacts) and i believe thats an L6 plug (3 contacts), though its hard to see for sure in the element picture if im right.
winner?
rollinred
Well-Known Member
if no one else found it, i think you mismatched the element plug to the socket on the control box. i see an L14 receptacle (4 contacts) and i believe thats an L6 plug (3 contacts), though its hard to see for sure in the element picture if im right.
winner?
Winner winner chicken dinner!
For some reason I grabbed the wrong receptacle, that reason being a night out with 3 or 4 beers in me. Oh well, I just have the element on the 4 contact plug, with nothing on the neutral. Might get around to fixing it... but not likely. Works just as well this way.
rollinred
Well-Known Member
Reminds me of the time I was working on a microwave that didn't have the right plug on the end. Grabbed my jumper and plugged it in. Went to depress one of the alligator clips and got quite a shocker.
You can't fix stupid.
You can't fix stupid.
jpalarchio
Well-Known Member
The design I came up with allows you to take the element out every time withing a few seconds BUT, it does require a couple of spot welds as seen on other builds because it is welded to the outside of the box.
This looks very similar to a flanged water heater element. I haven't looked at one real closely but perhaps one could be used instead of getting a regular element welded?
rollinred
Well-Known Member
This looks very similar to a flanged water heater element. I haven't looked at one real closely but perhaps one could be used instead of getting a regular element welded?
I thought of it many times since I have dozens of flanged elements I could has "stole" from work. But, there is no way to attach them to the brew kettle unless you came through the bottom. If there was an element with a flange and the standard 1" threading we would be in much better shape.
jpalarchio
Well-Known Member
I thought of it many times since I have dozens of flanged elements I could has "stole" from work. But, there is no way to attach them to the brew kettle unless you came through the bottom. If there was an element with a flange and the standard 1" threading we would be in much better shape.
Forgot you were in the industry, guess I should have assumed you would have considered that.
OT: I have family up in TC and finally, after several failed attempts, made it over to Right Brain this summer. Interesting place, good brews (and haircuts?)...
kal
Well-Known Member
Tighten the nut on the inside the kettle enough and the washer that is outside the o-ring will be compressed between the kettle wall and the element box. The o-ring does not come into play. There's no way you can't have a good ground/continuity between the kettle wall and the element box. It's 3 pieces if metal completely sandwiched together as tight as they can go.I had leaks and also used a meter to test the ground and in several instances the element was not grounding! This is NOT good. It does this because the O-ring doesn't "squish" enough to make contact with the kettle body, AND using the silicon that is required to prevent leakage in to the electrical box can cause a situation where no contact between the base of the element and the box. Keep in mind this is a rare condition but it can happen.
It's like placing three washers on a bolt and then tightening them down with a nut as tight as it can go. They have to have good electrical connectivity. It's impossible not to.
Maybe you're using a different o-ring and/or washer than the ones I use such that the result wasn't tight?
Here's a picture of how it should be:
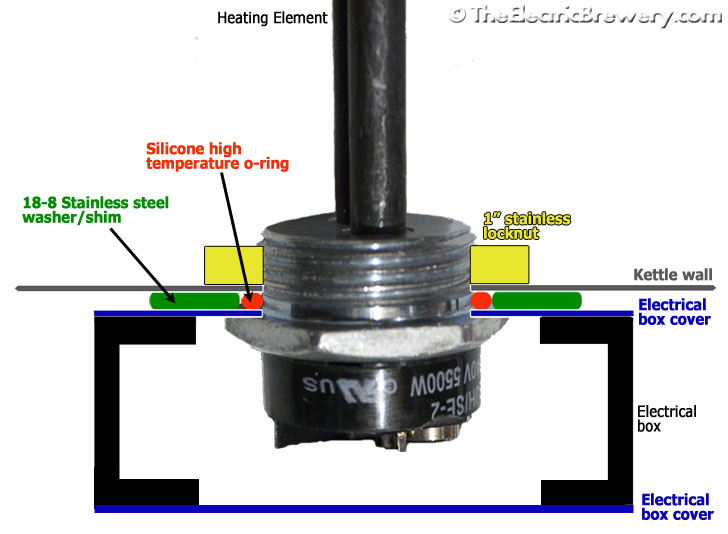
The silicone on the inside is only placed *AFTER* the element is secured meaning that the element itself is clamped against the element box all around. Again, there's no way you can't have a good ground. The two are flat metal surfaces held together as tightly as possible. There is no silicone between them. Do not apply the silicone before.
Kal
kal
Well-Known Member
You need to tighten it way down. It needs to be 100% tight. When done correctly the element box will feel like it's welded on to the kettle. You cannot twist or turn it at all. (I tried as hard as I could, while heating water, wearing oven mitts).Yes, I built a Kal style element and it leaked unless tightened way down.
Kettle size (within reason) does not matter as far as o-ring compression is concerned. The o-ring and washer are a specific size matched for each other so that the o-ring compresses down until the two surfaces it is against (kettle wall & element box) come in contact with the washer.This would work MUCH better on bigger kettles because the o-ring does not need to compress as much.
I don't take credit for my design as it's not actually mine.
It's exactly the same method of weldless sealing that John Blichmann uses to create a tight, waterproof seal on all their Boilermaker kettles for the ball valve, the top and bottom of the sight guage, and the thermometer. There is *nothing* welded on a Boilermaker kettle other than the handles. I don't know how many they've sold but I've never heard of anyone mentioning that their Boilermaker leaks on any forum. The ball valves gets pushed/pulled every brew day but stays extremely tight. If you told someone it was weldless they would not believe you. That's how tight your element box should feel. It should feel welded on when tightened correctly using my method (err, John's method).
The silicone is not needed as someone mentioned. I also used my setup a few times without it first, just to see. It's just a safety precaution (just in case).
Soemthing with your mockup was incorrect I'm afraid. Maybe my instructions were not clear?
Kal
cl330b
Well-Known Member
- Joined
- Jun 26, 2011
- Messages
- 456
- Reaction score
- 7
I use the same method of mounting the elements as Kal and it works great for me. No leaks at all, no silicone or JB weld either. Just the nut, element, o-ring, and washer. Although I did take an extra measure on the grounding. But I did verify with my meter before adding the extra ground strap and the ground was solid.
rollinred
Well-Known Member
Kal,
Thanks for joining in with your comments. I hope you noticed my praise for your innovate and down right inspirational approach to the electric brew system. I think most of us here owe a good portion of our ideas to what you did.
That said, my element mount is done. The way I have mine mounted is truthfully better, albeit, more difficult if you can't get it welded. Not only does leaking wort not have any single chance of getting in to the electrical box, the threads reach further and the o-ring can be compressed further.
The other issue I had with your design (You designed it, even if it was inspired by others), was that if you wanted to remove the element it could fall back inside the box. So really what I did was reverse engineer your mount system to make it more versitile and less prone to leakage.
I also want to mention that the size of the kettle makes a HUGE difference. I am guessing you have never used a 10 Gallon Blichmann for this. If not, on thing you wouldn't know is that once you get the nut started on the inside you physically can not turn it as tight as needed without some kind of wrench. This is do to the Kettle concave catching the apexes of the nut.
Did you notice how I put that washer inside the kettle behind the nut?
The reason is that this allows the nut to spin freely without catching. But doing that is only possible if the threads reach far enough in the kettle, which would require some kind of mount like I am using.
I think your method may work find on the larger kettles because it is easy to tighten the nut far enough. With a 10 gallon or similar I would literally have to flatten the wall of the kettle to get it working right so that the apexes of the nut do not catch.
Really the only thing that keeps things sealed in your design is being able to tighten the nut far enough. This is because the o-ring is squeezing against the threads instead of the surface that was designed to mate with the seal.
Again, thank you for everything you have done. I referenced your site many times in this build. As I said before the only shortcoming is the element mount system. The way I did it isn't perfect either, but it solves a couple of the problems that exist without breaking the bank. There is only two added steps of having to find a piece of steel or stainless and then getting a couple tack welds.
rollinred
Well-Known Member
I use the same method of mounting the elements as Kal and it works great for me. No leaks at all, no silicone or JB weld either. Just the nut, element, o-ring, and washer. Although I did take an extra measure on the grounding. But I did verify with my meter before adding the extra ground strap and the ground was solid.
I hope everyone understands why I am discussing this every chance I can. Not to advocate for myself and brag about my mount, but to explain that this previous style mount is not ideal in any means. It would never pass in any industry as being safe. Where as in the industry I am in (commercial food equipment), the way I mounted this is very common practice.
Here is the reason.
Make this a graphics visual in your head if you can.
Kettle wall/O-ring/sealing surface/electrical box
That equals total seal with NO chance of the liquid seeping behind the element
Old method
Kettle wall/O-ring/electrical box/sealing surface
This equals chance of liquid leaking directing in electrical box
There really are two sealing surfaces, the kettle wall and the flat element sealing surface. The O-ring should, in every case, touch those surfaces directly. Otherwise there is not a 100% reliable seal. Not to mention no part of the sealing surface should be inside the electrical box. It should be outside in case a leak occurs and therefore it leaks outside of everything.
But, this is also speaking from my industry where GFI is not used. So if you have enough confidence in the GFI to save your life then by all means use whatever method you choose to. I am in no way stating that everyone is about to die because the use one element method over another.
I will simply stick with the standards used in my industry, which may be one of the most prominent where heating elements are mixed with water. I know there is a reason why they have these standards, and it includes people who have perished, so maybe I am paranoid.
rollinred said:Kettle wall/O-ring/sealing surface/electrical box
That equals total seal with NO chance of the liquid seeping behind the element
Old method
Kettle wall/O-ring/electrical box/sealing surface
This equals chance of liquid leaking directing in electrical box
This is a great explanation. I think some are overlooking this as the fundamental design change.
kal
Well-Known Member
I think there's still some confusion as this is incorrect:
Look at this picture of my design:
The electrical box cover that sits against the o-ring is so thin that the seal in my setup is indeed the same as yours which is: Kettle wall/O-ring/sealing surface/electrical box
The o-ring and washer are chosen such that the o-ring completely compresses against the flat side wall of the heating element as well as the kettle wall and the electrical box. This works because the cover plate is extremely thin (0.92mm).
The only reason to remove the element is if it's damaged and needs to be replaced. You mention that your method of welding it to a plate makes this easier but I'm not sure how as if you need to replace your element, it's not only $20 for a new element but you need to re-fabricate a new mounting plate and weld the element to the plate. For most people, that's more work and expense.
As others have said, the silicone on the inside isn't needed. Even if you do use it and need to replace the element, cut it off with an exacto and re-apply more later if you like. One tube will last you for many many elements.
The very thin element box cover on the inside bends somewhat (as does the thin washer) when you tighten things down which allows a good seal to be created against the kettle wall. If the plate used were rigid, this would not occur. On your setup when you tighten down the top and bottom of the o-ring will compress more than the left/right edges since the plate is thick/rigid. You can your o-ring here:

Since there's no washer around the o-ring on your design you have to be careful to not overtighten and cause the o-ring to bulge (causing leaks) nor can or should you bump or move the element box. That to me means it's more prone to leaks. This is common concern and complaint that people have always had with traditional weldless valves that use a silicone o-ring for structural support. They ask that you don't overtighten. But then they leak when you twist and turn them sometimes but you compress/decompressing the o-ring by varying amounts in different spots, causing leaks.
When you mocked up my design, are you sure that you didn't have the heating element rim inside the thick electrical box? It needs to be only against the thin cover, which then only reduces the element thread depth by 0.92mm (0.0362").
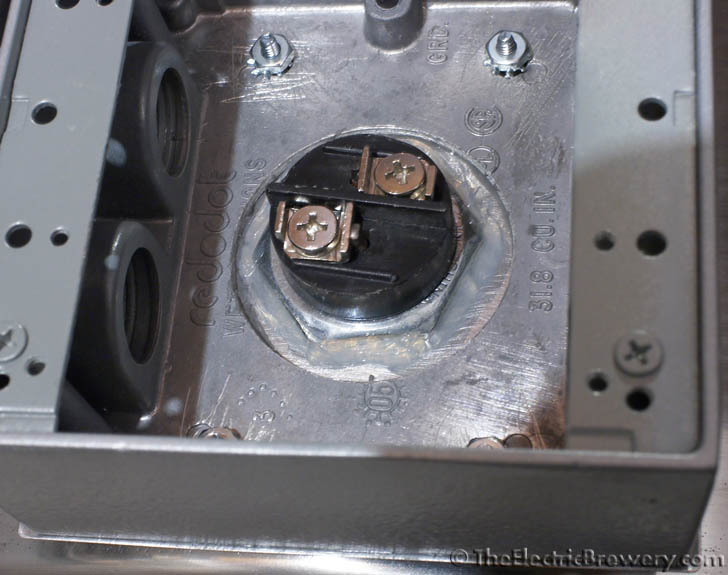
In other words, is the same box you used when you mocked it up?:

If yes, that won't work. The hole needs to be much larger. It has to be like this so that the element sits flush against the really thin cover. This is mine:
0.92mm is a very tiny amount, likely less than the thickness of the washer you used in the inside of the kettle. Especially when you consider the air space you have between it and the kettle wall on your setup:

If you could not get my design to work by reducing the element thread length by only 0.92mm then you did something differently than I did. Or maybe the element thread length is shorter on yours? Or something else is different?
Either way, if you got it to work then that's all that matters. We'll just have to agree to disagree which method is more leak-proof.
Kal
Old method: Kettle wall/O-ring/electrical box/sealing surface
Look at this picture of my design:
The electrical box cover that sits against the o-ring is so thin that the seal in my setup is indeed the same as yours which is: Kettle wall/O-ring/sealing surface/electrical box
The o-ring and washer are chosen such that the o-ring completely compresses against the flat side wall of the heating element as well as the kettle wall and the electrical box. This works because the cover plate is extremely thin (0.92mm).
The only reason to remove the element is if it's damaged and needs to be replaced. You mention that your method of welding it to a plate makes this easier but I'm not sure how as if you need to replace your element, it's not only $20 for a new element but you need to re-fabricate a new mounting plate and weld the element to the plate. For most people, that's more work and expense.
As others have said, the silicone on the inside isn't needed. Even if you do use it and need to replace the element, cut it off with an exacto and re-apply more later if you like. One tube will last you for many many elements.
The very thin element box cover on the inside bends somewhat (as does the thin washer) when you tighten things down which allows a good seal to be created against the kettle wall. If the plate used were rigid, this would not occur. On your setup when you tighten down the top and bottom of the o-ring will compress more than the left/right edges since the plate is thick/rigid. You can your o-ring here:
Since there's no washer around the o-ring on your design you have to be careful to not overtighten and cause the o-ring to bulge (causing leaks) nor can or should you bump or move the element box. That to me means it's more prone to leaks. This is common concern and complaint that people have always had with traditional weldless valves that use a silicone o-ring for structural support. They ask that you don't overtighten. But then they leak when you twist and turn them sometimes but you compress/decompressing the o-ring by varying amounts in different spots, causing leaks.
When you mocked up my design, are you sure that you didn't have the heating element rim inside the thick electrical box? It needs to be only against the thin cover, which then only reduces the element thread depth by 0.92mm (0.0362").
In other words, is the same box you used when you mocked it up?:
If yes, that won't work. The hole needs to be much larger. It has to be like this so that the element sits flush against the really thin cover. This is mine:
0.92mm is a very tiny amount, likely less than the thickness of the washer you used in the inside of the kettle. Especially when you consider the air space you have between it and the kettle wall on your setup:
If you could not get my design to work by reducing the element thread length by only 0.92mm then you did something differently than I did. Or maybe the element thread length is shorter on yours? Or something else is different?
Either way, if you got it to work then that's all that matters. We'll just have to agree to disagree which method is more leak-proof.
Kal
rollinred
Well-Known Member
Kal,
I mocked it up exactly like yours. I used different components. than what you see. Relying on lateral compressive force to seal is what all of us are talking about. It is not nearly as reliable of a seal as a sandwich installation, especially since the curvature of the kettle causes uneven compression.
For example, what if you o-ring gets a cut toward the inside without you knowing, where does the wort or water go? It will go back past the o-ring and likely into the electrical box.
If my o-ring gets damaged where does the wort or water go? On to my floor or brew stand where I can just wipe it up.
Sure, these circumstances are unlikely. But for anyone using the method which you propose, I would highly recommend drilling a weep hole in the bottom of the electrical box for emergency purposes since a leak in to the electrical box would be unseen.
The washer on the outside of the kettle around the o-ring does not distribute the force on the o-ring evenly, especially on 10 gallon kettles. I have cranked my element down as tight as a could and never had the o-ring displace at all.
I understand that some people will not like to, or simply won't, want to go through the extra effort. It took me no longer to create this element mount with the welds than when I did your method. Sure, I am lucky enough to have a welder in my dads shop. But I think after trying both methods, I think many will see the benefit in doing it this way. The only weak spot I still have is that the electrical box is not completely water proof, only splash proof, making it equal to yours in that regard.
Please don't take this as me trying to downplay what you have done. I am simply stating that it is not ideal, nor is any method anyone has created here. We are all piecing together stuff that wasn't meant to go together. Any improvement we can make gives someone else an idea that may end at the perfect solution.
Its a good discussion to have though.
kal
Well-Known Member
Yup! Re-thinking things is always good. For example - the weep hole. I thought about that a couple of years ago but never got around to do it. It warrants looking at again if for no other reason than safety reasons, just in case. You want to see wort or water dripping out in case there's a leak so that you know something is wrong.
Kal
Kal
There is definitely still confusion here. Kal, with your method, the sealing surface (the element flange) is INSIDE the junction box. A leak past the o-ring will end up inside the box.
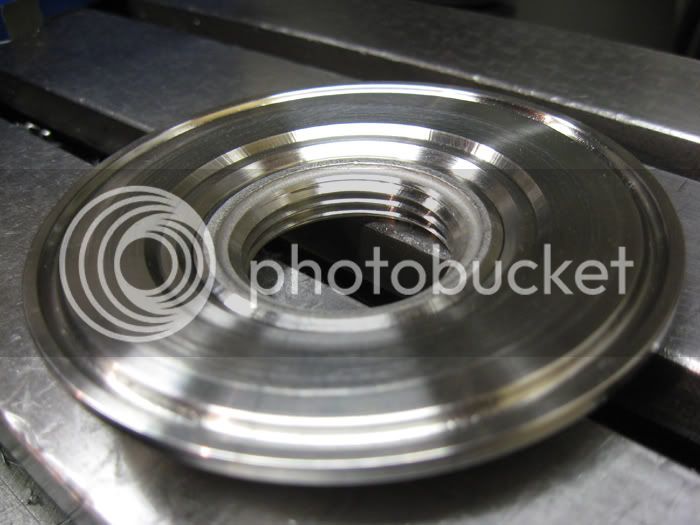
Here is a shot of my element installed. If the pic is clear enough, you should see stainless half coupling, element gasket, element flange, box. It cannot leak past the flange so cannot leak into the box. This is the design change.

Here is a shot of my element installed. If the pic is clear enough, you should see stainless half coupling, element gasket, element flange, box. It cannot leak past the flange so cannot leak into the box. This is the design change.

Even more of an issue, IMO, is the way that the O-ring is being used (which was mentioned already, so I'm probably beating a dead horse). I have complete faith in an O-ring used in the proper way, especially a high quality silicone O-ring, which is compressed between two surfaces AND retained in a groove. If my O-ring leaks, it's going to fill my electrical enclosure. Am I worried about it? Not at all. I know that the installation method can't be better. When I designed this, I was going to drill two small holes at the bottom of the ferrules to act as drains if the gasket were to leak, but to be honest, I can't put a drill to it! I also just don't worry about that O-ring leaking. You guys that don't have the O-ring captured in a groove have every right to worry about them leaking. It's much more likely in that type of installation.
There is definitely still confusion here. Kal, with your method, the sealing surface (the element flange) is INSIDE the junction box. A leak past the o-ring will end up inside the box.
View attachment 45089
lschiavo, this statement is incorrect. Kal's photo of the box interior with the silicone makes it look like the element flange is the sealing surface, but it is not. The box cover is the sealing surface, the flange is behind it. There is a very tight fit, I had to thread my element through the cover. I will take a photo of mine this evening that will illustrate this arrangement without the silicone. I would suspect that if there was a leak, even if the o ring was compromised, the liquid would take the path of least resistance and flow out between the box cover and kettle. I could test this with a full kettle (unplugged of course) and loosening the nut.
lschiavo's welded coupler arrangement looks nice and sturdy. I don't think water has a chance of getting the the box.
rollinred's method will also not let water in the box, but I don't think it looks very sturdy and an o ring could get damaged, squeezed out or over compressed without the washer between the outside of the kettle and the box. I am curious to see how it would hold up to a brew day.
kevink, you mention you have an issue with the way the o ring is used, but the Kal method is the same as all of the fittings on a blichmann. The washer ensures the o ring is tightened just right so there is a good solid seal. The washer and the threads form the "groove" that keeps the o ring in place and keep it from becoming over-compressed but still form a good seal. Once the whole assembly was tightened, the box felt very sturdy and I cannot move the box or element.
BTW, that triclover element is real nice.
Man, we are beating the hell out of this dead horse. Time for a cold one
rollinred
Well-Known Member
lschiavo, this statement is incorrect. Kal's photo of the box interior with the silicone makes it look like the element flange is the sealing surface, but it is not. The box cover is the sealing surface, the flange is behind it.
THIS IS THE PROBLEM!!
It means that you have a straight shot for water/wort go behind that cover should the o-ring not seat right or gets a cut/crack in it.
Trust me. I deal with this kind of stuff all the time. It is not a safe way to do it. The element and element only should be the point of contact with the o-ring.
Even if your element had to be threaded through the hole water can get through it. It would amaze you how small of a hole water can get through.
We are not beating a dead horse when it comes to water mixing with electricity. If you use the Kal design I HIGHLY recommend drilling a weep hole in the bottom of the electrical box. In fact I would go so far as saying you MUST drill a weep hole.
rsklhm10
Well-Known Member
Is the element completely welded to that stainless steel plate, or just tack welded in those few spots?
rollinred
Well-Known Member
Is the element completely welded to that stainless steel plate, or just tack welded in those few spots?
For now it is just tack welded. I intend to go back and weld it fully. I was checking the method before spending that time to do it. Heat from welding is a problem though, you don't want to melt the plastic portion of the element. Realistically you could leave it tack welded and just use silicone on the small space if you only require a splash proof mount. If you prefer a completely water proof mount you would have to weld all the way around.
- Status
- Not open for further replies.
Similar threads
- Replies
- 11
- Views
- 965
