110v Recirculating eBIAB 2.5 gallon batches

Homebrew Talk - Beer, Wine, Mead, & Cider Brewing Discussion Forum

Help Support Homebrew Talk - Beer, Wine, Mead, & Cider Brewing Discussion Forum:

This site may earn a commission from merchant affiliate links, including eBay, Amazon, and others.
Yep, the Auber rtd with cable upgrade. Seemed like the right choice for others so why not me too...
How does the upgraded cable from Auber connect to your controller box? Is it a female XLR jack, or something else? I'm about to pull the trigger on my Auber order and want to make sure I'm getting the right parts. Thanks!
 
How does the upgraded cable from Auber connect to your controller box? Is it a female XLR jack, or something else? I'm about to pull the trigger on my Auber order and want to make sure I'm getting the right parts. Thanks!

It's got spring loaded quick disconnects on both ends (kettle & panel). You have a standard type panel mount with wires for the pid. Probe stays in the T-fitting all the time with a quick disconnect there as well so you can completely remove the cable and store it.
 
For those of you wondering about 1500w boiling 3.25 gal it likely will but only with a skinny pot similar to a turkey fryer. One option I did was if you have an electric stove you can place it on there to add heat during the boil

Sent from my Nexus 7 using Home Brew mobile app
 
OK... So how the hell exactly do you set up the alarm on the pid to go off when temperature reaches your set temp? I've been reading up on it but can't find an answer. I know its possible cause others have done it. I want to set mash temp and walk away, alarm goes off when temp is reached and I stroll in and turn it off. Sounds easy doesn't it??????? My set up is this thread exactly. Didn't change a thing on P-J's design. Thanks in advance if anyone still lurking around here...
 
You need to set an Alarm 1 (ALM1) setpoint on the PID so that AL1 closes when the PID setpoint temperature is reached. AL1 will close when the temperature reaches the ALM1 setpoint plus the Hysteresis band = ALM1+Hy, so you need to set ALM1 to the PID setpoint minus whatever Hy is set to.

By default ALM1 is set to 100 C/F and Hy to 0.3 C/F. This means that AL1 will close when the temperature exceeds 100.3 C/F, and open again when it falls below 99.7 C/F.

If you have set ALM1 to be the same as your PID setpoint, then it may be that your system has tight enough control that it never reaches ALM1+Hy, and so it doesn't set off the alarm.
 
What do you have your ALM1 set at on the PID now? Is it not going off or is it going off at the wrong temp?

(If you're asking how as in where is the setting, it is something like the 8 button press once you get into settings on your PID. If you print out the manual, it lists all the settings you have to click through in order.)
 
Thanks to all the incredibly helpful posts in this thread, I'm putting together my parts order to build this system, and I have a couple of
questions for those who have built theirs already.

What would you change about your system/build if you were to do it again?

Also, what's the best location for the temp probe. I've seen it in the base of the sight glass, at the pot output, pump output and top of the recirc loop, as well as the side of the pot.
What is the most accurate reading location for the mash?

Tia
 
I wouldn't change anything about this build, I love it exactly the way it is. The only thing I do differently is that I use the basket along with the paint strainer bags. I do this because it makes it easier for me to lift all the grain out and then let the basket hang above the liquid to drain. Sometimes I will even pour some "sparge" water over the grains to try and get more sugar out of them and to bring my preboil liquid to the correct level. I did drill the holes on the bottom of the basket to make them larger to let more liquid flow through. I also close the valve a little during the mash to impede the flow going to the pump, this helps to ensure that there is always plenty of liquid below the grains feeding into the pump. No need to be recirculating that much liquid throughout an entire 60 minute mash, IMO.

I think the temp probe is in a great location. It is right next to the liquid being pulled into the pump so I doubt there would be much different if it were at the pump output even. Leaving it right inside the pot where the OP designed it also helps when you use an immersion chiller so you know when you have lowered it to pitching temp.

Great build again OP, I still love this thing!
 
I have my temp probe on the return inlet because I figure there will be 'some' temp drop. Now I have thick silicone tubing and it only runs about 3-3.5' over all, but that was the way I decided to do it. If the wort under all the grains is a few degrees higher than my set point, that isn't what is running through the grain so I don't worry about it.

I agree with the recirculation speed during mash because you want to keep wort under the grain and over your element. Also, I tried a really big beer once and created suction under my grain bed. So much so I collapsed my raised strainer I was using to keep grain bag off the element. I have a thread around here somewhere with pics.
 
What a great thread with a wealth of information! Thanks for contributing!
I've read through this thread a couple of times, I'm either blind in one eye and can't see out the other, or it wasn't posted; is there a 240 single element version of P-J's diagram? If so, can someone mention the post number or re-post?
This setup is exactly what I need to get me out of the cold garage during these seemingly endless Wisconsin winters.

Thanks in advance!

- DHB

DeadHead - check out my build thread here for PJ's diagram and my experiences building a single element 240V setup for 5 gallon brews. The diagram is pretty straightforward.

- Woodbrews
 
What a great thread with a wealth of information! Thanks for contributing!
I've read through this thread a couple of times, I'm either blind in one eye and can't see out the other, or it wasn't posted; is there a 240 single element version of P-J's diagram? If so, can someone mention the post number or re-post?
This setup is exactly what I need to get me out of the cold garage during these seemingly endless Wisconsin winters.

Thanks in advance!

- DHB
DHB,

I didn't have one that exactly fit. The example on the post 2 of this thread is set up for 120V.

With that said - I drew a diagram for you this morning. It is drawn with a 4500W - 240V element. You can certainly use an element with a lower wattage if that is what you want to do. Also be sure to GFCI protect your brewery

As always - Click on the image to see and save a full scale diagram printable on Tabloid paper (11" x 17")


Wishing you the best.

P-J
 
***EDIT*** I found it listed in the 16th post in the parts list!!


P-J,

Are these the contactors you had in mind when ginning up these diagrams?
http://www.auberins.com/index.php?main_page=product_info&cPath=2_31&products_id=129

Thank you for your time....and sorry to pester you.

Take Care,

DHB
Hey, There is no way that you can "pester" me. I'm pleased to be able to help you.

The contactor you referenced is the exact one. (Also noted in your edit... Good job!)

If you run into any other issues or need more info, please let me know.

P-J
 
I know this has probably been beat to death, but sometimes one needs some definitely confirmation from those with experience.

I'm building a 2.5g batch EBIAB with recirc, ala the OP's design. I'm using a single 2000W, 120v element on a 20a kitchen GFCI. 2 questions:

1)I'm planning on using 12ga wire for the main project box power, to the SSR, to the contactor, to the element. Planning on using 14ga for everything else. Is the 12ga sufficient for the ~4ft from the wall to box to element?

2)I think I'll be drawing about 19a max (~16.7a for the element, <1a for the greatbreweh pump, & <1a for the PID). Since I'm on a 20a GFCI circuit, that should be fine. But what about plugs/receptacles? Do they make 20a plugs and receptacles in a normal household 3-prong configuration? What do you recommend?
 
I am not an electrician but here is my 2c

1. Yes that should be fine. I am using the same set up but my cord is about 20' long. The cord get a little warm but no where near the max rating. I have read (iicr) that anything under 50' should not be of concern.

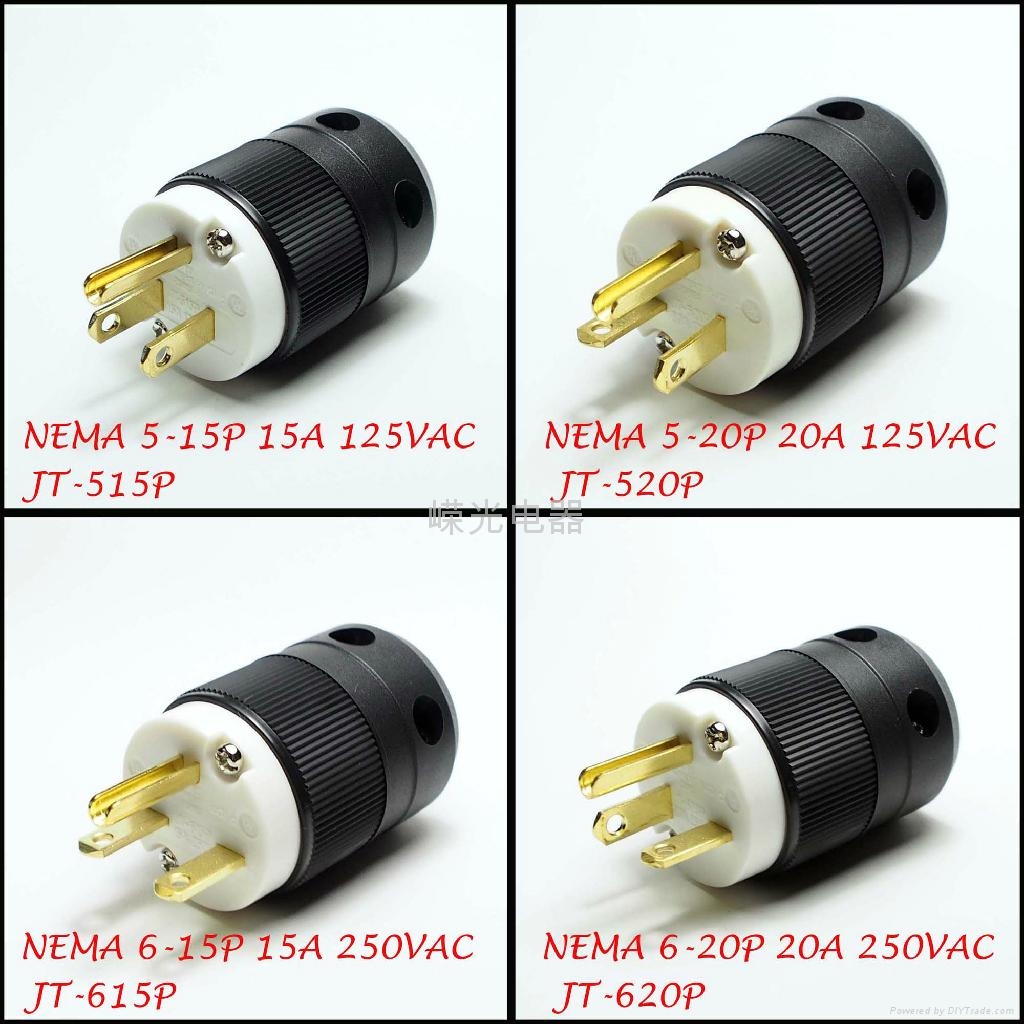
2. They do make 20a plugs. They have one of the 2 prongs (i think neutral) turned 90 degrees, see below. I spoke with some of the manufactures for the plugs and they told me that the components for 15a and 20a are the exact same other than the orientation to designate 20amp. This is done so equipment that would draw over 15amps, physically cannot be plugged into a 15amp outlet. If you notice in the picture of the receptacle the 20A can fit both types where the 15A can only fit the straight blades that are parallel. With that said I was told, for what I am sure is due to legal issues, that I should use a 20a plug. They are a bit more, but for piece of mind I got the 20a.

Outlets.JPG


NEMA_Straight_Plug_15A_20A.jpg
 
OK, so I probably have a 15A receptacle on a 20A circuit? (My kitchen receptacle doesn't have the 90 deg dogleg). Can I simply replace the household 15A receptacle with the 20A, 90 deg dogleg receptacle? Simple enough, although I'd like to keep everything using household plugs so I can brew somewhere other than at my house.
 
I really like the idea of recirculating, as seen on page 2 of this post.
The issue I'm having trouble wrapping my head around, is the recirc looks like a race horse (if you know what I mean). What's the best way to throttle that back? Restrict the flow by way of the ball valve? Have a rheostat to adjust the pump speed? Pros? Cons? What do the ones who have built these have to say?

Thanks in advance!

- DHB
 
Can anyone tell me the benefit of a resistored heating element?
http://www.grainger.com/product/RHEEM-Resistored-HWD-Element-15A528?opr=APPD&pbi=2E754

Searched the interwebs only to find that it helps "prolong" the element, but didn't state how. Would we benefit from using these?

Yeah, getting close to purchasing everything for the build, hence the additional questions.

Thanks again,

DHB

I assumed all elements are resistored and they are all just a big resistor. That should work, I got this one cause it is low watt density so if I every run dry it wont pop (I accidentally ran dry for like 1 sec the other day and no ill effects).

http://bostonheatingsupply.com/SP10868GL.aspx
 
I really like the idea of recirculating, as seen on page 2 of this post.
The issue I'm having trouble wrapping my head around, is the recirc looks like a race horse (if you know what I mean). What's the best way to throttle that back? Restrict the flow by way of the ball valve? Have a rheostat to adjust the pump speed? Pros? Cons? What do the ones who have built these have to say?

Thanks in advance!

- DHB

throttle with a ball valve attached to the "out" side. Dont want to limit the flow into the pump
 
No problem. I've asked my fair share of questions on here, just glad I can help. If you have any more please don't hesitate to ask them

Sent from my Nexus 7 using Home Brew mobile app
 
throttle with a ball valve attached to the "out" side. Dont want to limit the flow into the pump

If you get the Great Breweh pump that the OP lists than you can have the ball valve before the pump and throttle with no problems. I called Great Breweh directly when I was building mine and they confirmed there are no issues doing this. I've been doing it for over a year now and it's been all good.


Sent via carrier pigeon
 
Hey Sippin, I picked up a BGE pump and im pretty impressed with the little thing. How did you secure yours to your stand?

Sent from my C5155 using Home Brew mobile app
 
I did mine exactly the same as the OP, you can see it a little in his pics on Page 2. Using camlock fittings it connects to the ball valve and the tubing to recirculate back. Hope that helps.
 
Can anyone tell me the benefit of a resistored heating element?
http://www.grainger.com/product/RHEEM-Resistored-HWD-Element-15A528?opr=APPD&pbi=2E754

Searched the interwebs only to find that it helps "prolong" the element, but didn't state how. Would we benefit from using these?

Yeah, getting close to purchasing everything for the build, hence the additional questions.

Thanks again,

DHB

"Resistored" elements have the sheathing on the element isolated from the base by a small resistor. This is supposed to reduce the current flow generated by galvanic action between the water tank and the element when used in a water heater. This is in conjunction with the magnesium or aluminum anode placed in the tank.

I don't see any benefit from this in my brewing setup, as the element base rusted the first time I used it in a test before coating it with silicone adhesive.
 
If you get the Great Breweh pump that the OP lists than you can have the ball valve before the pump and throttle with no problems. I called Great Breweh directly when I was building mine and they confirmed there are no issues doing this. I've been doing it for over a year now and it's been all good.


Sent via carrier pigeon


I have a 12v solar pump and a ball valve in front of it. Throttling with the valve limits the flow but also causes the pump to whine a bit. Does the Great Breweh pump whine when throttled? Any idea whether it will cause long-term damage? Thx.


Sent from my iPad using Home Brew
 
The GreatBrewEh pump does whine a little bit but only when I have it throttled a lot, like almost completely closed. I'm not sure if your pump will get damaged or not. When I looked at the web page for the GreatBrewEh pump it says it has automatic dry-running protection, so even of there is no liquid being sucked in the pump will be fine. I have no idea of the technology behind that.
 
I think of the GBE pump like a fish tank filter pump. Its a magnet drive with an impeller. As long as there is liquid in it it will not burn up. However that is why they recommend the ball valve on the output size to ensure there is always liquid in the pump to prevent burn out.

Send while squinting at a tiny ass screen.
 
How much does the recirculating help the efficiency or is it mainly just for a more consistent temperature?
 
Back
Top