• Please visit and share your knowledge at our sister communities:
  • If you have not, please join our official Homebrewing Facebook Group!

    Homebrewing Facebook Group

iSpindle - DIY Electronic Hydrometer

Homebrew Talk

Help Support Homebrew Talk:

This site may earn a commission from merchant affiliate links, including eBay, Amazon, and others.
I got some of the parts ordered yesterday, and am working on gathering up the odds and ends. One question I have (ok, one of a few, but the only one I'm asking this morning)...

What is up with the reed switch? I've seen it mentioned here and there, but I don't see it in most schematics. Was it an alternative to the main switch?


Yes it is, I used a little slide switch which seems to work fine, it's in the AliExpress wish list I shared and is pretty cheap
 
Yes it is, I used a little slide switch which seems to work fine, it's in the AliExpress wish list I shared and is pretty cheap

Thanks! Hopefully I can get the rest of the components ordered today. I'm going to try to make an Adafruit Huzzah variant of it.
 
Dear All,

I know a few of us have had some trouble with the iSpindel going into deep sleep and not waking at the prescribed time (say every 15min).
I built several boards with 470 ohms resistors that failed to wake, and only when I used a BAT43 Schottky diode did it work. However, my question is has anyone had any success using a lower resistor of say 390, 350 or 330 ohms?
The reason for this, is I believe that a Schottky diode will still cut out when the battery voltage to say 3.6 volts in comparison to a resistor of the correct value may go down to 2.8 volts.
Therefore, any input would be appreciated?
Thanks.
 
Do you happen to have a link to the bottle you are using? I think I may go ahead and get my parts on order. Nice job in the circuit board!


If you go back to page 4 of this thread I link the pelting I got from ebay.

Word of warning though it doesn't seem to fit the sleds that you can download from the iSpindel GitHub but the one I bought from 3d-mechatronics.de did fit perfectly.
 
If you go back to page 4 of this thread I link the pelting I got from ebay.

Word of warning though it doesn't seem to fit the sleds that you can download from the iSpindel GitHub but the one I bought from 3d-mechatronics.de did fit perfectly.

Thanks, got everything on order! I have a 3d printer so will have to modify the sled models to fit a bit better. Thanks for the help.
 
I've been reading through this, but I wanted to skip to the end and reap the rewards without reading all 35 pages or so. It looks like it works, so I want one. My question is, since I'm a novice at soldering boards and processor programming, can I do this? What would it cost to have one made for me (that wouldn't be fun, but just checking my options).

If I go to the github and download the .zip file, will it have a program that I would be able to install on the processor?

Sorry, I know it's wrong of me to come in without reading everything, but I've grown so accustom to instant gratification with the internet, I don't want to wait. :)
 
I've been reading through this, but I wanted to skip to the end and reap the rewards without reading all 35 pages or so. It looks like it works, so I want one. My question is, since I'm a novice at soldering boards and processor programming, can I do this? What would it cost to have one made for me (that wouldn't be fun, but just checking my options).

If I go to the github and download the .zip file, will it have a program that I would be able to install on the processor?

Sorry, I know it's wrong of me to come in without reading everything, but I've grown so accustom to instant gratification with the internet, I don't want to wait.

I guess my question is "other than the board that can be ordered for $7, is the list on the github page still the best components to get? Is there an updated component listing?

18650 LiIo cell (e.g., Panasonic NCR18650B)


///Components
•Wemos D1 mini
•GY-521 Gyro & Acceleration Sensor (MPU-6050 on suitable breakout board)
•DS18B20 Temperature Sensor
•Square grid 3x4cm or printed circuit board
•Resistors - 4k7 ohms - 220k ohms - 470 ohms
•microswitches Or at the PCB Reed Wechsler
•Lipo charger TP4056 (6 pin recommended)

http://cachers-world.de/de/Petling-XL
 
I've been reading through this, but I wanted to skip to the end and reap the rewards without reading all 35 pages or so. It looks like it works, so I want one. My question is, since I'm a novice at soldering boards and processor programming, can I do this? What would it cost to have one made for me (that wouldn't be fun, but just checking my options).


If I go to the github and download the .zip file, will it have a program that I would be able to install on the processor?


Sorry, I know it's wrong of me to come in without reading everything, but I've grown so accustom to instant gratification with the internet, I don't want to wait. :)


Yes you can do it, my soldering level is amateur at best and I managed to solder the bits together to get it to work. Hardest bit for me was cutting the breadboard to size.

The board I put together makes it's a fair bit easier.

You can get everything you need from the German site I listed earlier and that's about €50 you still need to solder and assemble though.
 
How much have the sleds tended to cost to print? The online 3D printing vendors I've found seem to range in the $14-$17 range. I've never 3D printed anything, so I don't know if that is par for the course or not.
 
How much have the sleds tended to cost to print? The online 3D printing vendors I've found seem to range in the $14-$17 range. I've never 3D printed anything, so I don't know if that is par for the course or not.
Check your local library. I think I paid less than $5.00 for mine.
http://www.austinlibrary.org/site/PageServer?pagename=Spring_2014_News_NewCentral
A Tech Center that will provide the entire community with access to the latest technology from e-readers to 3D-printers and various software and online resources
 
Since I worked with @Mikmonken on it, I can tell you that it is not Eagle. It was done in KiCAD. That being said, it's not a complicated schematic if you wanted to recreate it in Eagle.

To both you, that PCB looks super!
Would be perfect in a bit larger and longer version where gryo then is placed just as mine in the cap-head of a yeast tube! Gonna look at Kicad and see if I can make one version just a bit larger and hold 4 copper lines for placing the gyro downwards!

Any chance to get the orginal files?
 
I've been reading through this, but I wanted to skip to the end and reap the rewards without reading all 35 pages or so. It looks like it works, so I want one. My question is, since I'm a novice at soldering boards and processor programming, can I do this? What would it cost to have one made for me (that wouldn't be fun, but just checking my options).

If I go to the github and download the .zip file, will it have a program that I would be able to install on the processor?

Sorry, I know it's wrong of me to come in without reading everything, but I've grown so accustom to instant gratification with the internet, I don't want to wait.

I guess my question is "other than the board that can be ordered for $7, is the list on the github page still the best components to get? Is there an updated component listing?

18650 LiIo cell (e.g., Panasonic NCR18650B)


///Components
•Wemos D1 mini
•GY-521 Gyro & Acceleration Sensor (MPU-6050 on suitable breakout board)
•DS18B20 Temperature Sensor
•Square grid 3x4cm or printed circuit board
•Resistors - 4k7 ohms - 220k ohms - 470 ohms
•microswitches Or at the PCB Reed Wechsler
•Lipo charger TP4056 (6 pin recommended)

http://cachers-world.de/de/Petling-XL

Use a 330 ohm resistor instead of 470 ohm.
 
Hey guys, I've just upgraded my iSpindle based on the WEMOS D1 mini PRO with an external antenna. I had to re-solder the tiniest connector on the board which was very challenging to say the least but with pretty good results! The WIFI signal has improved about 50% to 60% which helps if your fermenting fridge is in the garage and 15 meters away from you WIFI router :D. Anyway, thought id share some pics

link to similar antenna as the one i am using: https://www.ebay.com.au/p/?iid=272609208646&chn=ps&var=571728694067

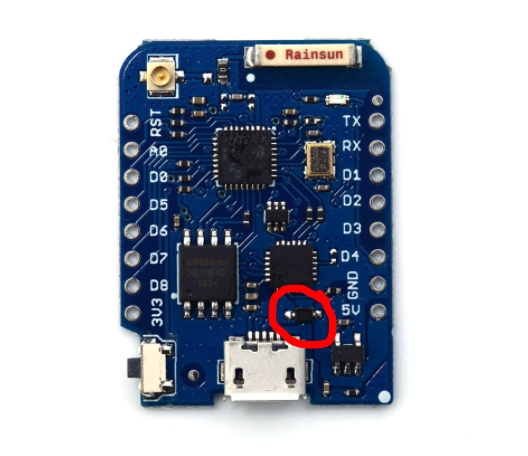
On the D1 Mini Pro, where is the diode to remove?:confused:

Cheers.
 
Check your local library. I think I paid less than $5.00 for mine.
http://www.austinlibrary.org/site/PageServer?pagename=Spring_2014_News_NewCentral

Unfortunately our local branch is still "planning on getting one" sometime in 2017, and the main branch is supposed to have one when it reopens (it is already after the original reopening date). I haven't checked the other neighborhood branches though.

I did just come across this site though: https://www.3dhubs.com. It seems to connect you with local businesses or people with 3D printers. The lower end for the sled seems to be around $5-7.
 
I did just come across this site though: https://www.3dhubs.com. It seems to connect you with local businesses or people with 3D printers. The lower end for the sled seems to be around $5-7.

I used 3D hubs to print a couple of sleds and it was AUD$14 for two of them. The guy did a great job but I still had to take to them with a file to get them in the tube. This was for a custom designed sled which, with the benefit of hindsight, has been customised further. I'm currently using a variant of this one https://www.thingiverse.com/thing:2225597
 
Another question, how to calibrate ispindel in order to show the SG and not the Plato ?

which type is the correct in column Abweichung °
= IF( [@[gemessener °Plato]] <> ""; [@[gemessener °Plato]] - ( 0,008699786 * [@[gemessener Winkel (°)]] * [@[gemessener Winkel (°)]] - 0,457563239 * [@[gemessener Winkel (°)]] + 5,15023517 );"")

Which is the correct type for Plato Formel row?
0.008699786*tilt^2 - 0.457563239*tilt + 5.15023517
 
I used 3D hubs to print a couple of sleds and it was AUD$14 for two of them. The guy did a great job but I still had to take to them with a file to get them in the tube. This was for a custom designed sled which, with the benefit of hindsight, has been customised further. I'm currently using a variant of this one https://www.thingiverse.com/thing:2225597

Good to hear that you had a positive experience with 3D Hubs. I'll be printing a custom sled as well because I'm using the Adafruit Feather Huzzah, and had to do some fancy positioning with the boards to get everything to fit. The components should be here next week, but unfortunately the pelting is a few more weeks out.
 
On the D1 Mini Pro, where is the diode to remove?:confused:

Cheers.

Should be this one. I believe it has the letters SL written on it

Wemos.PNG
 
Good to hear that you had a positive experience with 3D Hubs. I'll be printing a custom sled as well because I'm using the Adafruit Feather Huzzah, and had to do some fancy positioning with the boards to get everything to fit. The components should be here next week, but unfortunately the pelting is a few more weeks out.

Well, 3D hubs is all down to the individual with the printer. I had a few to choose from but ended up with the one closest to work so I could pick up easily. Turned out fine.

I'd be interested to see your sled. My mods were due to a different charging module.
 
Well, 3D hubs is all down to the individual with the printer. I had a few to choose from but ended up with the one closest to work so I could pick up easily. Turned out fine.

I'd be interested to see your sled. My mods were due to a different charging module.

Here it is: https://tinkercad.com/things/gQz4HZnh6by

It is still rough, once the components all come in I'll get more precise measurements. It is based on no math whatsoever, I just hope it tilts close to the right angle. The Huzzah will slide into the inner slot, and the MPU-6050 and perfboard into the outer one. The battery holder has feet that will clip into the holes, and hopefully the little "wings" with keep it stable against the pelting wall.

Parts List
  • Adafruit Feather HUZZAH
  • DFRobot MPU-6050
  • Generic Perfboard for resistors and such
  • DS18S20 Temp Sensor
  • NC Reed Switch
  • Magnet for reed switch
  • Battery clip for 18650
  • Battery
 
i follow the calibration method 2 in 0 Plato (1000 SG) tilt shows 73,34 an on 12,4 plato (1050 SG) tilt shows 80,14 is that correct?
 
Well, 3D hubs is all down to the individual with the printer. I had a few to choose from but ended up with the one closest to work so I could pick up easily. Turned out fine.

I'd be interested to see your sled. My mods were due to a different charging module.

I'm considering using 3D Hubs as well, but I'm not sure what material to select for the printed part.

Here are the choices:

  1. FDM
  2. SLA
  3. SLS

Anyone able to offer some advice?

Thanks!
 
i follow the calibration method 2 in 0 Plato (1000 SG) tilt shows 73,34 an on 12,4 plato (1050 SG) tilt shows 80,14 is that correct?

I won't say it's "incorrect", but it is suggested to make it around 15~25 tilt in water.
I bet you need to put some weight, usually around 15g to 25g, at the bottom.
 
I won't say it's "incorrect", but it is suggested to make it around 15~25 tilt in water.
I bet you need to put some weight, usually around 15g to 25g, at the bottom.

With i have 10 grams shows 14,47 on plato 0 i think that is good!!
 
Woo hoo. I have a live ispindle. Thanks guys for your posts. Very helpful. I had some issues with the spindle accepting changes in the config screen so I changed the 470 ohm resistor to the shottky and it now accepts the changes. You wouldn't believe it but my internet connection is now down so I can't get back to ubibots. So close!
 
Back
Top