BrewPi@ESP8266, no need of RPI and Arduino.

Homebrew Talk - Beer, Wine, Mead, & Cider Brewing Discussion Forum

Help Support Homebrew Talk - Beer, Wine, Mead, & Cider Brewing Discussion Forum:

This site may earn a commission from merchant affiliate links, including eBay, Amazon, and others.
Yeah, guess I better pay more attention. On a side note, will 2MB be enough to run brewpiless without issues?


1MB program space is necessary to enable OTA update. 1MB SPIFFS should be enough for around 3 months log. You might need to delete the logs more often. I don’t any issues other than that.
 
1: What do you guys do for access to brewpiless through internett? I have 4 chambers running on brewpiless. And the only way, I found is to open ports to all chambers. Anyone with a better solution?

2: After running for 24h the LCD displays only *^`?=)#/"&!% etc. Noe values. The online LCD works flawlessly. Any takes?
 
fwiw I have a fleet of "BrewPi Classic" systems and instances running, all accessible from the interwebs, and each host is assigned a port through my router chain. Instances on any given host are differentiated by their file path.

Pretty sure this is SOP...and pretty much unavoidable.

LCD scrambles are power (and static discharge!) related.
It's endemic to the 20x4 displays, sadly, whether they are connected through an I2C backpack or native 4/8 bit parallel interfaces...

Cheers!
 
1: What do you guys do for access to brewpiless through internett? I have 4 chambers running on brewpiless. And the only way, I found is to open ports to all chambers. Anyone with a better solution?

2: After running for 24h the LCD displays only *^`?=)#/"&!% etc. Noe values. The online LCD works flawlessly. Any takes?

1. I prefer to let BPL repport to clouds, like thing speak.com or ubidots.com. It's simpler and easier. You can setup an alert at the same time if something unexpected happens, like beer temp goes over a point or not reporting for a longer time.

2. I had the same issue. Unfortunately, it's more hardware issue. I've tried to re-initialized the LCD every 10 minutes. It seems to work sometimes but I still get scrambled LCD display.
 
1: What do you guys do for access to brewpiless through internett? I have 4 chambers running on brewpiless. And the only way, I found is to open ports to all chambers. Anyone with a better solution?

2: After running for 24h the LCD displays only *^`?=)#/"&!% etc. Noe values. The online LCD works flawlessly. Any takes?
1 - Using VPN to access your home network?
2 - It happens to me too. Gave up trying to understand.
 
2: After running for 24h the LCD displays only *^`?=)#/"&!% etc. Noe values. The online LCD works flawlessly. Any takes?

I suspect it's related to electrical interference of some sort. I had it happen to mine a couple times when I was wiring it up with the case open and I was moving the LCD and wires around. Now that it's closed it up, it has been stable for several weeks. The same thing used to happen to my 3D printer. Repositioning the ribbon cable coming off of the back of the LCD was the best suggestion people offered up for solving the problem there as well.

Robert
 
I wanted to say a big thank-you for this Vito, my brewpi was very flaky (probably due to a dodgy pi) but this is exactly what I was looking for.

I also wanted to say that if anyone, like me, uploads the firmware and gets stuck with a "Connecting to controller" message that doesn't go away, try turning off your ad/popup blocker. It worked for me, and yes I felt like a goose.
 
Hi, has anyone got an idiots guide on how to flash your esp8266 with brewpiless, first go at arduino flashing and not sure where to put the brewpiless master folder to be able to flash it to esp.
Thanks
Dave
 
Hi, has anyone got an idiots guide on how to flash your esp8266 with brewpiless, first go at arduino flashing and not sure where to put the brewpiless master folder to be able to flash it to esp.
Thanks
Dave
Hi Dave, this is how I did and it worked for me:

1 - Select a good microUSB cable;

2 - Download and instal CH340 driver from here

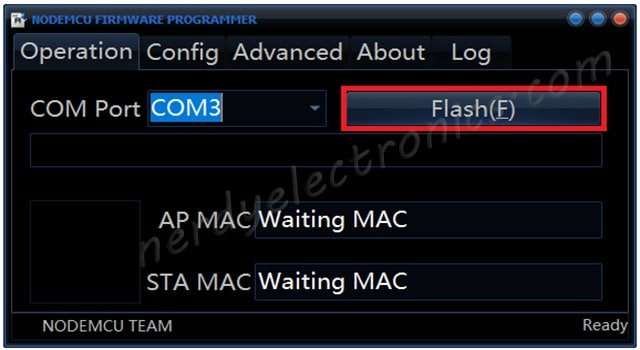
3 - Download and install the NodeMCU flasher from here: Win 32 or 64
4 - Open the NodeMCU flasher

5 - Connect your ESP8266/NodeMCU/Wemos D1 Mini to your PC using the microUSB cable. Once it's connected you will see at the "Operation" menu that a new port became available (depending on which USB port you've connected the device.

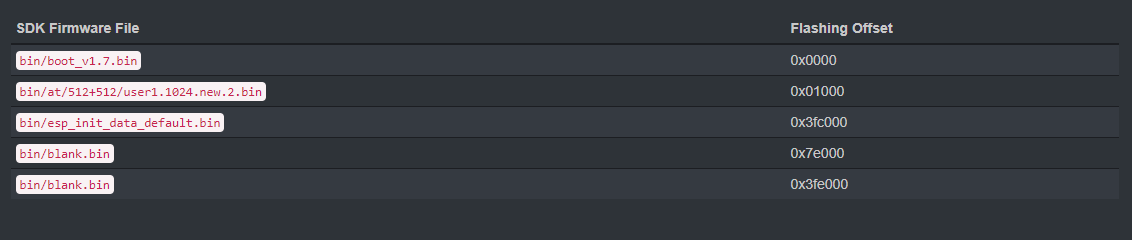
6 - Download the BrewPiLess *.bin file from here. * I suggest the "BrewPiLess.v2.3.3.bin"

7 - At the "Config" menu, click at the gear logo and select the path to the file you just downloaded from step 6. * Make sure to tick the blue box at the begining of the path.
NodemcuProgConfig-1.png


8 - Go to the "Operation" menu and click on "Flash"
flasher-open-1.jpg


9 - After flashing, close the NodeMCU flasher, disconnect the device from the microUSB cable and reconnect.

10 - In a few seconds you will notice a new Wi-Fi network called "BrewPiLess.

11 - Connect to this network. Once connected, it will open a webpage asking you to enter your home wireless login/password. Be fast and do this within 3 minutes, otherwise BrewPiLess will start the AP Mode.

12 - BrewPiLess will reboot and connect to your home network. Login into your Router and check/copy the BrewPiLess IP address.

13 - Type the IP address of your BrewPiLess and you will be prompted into the BPL main menu/display.
 
Where can I find a .bin to wipe the ESP8266 clean and start over?
My ESP8266 came from the shadows to life using this tutorial. All you have to do is:

1 - Download and install the NodeMCU Flasher from here: Win 32 or 64;

2 - Download ESP8266 files from here and unzip it;

3 - Upload the specific bins from the unziped file to the ESP8266 memory as follows:
FKzI0rC.png
 
I'm trying to load BrewPiLess.v2.3.3.thorrax.bin Everything flashed and I'm able to log onto BrewPiless but not sure if I flashed the correct version.

Capture.JPG


Capture2.JPG
 
But what is the problem, exactly? Where did you stop? What error messages you got? By the way, if you don't mind, do you know the difference between the regular version and the thorrax version?
 
The thorrax version changes the pin out of the ESP8266 to match thorraks PCB
attachment.php

But what is the problem, exactly? Where did you stop? What error messages you got? By the way, if you don't mind, do you know the difference between the regular version and the thorrax version?
 
Well, if you flashed it correctly and already logged in I just did't get what issues you are having:confused:

Feel free to share with us.
 
I can't log in using the default password and username. Chrome browser
I was wondering if the version displayed would indicate if the thorrak version was loaded.Something like
"v2.3.3 thorrak"
 
I can't log in using the default password and username. Chrome browser
I was wondering if the version displayed would indicate if the thorrak version was loaded.Something like
"v2.3.3 thorrak"

NO. NO such thing exists.

However, you can check the "Device Setup" page, and "Refresh Device List".

If you can find Controller PIN D0, D5, and D7, then you flashed thorax board configuration.
 
I still can't log in with the default password and username
"HTTPxxxxxxxxxx is requesting your username and password. The site says: “asyncesp” (FIRE FOX)

NO. NO such thing exists.

However, you can check the "Device Setup" page, and "Refresh Device List".

If you can find Controller PIN D0, D5, and D7, then you flashed thorax board configuration.
 
First I tried to follow the tutorial from Pratik Panda and it didn't work. Then I tried the one I recommended you and it worked properly.

I tried Chrome first. Is there a way to reset the password? I reflashed the 8266 twice still the same thing.
If you already erased the memory and you are still having the same problem I believe there is something in the procedures you are not following.

Which board do you have? Wemos D1 Mini?

And try to install the regular version of BPL instead of Thorrax'
 
I flashed the reg. version of BPL on my Wemos D1 Mini. I can see it on my network available list in windows.Not sure what to do next.
 
[quote10 - In a few seconds you will notice a new Wi-Fi network called "BrewPiLess.

11 - Connect to this network. Once connected, it will open a webpage asking you to enter your home wireless login/password. Be fast and do this within 3 minutes, otherwise BrewPiLess will start the AP Mode.

12 - BrewPiLess will reboot and connect to your home network. Login into your Router and check/copy the BrewPiLess IP address.

13 - Type the IP address of your BrewPiLess and you will be prompted into the BPL main menu/display.
][/quote]
10 - I can see the 8266 but the SSID is not BrewPiLess
11 - I can connect to the 8266 but nothing happens and I get a timeout warning
 
The SSID must be BrewPiLess (actually is brewpiless). If it doesn't show up you didn't flash the BPL bin.

Follow the procedure to flash the BPL bin but this time select only this file at the NodeMcu flasher and don't select the Internal://NodeMcu box.
 
is it possible/allowed to use this OLED display?

Yes. Just add the following options to build_flags to build the image.

-DBREWPI_OLED_SH1106=true -DOLED_LCD=true


I don't have this one and haven't tried it, but someone does.
 
Back
Top