SPI or IIC interface?
IIC it is.

SPI or IIC interface?

Let me ask you one more question, if I accidentally killed my OLED is it possible to reflash ESP8266 with new .bin file, which supports 2004 I2C LCD?

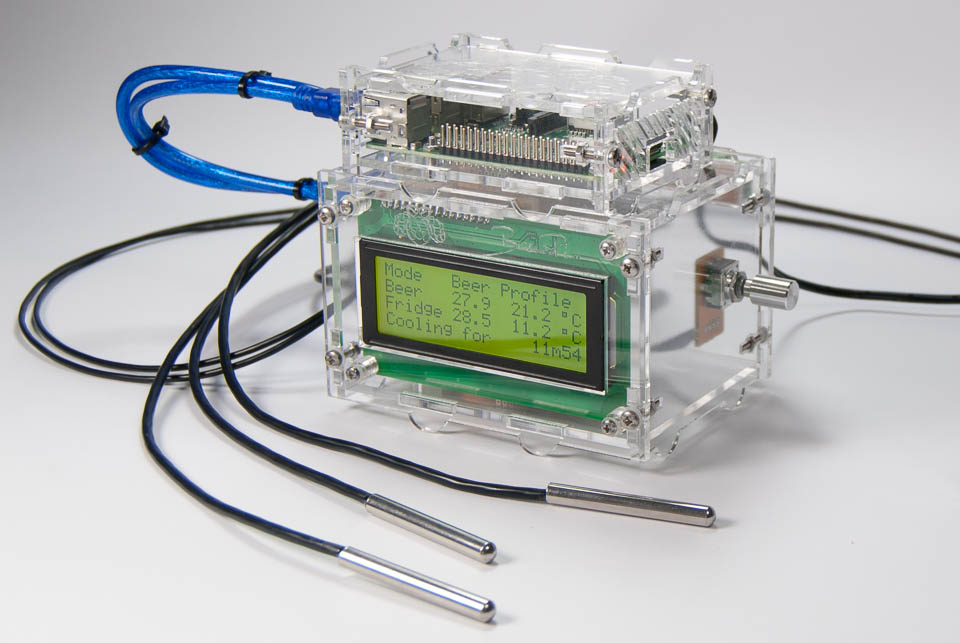
I'm finishing up my first fermentation with brewpiless. It did an excellent job maintaining temps and ramping temps up when needed. Beer temp tracked the set point far better than any controller that I've used previously.
However when it comes to cold crashing it seems like it's being quite conservative on how much cooling to use and what the fridge setpoint should be in relation to the rate at which the beer set point is decreasing. Here's a graph:
https://app.ubidots.com/ubi/getchart/page/N1o3XDZJ7qgpSrSyBc0WByPo8n0
The beer set point was 34 and it seems like it locked in the fridge set point to 33.8 pretty early on. So the rate at which the beer cooled was much slower than set by the profile. I'm looking at the parameters that can be tuned via JSON commands, but I'm not sure which one might be in play here. Maybe tempSetMin is what I'm looking for, but I'm guessing I may need to tinker with the PID values a bit. Is there a way to see the current values for each of these settings? I don't see anything in the documentation and I looked through the code in JsonKeys.h, but I didn't see anything in there that looked like it would print out the current config. Thanks for the help.
Robert
Yes. You are on the right track. it is "tempSetMin" that constraints the minimum set temperature, default to 1 degree Celsius.
To access it and PID parameters, check this section:
https://github.com/vitotai/BrewPiLess#json-commands
BTW, I don't know how to put all data in a chart on ubidots.com like yours. Would you shed some light on me?
Yup, I've used it before. I just wasn't sure which parameter to use for this particular issue. Is there a way to print out the current values? I didn't see anything in JsonKeys.h and there doesn't appear to be anything in the UI to do it.
On ubidots, I have one device with 4 variables. The on the dashboards page I added a line graph with all 4 variables from that device. On the brewpiless side I'm sending:
{"beer-temperature":%b,"fridge-temperature":%f, "beer-set":%B, "fridge-set":%F}
Robert
OK, everything works but I can't get it global, just local network, when my computer and BPL are connected to the same network.
Is there any network connecting tutorial for this device?
I have a wireless router (BPL is connected every time), I have set domain on no-ip.org but I simply can't get it on the network, to see it with my phone or other computer.
Can't you remotely access your home network using VPN?I found a solution. The main trouble is that my public and WAN IP addresses are diferent, therefore is no way to port forward it.
I have one extra PC, will use it locally with brewpiless and control it with TeamViewer.


You guess.I was wondering for those who have more than one fermenter, if anyone ever thought of hacking brewpiless to run multiple instances. Or would they rather build several units of BPL?

guys, is there a way to add co2 sensor to brewpiless?
Could you please tell me more about "By using latest "ferment and calibrate" feature, I can usually get reading within 1 point error." part?
Of course that gravity is not the the best way to know everything about fermentation.
Happy new year to all!
My ferm fridge Ranco controller gave up the ghost the other day and my research for a connected device has lead me here. So happy I found this project, it looks fantastic!
Hardware wise, is this a good buy? I figure the inductive load model would be the best match for a refrigerator.
http://www.electrodragon.com/product/esp-relay-board-il-inductive-load/
https://github.com/vitotai/BrewPiLess/issues/26#issuecomment-334972253
I am having issues getting the SSID to display. I've followed posts #532 and 534 to erase and then try different versions of the binary files.
I've started a conversation privately to resolve this issue. If I get a fix there, I will reply here that I no longer need help.
Upon startup, the LCD will display that I should initialize wifi (it's never been connected. I just got it from amazon) but I cannot see the brewpiless ssid on any of my wifi devices. The timeout occurs and it proceeds to display mode/beer/fridge/idling.
Any help would be greatly appreciated. I'd like to get this tackled tonight/tomorrow before the weekend is over.
Thanks!
#include <ESP8266WiFi.h>

const char* ssid = "YOUR_SSID";//type your ssid
const char* password = "YOUR_PASSWORD";//type your password

void setup() {
  Serial.begin(115200);
  // Connect to WiFi network
  Serial.println();
  WiFi.begin(ssid, password);
  while (WiFi.status() != WL_CONNECTED) {     delay(500);     Serial.print(".");   }
    Serial.println("");
    Serial.println("WiFi connected");
}
void loop(){}
Enter your email address to join: