Wiring Question - Homemade Dryer Cord Splitter/Extension

Homebrew Talk - Beer, Wine, Mead, & Cider Brewing Discussion Forum

Help Support Homebrew Talk - Beer, Wine, Mead, & Cider Brewing Discussion Forum:

This site may earn a commission from merchant affiliate links, including eBay, Amazon, and others.
What confuses me is, why isn't a company offering this stuff?

I can go to Spike and order a kettle, custom made. When it comes to the heating element, unless you want that one that they keep on their shelf, you gotta go somewhere else.
You go to that other place (Brewhardware, wherever) to get your heating element (and other fittings) and then you're on your own for the controls for the heating element (I'm not sure what good a 5500W heating element is if I can't control it).
You find someone who offers the controls, but you're on your own for the wiring.
You find all the wiring you need (typically at home depot or some other place) and they usually don't really have what you need, and have to special order GFCI parts (or other things) and cut plugs off wires inserting other plugs.
And that doesn't count the cost of the electrician to put in a 240v outlet if for some reason you don't have one.

It seems to me like the person that offers the heating element should offer the controls and the wiring. A one time, buy it and you're done package. I'm a handy person, so I don't know if I'd buy it myself, but having the option to pay $X at the time I buy my kettle, plut it into the wall and make some frickin beer sounds great. It seems like the markup would be there for a healthy profit margin, especially if you can get most of these parts at bulk pricing.

It's just odd to me that the only way to really get it done is to patch together 4 different pieces of equipment from 4 different vendors, slap some duct tape on it and hope your house doesn't burn down.

EDIT: I see Brewhardware offers some cables and plugs. I missed that originally.

I know of one place that DOES offer it: https://ebrewsupply.com/ Not sure they're the best price; their wire, for instance, is pricey. The thing is, you pay for the convenience of having it all together.

Interestingly, I didn't find this until just recently; they have a DIY panel that looks really good, and they include all the wiring and such to do it.

I can't recall Kal's site but they also offer such stuff.
 
I know of one place that DOES offer it: https://ebrewsupply.com/

Even their controllers don't offer GFCI protection. Although perhaps they're assuming you'll put it in place when you hire an electrician to wire your L14-30 outlet for power supply.

I actually don't think their prices are that bad. I wouldn't call it cheap, but considering the next to zero competition . . .
 
Are you referring to heat sticks?
https://www.brewhardware.com/product_p/hotrodrtu.htm

They're more expensive than a standard 2250W heating element (like over twice the price) that runs on 110v, at almost half the power.
At 1500W each, I'd need about 4 to get the same heat output as one 5500W 240V unit. At that point it's twice the price of the 240V unit, including the wiring, spa outlet w/GFCI, dimmer and splitter.

They're a nice bandaid, but I don't view them as a long term solution.
I went down a different path altogether.

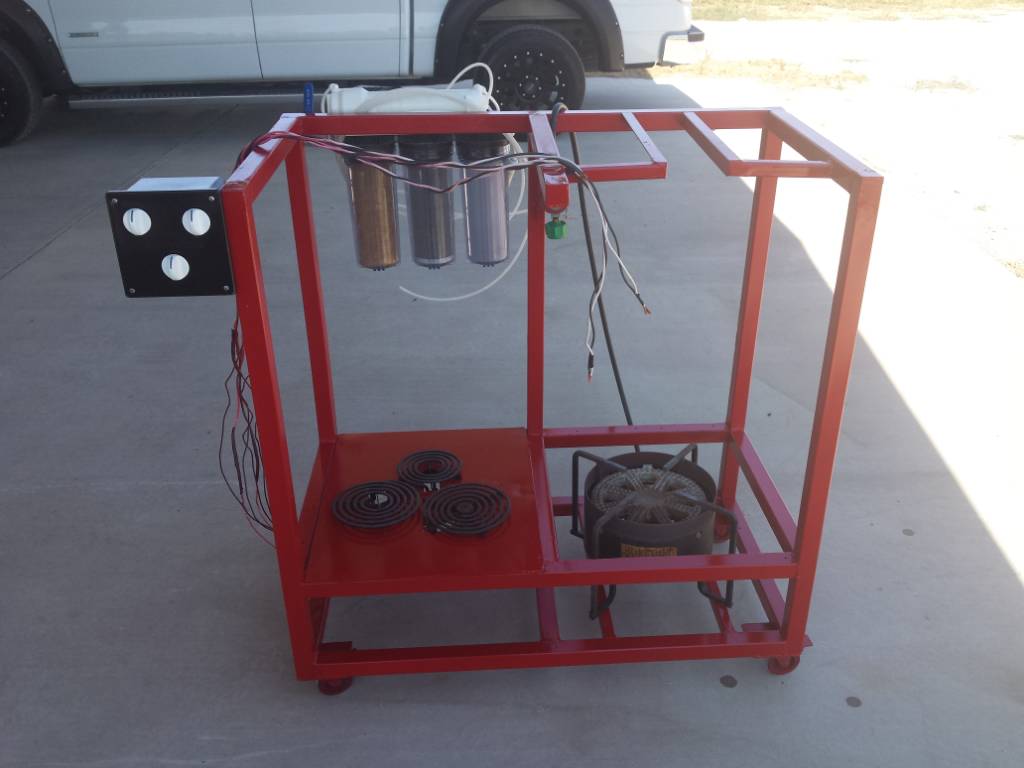
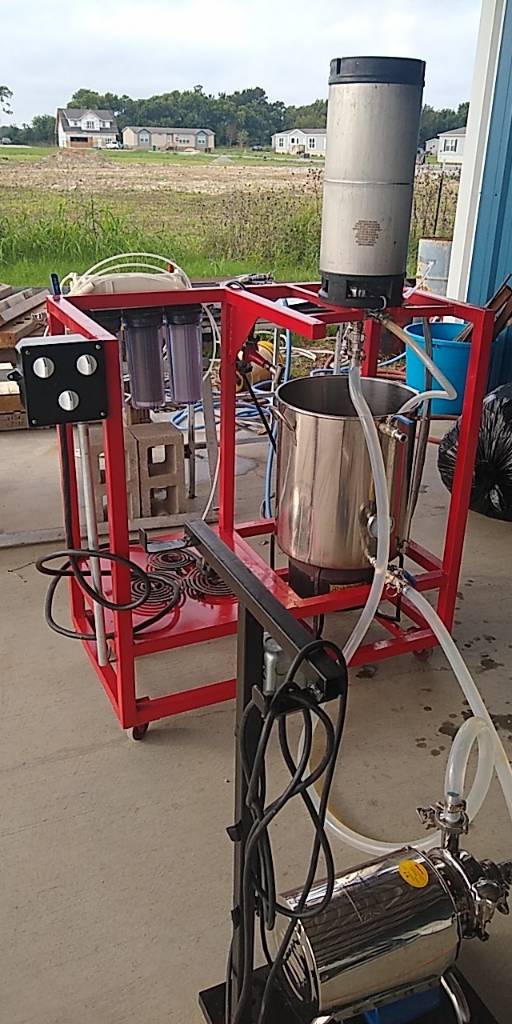
My dedicated 220 volt brew/keg cleaning stand.

Standard flat stove elements and the stove controls in a box. Simple and easy to wire.

Major downside is the elements will initially trip a GFCI outlet until they heat up.

The running theory is they get enough moisture inside the tip of the elements near where they plug in to pass current across. They heat up and dry out and no longer trip the breaker.

I run it on a standard breaker first then switch over to a GFCI plug. I have the luxury of setting up plugs in my shop how I like so it works out for my setup.

I need to dry them out and use some high heat epoxy to seal the element ends.
20180803_143159.jpeg
 
Picture is before I hard wired the controls. Propane burner is for backup or for heating cleaning solution.
 
@bfbrewer - no picture was attached.

On another note, many apologies in advance for those who may get frustrated with me, but I sometimes have a tendency of having "paralysis by analysis" syndrome.

I ran the numbers on getting the 120v heater vs the 240v heater in cost. This is what I came down to:

120V system:
Heater - $65
12' Extension cord - $56
L6-30 to standard adapter - $40
Total cost - $161

240V system:
Heater w/Cord - $49
15' 10/3 Cord - $23
L6-30 Plug - $13
Stilldragon Controller - $41
Spa Box - $77
Dryer Cord - $13
Dryer Plug - $10
Total Cost - $226

Total price difference - $65 more expensive to do 240V

That assumes I just buy the cords pre-made off amazon. Not the cheapest option, but if I were to buy some wiring and do the plugs myself, I mine as well do the full wiring for the spa box and everything.

Assuming I went with 120V to start with, then switched to 240V later in order to cut down on heating times, I could repurpose some of the wiring, but would still need to get the spa box, some plugs/cords/outlets, and the controller, not to mention the second heater. Which would run me about $190 in extra costs. Which means I'd be out $125 more if I did the switch.

I really don't want to have to sit down and do all this wiring at the moment, but it's hard for me to justify paying $161 now, then $190 later ($351 total), instead of $226 now.
Here it is wired and in action
IMG_153900806621F.jpeg
 
I went through the exact same thought process and it helped me justify going with the 240v system. My apprehension was doing the electrical work myself but not wanting to get electrocuted it I made a mistake.
 
@bfbrewer - no picture was attached.

On another note, many apologies in advance for those who may get frustrated with me, but I sometimes have a tendency of having "paralysis by analysis" syndrome.

I ran the numbers on getting the 120v heater vs the 240v heater in cost. This is what I came down to:

120V system:
Heater - $65
12' Extension cord - $56
L6-30 to standard adapter - $40
Total cost - $161

240V system:
Heater w/Cord - $49
15' 10/3 Cord - $23
L6-30 Plug - $13
Stilldragon Controller - $41
Spa Box - $77
Dryer Cord - $13
Dryer Plug - $10
Total Cost - $226

Total price difference - $65 more expensive to do 240V

That assumes I just buy the cords pre-made off amazon. Not the cheapest option, but if I were to buy some wiring and do the plugs myself, I mine as well do the full wiring for the spa box and everything.

Assuming I went with 120V to start with, then switched to 240V later in order to cut down on heating times, I could repurpose some of the wiring, but would still need to get the spa box, some plugs/cords/outlets, and the controller, not to mention the second heater. Which would run me about $190 in extra costs. Which means I'd be out $125 more if I did the switch.

I really don't want to have to sit down and do all this wiring at the moment, but it's hard for me to justify paying $161 now, then $190 later ($351 total), instead of $226 now.

Yes, you are the definition of paralysis by analysis.

Put the 240 in and be done with it. And do it right, not this half-assedly way you're looking at now. You know very well you're not going to be satisfied with it, and before long you'll wish you had a full 5500-watt element.

If you're short a few bucks, sell off some stuff. Surely you have some unused items you can put on Craigslist. Find a way to do a very short-term part-time job to earn a couple of hundred extra. Cut back on your morning Latte for a month. Pack a lunch instead of eating out. There's nothing wrong with being frugal and careful, but there comes a time when such behavior is a conceit. You're nearly at that point.

So saith the Mongoose.
 

Both impressive and . . . . it appears extremely unnecessary.

Why would you have propane and heat?
I'm also not sure why you would wire up three stove heater elements instead of a standard heat stick.
Or why it makes sense to have it wired as both a GFCI outlet and a non-GFCI outlet.

If it works for you, fantastic. I just don't understand it.
 
Put the 240 in and be done with it.

So saith the Mongoose.

You're right. I know. Just takes a while to get there. :)

Thanks for sticking in there with me.

And do it right, not this half-assedly way you're looking at now.

I might be confused, but what do you mean by this? What is the right way, with the spa panel and controller?
 
Both impressive and . . . . it appears extremely unnecessary.

Why would you have propane and heat?
I'm also not sure why you would wire up three stove heater elements instead of a standard heat stick.
Or why it makes sense to have it wired as both a GFCI outlet and a non-GFCI outlet.

If it works for you, fantastic. I just don't understand it.
We have power outages in my area so propane is my backup.

I usually run it on a non GFCI outlet when brewing alone.

I like the versatility of putting any flat cooking vessel on the elements. It's basically a big stove top.
 
You're right. I know. Just takes a while to get there. :)

Thanks for sticking in there with me.


I might be confused, but what do you mean by this? What is the right way, with the spa panel and controller?

I'm ok with the Stilldragon 240 controller. You're trying to cheap out by using a couple of 120-v elements, and in the end, you won't be as happy with it, and if and when you do upgrade to a 5500 element, what are you going to do with the others? You might be able to sell them, if you can find someone with the right application.
 
Makes sense. I agree. Thanks for the support. I owe you considerably.

I placed the order for the Stilldragon.
I'm awaiting confirmation on the 5500W heating element from the seller mentioned earlier.
Once I confirm, I'll place the order for the 10/3 cable and two L6 plugs from Brewhardware.
Immediately after I'll place the order for the dryer cord, dryer plug, and spa panel from amazon.

Then wire, and be done :)
 
I’ll go against the grain a bit here and say go with what your are comfortable with.

There is value in starting small and building as you gain experience and know more about what you want. Just about all of your 120v plan can be repurposed into a larger system as you grow.

It’s more expensive but don’t discount the value of learning as you go.

That being said, I am currently changing from 30 to 50 amp because I got tired of the limitations of 30 amp. It would have been less expensive overall if I had started right with 50 amp...
 
First time today I used the entire system--boil kettle with 5500 watt element, RIMS system for the mash tun. It's amazing how fast a 5500-watt element can heat water.

And the beauty of the RIMS approach is I was able to hit my mash temp.

On top of that, I used the steamslayer system to avoid all that boil steam going into the garage. It worked shockingly well.

+1 for electric.
 
FYI, if you're looking to do 240v on the cheap(er), I got one of the 5500w elements (and a cable) described in this thread for $49 shipped from China.

Thanks for the contact. When I realized it included a cord (that would probably cost me about $35 to build, at the cheapest) I realized it was a no-brainier and contacted the guy.

Unfortunately, the response I received was:

"We have no stock at now.
When everything is okay, I will contact with you."

Very nice and polite, but I don't know what that means. Is he expecting to have stock in the next couple of weeks, or 3 months?

I was waiting on placing the order with BrewHardware to see how the heating element worked out (if I couldn't get it from the China retailer, I'd order from him), and I was planning on ordering the 10/3 cable from BrewHardware as well. Which puts me in a little bit of a standstill at the moment, as I can't get started on my wiring when the rest of the parts arrive this week.

Local lowes doesn't sell SJEOOW by the foot, instead they only sell it by the roll. I can get 10/3, 20' for $35, which is still cheaper than I can re-purpose most extension cords for. Or I can get 10/4, 25' ordered for $42. Does anyone think it's worth it to get the 10/4 over the 10/3? I'm not really concerned about grounding it, although I'm sure I would if the cord was lying there.
Arg. Too bad he's out of stock. As far as 10/3 or 10/4 I'm not sure what you mean about being concerned about grounding it--there's a ground wire in 10/3 and 10/4, the difference between them is that you also have a neutral wire in 10/4 so you could run 120v stuff in your panel as well.

The only thing I'd caution with attempting to use 10/4 to wire your element plug (and just ignoring the neutral wire) is that you might have trouble getting your L6-30P plug to fit over/around the diameter of that cable. It was a tight fit for me with 10/3 SOOW and the cheap L6-30P plugs I had.
 
Last edited:
I'm assuming the limitations you're running into aren't solely the result of a heater, but some pumps as well, correct?

The ability to run two heaters at once is really what's driving the switch to 50 amps. The pumps don't pull that much; maybe 2 amps between the two.

I have a two vessel system - A boil kettle and mash tun w/RIMS. The 4500W/240V heater in my kettle draws 18.75 amps. My RIMS heater is 3500W/240V, which draws 14.6 amps. I can't run both at the same time on 30 amp service, which really limits how I can heat the sparge water. My original design included a HLT, which had a 1500W/120V heater in it. I could (barely) run the RIMS and HLT together but it took a long time to heat up the HLT.

Going to 50 amp will open up a lot more possibilities, including on-demand heating of sparge water if I decide to go that route.
 
Last edited:
there's a ground wire in 10/3 and 10/4, the difference between them is that you also have a neutral wire in 10/4 so you could run 120v stuff in your panel as well.

I thought 10/3 came with two hots and a neutral, while 10/4 came with two hots, a neutral and a ground. Clearly I was wrong.

So, in hooking up my dryer cord, I realized I was wrong about the plug I had. I thought I had a 240v 3 prong plug set up, but I actually have the 4 prong dryer plug. Which means I already have a 10/4 cord that will be going from the outlet to the spa box, then from the spa box to the dryer. The question is whether I should run the 10/3 from the spa box to the controller to the heating element, or run the 10/4 from the spa box to the controller to the heating element.

But it sounds like I only need 3 wires to go from the spa box to the controller to the heating element, right?
 
Ah, ok. Gotcha.

On a side note, I really don't understand the value of a RIMS or HERMS system. They seem so complicated compared to what you need.

Maybe after a few electric brews I would disagree though.

Compared to BIAB, RIMS and HERMS adds complexity because you have a separate mash tun. The main advantage that you get with a separate mash tun is the ability to set your grain-to-water ratio for your mash. The RIMS or HERMS setup is there to give you precise control over the mash temperature by recirculating the mash through a heat source (either direct heat for RIMS or indirect via HERMS). This gives you more control over variables that will affect your beer in the end.

Many people do BIAB and full volume mashes and that's totally fine. "Keep it Simple" is a great motto after all. However, I like having more control over the mash variables than that so I've accepted the higher complexity as a trade-off.

I thought 10/3 came with two hots and a neutral, while 10/4 came with two hots, a neutral and a ground. Clearly I was wrong.

So, in hooking up my dryer cord, I realized I was wrong about the plug I had. I thought I had a 240v 3 prong plug set up, but I actually have the 4 prong dryer plug. Which means I already have a 10/4 cord that will be going from the outlet to the spa box, then from the spa box to the dryer. The question is whether I should run the 10/3 from the spa box to the controller to the heating element, or run the 10/4 from the spa box to the controller to the heating element.

But it sounds like I only need 3 wires to go from the spa box to the controller to the heating element, right?

You are correct, although really, the wires in the cable aren't "hot" or "neutral", they're just colored wires. How you connect them to the source is what makes them "hot" or "neutral". An insulated wire is an insulated wire no matter what color the insulation is. Electrical convention has black and red as "hot", white as "neutral", and green/bare wire as "ground" and you should absolutely stick with that.

BUT...when you hook up to the heating element, there are only 3 wires you can connect: 2 hots and 1 ground. Therefore, it's 100% acceptable to hook up the white and black wires using 10/3 cable to the heating element AS LONG AS you mark the white wire as a "hot". Electricians usually do that by wrapping black electrical tape around the white wire at each end of the cable where they get connected. If you have an electric water heater in your house, take a look at how it's wired up: I'll bet that it has black, white (with something wrapped around the end to mark it as a "hot") and a ground. No red; electricians don't waste money by running more wire than they have to.

Keep in mind, this is common practice for electricians and it's how they know what they are looking at when they work on your house. On your brewing rig, it's just you dealing with it, so as long as YOU know what you are doing, you can do it however you want. I highly recommend sticking with standard convention because it works and helps you remember what you did when you look at it 3 years down the line...
 
Last edited:
Compared to BIAB, RIMS and HERMS adds complexity because you have a separate mash tun. The main advantage that you get with a separate mash tun is the ability to set your grain-to-water ratio for your mash. The RIMS or HERMS setup is there to give you precise control over the mash temperature by recirculating the mash through a heat source (either direct heat for RIMS or indirect via HERMS). This gives you more control over variables that will affect your beer in the end.

Well beyond the scope of this thread, but a great opportunity for me to learn (so how can I pass up on that opportunity, right?).

How does a RIMS or HERMS give you more flexibility in setting your grain-to-water ratio? It seems to me (probably rather naively) that you can just as easily set your grain-to-water ratio with BIAB (or a similar method). What gives RIMS or HERMS an advantage in this regard?

I completely understand the ability to have a more precise control over mash temp, and for a commercial set up I think either of these systems works quite well. But on the small scale I'm not certain I understand the benefit of having a separate hot liquor tank over simply putting a heating element in your mash tun and cycling the wort. It seems significantly less expensive, potentially just as accurate, and consuming less space. I would imagine having small pockets of either too hot or too cold wort would be a very real possibility in a recirculation system, but it seems that possibility is significantly larger in a 200 gallon tank than in a 10 gallon tank.

Maybe I'm not getting something though.

You are correct, although really, the wires in the cable aren't "hot" or "neutral", they're just colored wires. How you connect them to the source is what makes them "hot" or "neutral".

Makes sense. Thanks.
 
Well beyond the scope of this thread, but a great opportunity for me to learn (so how can I pass up on that opportunity, right?).

How does a RIMS or HERMS give you more flexibility in setting your grain-to-water ratio? It seems to me (probably rather naively) that you can just as easily set your grain-to-water ratio with BIAB (or a similar method). What gives RIMS or HERMS an advantage in this regard?

I completely understand the ability to have a more precise control over mash temp, and for a commercial set up I think either of these systems works quite well. But on the small scale I'm not certain I understand the benefit of having a separate hot liquor tank over simply putting a heating element in your mash tun and cycling the wort. It seems significantly less expensive, potentially just as accurate, and consuming less space. I would imagine having small pockets of either too hot or too cold wort would be a very real possibility in a recirculation system, but it seems that possibility is significantly larger in a 200 gallon tank than in a 10 gallon tank.

Maybe I'm not getting something though.


Makes sense. Thanks.

Hey...it's your thread, so you control what the scope of the thread is all about!

Anyway...if you set your grain to water ratio around say 1 qt/lb of grain, you only get around 2.5-3 gallons of wort in your kettle for a typical grain bill around 12 gallons. To get to a 5 gallon batch size, you will need a lot of sparge water ready to go at around 170F if you want to rinse your grains thoroughly and get as much of the sugars out as you reasonably can. That takes some kind of method to heat that sparge water. I use my boil kettle; others use a HLT, and some even use the RIMS as an on-demand heater (that takes a LOT of power...)

You don't have to do this - a lot of people just drain the mash and don't bother sparging. They get less mash efficiency that way, but grain is cheap, so they trade off having to buy a bit more grain for simplicity. You can also just do a full batch sparge, where you mix 7-8 gallons of water with the 12 lbs of grain, but grain-to-water ratio does affect the starch conversion, so again, it's a control variable I want to be able to adjust for the recipe I'm brewing.

In the end, it all comes down to how you want to brew. The good news is that your system (as you are planning right now) can all be repurposed for a more complex system later. Add a pump and PID controller, and you can recirculate the mash in and out of the boil kettle. The pump can be used to whirpool at the end of the boil too. Then add a separate mash tun...then a RIMS heater...then motorized ball valves to switch things around at the push of a button...yeah it can get crazy but you really don't lose anything along the way! I've gone through 4 major revisions of my system, and the only thing I can't reuse is my HLT, but that's my choice: I wanted to go from 3 vessel to 2 vessel.

You are absolutely doing the right thing by asking these questions, and making sure you have enough ports on your kettle - that's harder to change later (but not impossible).
 
Last edited:
Anyway...if you set your grain to water ratio around say 1 qt/lb of grain, you only get around 2.5-3 gallons of wort in your kettle for a typical grain bill around 12 gallons. To get to a 5 gallon batch size, you will need a lot of sparge water ready to go at around 170F if you want to rinse your grains thoroughly and get as much of the sugars out as you reasonably can. That takes some kind of method to heat that sparge water. I use my boil kettle; others use a HLT, and some even use the RIMS as an on-demand heater (that takes a LOT of power...)

I see that, but I just don't understand it. Maybe I'm being too obtuse.

I just don't understand why having a RIMS or HERMS system gives you any greater control over mash temp than having a recirculating one pot system. I also don't understand why you would go with a RIMS or HERMS system to try and get better efficiency. In part, the extra half a pound of grain at bulk prices runs another $0.75 to get the same final gravity. If your HERMS or RIMS system costs $800 (and I know it doesn't) it would take 1,000 brews to justify the cost difference over just getting some more grain. And even at that point, you could just crush a little finer with BIAB to get the same final gravity.

It's a very common system, I get it. I see them for sale second hand all the time, and see companies offering the three vessel system for big cash. I just don't understand it. A commercial brewery can't put their grain in a bag, and can't afford to throw an extra hundred pounds of grain in a mash tun. Which is why they need a three vessel (or two) system. But on a 5 gallon or 10 gallon system I just don't see it as worthwhile.

But who knows. Maybe my attitude will change over time.

The good news is that your system (as you are planning right now) can all be repurposed for a more complex system later. Add a pump and PID controller, and you can recirculate the mash in and out of the boil kettle. The pump can be used to whirpool at the end of the boil too. Then add a separate mash tun...then a RIMS heater...then motorized ball valves to switch things around at the push of a button...yeah it can get crazy but you really don't lose anything along the way! I've gone through 4 major revisions of my system, and the only thing I can't reuse is my HLT, but that's my choice: I wanted to go from 3 vessel to 2 vessel.

You are absolutely doing the right thing by asking these questions, and making sure you have enough ports on your kettle - that's harder to change later (but not impossible).

That's exactly what I was going for. Thank you for the validation.

Honestly I started on this journey looking for a bigger kettle. My 7.5 gallon pot wasn't going to work forever. If I was getting a bigger kettle, I mine as well get an output valve on it. And if I'm getting an output valve on it, I mine as well get all the ports I could imagine using later on. It was only at that point that I figured "why would I get a kettle that has a port for an electric heater, but not get the electric heater?"

The rest of the ports I currently have no plans on using. I also have no plans on making a 10 gallon batch. But I can if I want to in a year, or 5. I can add a mash re-circulation, or a steamslayer, or a whirlpool pump, or a PID controller, or ditch the BIAB and go with a 3 vessel system. Hopefully not (for my wallets sake), but you never know :)
 
I see that, but I just don't understand it. Maybe I'm being too obtuse.

I just don't understand why having a RIMS or HERMS system gives you any greater control over mash temp than having a recirculating one pot system. I also don't understand why you would go with a RIMS or HERMS system to try and get better efficiency. In part, the extra half a pound of grain at bulk prices runs another $0.75 to get the same final gravity. If your HERMS or RIMS system costs $800 (and I know it doesn't) it would take 1,000 brews to justify the cost difference over just getting some more grain. And even at that point, you could just crush a little finer with BIAB to get the same final gravity.

It's a very common system, I get it. I see them for sale second hand all the time, and see companies offering the three vessel system for big cash. I just don't understand it. A commercial brewery can't put their grain in a bag, and can't afford to throw an extra hundred pounds of grain in a mash tun. Which is why they need a three vessel (or two) system. But on a 5 gallon or 10 gallon system I just don't see it as worthwhile.

You're not being obtuse; you're being practical.

RIMS or HERMS won't give you any more control over mash temperature than a single vessel recirculation setup...by the way, single vessel recirculation is often referred to as a "In Kettle RIMS", so it's basically the same as mash tun with some kind of external recirc. The main reason people use external heating is because you can't directly heat a plastic cooler, which is a very common mash tun. If you use a stainless steel pot, then "In Kettle RIMS" works just fine.

A separate mash tun really only gains you in the ability to adjust your grain-to-water ratio for the mash, and then have a ready supply of heated sparge water from another vessel. That's basically the only real advantage of the multi-vessel system over a single vessel system.

I think 3 vessel is so common because that fairly closely duplicates professional breweries. The hobby started by copying a known process. Propane was the heating method available in the early days, and heating water takes a LONG time, so multiple vessels was advantageous. As the hobby has it's grown over the years, newer methods (like electric kettles, RIMS, BIAB, etc.) have been developed and you now see an almost endless variety of systems. The really cool thing about our hobby is the multiple ways people come up with to achieve similar ends.
 
Arg. Too bad he's out of stock.

He told me it would take him about a month for the item to get back in stock. So now I get to play the game of "do I wait 6 weeks to save $50, or just order it from BrewHardware now."

I'm guessing all the other parts will be here by the end of next week. I like saving money, but I'd hate to stare at a kettle for a month just waiting (and realistically speaking, it could be longer than a month).
 
A separate mash tun really only gains you in the ability to adjust your grain-to-water ratio for the mash, and then have a ready supply of heated sparge water from another vessel. That's basically the only real advantage of the multi-vessel system over a single vessel system.

Many ways to skin a cat and all, and I understand that those systems may appeal to others, I just still don't understand why. I know the extra space and expense doesn't justify the extremely small amount of flexibility in my mind.

10 years ago I don't remember seeing any of these "all in one pot" systems. So I could get the three vessel system then (I actually remember thinking it was massive overkill then too), or even 30 years ago. But not today.

I think 3 vessel is so common because that fairly closely duplicates professional breweries. The hobby started by copying a known process.

And that, in my opinion, is a major flaw in the hobby. Hobby brewers have so much more flexibility. It makes no sense for someone with such incredible flexibility and freedom to copy a rigid and highly regulated professional brewer.

But I guess as long as you're having fun at it, what does it really matter.
 
Many ways to skin a cat and all, and I understand that those systems may appeal to others, I just still don't understand why. I know the extra space and expense doesn't justify the extremely small amount of flexibility in my mind.

10 years ago I don't remember seeing any of these "all in one pot" systems. So I could get the three vessel system then (I actually remember thinking it was massive overkill then too), or even 30 years ago. But not today.

And that, in my opinion, is a major flaw in the hobby. Hobby brewers have so much more flexibility. It makes no sense for someone with such incredible flexibility and freedom to copy a rigid and highly regulated professional brewer.

But I guess as long as you're having fun at it, what does it really matter.
Obviously I can't speak for anyone else, but I can give you some sense of how I arrived at a 2-vessel 50A system. I had originally planned on doing eBIAB, and upgrading to more vessels later if I was unsatisfied with eBIAB for some reason. But then I found BruControl and started reading about it. I became very enamored of automating as much of the brew day as possible (including, ultimately, cleaning) so that I could do other things during a brew day. After a bit more thought and planning for my space, I decided that it was easier for me to have two vessels horizontally as opposed to having an eBIAB kettle and enough vertical space for a pulley to hoist the grains out (I plan to brew in a cart on wheels with as much of my brewing equipment on it as possible). Conveniently, two horizontal vessels is also a bit more conducive to automation. And as Wizard said above, I wanted the flexibility to brew higher gravity beers more easily than a single vessel would allow. With a 5500 watt heater in my RIMS tube, I can heat sparge water on demand for any beers that are high enough gravity that I don't want to do no-sparge.

However, somewhat to your point, changing the scope of my build has made it substantially more complex, and substantially more expensive. I am ok with that. At this stage in my life, the project of building my system is almost as much fun as brewing beer on it will (hopefully) be. It was a close call for me though. I almost just said f*** it and bought a robobrew.
 
But then I found BruControl and started reading about it. I became very enamored of automating as much of the brew day as possible (including, ultimately, cleaning) so that I could do other things during a brew day.

I'll have to read up about BruControl (I'm not familiar with it), but generally speaking I'm specifically not interested in automating my brew day.

I understand the value in speeding up the brew day (which is obviously why I'm building an eBIAB system). Right now it's difficult to find 7 straight hours to do a brew, and if I can get that down to 4-5 it opens doors for me. But for me I want to brew. I want to crush the grains and smell them, fiddle with the nobs to get the right temp, hold the spent grains, watch the pot for boil overs, be involved in the process. In part I better understand it as a result, but in part its what makes it enjoyable. I made this beer, a machine didn't.

I know I could automate the system more, and if that was my intention I'd probably go with a Unibrau. But to me the hobby isn't programming a controller, watching TV and getting up when a timer goes off. If that was my intention, I'd rather just buy all my beer.

But hey, that's me. I'm relatively young, and relatively stubborn. I understand others don't want to lift this, move that, and want the newest stuff. That's fine too. I just know it isn't for me.
I sort of get what you're saying about wanting to make the beer rather than having a machine do it for you. That's why the Brewie and PicoBrew don't appeal to me that much. But I very much intend to make the wort that I brew--I'll design the recipe, I'll crush the grains and measure the water, and you can be darn sure that I'll be there to make sure that the pot doesn't boil over. But fiddling with knobs to get the right temperature is pointless to me when a PID (or computer) can do that waaaay better than I can.

But hey, like you said. Different strokes for different folks!
 
Spa panel box showed up yesterday. It was smaller than I thought it was going to be, which unfortunately means I won't be able to fit most of the outlets inside the box. Oh well, I have a few extra outlet boxes that will work just fine, and I'll attach them to the sides of the spa box.

I wanted to make sure I'm wiring this spa box right the first time, rather than have it fry and waste $80.

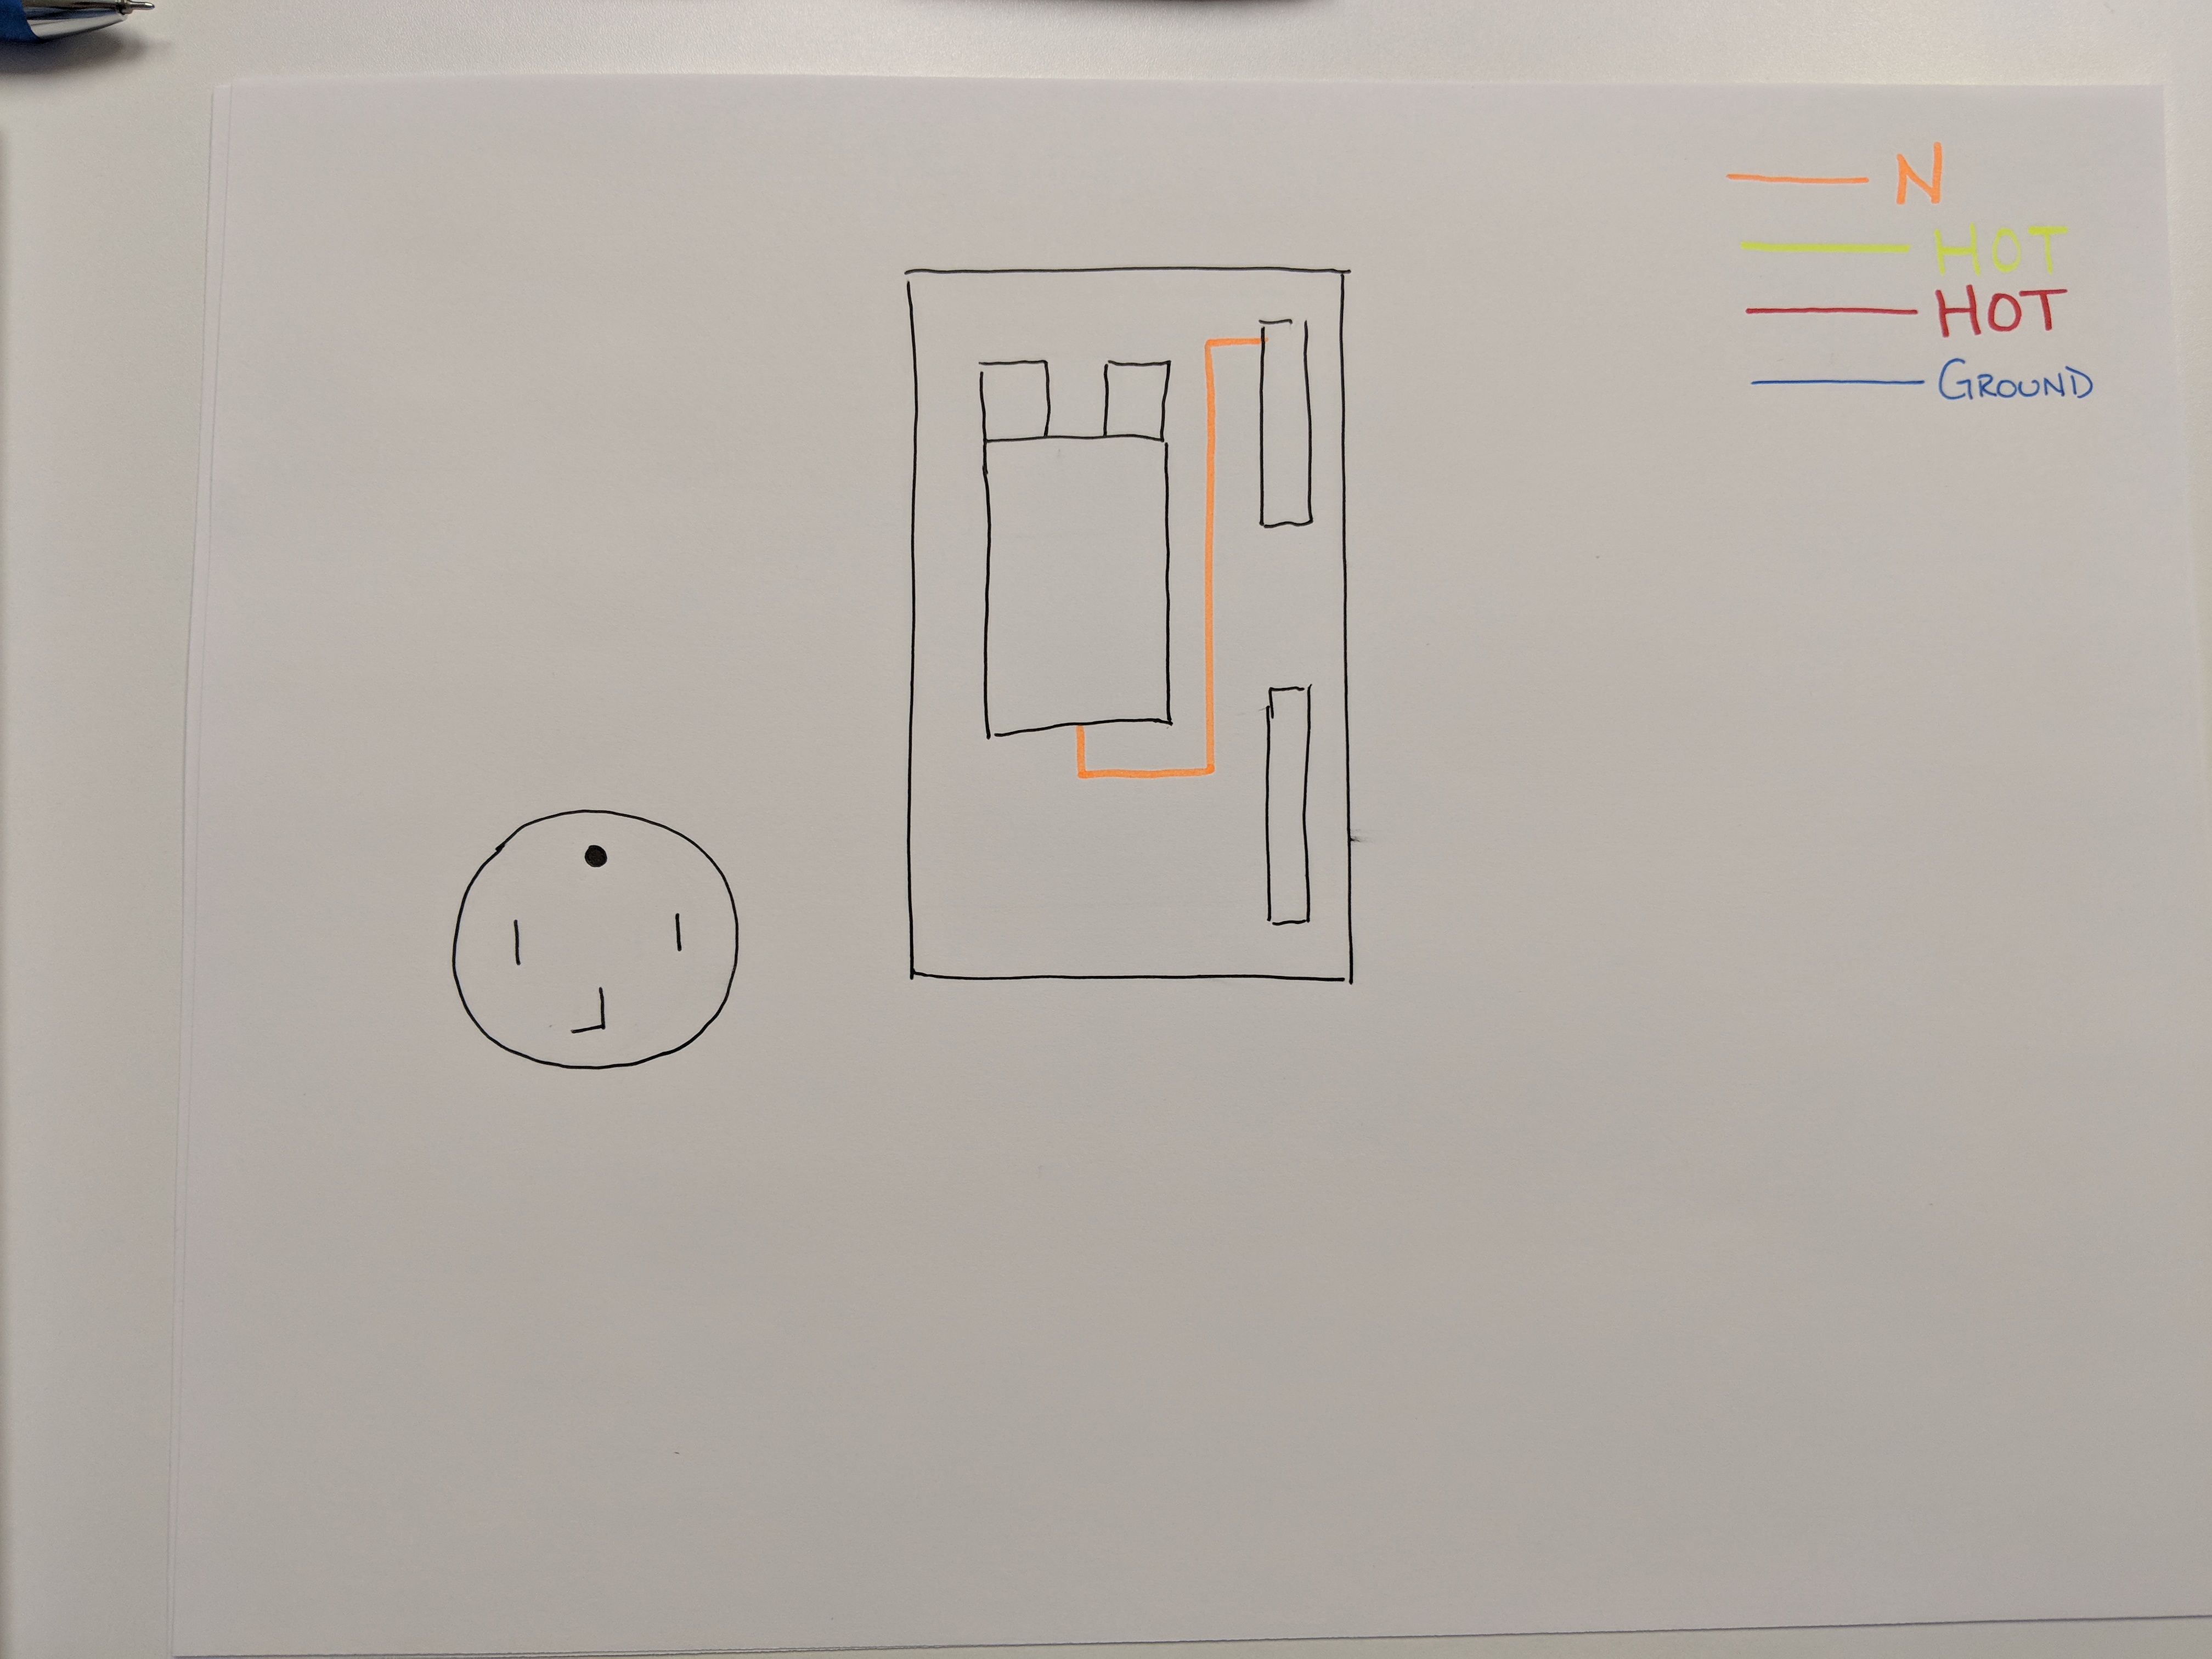
So the first picture I have is how the spa panel showed up. A breaker with a white cord connecting it to the neutral bar.
IMG_20181024_101245.jpg
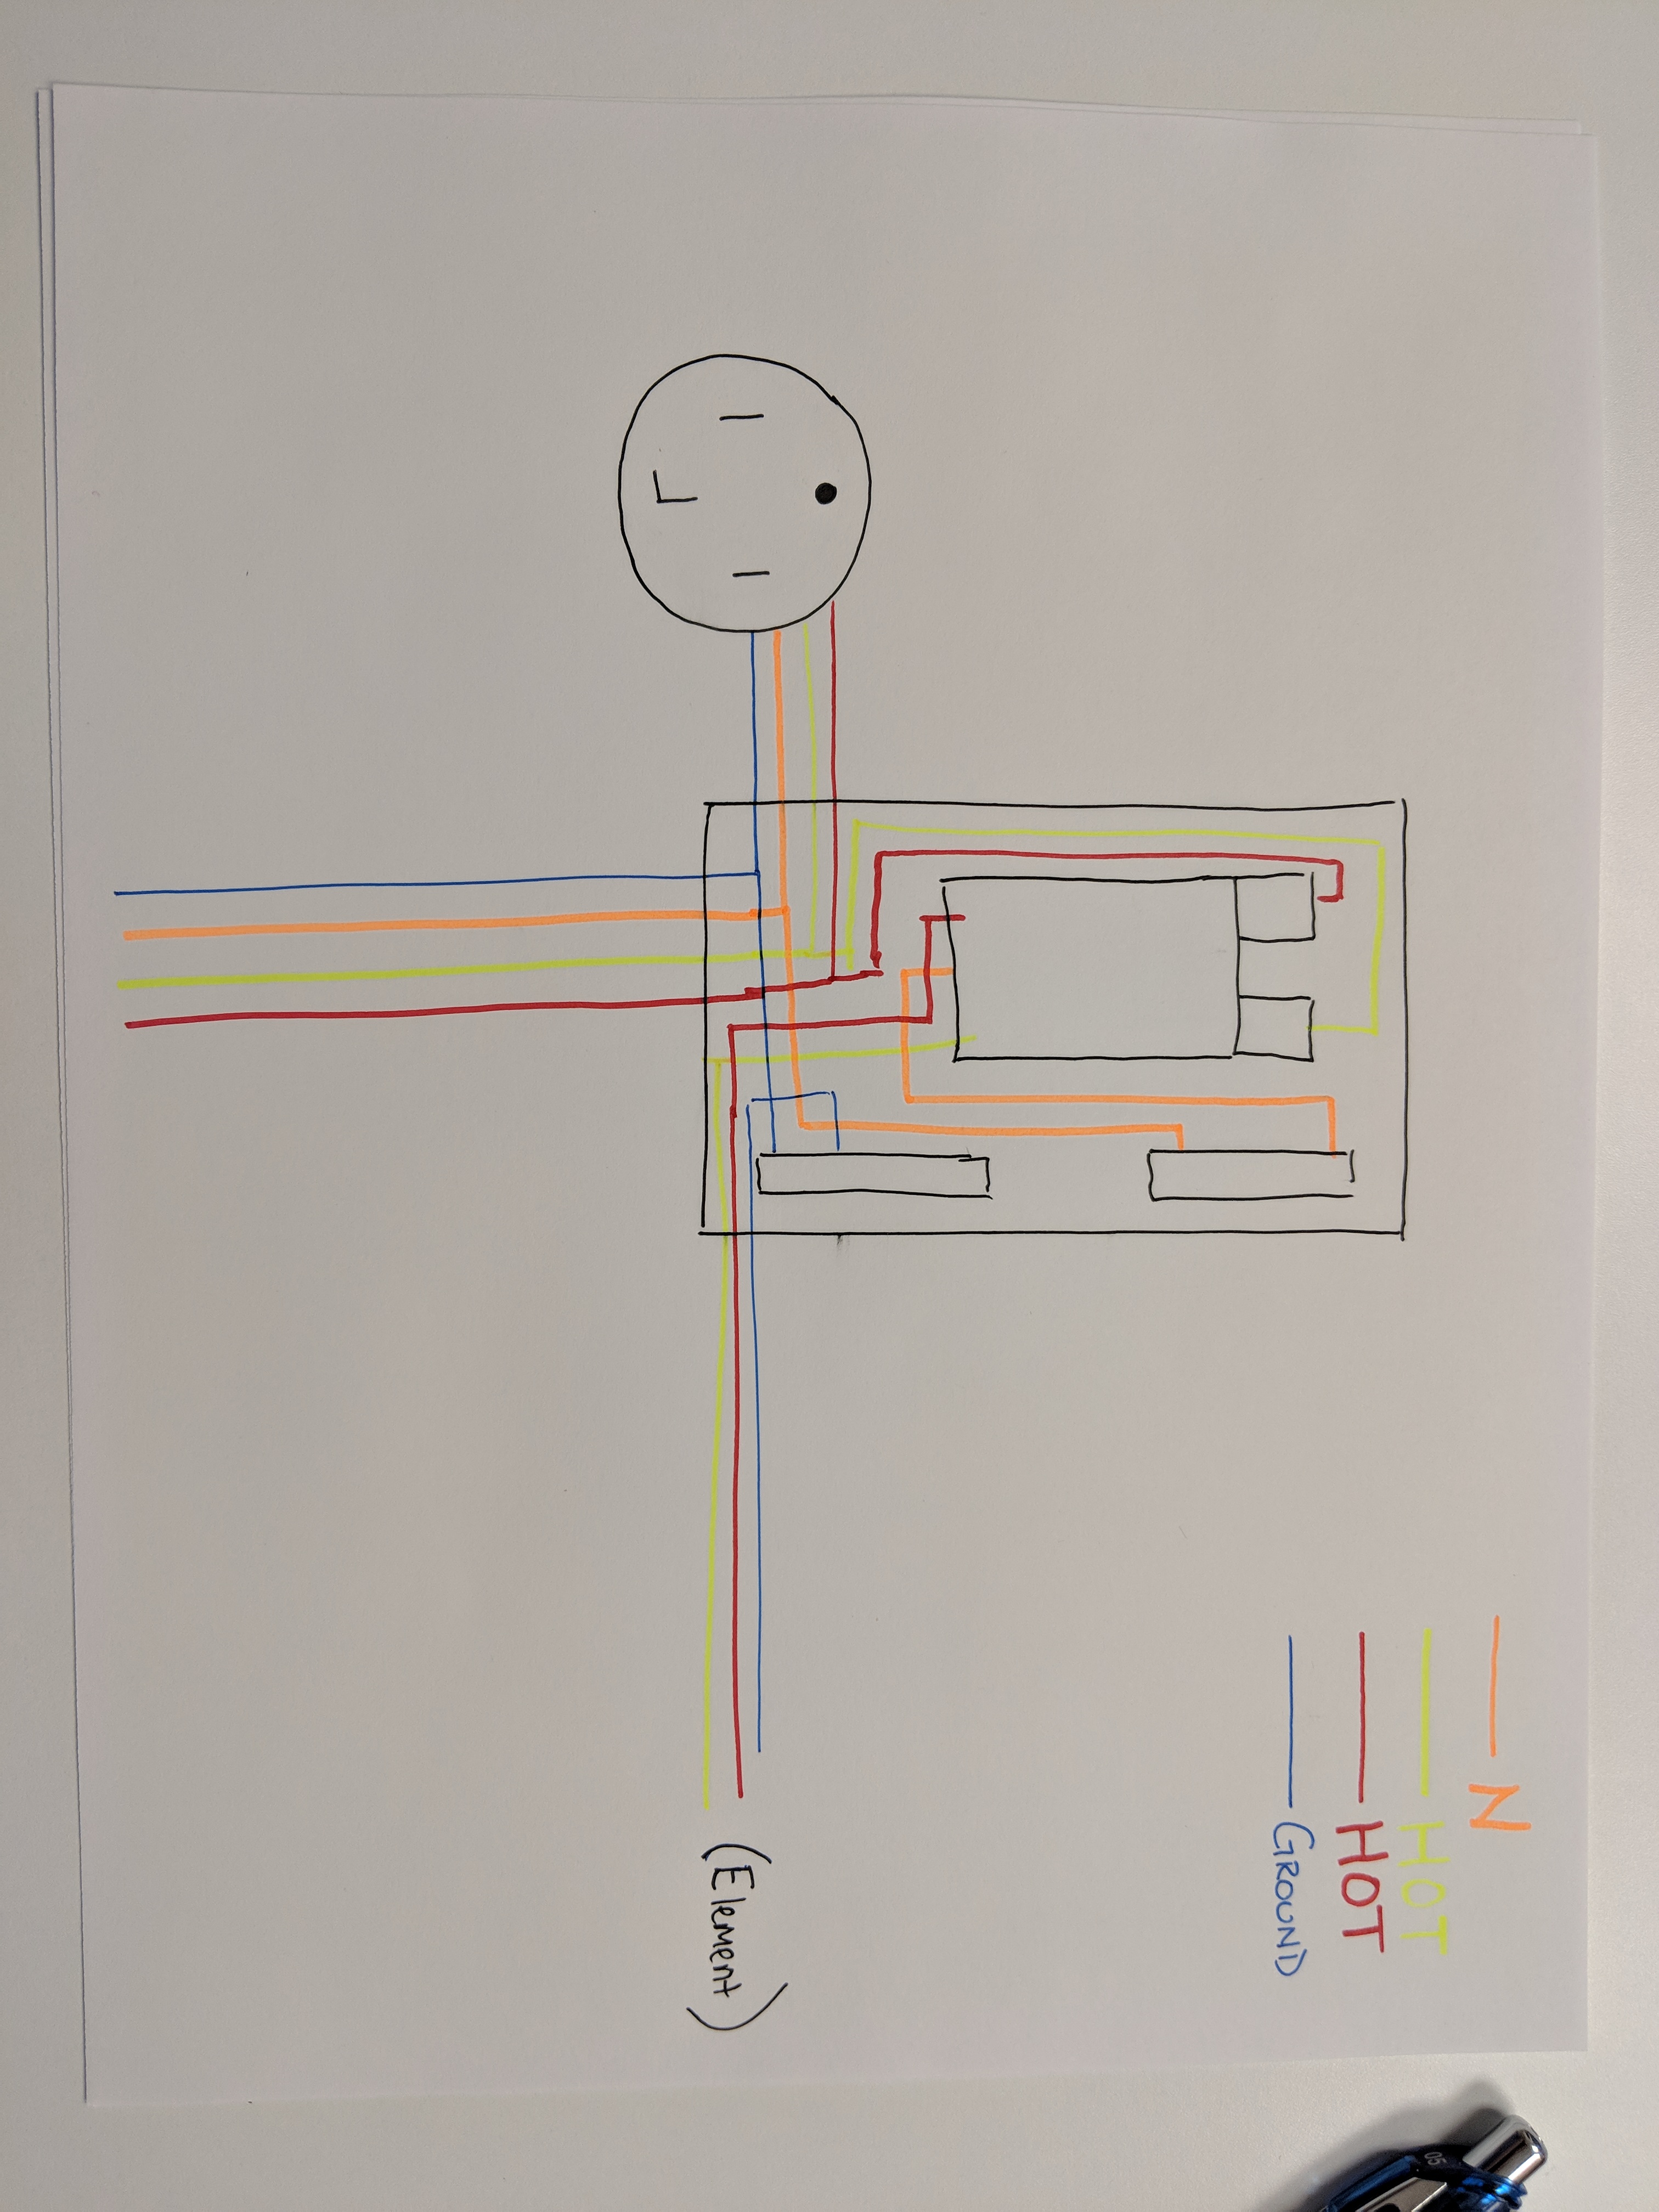
To connect it, I'll need to run the 4 wires (two hot, neutral and ground) from the wall outlet into the spa panel. I'll pigtail all 4 wires to the new dryer outlet, then run the ground to the ground bar, the neutral to the neutral bar, and the two hots to the "in" power on the panel. From there, 3 wires will exit the box, two hots from the breaker and one ground from the ground bar.

IMG_20181024_101633.jpg

Sorry for the colors. I feel like I'm in elementary school again :D

From there, I'll have two hots and a ground heading to the StillDragon controller before the element itself. The wiring diagram for the StillDragon appears to indicate that one of the hots (white) will continue to run straight through the controller, while the second hot (black) and the ground (green) will run through the SSR (https://www.stilldragon.org/uploads...ller.Kit.Build.Instructions.v1.0.20131020.pdf).

I wasn't planning on having to solder anything in the StillDragon, so that's a bit unexpected. I guess I should have read the instructions first. Looks like I"m picking up a cheap soldering iron on my way home from work.

Does all of that look/sound right?
 
It looks correct to me. Just to be completely overbearing on details :rolleyes:, you should use black and red for "hot", white/black dashed line for "neutral" and green for ground on your drawing. Makes it a LOT easier to understand how to wire it all up when you are working on it, since that will match the actual wire colors you'll be working with.

How are you planning on hooking up the 120V outlets into this? Is there a spare breaker spot for those?
 
Back
Top