Wiring Question - Homemade Dryer Cord Splitter/Extension

Homebrew Talk - Beer, Wine, Mead, & Cider Brewing Discussion Forum

Help Support Homebrew Talk - Beer, Wine, Mead, & Cider Brewing Discussion Forum:

This site may earn a commission from merchant affiliate links, including eBay, Amazon, and others.
It looks correct to me.

Fantastic. Thanks!

you should use black and red for "hot", white/black dashed line for "neutral" and green for ground on your drawing.

Yeah, I've got a few spare moments, and I'm working with some scrap paper and some highlighters I found lying around. I don't have a green one lying around :)

How are you planning on hooking up the 120V outlets into this? Is there a spare breaker spot for those?

I'm not planning on hooking up any 120V outlets to this. Just the heating element through the SSR controller.
 
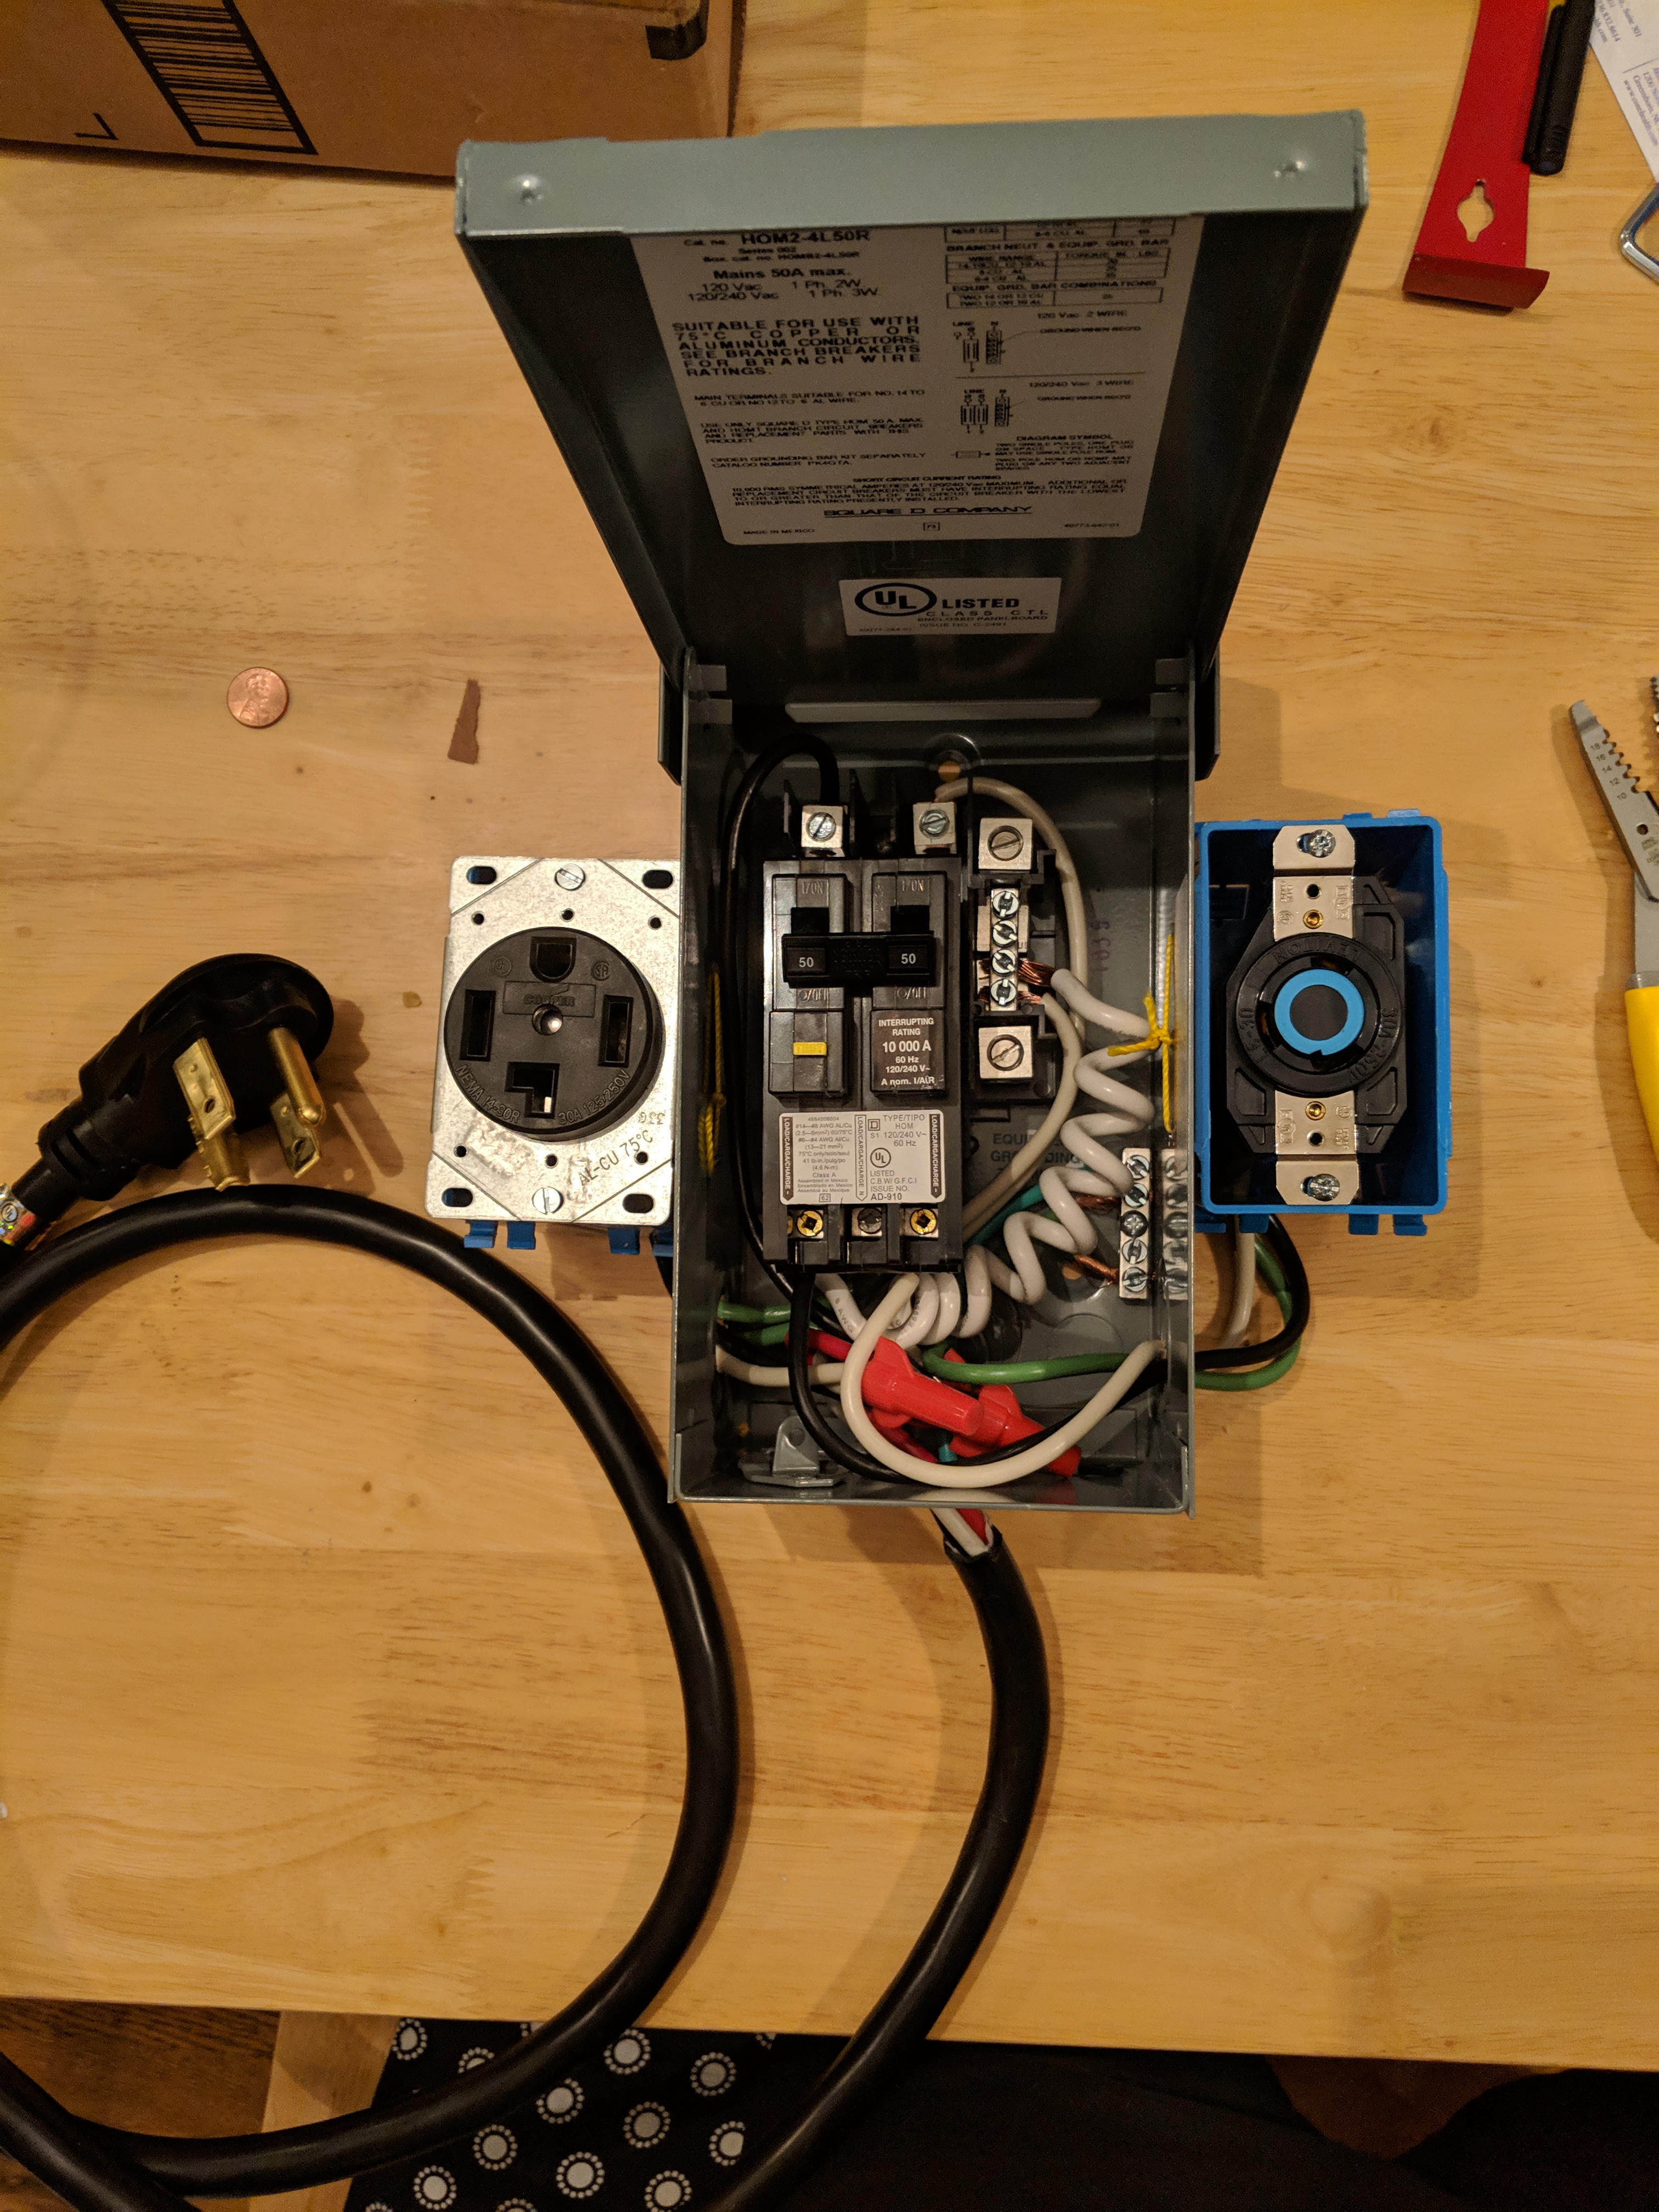
So I got the spa panel wired up. What do you think?

IMG_20181025_191956.jpg


IMG_20181025_192105.jpg


Unfortunately the box is a little crowded, and you can't see many of the wires. I also wasn't able to fit either of the two outlets into the spa panel, so I had to attach them to the side of the spa panel. I also only had 3 wire colors (the white, black and green in the 10/3 cord) but I was pigtailing the dryer outlet to the dryer cord, so I had to reuse a green wire (so it's white-hot, black-hot, green-neutral, green-ground). Not super happy about it, but it will have to do for now.
 
I can't say much about the wiring, but you should have some sort of strain relief on that power cord going into the box. And the wires to the receptacles pass through the box without apparently any kind of strain relief or relief from rubbing on the sides of the holes.

It may work; it wouldn't pass code inspection. Since it looks just like a long extension box, I'd guess it would work, but at the very minimum--especially since you're planning to move this around a lot--get some strain relief on that power cord.
 
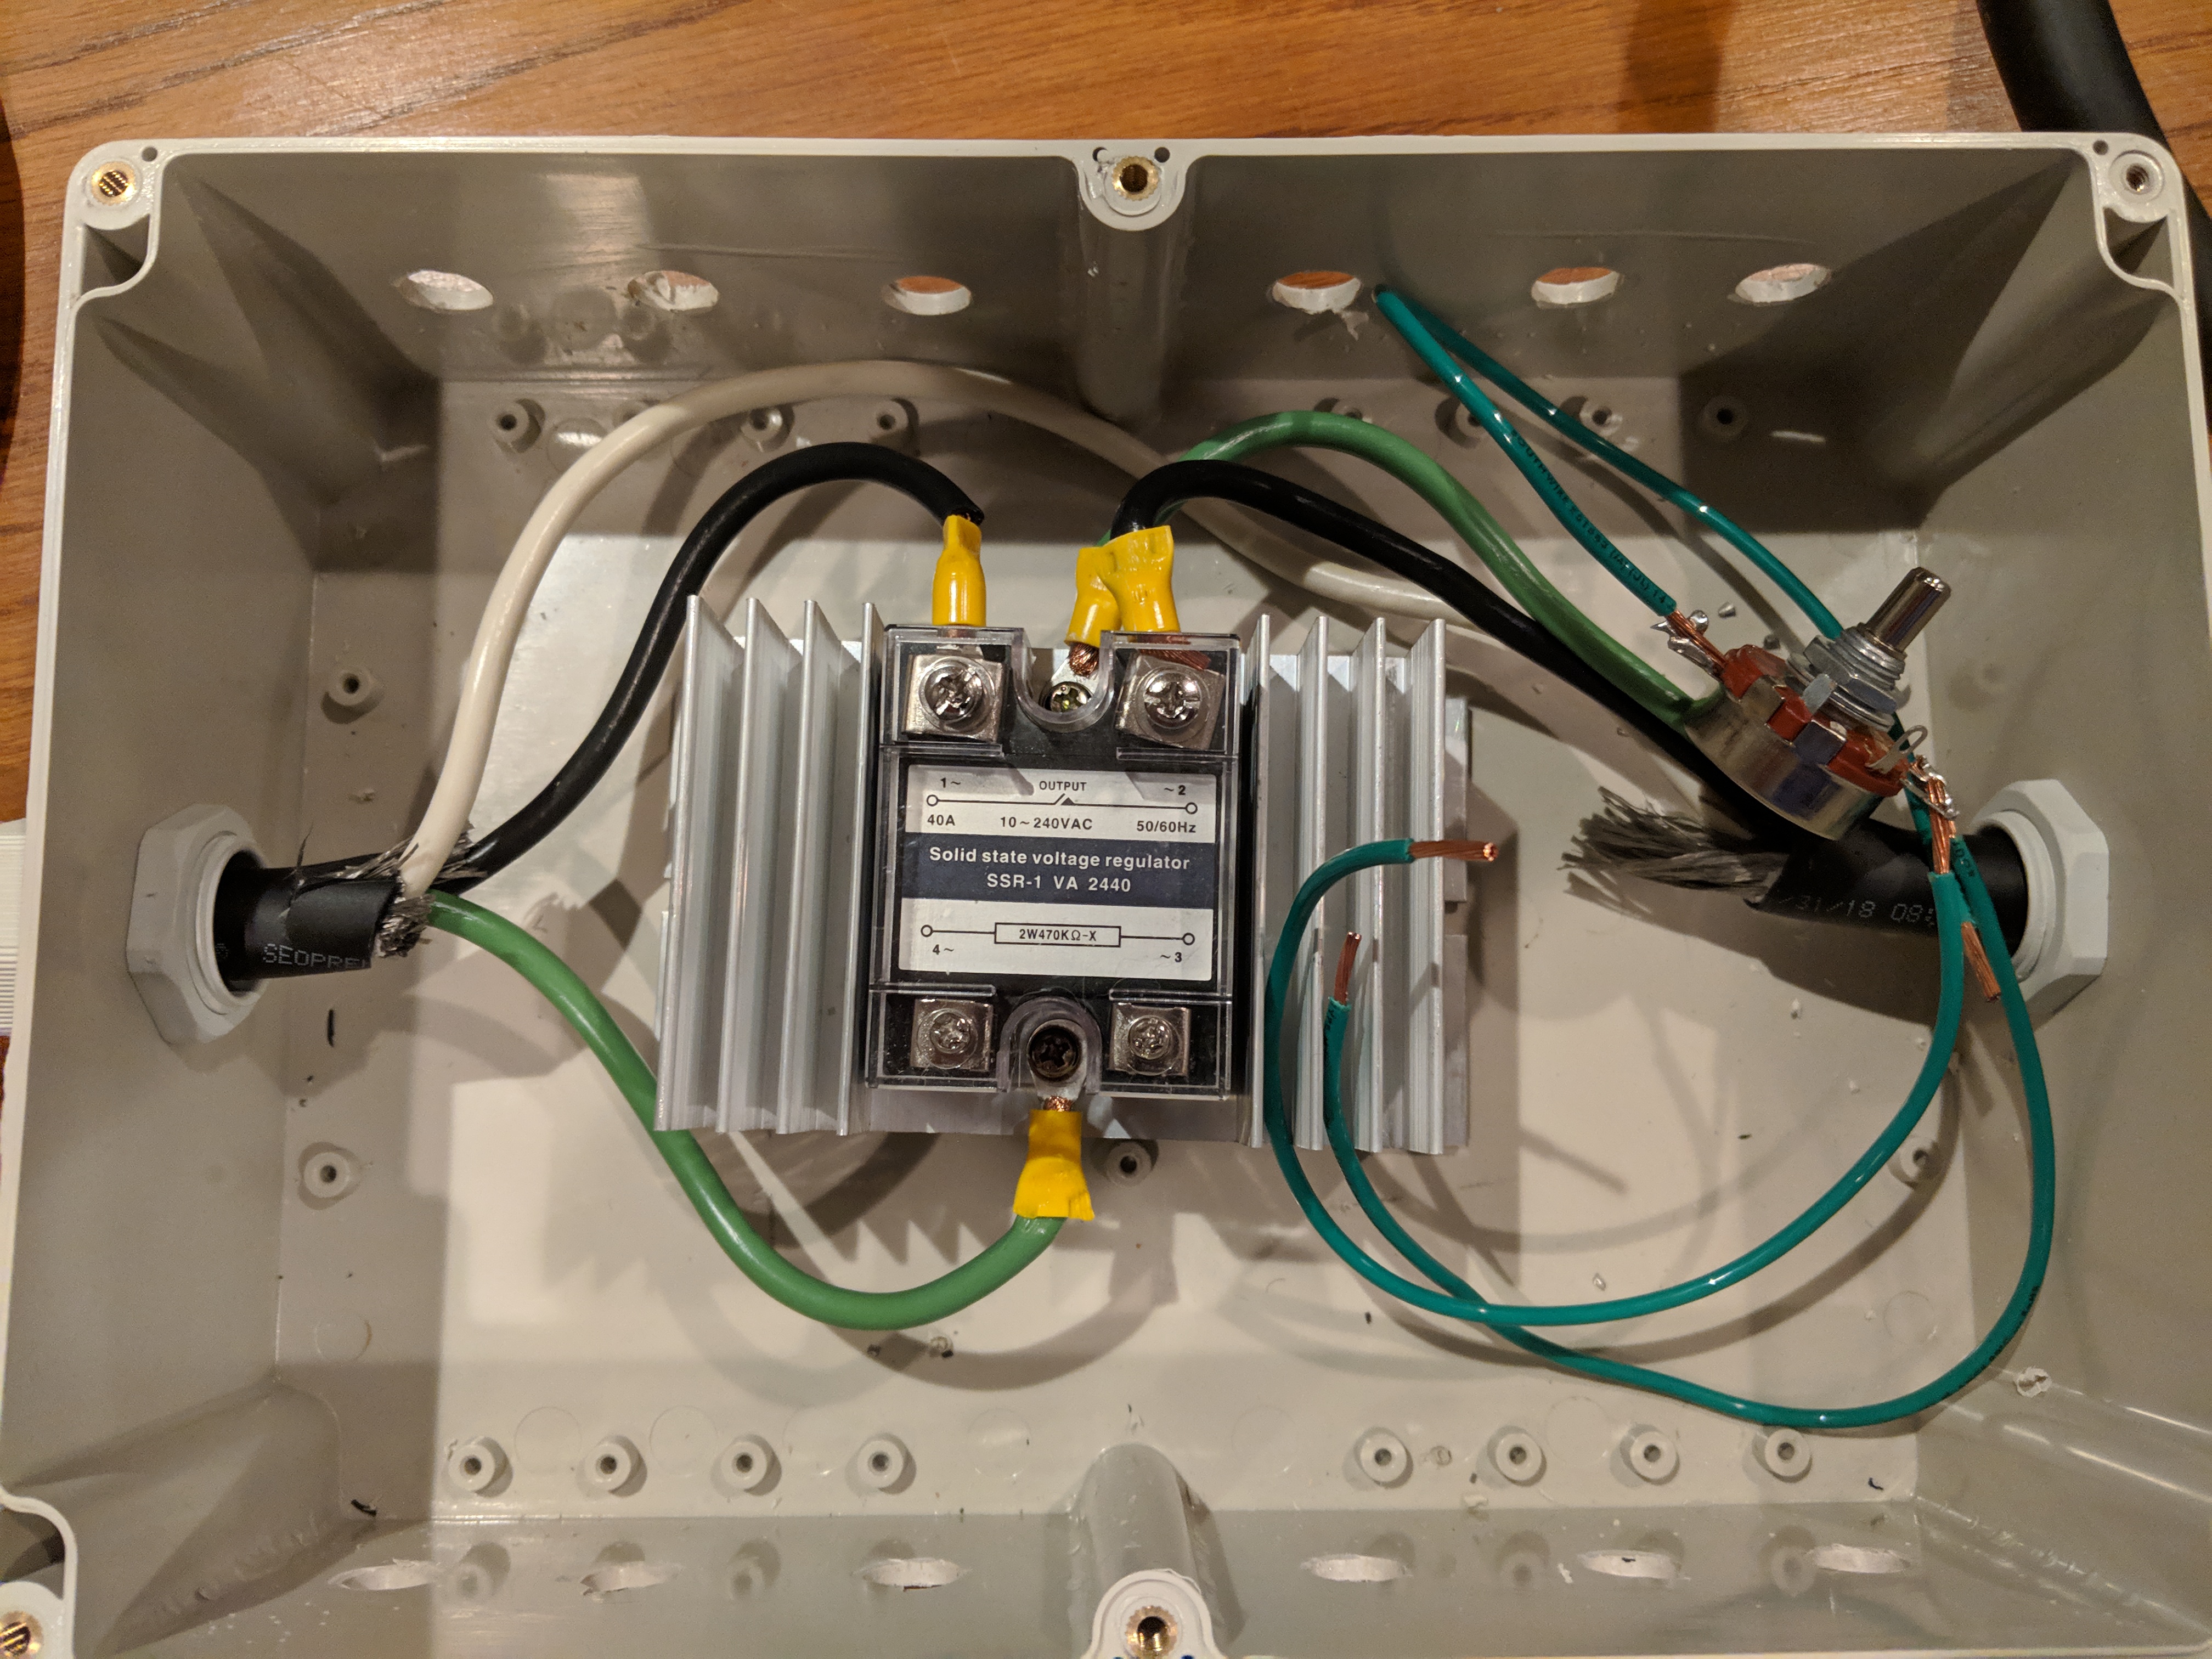
I also got probably 80% of the StillDragon Controller assembled.

IMG_20181026_064436.jpg


The nob on the right isn't connected yet (although I did my first soldering job, yay!, even if it looks like a 4 year old did it), and the heat sink isn't attached to the box yet, but most of the other wiring is done. I must say the instructions (https://www.stilldragon.org/uploads...ller.Kit.Build.Instructions.v1.0.20131020.pdf) aren't very helpful. I wasn't aware that I had to drill holes to secure the heat sink to the box until I wired most of this. I also didn't know I needed to drill holes for the rubber feet until everything was in the box. Probably more importantly, I assume the grease that came in the pack goes between the heat sink and the SSR, right? Nothing about that in the instructions.

There also appears to be more screws in the set than I know what to do with.

IMG_20181026_064451.jpg


The bag on the bottom has 4 rubber feet, 4 screws and 4 nuts to secure the feet to the box, as best I can tell. There are also two additional screws in the box that were used to secure the lid of the box to the base. The top bag has two screws and two nuts that, as best I can tell, are to secure the heat sink to the bottom of the box, as well as 4 other screws that I assume are to also secure the lid of the box to the base (for 6 total screws to put the lid on). The top bag then has two additional screws that I can't tell what they go to. Any ideas? It is somewhat frustrating to have extra parts.

The package didn't come with a packing list or instructions, and there doesn't appear to be many other instructions on assembly other than what I liked above, and the video on youtube that StillDragon put up isn't very helpful either. Rather than do a video of someone actually putting it together, their video is someone talking about what's in the box, telling you it would be easier to go to Lowes if a part is missing than email them for a replacement, and if you can't figure it out yourself you should probably call an electrician. Not that this is super confusing, but you don't want to drop the cash to have some "magic smoke" set you back to zero.
 
Ummmm......isn't that heat sink supposed to be attached to the OUTSIDE of the box, so as to get rid of heat?

BTW, you have strain relief on that stilldragon box; that's what you need on the spa panel.
 
It may work; it wouldn't pass code inspection.

Other than the strain relief issue, what about it wouldn't pass inspection? Not that it matters much to me, as it isn't a permanently installed item, and should I sell the home I can just unplug the unit, but I'm just curious.

but at the very minimum--especially since you're planning to move this around a lot--get some strain relief on that power cord.

It actually probably won't be moved. I'll secure the box to the wall right behind the dryer, and reach over the dryer to plug in the L6-30 cord when I need to brew. But your point is still well received. What type of strain relief item should I be looking for?
 
Other than the strain relief issue, what about it wouldn't pass inspection? Not that it matters much to me, as it isn't a permanently installed item, and should I sell the home I can just unplug the unit, but I'm just curious.

Mark the white/hot wire by wrapping black electrical tape around the end where it connects into the plug and inside the spa panel.

Those two electrical boxes you used for the outlets are not supposed to be installed outside of a wall. I would use a weatherproof box that's meant for installation outside a wall. Something like this: https://www.homedepot.com/p/1-Gang-...1-2-in-Threaded-Outlets-Gray-5321-0/202056216

I can't tell from the pictures but make sure that the ground bus and the neutral bus are NOT connected electrically. That's only allowed inside your main house panel.

It actually probably won't be moved. I'll secure the box to the wall right behind the dryer, and reach over the dryer to plug in the L6-30 cord when I need to brew. But your point is still well received. What type of strain relief item should I be looking for?

Strain relief: https://www.homedepot.com/p/Halex-1-in-Strain-Relief-Cord-Connector-16933/202077067?cm_mmc=Shopping|G|Base|D27E|27-6_CONDUIT-BOXES-FITTINGS|NA|PLA|71700000034238990|58700003946879308|92700031954573769&gclid=CjwKCAjw9sreBRBAEiwARroYm6tfGe8F7epUTG23KWZS1fqf5WUpeW52qBWpDJVLfoyOUwjBtqMXLBoC4scQAvD_BwE&gclsrc=aw.ds
 
Those two electrical boxes you used for the outlets are not supposed to be installed outside of a wall. I would use a weatherproof box that's meant for installation outside a wall. Something like this: https://www.homedepot.com/p/1-Gang-...1-2-in-Threaded-Outlets-Gray-5321-0/202056216
https://www.homedepot.com/p/1-Gang-...1-2-in-Threaded-Outlets-Gray-5321-0/202056216

Out of curiosity, does it functionally matter?

I can't tell from the pictures but make sure that the ground bus and the neutral bus are NOT connected electrically. That's only allowed inside your main house panel.

They aren't connected. No worries there :)


Sorry for the "newb" question, but the strain relief would be placed on the two sides of the panel where the wires are coming out, and again at the two points where the wires enter the gang box, but having the wires between the two strain relief items as photoed is fine?
 
Out of curiosity, does it functionally matter?

Depends on the chances of water getting splashed up into the box. Personally, I'm really picky about protecting against water and electricity mixing...the GFCI is only there as a last line of defense - your first line of defense is a proper design that prevents the issue from occurring in the first place.

This may seem like overkill, but considering electricity can kill you at levels around 0.1 amp, I don't take any chances!

Sorry for the "newb" question, but the strain relief would be placed on the two sides of the panel where the wires are coming out, and again at the two points where the wires enter the gang box, but having the wires between the two strain relief items as photoed is fine?

Yes; basically a strain relief is there to prevent the wires from moving at the entrance to the boxes, where the edge of the box could wear a hole through the insulation and cause a short.

The strain relief I linked to earlier is for the cords that have the plugs on them and goes on the outside of the boxes. This type can be used inside the spa panel where the wires come into it: https://www.homedepot.com/p/Halex-3...Cable-Clamp-Connectors-5-Pack-20511/100133208

Keep in mind, that the spa panel itself isn't waterproof, so these type of strain reliefs aren't either. I only use these on stuff that can't get wet! It's why I don't use spa panels in the first place and install the GFCI breaker back in my main panel.
 
Last edited:
FYI, if you're looking to do 240v on the cheap(er), I got one of the 5500w elements (and a cable) described in this thread for $49 shipped from China. Of course, your point still stands as to all of the other stuff you'd have to do/buy to get started with 240v. I was always planning to jump in with both feet on my electric build and I've still spent substantially more than I originally anticipated. And I ain't made a drop of wort yet...
Those elements from yuling are cheaper if you order more than one.. I ordered 2 of them for my home brewery for $62 including shipping almost 2 years ago... I then ordered 10 of them with 2" Tc bases for $320 shipped.. no issues with any of them. I did source my own cord and hardware which might make most of the difference
 
Last edited:
It all adds up btw if you look through my build thread you'll see I started on a very small budget but was able to accomplish a lot. It didnt stop me fro. Getting addicted to the hardware hobby end of things which meant co stant upgrades as many people fall victim to in such hobbies.
 
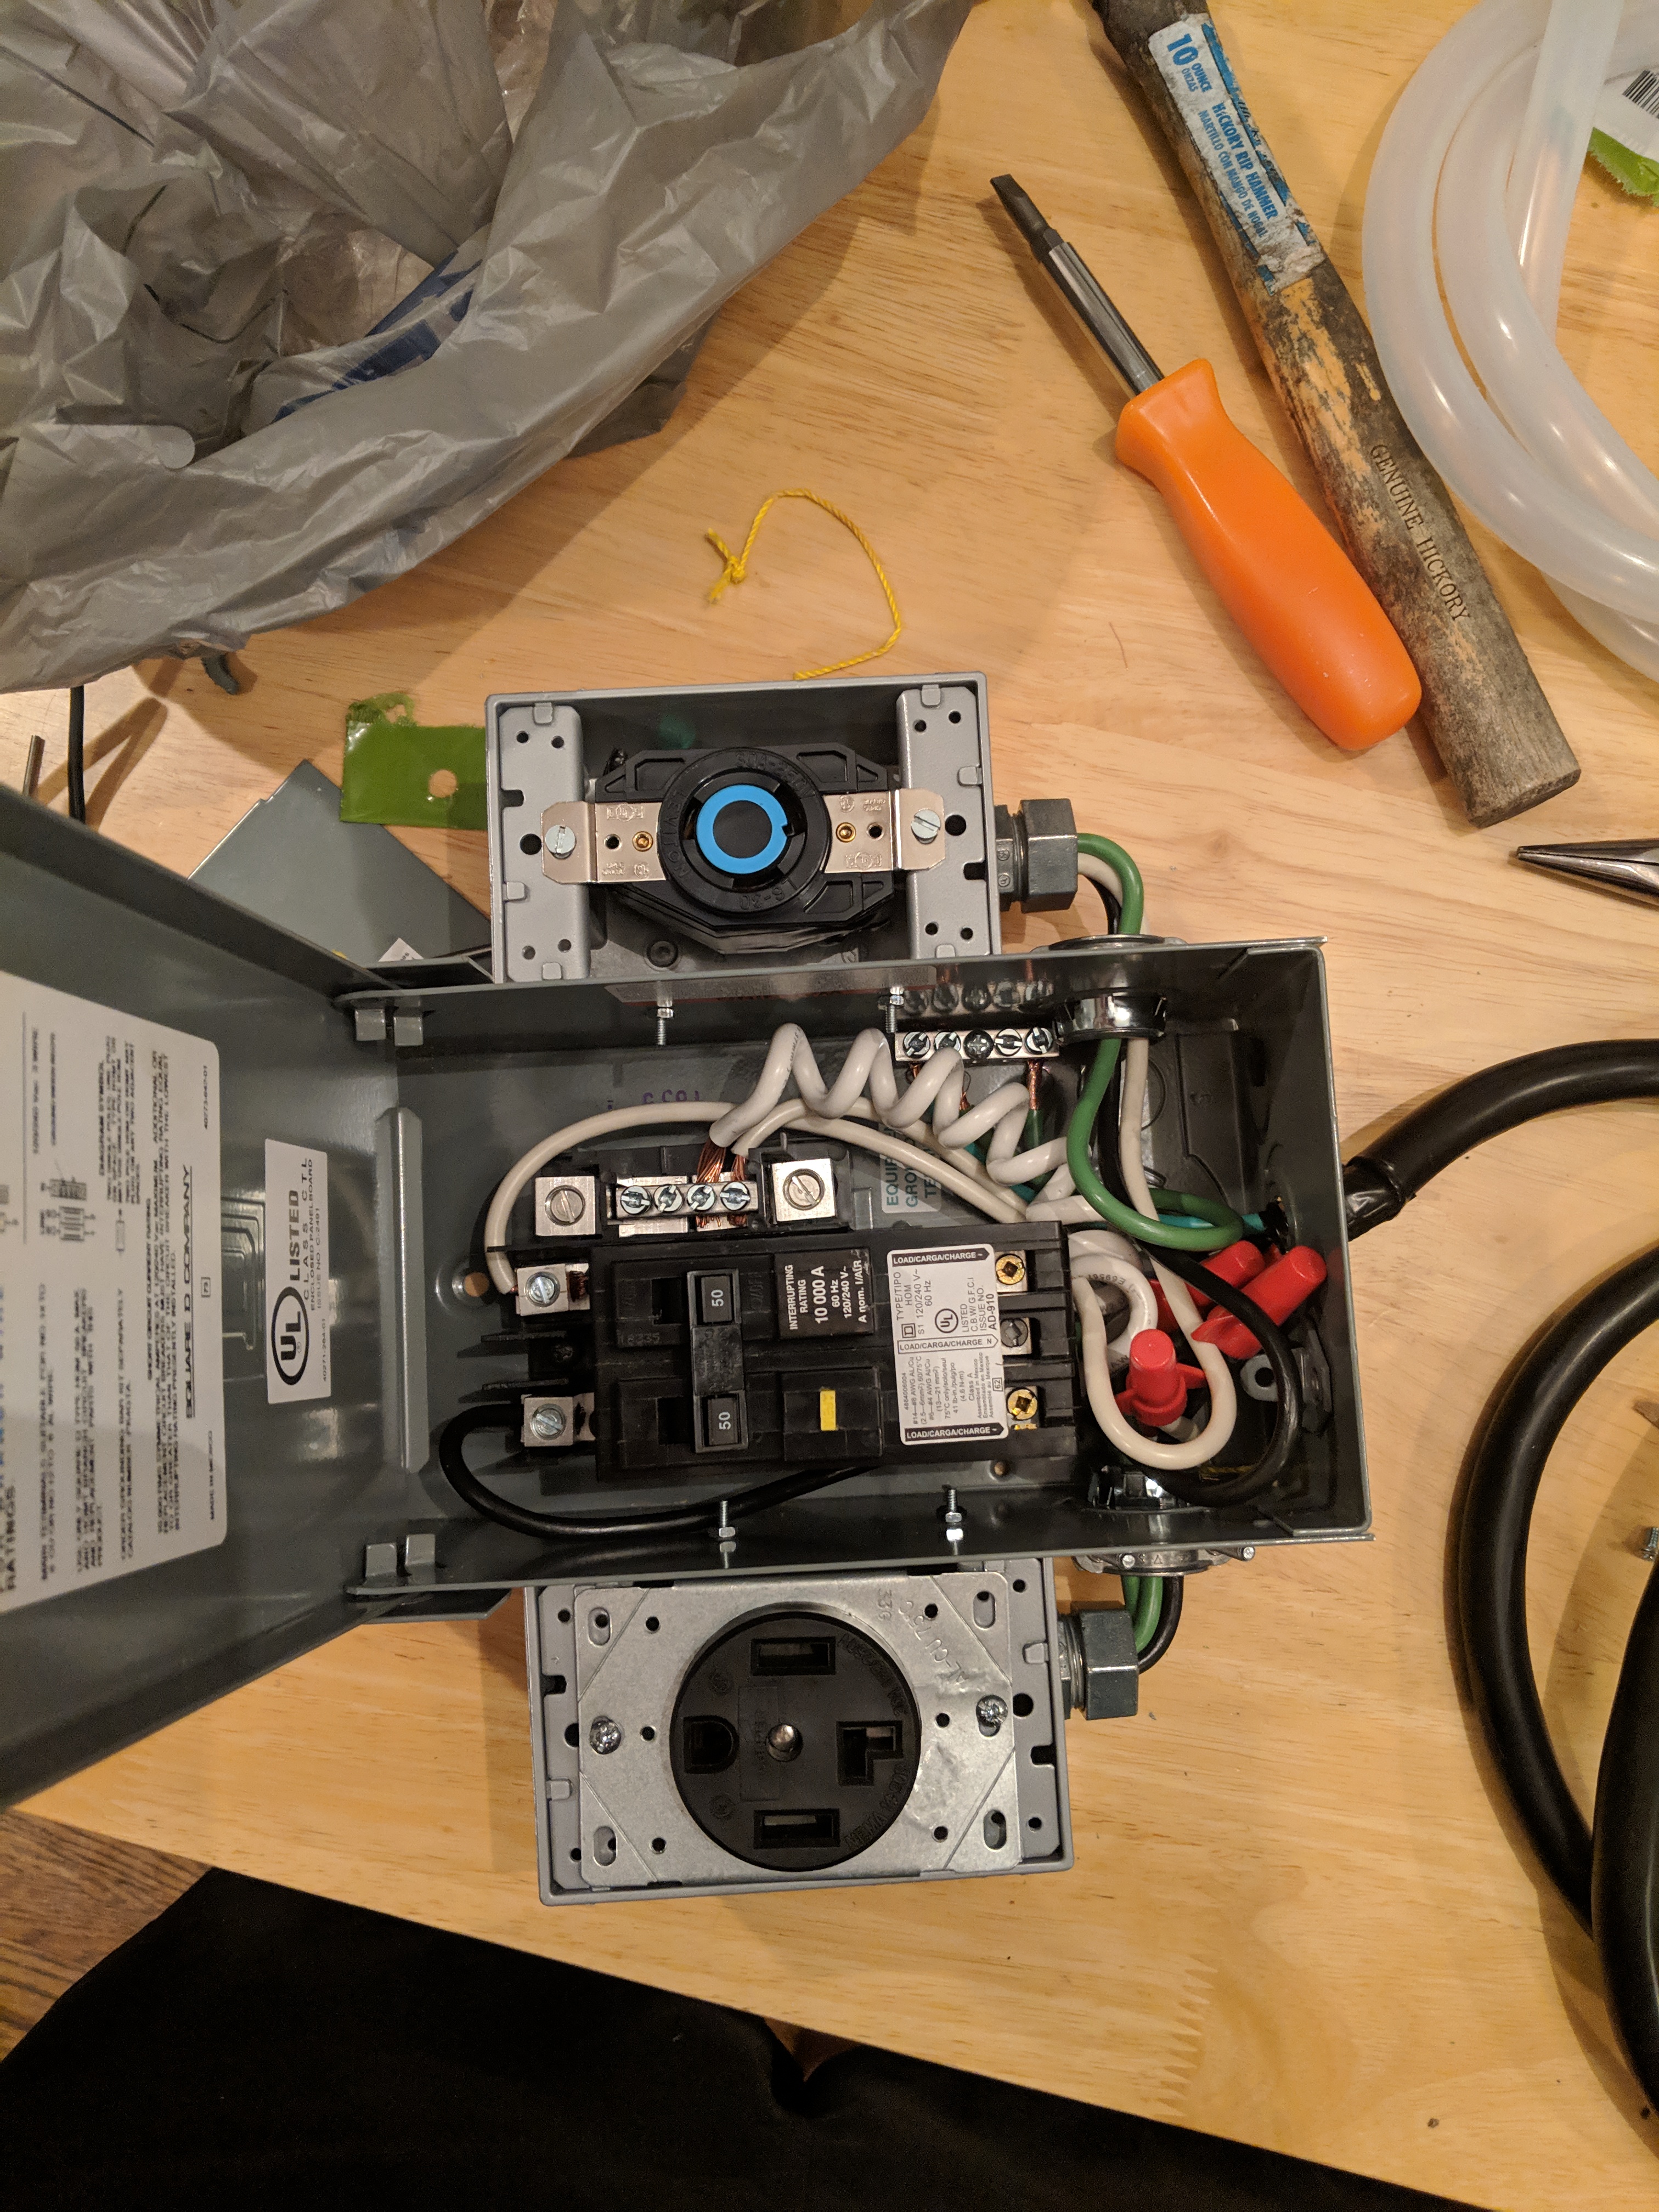
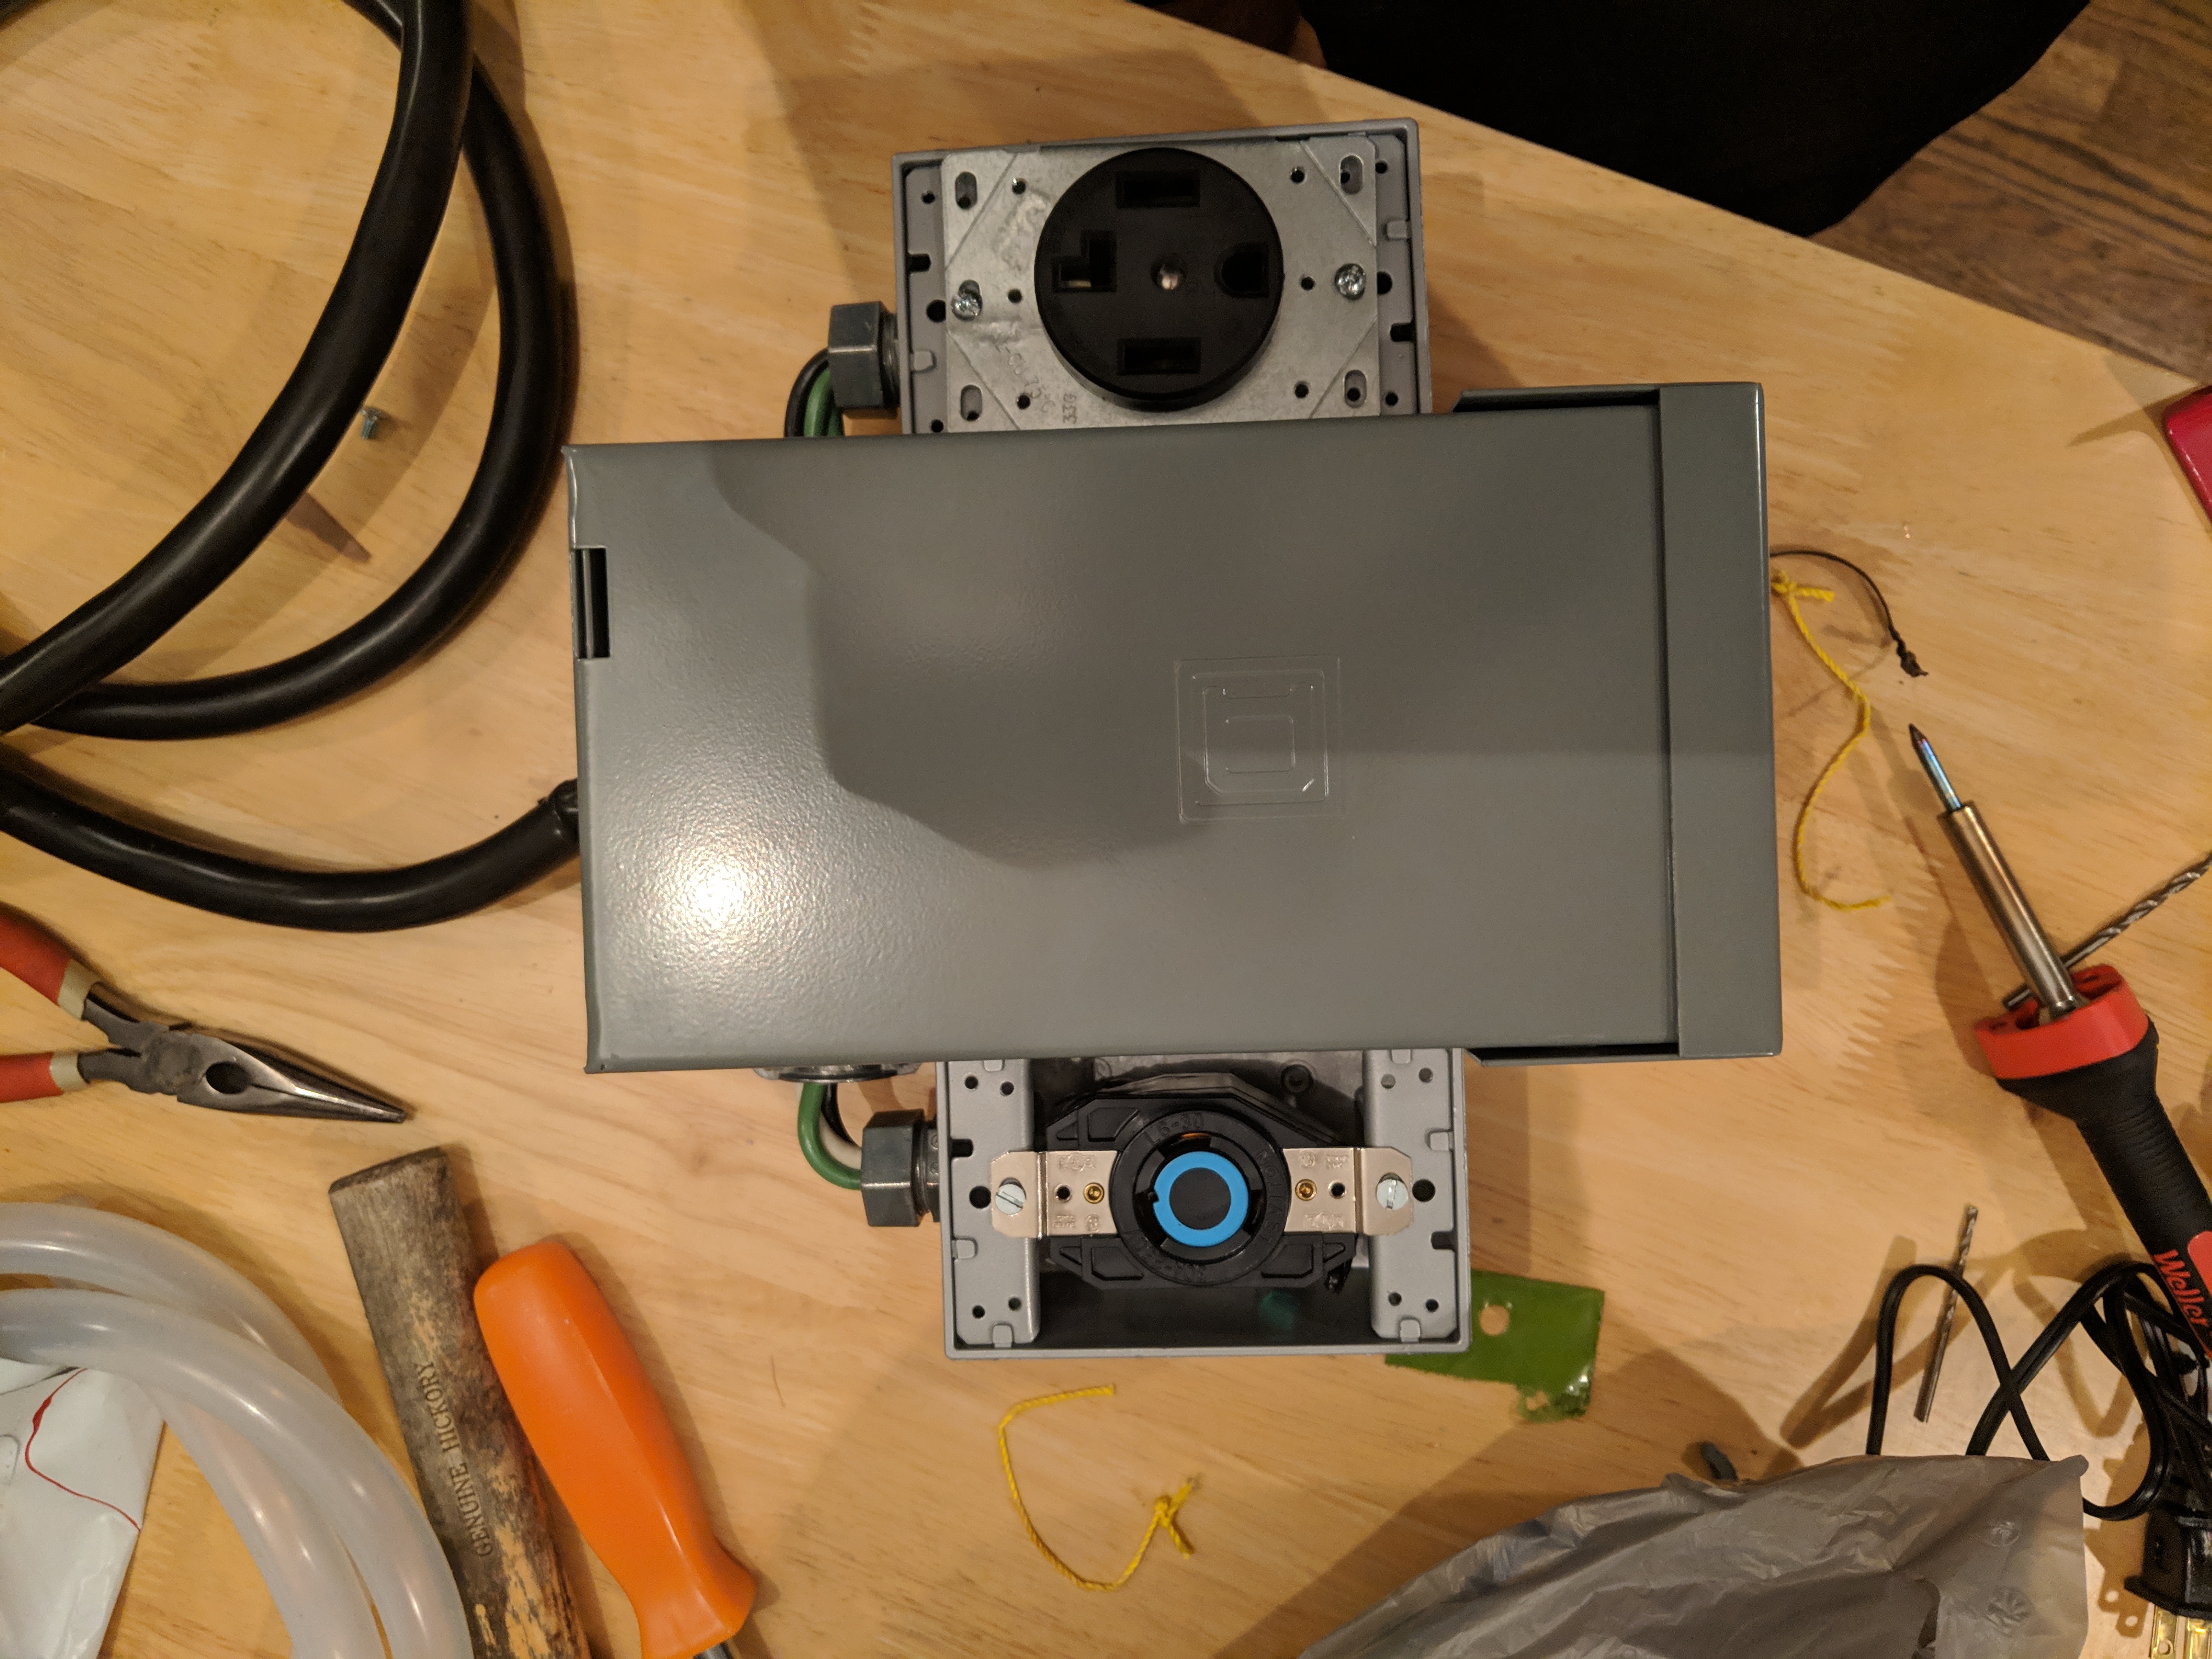
I went ahead and redid some of it.

IMG_20181026_192652.jpg


IMG_20181026_192715.jpg


I replaced the two plastic wall boxes with two metal, all-weather boxes. I also replaced the string that was attaching the boxes to the spa panel with bolts. I then installed strain relief at each box, and clamp connectors between the box and the panel. It was actually quite a tight fit with those connectors/strain relief.

I finished doing all of it, stared at the marvel that was the box at about 9 pm yesterday, and realized I forgot a clamp connector for the wire that goes into the panel. Sigh. I'm going to do with out it for the moment.

So, look better now?
 
opening a brewpub , 3bbl electric system I built.

Awesome! Congrats! What's the name?

I know I can get a better deal on 10 elements than I can on 1, but then I'd have 9 more heating elements standing around. In theory I could resell the other 9, but I'm not sure it's worth the effort.

In the end, I think the kettle will be done early next week. All of the other electronics are done, and all I'm waiting on is the kettle and the heating element. I would like to get the kettle going once it gets here, at least testing boil off rates and timing for heat up, and would prefer not to wait another 3-6 weeks on that. So I decided when Spike tells me the kettle is ready to ship, if the Chinese contact hasn't reached out to me yet, I'll order one off eBay for $52. It doesn't come with a cord, but still not a bad deal. And at that point both the kettle and element will probably arrive around the same time.
when I was talking about the better deal I was referring the fact that they get cheaper by bulk but even the 2 I bought together for $62 shipped... combining the shipping saves money.


And thanks,
brewery is prosperbrewingllc.com
 
I went ahead and redid some of it.


I replaced the two plastic wall boxes with two metal, all-weather boxes. I also replaced the string that was attaching the boxes to the spa panel with bolts. I then installed strain relief at each box, and clamp connectors between the box and the panel. It was actually quite a tight fit with those connectors/strain relief.

I finished doing all of it, stared at the marvel that was the box at about 9 pm yesterday, and realized I forgot a clamp connector for the wire that goes into the panel. Sigh. I'm going to do with out it for the moment.

So, look better now?

yes, bolting the accessory boxes rather than tying with string is certainly an improvement. the all-weather boxes are only of value if they have a cover but being mounted to the wall, it really shouldn't be getting splashed. the individual conductors from the spa panel to the accessory boxes is a code violation but practically, not a dangerous situation.
 
the all-weather boxes are only of value if they have a cover but being mounted to the wall, it really shouldn't be getting splashed.

Eventually, I'll get covers for them. Practically it doesn't matter, as it's 10 feet away from any water source and behind a laundry room door most of the time, and if water gets splashed on the all-weather boxes, the odds are water will be splashed on the outlet that's 3 feet below it (and not all-weather), but for aesthetics I'll probably do it anyway.

the individual conductors from the spa panel to the accessory boxes is a code violation but practically, not a dangerous situation.

Thanks for checking it.

Yeah, I know it won't pass code, but it isn't a permanently installed structure. So if I have to get the house inspected for some reason, I'll unplug it and put it in the closet, wait till the inspector comes back and plug it back in. No biggie. As long as it isn't a safety concern, I don't really care.
 
sounds good, at least you are recognizing the issues. i have several violations at my home but i am comfortable with them. there is a big difference between recognize a violation, assessing the situation and making an informed decision compared to just saying 'bah, who cares?'
 
I see that, but I just don't understand it. Maybe I'm being too obtuse.

I just don't understand why having a RIMS or HERMS system gives you any greater control over mash temp than having a recirculating one pot system. I also don't understand why you would go with a RIMS or HERMS system to try and get better efficiency. In part, the extra half a pound of grain at bulk prices runs another $0.75 to get the same final gravity. If your HERMS or RIMS system costs $800 (and I know it doesn't) it would take 1,000 brews to justify the cost difference over just getting some more grain. And even at that point, you could just crush a little finer with BIAB to get the same final gravity.

It's a very common system, I get it. I see them for sale second hand all the time, and see companies offering the three vessel system for big cash. I just don't understand it. A commercial brewery can't put their grain in a bag, and can't afford to throw an extra hundred pounds of grain in a mash tun. Which is why they need a three vessel (or two) system. But on a 5 gallon or 10 gallon system I just don't see it as worthwhile.

But who knows. Maybe my attitude will change over time.


That's exactly what I was going for. Thank you for the validation.

Honestly I started on this journey looking for a bigger kettle. My 7.5 gallon pot wasn't going to work forever. If I was getting a bigger kettle, I mine as well get an output valve on it. And if I'm getting an output valve on it, I mine as well get all the ports I could imagine using later on. It was only at that point that I figured "why would I get a kettle that has a port for an electric heater, but not get the electric heater?"

The rest of the ports I currently have no plans on using. I also have no plans on making a 10 gallon batch. But I can if I want to in a year, or 5. I can add a mash re-circulation, or a steamslayer, or a whirlpool pump, or a PID controller, or ditch the BIAB and go with a 3 vessel system. Hopefully not (for my wallets sake), but you never know :)


Regarding chasing the extra efficiency....there's really little reason to pursue it if all you brew are low-mid gravity beers. If you're getting 60% efficiency brewing a 1.060 OG IPA, you're going to really struggle brewing a 1.128 OG stout. The reason is that efficiency drops for larger grain bills (all else being equal). So you get a drop in efficiency now that you're starting with a 25 lb grain bill for a 5.5 gallon batch. So you add more grain, right? The problem is that the additional grain bill drops your efficiency even more and, at some point, you just can't get there.
 
FOLLOW UP:

The 15 gallon Spike kettle arrived a little over a week ago, and the 5500w heating element arrived yesterday. I took it all for a test drive today with water to test the time it takes to heat up, the boil vigor, and the boil off rate.

IMG_20181110_100005.jpg


The heating element took 61.1 degree well water to 171.6 degrees in 20 minutes, for an average increase of 5.56 degrees per minute.

IMG_20181110_100012.jpg


I then tested some "hypothetical mashes." The Spike kettle was lighter than I thought it would be, so I was curious if it would have large heat loss over an hour mash. With the lid on, the kettle lost 13.8 degrees in one hour. I then brought the temp back up and wrapped the kettle in a sleeping bag, and had a 7.2 degree loss in one hour. In practice I should lose less, as the grains will hold some thermal mass. But it's a good baseline test.

It then took approximately 9 minutes to get from 166.1 degrees to boiling. At 100% on the StillDragon, the water was almost boiling over the sides. At 50% I had a light simmer. I kept it at 70%, which was the lowest point that still gave me a good boil.

MAN DID THIS THING PUT OFF SOME STEAM!!!!

I started with 7 gallons and ended with 5.4 gallons after a one hour boil. That gave me a 1.6 gallon boiloff, or a 22.8% per hour loss rate, although some of that would account for shrinkage. A higher than average loss rate, so I was a little surprised.

After the boil, the heating element was covered in a chalk like film. It cleaned off fairly easily, but I've never seen that from boiling water in pots before. Interesting.

IMG_20181110_145311.jpg


Overall, a 15 gallon kettle is definitely more than I need at the moment, but I'm very happy with the kettle, and very happy with the 240v heating element.

Thanks to everyone for helping me get to this point. I should be doing my first beer batch in this kettle this weekend.
 
After the boil, the heating element was covered in a chalk like film. It cleaned off fairly easily, but I've never seen that from boiling water in pots before. Interesting.
that's normal, I don't completely clean that off after every brew, I don't even take mine out anymore but a couple of times a year I will
 
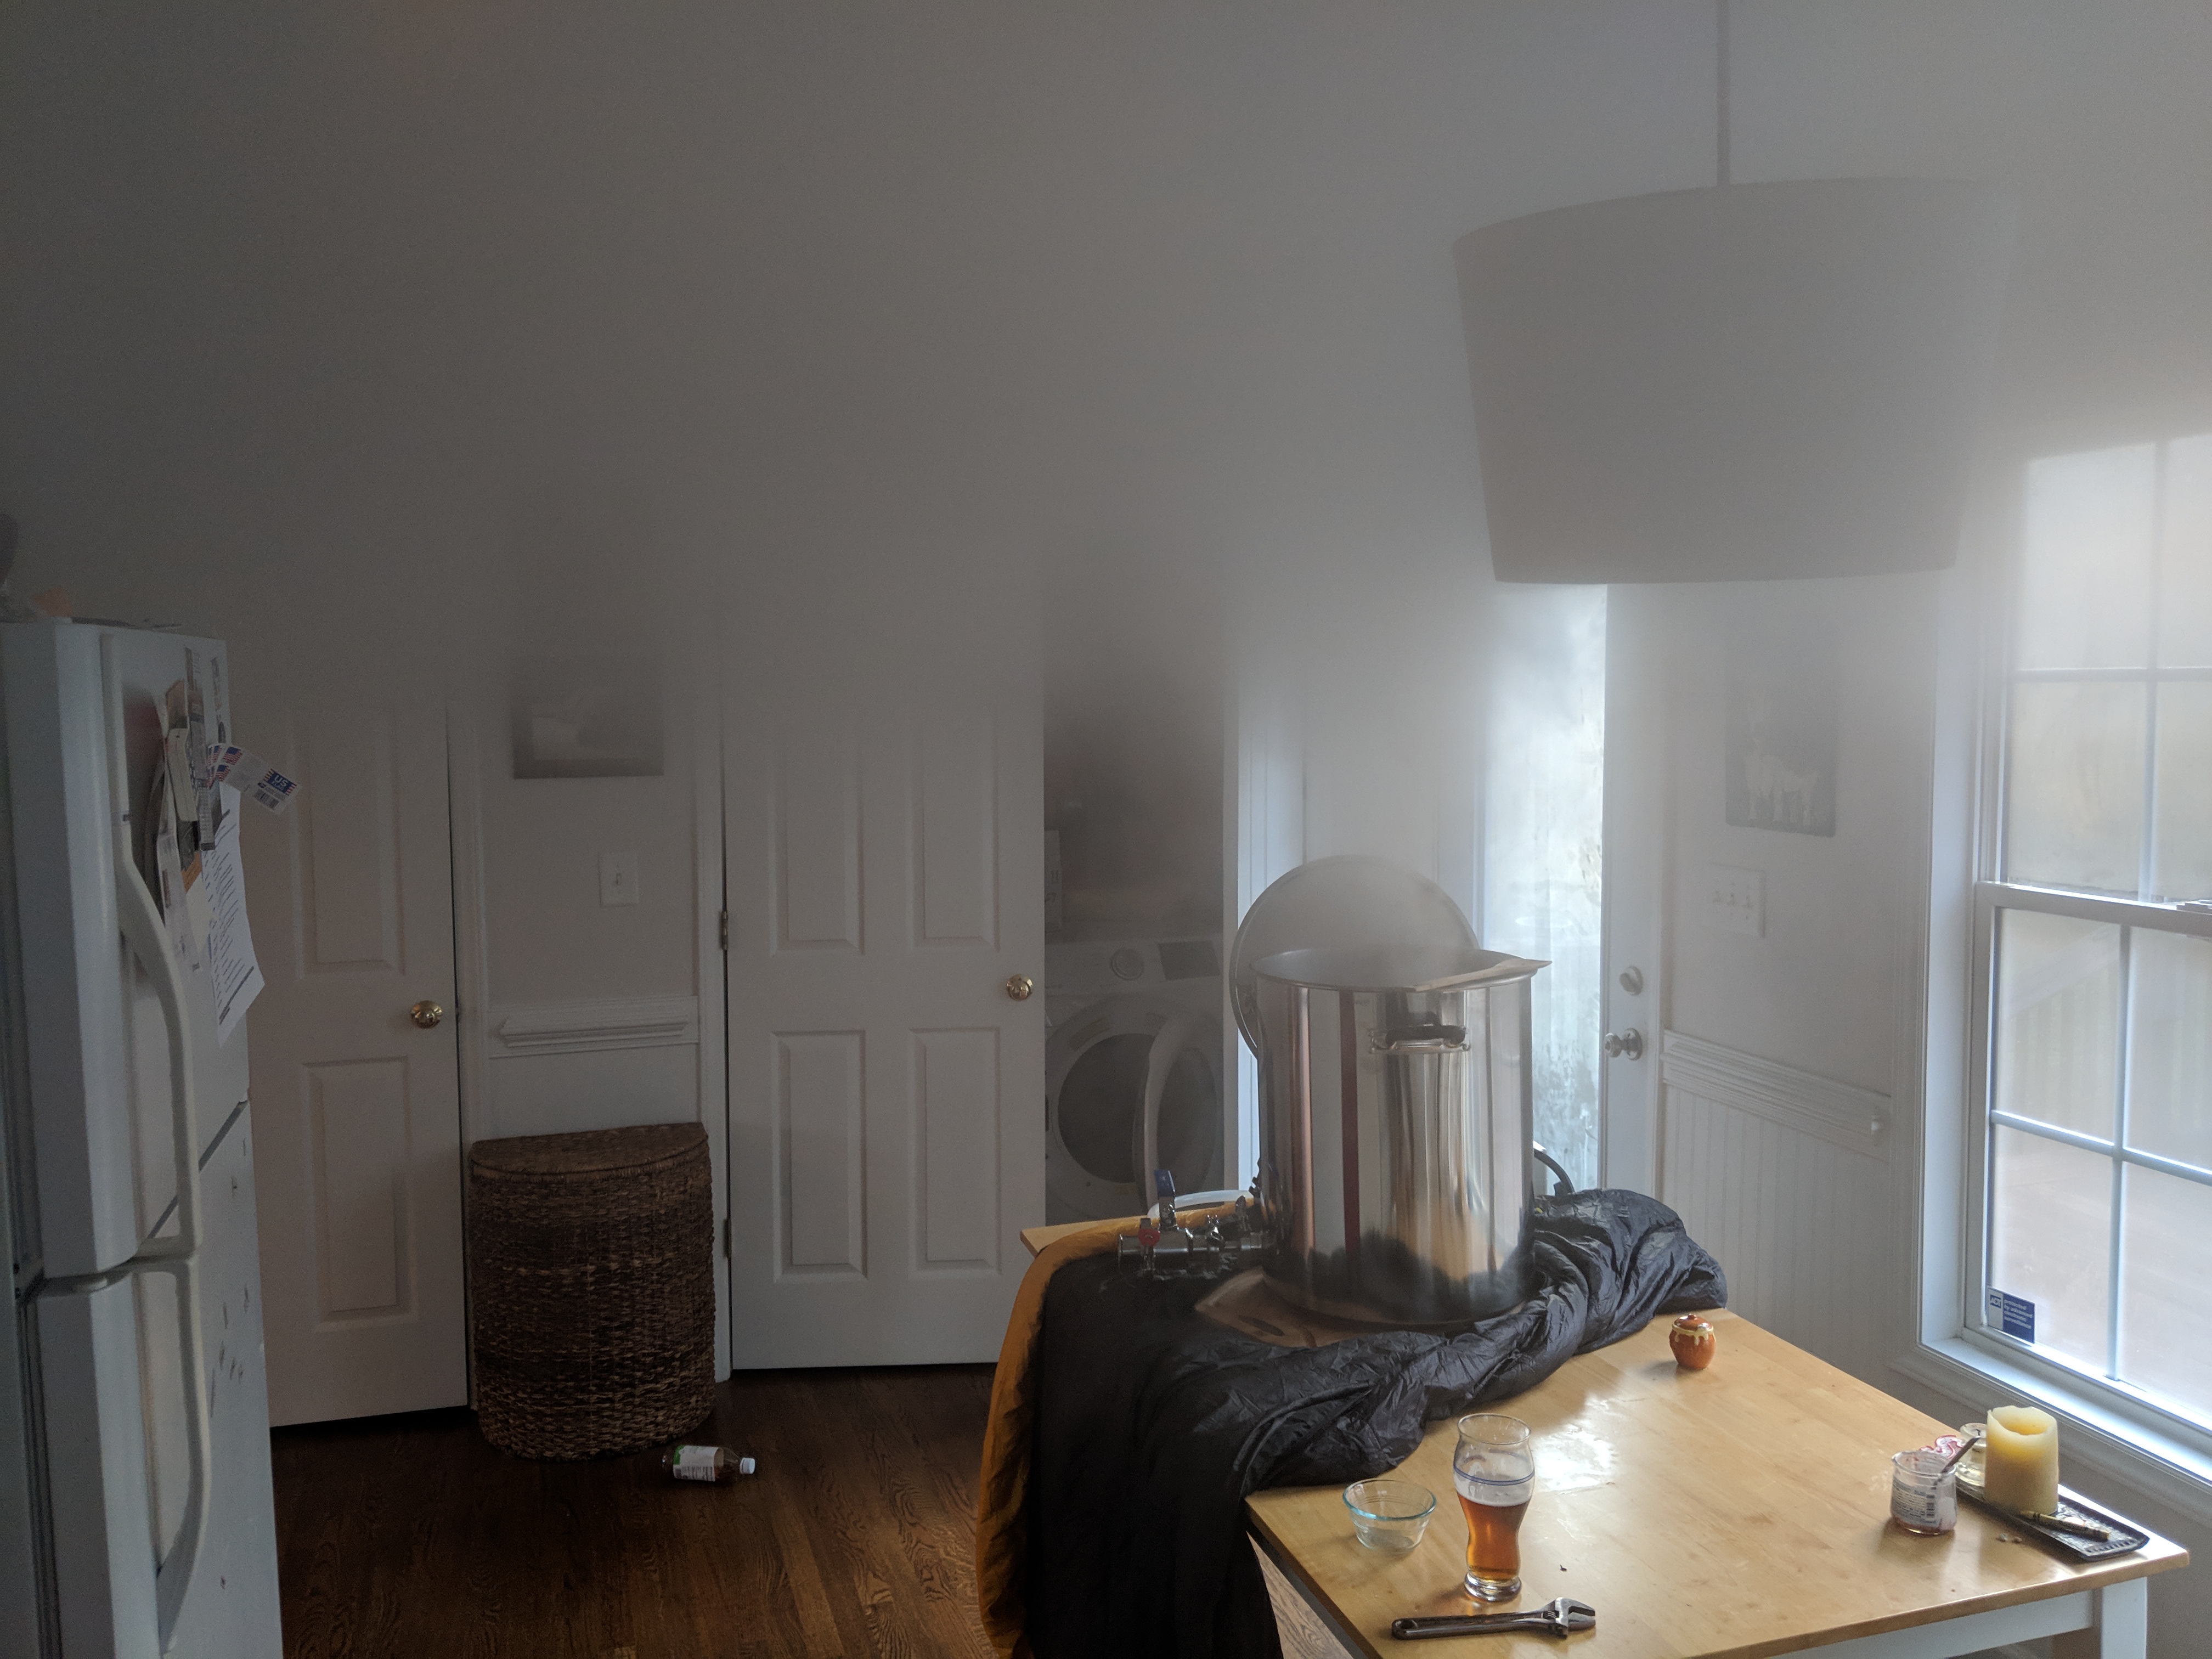
So . . . first brew occurred yesterday and looks like I hit a snag. The beer itself turned out fine, but the kitchen not so much.

IMG_20181111_164842.jpg


In a 90 min boil, at 65% power (the minimum to get a good rolling boil), it threw off so much steam in my kitchen I couldn't see the ceiling. The smoke detectors went off, and it was literally like a sauna. With it being 40 some degrees outside, it wasn't enjoyable to open the doors, but I had no other choice.

Looks like I'm going to have to look into some type of steamslayer type solution.
 
Back
Top