How to add permanent volume markings to a kettle (illustrated)

Homebrew Talk - Beer, Wine, Mead, & Cider Brewing Discussion Forum

Help Support Homebrew Talk - Beer, Wine, Mead, & Cider Brewing Discussion Forum:

This site may earn a commission from merchant affiliate links, including eBay, Amazon, and others.
This is how mine turned out on my aluminum kettle. Even with the oxide layer, I can still see the markings very clearly! I am very pleased with how it turned out.
20140525_002941_zps0afc254f.jpg


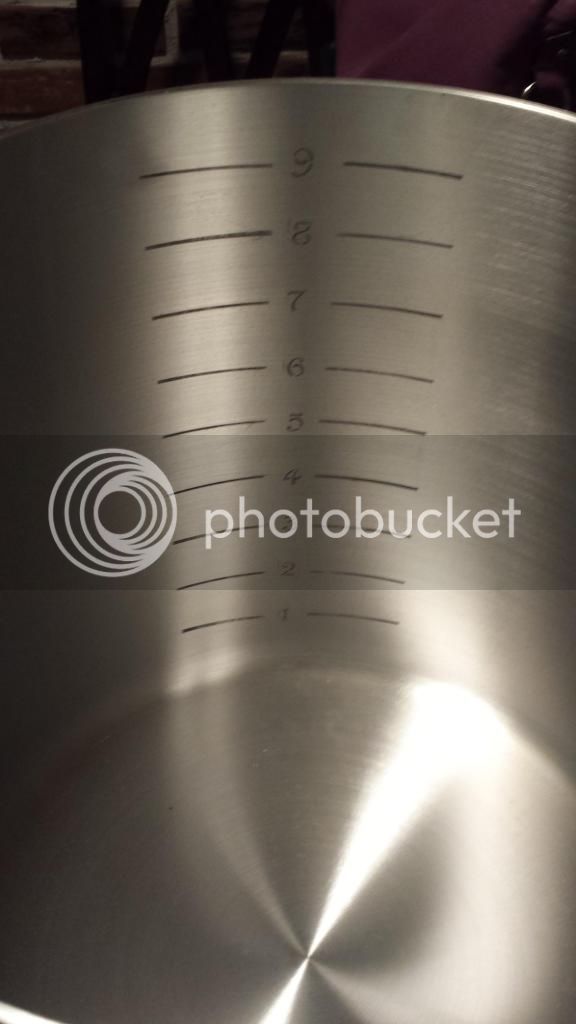
Wow! If you told me that was bought like that, I'd believe it. Great job man!
:rockin:
 
I may have missed it through this entire thread but has anyone used a foam brush instead of a Q-tip type of applicator?


Sent from my iPhone using Home Brew

I don't see why it wouldn't work, as long as the "circuit" is completed. You can search metal etching on google and there will be a lot of information on the subject. Interesting stuff!
 
This is how mine turned out on my aluminum kettle. Even with the oxide layer, I can still see the markings very clearly! I am very pleased with how it turned out.
20140525_002941_zps0afc254f.jpg

That looks great! I'm curious why your etchings came out black when every other pic in this thread is white. Yours looks like electro-marking rather than etching. Did you do anything different than the described process in the OP?
 
That looks great! I'm curious why your etchings came out black when every other pic in this thread is white. Yours looks like electro-marking rather than etching. Did you do anything different than the described process in the OP?

I didn't do much different. My pot is aluminum not stainless steel so that might have an effect. I did have to use a lot more salt than the OP suggested to get it to work and I went over each spot very slowly. It took me forever to finish it, probably like an hour and a half to two hours because I wanted deeper etching. Also, I seemed to get more sizzling action when I moved the positive wire closer to the spot I was working on so I taped the wire right next to each line as I did it. The lighting might have some effect, it looks a little darker in the picture than they actually are but they still aren't white like everyone else's.
 
I didn't do much different. My pot is aluminum not stainless steel so that might have an effect. I did have to use a lot more salt than the OP suggested to get it to work and I went over each spot very slowly. It took me forever to finish it, probably like an hour and a half to two hours because I wanted deeper etching. Also, I seemed to get more sizzling action when I moved the positive wire closer to the spot I was working on so I taped the wire right next to each line as I did it. The lighting might have some effect, it looks a little darker in the picture than they actually are but they still aren't white like everyone else's.

I have an aluminum pot too, and did my etching pretty deep with more salt than recommended as well. My etching doesn't have a color, it looks the same as the surface metal, just deeper. You can feel it, but it doesn't stand out to just look at it.

Your pot looks like it's never even been used yet, doesn't look like there's an oxide layer yet even. Mine has hundreds of batches worth of baked on wort stains.

You are right, my pot had not been used yet. It was brand new at the time. It is now used and even with the oxide layer the markings are still darker. I don't know why it is like that but I like it.
 
Very nice and great idea!! I look forward to some more pics from other folks :D

That was awesome! I recently calibrated my glass carboys and knew that I needed to figure out a better way than measuring my delicate glass thermometer every time I wanted to know how my volume was doing. I'm so glad I didn't try to install a sightglass. Just a couple tips though: It's a good idea to use electrical tape as it seems to seal the best and it's plastic and seems to be impervious to the acid solution. I used a variety of tapes and the electrical tape sealed the edges best. Use a lot of tape, and tape up nearby spill-over areas that the vinegar/salt solution might accidentally taint. Don't get all dainty and resourceful, use good tape and use plenty as your job will look much slicker. Also, prepare to go through a lot of q-tips. A foam brush would be inappropriate as it would hold too much solution and get all over the place, not to mention how gunky and corrosive it would quickly become. Lastly, I needed a little more than two t-spoons of salt with my 1/4-cup of white vinegar. And lastly lastly, I had some cheap-o alligator clips that I got on Amazon that were almost free. I used those to connect to my brew to battery to "etching pen." It was great as it was easy to clip and unclip the put between etching/wiping and easy to change the pen quickly. I highly recommend these little clips as wrapping and unwrapping corroded frayed gunky little wires every 30-seconds is just too tedious and messy. Really, you're gonna spend a few hours with this project, don't get all hemmed up on the clumsy "pen" procedure. Spend the $5. Anyhow... Awesome project for the DIYer. It was really fun. Here's some photos:
DSCN6323.jpg


DSCN6320.jpg


DSCN6308.jpg


Use a lot of q-tips! :mug:
 
Last edited by a moderator:
100%


Also a lot of time and patience!


I found that It did take about four times longer than I thought... But now that it's done I couldn't be happier. It's much easier to hit my post boil numbers when I have the exact volume I need to begin with!


Sent from my iPhone using Home Brew
 
Whats the deal, thread fell to the second page! Been following for a couple weeks and am eager to hear some reviews on how these are holding up after a few brew days on them and ease of reading while brewing? In the process of building my keggle and am still on the fench of a sight glass. Would love to get some reccomendations!
 
Did mine back in March. I've done 2 brews with it and the markings have held up just fine. No problem reading them throughout my mash (BIAB) and boil. It's been real nice being able to spot check my volume with such ease.


Sent from my iPad using Home Brew
 
Marked my bk and have brewed at least 6 times it's held up fine but virtually impossible to see while boiling the wort. It's not until knockout that I can truly gauge the amount based on the markings. Yes my old dipstick wasn't great during the boil either but it could at least gauge roughly the amount. Due to hop sludge and faintness of the markings the readings during the boil are tough. But I will say having them for preboil and post boil are really nice.
 
Did you write the article or is the author taking credit for your ingenuity? I read the whole thing and didn't find any credits anywhere.


Yea I wrote it. At the top it says "By Matt Bates"


Sent from my iPhone using Home Brew
 
I saw that. "itsgus" is all I know about you lol. Nice write-up! Did you get a paper copy to hang in your brew spot?
 
Curious, how have people figured out where the gallon marks should go....obviously one would start buy filling up a gallon container with water then add that to the kettle to be etched, but what is used to mark the sides of a Wet kettle? Tape will not stick....measuring perhaps, say if a gallon of liquid equals every 6" up the side if a particular kettle, not sure. What's the performed method?


Sent from my iPad using Home Brew
 
If I were to do it, and I plan to do it soon, I would probably use a sharpie or grease pencil to mark the water level as I added a half-gallon at a time
 
I put a strip of electrical tape from the bottom of the kettle to the top and cut small notches in the tape with a box cutter after each added gallon


Sent from my iPad using Home Brew


Yeah, I like this one....thanks!


Sent from my iPad using Home Brew
 
Thanks everyone for getting this technique to the cover of BYO magazine.

https://byo.com/stories/issue/item/3113-etch-your-kettle-projects

Thanks Dawson @ BYO for reaching out to me.

I'm so glad this process has worked out so well for so many of you.

Congrats!
Awesome idea and thanks for sharing. I have't done it yet, I have sight glass on HLT and BK and a friend has my Polarware kettle but plan on etching my MT and my Polarware kettle when it comes home.
thanks again,
 
Hi,

New here, but here's what I've just done, etching my new 9-gallon kettle. I managed to measure the gallons and half gallons using a growler and a gallon jar, calibrated with a measuring cup and I used electric tape for the marks.

For the numbers, I had to take the negative of stickers since I wasn't able to find a stencil, hence some askew numbers, hehe.

I used apple cider vinegar because it's what I had here, a 9v battery (but my 8,4v adapter worked too), 4-5 Q-tips and some wire.

Thanks OP for sharing this method! I've seen it in my Brew Your Own last issue, too, but I came here to see if people had done it successfully. I saw the enthousiastic messages from shifu Palmer and I didn't read further, hehe!

;)

20140805_115128.jpg


20140805_122916.jpg
 
It's cheaper and easier than adding a sight glass!

I'll give you cheaper, by a landslide. Easier? not a chance. You still have to manually calibrate your levels if you care about accuracy and in both cases that's the most time consuming part. The sight glass takes about 5 minutes to physically install.

I like the idea of etched or punched marks on a pot and it works great in most situations. However, if you build a tiered system for gravity flow, interior marks on your lifted vessels is useless. The other issue is in boil kettles when it's relatively cold outside. The plume of steam that comes from my boil kettle wouldn't let me see the marks anyway.
 
Hey bobby if you can do it cheaper then I did it I'll take three sight glasses of yours. But i don't think you will match the price I did mine for lol it was free. But if you want I hand some out I'll gladly take some with no argument with the weld in fittings set up, Lol
 
Great thread and thanks to the OP. I did a "test run" on a small, 4 gallon Walmart pot that I had. I figured it was best to try it out on it first before trying on a bigger kettle.

Like others here, I used a wall wart instead of a 9 volt which worked well. Originally I used a 6v charger used for charging a LED flashlight. After the initial ticks though, I switched to an old netbook charger that pushes 19v and really sizzled. It did a good job faster than the 6v.

IMG_20140810_205830.jpg
[/URL][/IMG]

IMG_20140810_210312.jpg
[/URL][/IMG]

I then marked off the Gallon marks and used masking tape to make the appropriate ticks.

IMG_20140810_213144.jpg
[/URL][/IMG]

Eventually, I ended up with Gallon and half Gallon marks and numbers.

IMG_20140811_201503.jpg
[/URL][/IMG]
 
After I was finished with the tick marks, it was time to try a logo. I picked up some sticker paper from Staples and used it to print out and cut out a quick text logo to try.


I cut it out with a utility knife. It took a fair amount of time and isn't something I would want to do often.


Carefully pealing the backing off, I stuck it to the pot to get ready for the etching.


The solution quickly made a mess of the sticker. I didn't have high hopes of what it would look like after I took the sticker off, I figured the solution most likely burned behind the sticker and would be a blurry mess when I took it off. Using these stickers is in no way a re-usable technique. If you wanted to use this to mark your kegs or all your pots, you'd be in for a lot of cutting work making unique templates for each etching.


Pealing it off though and cleaning it up revealed a much better etching than I decided. I think it's because although the solution bubbled and soaked the paper part of the sticker, the glue just became more gunky and stayed in place which I think helped keep the template integrity. Too mad these stickers aren't reusable in any way, it would be great to do this to all my pots and kegs.

 
how long are you guys letting it sit after you etch? Im brewing saturday and want to do this tomorrow
 
Back
Top