• Please visit and share your knowledge at our sister communities:
  • If you have not, please join our official Homebrewing Facebook Group!

    Homebrewing Facebook Group

Yeast Washing Illustrated

Homebrew Talk

Help Support Homebrew Talk:

This site may earn a commission from merchant affiliate links, including eBay, Amazon, and others.
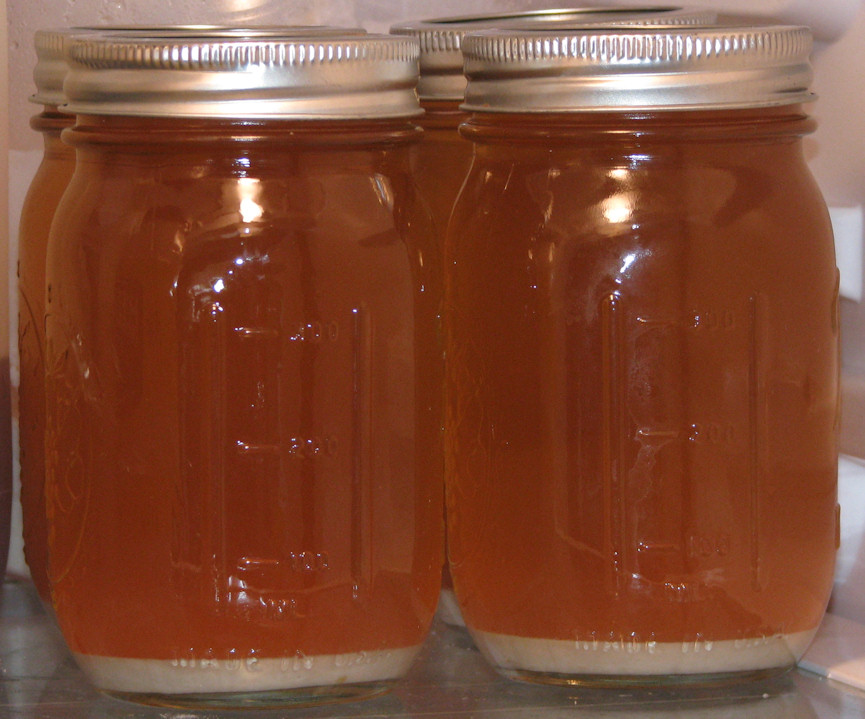
On a side note; I have found in order to get the muck to settle out first and save only the yeasty water, the solution MUST be really thinned out.

Thanks! I was wondering why exactly the OP asked for so much more liquid than could fit back into the mason jars to be added, and I did it that way the first couple washes but I began to not add the large jar and I noticed that I was taking on a bit more dead/non-viable yeast in my wash jars. Gonna stick to adding LOTS of that cooked water! (also, unrelated: I have taken on your rule and made it known around here as well! heh) :ban:
 
heh. errr. This post is 82 pages as of right now? :D

Uhm...that's cool and all but it's actually only page 41 on mine...hence the initial question.


dasfgs.jpg


Yours must be (default) set to 10 posts per page. I prefer to have more posts per page. Makes for easier reading on these massive threads. :ban:
 
Aaaaaaand this is what happens when you don't check the temp of your mini-fridge and don't use glycerin because you aren't actually intending to freeze your yeast.
frozyeast.jpg

frozyeast2.jpg
 
How much water works best to poor onto the trub? The original post had the 4 pints and I'm guessing the big jar is about a 1/2 gallon.
 
Well here's my first attempt. After drinking a few homebrews and bottling I poured around a 6 quarts of water in the fermentation bucket. I think I then poured that into some larger glass containers. I couldn't fit it all in my containers so I probably left about one quart in the bucket. 30 minutes in those then I poured off the top 25% of liquid then collected the rest trying to leave the trub behind. 20 more minutes and then into these jars.

These have been in the fridge for 3 days now. Mr Malty says I need 97ml for my next batch, so if the markings on those containers are accurate I'd need all 4 jars.

Anything I can do to collect more next time, maybe only pour a gallon of water in?

O1vY2.jpg
 
Working on my First cleaning This very minute! Of the Wyeast 1968 that cost me $7.80 for the single pouch.. would be fantastic to not have to buy this again for awhile!! Doing the on the side method of the carboy! Plus i hear a light snow has started in kc! Singing... Its starting to look alot like Christmas!
 
So I think i got my Yeast too clean.. seems to only have about 1/8th inch of stuff maybe at the bottom on the pint jars. I what was left of the half gallon jar i used and added some dextrose to it last night to see if i could get anything going and so far it doesnt seem to be doing anything.... First time washing btw and i didnt seem to have any "CRUD" as others have shown.. Any thoughts? if it didnt work no biggie learning curve right!
 
I followed his directions to the T, and can pitch just ONE jar and have a very vigorous fermentation every time. (if you're pitching into a 10 gallon or something, you would probably need more than one jar.) Btw, the jars are good for about 5 generations.
 
I have 2 questions:

1. If I'm using White Labs California Ale yeast and wash it can I then use the washed yeast for any APA or IPA I brew next or is it recommended to only use it for the same recipe again? For example if I made a pale ale with cascade hops and then wanted to make an IPA with chinook and simcoe, I can still use this yeast for both batches without any off flavors correct?

2. I've read that you can use 5 generations worth of yeast. Does this mean you start with the first yeast strain for a batch of beer. Then it's washed and you now have 4 yeast jars for the 2nd generation batches. With the 2nd generation you can get as many as 16 jars of washed yeast which would last me half a year or more and would then be used for 3rd generation batches. Is this correct?

Thanks
 

It could be the perspective of the photos or it could be a different issue, but it seems like you're using much larger (instead of jelly/jam) jars than the OP and myself. So you're spreading the yeast thinner over each jar. This potentially COULD explain why you are seeing such a thin layer on the bottom of each jar. Just my thoughts.
 
I assume.. you know what that does.. your referring to my post.. i think i used the same final sized jars. plus my color is not quite but almost a pale straw color i can take a pic tomorrow and post up..
It could be the perspective of the photos or it could be a different issue, but it seems like you're using much larger (mason instead of jelly/jam) jars than the OP and myself. So you're spreading the yeast thinner over each jar. This potentially COULD explain why you are seeing such a thin layer on the bottom of each jar. Just my thoughts.
 
I assume.. you know what that does.. your referring to my post.. i think i used the same final sized jars. plus my color is not quite but almost a pale straw color i can take a pic tomorrow and post up..

Wait what? I don't actually understand the first part of your message. "You know what that does.." Know what what does? And I was actually referring to EvilHomer's post, though if you are using mason jars as well, it is very possible that it is what is causing your problem of thin layers of yeast as well.
 
you missed the "I assume" part .. thats what that does.. ass u and me but mostly me in this case..
Anyways. Whats mason jars have anything to do with it? not sure i got that part..? Thanks!
The OP used..
"The only materials that I use besides regular racking equipment is this:
4 pint sized Mason jars w/lids
1 larger container for extra water"


Wait what? I don't actually understand the first part of your message. "You know what that does.." Know what what does? And I was actually referring to EvilHomer's post, though if you are using mason jars as well, it is very possible that it is what is causing your problem of thin layers of yeast as well.
 
you missed the "I assume" part .. thats what that does.. ass u and me but mostly me in this case..
ah. Well I actually was not referring to your post, hence the quoting "evilhomer"
I suppose the confusion arose from the punctuation used. "I assume, you know what that does, that you are. . ." would have been better understood.
But it appears as though the jars the OP is using are "ball" jam jars, not the large mason jars you are referring to/using.
I use ball jam jars, and have between 1 and 1 1/2 inches of viable yeast.
 
Hi all I searched the thread before asking - I use a mesh bag to remove my hops when the wort goes into the fermenter. Assuming much less trub, would you still wash/decant twice? Anything else that would be worth noting of difference? Thanks.
 
I would still wash/decant twice. I also use a mesh bag to remove the hops and hot break material prior to fermentation. However, the trub is more than hops, it also contains dead yeast and other crap. Despite using the mesh bag, I have rushed washing my yeast before and ended up with quite a bit of useless trub in the jars... So the moral of the story is: Take your time, and wash/decant twice and pour slowly like Bernie suggests!
 
I think mine settled too much ended up being about 30 min between times had to get the little kids to bed.. it seems like there isnt much left in there.. I will still try some yeast nutrients and see if i can get a starter going for my next esb anyways.. it cant hurt.. atleast its a learning curve..
I would still wash/decant twice. I also use a mesh bag to remove the hops and hot break material prior to fermentation. However, the trub is more than hops, it also contains dead yeast and other crap. Despite using the mesh bag, I have rushed washing my yeast before and ended up with quite a bit of useless trub in the jars... So the moral of the story is: Take your time, and wash/decant twice and pour slowly like Bernie suggests!
 
Back
Top