Will this cheap 3500 watt induction burner work?

Homebrew Talk - Beer, Wine, Mead, & Cider Brewing Discussion Forum

Help Support Homebrew Talk - Beer, Wine, Mead, & Cider Brewing Discussion Forum:

This site may earn a commission from merchant affiliate links, including eBay, Amazon, and others.
I love the concept of induction heating, but I don't feel the Advantco is the right tool for the brewing application. Induction is a very versatile heat generator. Things could be so much better if a unit was actually engineered for the application.
 
I love the concept of induction heating, but I don't feel the Advantco is the right tool for the brewing application. Induction is a very versatile heat generator. Things could be so much better if a unit was actually engineered for the application.

Just keep in mind, for $180 there simply is NO alternative. I'm looking at buying a 2nd one (don't tell SWMBO).

So what do you envision would make a better brewing induction heater?
 
Just keep in mind, for $180 there simply is NO alternative. I'm looking at buying a 2nd one (don't tell SWMBO).

So what do you envision would make a better brewing induction heater?

More surface area and a control system ! Among other things... more power, variable power levels.
 
I just purchased and used for the first time an induction cook-top for my 5-gal BIAB setup. I purchased the Adcraft ind-c208v from JES restaurant supply.

http://www.jesrestaurantequipment.com/manual-control-induction-cooker-constructed-heavy-duty-stain-p-1052240.html

I purchased this unit because it had a manual control which means that later I can automate using a PID and an SSR to control the power to the unit. The actual heated surface area is the same as the Avantco unit. I did get a little gray residue in the bottom of the kettle but it was easy to clean out. My time to get to mash temps was longer as well as my time to get to boil. The boil was vigorous enough but I didn't boil off as much as I did with propane so I will have to adjust for that. Overall after using it for the first time I am happy with it. It's $30 more or so but it seems very sturdy and as i said I think I can automate with it somewhere down the road.

Oh and you can't beat brewing inside when it is cold and windy outside! :ban:
 
I purchased this unit because it had a manual control which means that later I can automate using a PID and an SSR to control the power to the unit.

... as i said I think I can automate with it somewhere down the road.
Have you tried unplugging and plugging it back in to confirm that it could be manually controlled? The problem with the IC3500 and perhaps all or most induction units is that they reset to low/zero power when power is removed.

[This electrical engineer plans to try to figure out a way to control the power on an IC3500, but no telling how long that will take. :mug:]
 
I'd hold off on spending a bunch of money and time on these things... I'm guessing that some pretty whiz bang induction equipment is going to be released to the market in the near future.
 
Have you tried unplugging and plugging it back in to confirm that it could be manually controlled? The problem with the IC3500 and perhaps all or most induction units is that they reset to low/zero power when power is removed.

[This electrical engineer plans to try to figure out a way to control the power on an IC3500, but no telling how long that will take. :mug:]

I have actually. There is a 2-3 second delay between restoring power to the unit and it turning on the coil/generating heat(also an annoying beep that would have to be dealt with :)). I am assuming that it needs to confirm a pot is on the unit before it will fire the coil. This delay would definitely add some hysteresis when trying to control it. Also when you shut it down correctly, with the control knob, the fan continues to run for a period of time, presumably to cool the unit down. Not sure if it is possible to control the coil via some other means and keep the fan running. It's too new for me to tear it open just yet! I'll get a couple more brews in before I consider looking into modifications. Hard thing for this electronics engineer to do!

Cheers!
 
I'd hold off on spending a bunch of money and time on these things... I'm guessing that some pretty whiz bang induction equipment is going to be released to the market in the near future.
That sounds great, unless it's at a whiz bang price point.
It's too new for me to tear it open just yet! I'll get a couple more brews in before I consider looking into modifications. Hard thing for this electronics engineer to do!
Yeah, I'm right there with you.
 
If you're planning on going PID control, then why bother with the induction setup? The fittings and element for your kettle would cost less.
 
If you're planning on going PID control, then why bother with the induction setup? The fittings and element for your kettle would cost less.
The problem with an element is that you can't directly heat a mash with it. It will scorch any grain that comes in contact with it. So then you need to set up RIMS or HERMS, with their inherent disadvantages.

Directly heating a kettle with induction is a much better option.
 
You can use an element in a mash, you just need to keep the grain off of it and a relatively rapid recirculation. I do it all the time in my eBIAB rig.

If you think that induction is any safer in a mash, you're probably mistaken. The watts/surface area is higher and you still need to keep the grain away from the heating area.

I'm only offering advice based on my own experiences. I started with induction, realized that I'd have far more control with an element in the kettle and a DSPR120.

Don't get me wrong; induction works but trying to convert it to a temp control option isn't really cost effective or viable. Besides that, a kettle element is higher wattage and nearly 100% heat transfer, so much faster temp rises and shorter time-to-boil.
 
You can use an element in a mash, you just need to keep the grain off of it and a relatively rapid recirculation. I do it all the time in my eBIAB rig.
Sure you can. The issue is if you want to do a conventional mash in a mash tun. Most elements are pretty big. If you put one under the false bottom, you end up with a lot of dead space.

If you think that induction is any safer in a mash, you're probably mistaken. The watts/surface area is higher and you still need to keep the grain away from the heating area.

The watts per surface area are whatever the designer of an induction system makes them.

A false bottom works quite nicely for keeping grain away from heat sources. People have been direct heating mash tuns with flame for ages.

I'm only offering advice based on my own experiences. I started with induction, realized that I'd have far more control with an element in the kettle and a DSPR120.
That is great if you want to BIAB.

Don't get me wrong; induction works but trying to convert it to a temp control option isn't really cost effective or viable.
Really ? And you've tried all the methods of doing that on all the induction systems out there ?

Besides that, a kettle element is higher wattage
How many Kw would you like ? 2,3,5,10, 15, 20... ?

and nearly 100% heat transfer, so much faster temp rises and shorter time-to-boil.
Wanna race ?
 
Well, this isn't a penis size measuring contest.

I was referring to using off-the-shelf, *affordable* induction units. Specifically, the IC3500. The heating circle is pretty small. It's also very unforgiving if there's a lack of thermal movement in it's heating area, scorching happens pretty instantly.

The more powerful units are extremely cost-prohibitive.

You can use a RIMS system with an element if you're not BIAB.

An average DIYer cannot design and build an induction setup for brewing. That's the complete opposite of what can be done with resistance heating, PID/DSPR120/SSVR which is downrigth simple, by comparison.

Induction works. You can brew with it. If you're looking for fine temperature control it's not the most cost-effective way to get there.
 
An average DIYer cannot design and build an induction setup for brewing. That's the complete opposite of what can be done with resistance heating, PID/DSPR120/SSVR which is downrigth simple, by comparison.

I consider myself an average DIYer and my plan has been to slowly build up my system to the point of using an induction element.

My system is setup somewhat similar to the BrewEasy, except right now I heat my water with my gas stove and maintain my temps using a pos salton heating element. I made an insulated jacket with 0.5" styrofoam rolls. As of now I lose at most 2f an hour and have to turn on my heating element once.

The next step is to introduce the adcraft cv-208v and in time maybe the hosehead UNO.

I should add that I boil and ferment in the same vessels, so having one induction burner at this point seems a bit more cost effective.
 
If you're planning on going PID control, then why bother with the induction setup? The fittings and element for your kettle would cost less.
A big advantage of induction over an internal element is that there's no element inside the kettle to clean or disinfect. Yes, there are disadvantages, but less crap to deal with is significant.
 
FYI, there is no issue with high heat density in a properly designed induction system.

A 13" coil has an area of 133 in^2. If it delivers 5 Kw, that is a heat density of 38 watts/ in^2, well in the ULHD arena. Plus you can turn it down to 1, 2 or 3 Kw as needed during the mash itself.
 
CBier60 - I used to use induction. I know how it works. Honestly, it takes me about the same time to clean my element as it did to clean the gunk off the bottom of the kettle from where the induction hob was, especially with the all-stainless elements.

brewman - Again, this thread is about the Avantco 3500. It's hob is around 6-6.5 inches in diameter if I remember right.

I'm not bashing induction. I'm merely stating that it has limitations.
 
Happy to say I just completed my water test, and everything seems to be working. I was able to heat 2.5 gal to over 160 F in what seemed like a short amount of time (I forgot to time it).

One hiccup along the way was that I had the electrician add the outlet before I had the burner, because I wanted to make sure it was doable before buying the burner. Though we both checked it, he wound up putting in the wrong outlet. I ordered the correct outlet from Amazon ($10) and installed it myself.

Also new to me is the chugger pump, so I got that all hooked up and working too (thanks to Bobby at brewhardware.com for helping me with that).

All that is left is to add a range hood, and I should be set to brew inside.

Link to photo:
https://drive.google.com/file/d/0B3ZbdM_ui41PR0p5bWZSMXExWE0/view?usp=sharing
 
Last edited:
I'm not bashing induction. I'm merely stating that it has limitations.

Respectfully, you've got it wrong. Induction doesn't have many limitations. The Advanco 3500 is what has the limitations.

I'm subscribed to this thread because the Advanco users are probably the most advanced brewers using induction.
 
Respectfully, you've got it wrong. Induction doesn't have many limitations. The Advanco 3500 is what has the limitations.

I'm subscribed to this thread because the Advanco users are probably the most advanced brewers using induction.

I love the Advanco, yes it has some limitations, but it works fantastically. I do BIAB and I recirculate my mash. Yes, I have the heat going and I monitor it for the whole mash time, but that is fine for me, I did not get into this to plug something in and walk away from it and come back later for beer. It's about the process. With the Advanco, I get to brew indoors, in my basement, and not have to worry about the weather, bugs and bird crap. I can also brew at any time of day for me.

If you wan the convince of electrical brewing, without huge expenses, then this is the way to go.
 
If you wan the convince of electrical brewing, without huge expenses, then this is the way to go.

And it would be even better with a larger coil for lower heat density, more power, 5Kw versus 3.5Kw, and a built in controller so that you can walk away and it stays at the set temperature. If you like controlling it manually, set it up for manual control.

Induction is in its infancy in this hobby.

I agreed, those features would be nice.

But again, at what price do you think this can/should happen?

How about the idea of plugging 5 kW appliances into a wall socket in a home setting?
 
How about the idea of plugging 5 kW appliances into a wall socket in a home setting?

I wired a 20A 120/240VAC receptacle into the back of the pot drawer in our island. I used 12/3 wire and it is protected by a GFCI.

Out of sight, out of mind until I need it. The receptacle cover is spring loaded, so it snaps closed when it isn't in use. I can plug into the receptacle without removing either drawer and the plug doesn't protrude way out into the galley isle. The drawer needs to stay open about an inch to allow the cord to exit.

I have't tested it yet. I plan to brew in the kitchen in the near future.

The bottom picture is the before image... I provided it as a reference of where the drawer was located in the island.

20170205_162748.jpg


20170204_124245.jpg
 
How about the idea of plugging 5 kW appliances into a wall socket in a home setting?
I wired a 20A 120/240VAC receptacle into the back of the pot drawer in our island. I used 12/3 wire and it is protected by a GFCI.
Your 20A/240V drop is fine for the 3.5kW IC3500, but isn't sufficient for 5kW. You really need a 25A minimum drop for that.

BTW, I'll be glad to buy the $250 5kW 13" manual induction top you're "promoting". :)
 
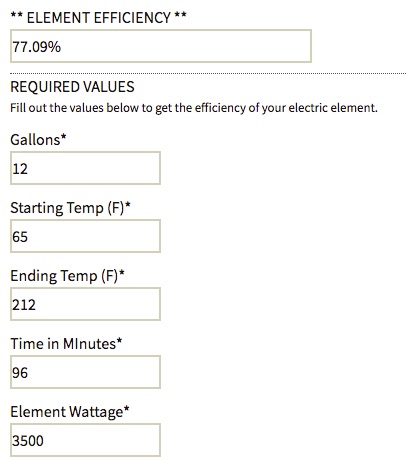
Automatic Control with the Avantco burner... Sure? Anything can be automated with a slight hack (right)?!?!

I have been working on this for a while now (OK, more thinking), and one may say it's still at the "idea" stage... But with two young kids I barely have time to brew!

Anyway, here are my plans that I hope to be testing out soon and I hope it sparks a few more ideas here for Automatic Control.

Goal: Automatic Control of the Mash temperature of course!

1. Add two wire pairs to the underside of the PCB to control the Up/Down switches. Status: Done! See pictures.
2. Add two SSR's to the wire pairs that will activate the up/down switches. The switches had around 5 volts DC on them (if I remember correctly) and when shorted together it will act like the switch was pressed. Status: Need to find the SSR's.
3. Recirculating mash. Status: Done!
4. Write an application that will control the SSR's based on the mash temp and have a cool interface and have control over my entire brew process! Status: STARTED!
5. Tune and Test! Status: Coming soon...
6. Brew!!! Repeat steps 5 and 6 again and again! Status: Coming soon...

I'm using Vb.net to a USB controller with several I/O, one would be able to do this with a raspberry pi and/or arduino just as easy. Tuning the controller is going to be the best part and what I'm looking forward to the most! There are only 10 steps from 500 to 3500 watts. 500 isn't off but in my experience it's close enough. I do plan on using the Watt mode, but will also try out the temp mode when tuning as the burner does have some control already and it may help... I don't remember home many steps there are while in the temp mode?

Concerns I have:
Loud beeping noise? (Would hate to wake up the kids!) First, I will try adding some tape over the speaker, if that isn't enough I will just remove the speaker all together.

Switching too fast or too much? Start with a 10 second delay before making any changes and adjust as needed. But, maybe it doesn't matter at all and one would just switch away... Not sure, but the tighter the control means more accurate temps and it also means more switching... Also Faster the better!

No feedback to tell me the power level or step? May take some more digging into the PCB to find a spot to monitor and tie it back to one of the controller's input.

Again, not complete yet... But I wanted to share what I have so far to help spark other ideas!

Cheers! :mug:

2017-02-22 19.34.20.jpg


2017-02-22 19.34.00.jpg


2017-02-22 19.34.25.jpg
 
Your 20A/240V drop is fine for the 3.5kW IC3500, but isn't sufficient for 5kW. You really need a 25A minimum drop for that.

Most breakers will pass 20-50% more current than their nominal rating for hours.

5,000 watts/240V = 20.83 Amps.
20.83 Amps/ 20A = 4% "overload"

I don't have any heating processes that will require full power (5 Kw) for hours. 12 gallons from 150 to 210F with 5Kw induction takes ~12 minutes, after which much less power is needed to just maintain the boil. It takes roughly 1000 BTU to boil off a pound of water. 8,300 BTU per gallon boiled off. A 5Kw induction system will boil off ~2 gallons per hour at full power.

In reality, 5Kw is the nominal rating of the induction system. How much power it actually draws/supplies depends on the actual input voltage as well as the inductive coupling between the pot and the induction coil. Power factor also plays a role.

My "2500" watt induction system pulls 9.8-9.9 amps at 242 volts AC supplied using my preferred pot and a sub optimal coil. I haven't measured the power consumption of my 5Kw system yet.

Immersion resistance elements have a similar "nominal" rating. What they actually draw depends on input voltage and probably the temperature of the liquid they are heating.
 
2. Add two SSR's to the wire pairs that will activate the up/down switches. The switches had around 5 volts DC on them (if I remember correctly) and when shorted together it will act like the switch was pressed. Status: Need to find the SSR's.

Not all "SSR"s will switch DC loads. Use opto isolotators instead. FOD814A or similar.
 
Most breakers will pass 20-50% more current than their nominal rating for hours.

5,000 watts/240V = 20.83 Amps.
20.83 Amps/ 20A = 4% "overload"

Advocating this is both stupid and dangerous. Deliberately running a circuit above (no matter how slightly) it's rated capacity could burn someone's house down.

Also, not sure where you got the breakers passing more current than their rating for 'hours'. Most breakers used in residential applications are 80% load rated.
 
Advocating this is both stupid and dangerous. Deliberately running a circuit above (no matter how slightly) it's rated capacity could burn someone's house down.

LOL ! Have you run the numbers on that ?

5,000 watts is a nominal load rating. As is the rating on an immersion element. What they actually draw depends on a number of factors. Breakers are not precise devices either. Nevertheless, they protect the rest of the circuit from damage regardless of the load applied. When the breaker, wire and plug are properly sized to each other there is zero chance of anyone's house burning down, regardless of whatever load you may apply.

I think you would be very surprised to see the current draws of various appliances versus what their nominal rating says, especially if there is a motor or high temperature resistance element involved.

Also, not sure where you got the breakers passing more current than their rating for 'hours'. Most breakers used in residential applications are 80% load rated.

Huh ?

http://static.schneider-electric.us...100-400 A Frame FA-LA/FA-FC-FH/0600DB0105.pdf

Here is a discussion of the 80% load rating rule. Notice that "continuous" loads are those that operate for 3 hours or more.
http://www.electrical-contractor.net/forums/ubbthreads.php/topics/128677/80_breaker_rating.html
 
I stand by my original statement. Advocating that someone utilize a circuit beyond it's rating is stupid, dangerous, against code, and is a hazard. I'm not interested in 'running the numbers', I'm going by what's safe/best practice.

If the circuit is 100% perfect with tight/non-oxidized connections, there probably won't be a problem until the breaker gets hot and trips. In reality, there could be loose and/or oxidized connections which will cause resistance and in turn, create heat.

There's the liability angle, too. Burn your own house down doing something like this and the insurance company figures it out? Hello, denied claim. Likewise if you burn down someone *else's* house/building, that responsibility is yours.

I was going by this document for the 80%:

http://blog.schneider-electric.com/...g-confusion-80-vs-100-rated-circuit-breakers/

In short: You want to take risky shortcuts and risk your own neck? Go right ahead as long as you aren't hurting anyone else. Don't give others your 'advice' and say "LOL, don't worry!"

That sort of irresponsible nonsense can get people hurt or worse.

Also: That wiring you're showing in your picture would fail inspection around here. You have 'soft' in-wall wiring in an exposed area, prone to damage from any items in those drawers.
 
Also: That wiring you're showing in your picture would fail inspection around here. You have 'soft' in-wall wiring in an exposed area, prone to damage from any items in those drawers.
Spring loaded cover. The back in that cabinet is 1/2" plywood.

You got all the answers, don't ya ?
 
Not talking about the outlet. I'm talking about the exposed romex wiring to the right of it.
 
I'm shocked that an inspector didn't have a problem with that!

It won't "definitely" fail or be an issue, but if you're recommending electrical wiring to people on a random brewing website, i.e. dealing with NOOBS, water, and electricity, don't recommend something that is against code and potentially dangerous.

For anyone looking to wire, don't simply use romex, in exposed areas, you would want conduit around the proper wiring (not romex) to protect it from potential damage.

Now...let all hug it our and calm down.
 
Hi I'm looking to buy an induction cooker as well. Here in New Zealand they are hard to find, can only find one for >$500. I did find this one on Aliexpress, has some decent reviews, what do you guys think?
 
Hi I'm looking to buy an induction cooker as well. Here in New Zealand they are hard to find, can only find one for >$500. I did find this one on Aliexpress, has some decent reviews, what do you guys think?

Amazing how they sell it for $58 while shipping it to the US is $59. :D

Looks like a fair and decent unit.

I wouldn't be surprised if the internals are very similar to those of the IC3500, which is also China made. The coil looks similarly built.

From what I can see the unit seems to have a (black) molded plastic base with a stainless/glass top cover. At 5 kg it's much heavier than the IC3500. The exhaust fan seems to be in the bottom, right next to the air intake, which may or may not be good, depending on clearance. The IC3500 blows off quite a bit of hot air through the back port.

Although some buttons are self-explanatory It's everyone's guess what the chinese symbols mean on the control panel. The description hints to cooking presets, like boiling water, stir fry, etc. The IC3500 is much plainer, simpler in that regard.

After less than 2 years of regular, but not daily use, the fan on my IC3500 wasn't coming up to speed anymore unless I rapped the sides. So I opened it up and removed the fan. It has a sleeve "bearing" as found in cheap computer fans. I sprayed some teflon lubricant in it, like I've routinely used on fans of that type. That has kept it running much smoother since. It's an 18V DC fan, haven't found a suitable replacement yet.

Surprised the IC3500 hasn't appeared on Ali Express.
 
Anyone have a broken IC3500 sitting around? I think I fried my control board this past weekend by touching a switch to chassis ground! :( PM me if you do!

Lucky I could finish brewing outside! :mug:
 
Is anyone using a tri-ply/tri-clad bottom kettle with their Avantco IC3500??

With a single layer of reflectix on my Bayou Classic 1044 (non tri-clad):

Starting with 8 gallons at 58*

94* at 16 minutes
160* at 46 minutes
212* at 72 minutes

I'd like to see how that compares to something with a tri-clad bottom.
 
Back
Top