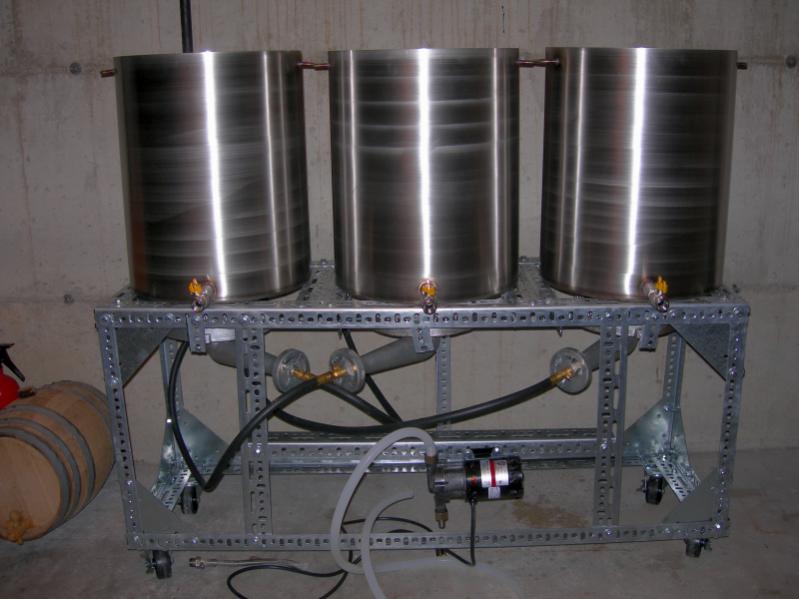
Sam listed 1 pack. I can tell you from experience you need two. I don't remember the pricing.
You are using an out of date browser. It may not display this or other websites correctly.
You should upgrade or use an alternative browser.
You should upgrade or use an alternative browser.
Weldless brew stand.
- Thread starter Bender
- Start date

Help Support Homebrew Talk:
This site may earn a commission from merchant affiliate
links, including eBay, Amazon, and others.
Question for you guys on the hardware packs. It says I must buy packs of 50 at $6.45 per pack. Does that mean there are 50 bolts in a pack for $6.45 or does that mean I have to buy 50 packs at $6.45. I am thinking it means the former since I can just put a pack in my cart at $6.45. However, I just wanted clarification since the current price seems cheaper than the $12.89 shown on the Wallace inventory sheet and that doesn't seem right to me.
Also, Would you recommend buying 2 packs of this hardware?
Thanks for the help!
That's about what I paid a few months ago... each pk of 50 comes with 50 bolts, nuts, and washers. I bought 2 packages... and actually had to go to Menards and get some additional because of a few extra things I added to my frame. 2 packages MINIMUM.
Ciliorozo
Well-Known Member
Excellent. Thanks guys! I can't brew right now because we are in the process of moving and the house must stay in show condition, so I am putting a RIMS rig together so that I can jump right into brewing in our next residence. SWMBO is giving me a dedicated brewing space and has approved this project! And since I do not have the skill or tools needed to weld a stand, I am using this erector set type idea!
Thanks again!
Thanks again!
Yeah I bought 2 packs initially and ended up ordering a 3rd. I put in a few extra braces and such and needed that 3rd pack.
Ciliorozo
Well-Known Member
Ok I am sold! A third pack will be mine!
BrewerRick
Active Member
Question for you guys on the hardware packs. It says I must buy packs of 50 at $6.45 per pack. Does that mean there are 50 bolts in a pack for $6.45 or does that mean I have to buy 50 packs at $6.45. I am thinking it means the former since I can just put a pack in my cart at $6.45. However, I just wanted clarification since the current price seems cheaper than the $12.89 shown on the Wallace inventory sheet and that doesn't seem right to me.
Also, Would you recommend buying 2 packs of this hardware?
Thanks for the help!
Yes buy at least two packs...There are 50 bolts, 50 washers, and 50 nuts. I would almost recommending buy a third for any extra brasing, mounts, etc. I ran out of washers, because I was doubling up on them (one on each side).

$22.00 ($623.23 / Ounce)
AMZLMPKNTW Ball Lock Sample Faucet 30cm Reinforced Silicone Hose Secondary Fermentation Homebrew Kegging joyful
无为中南商贸有限公司

$719.00
$799.00
EdgeStar KC2000TWIN Full Size Dual Tap Kegerator & Draft Beer Dispenser - Black
Amazon.com

$159.99 ($26.66 / Count)
3M High Flow Series System BREW120-MS, 5616001, For Brewed Coffee and Hot Tea, Valve-in-Head Design
SpaceCityProviders

$10.99 ($31.16 / Ounce)
Hornindal Kveik Yeast for Homebrewing - Mead, Cider, Wine, Beer - 10g Packet - Saccharomyces Cerevisiae - Sold by Shadowhive.com
Shadowhive

$479.00
$559.00
EdgeStar KC1000SS Craft Brew Kegerator for 1/6 Barrel and Cornelius Kegs
Amazon.com

$44.99
$49.95
Craft A Brew - Mead Making Kit – Reusable Make Your Own Mead Kit – Yields 1 Gallon of Mead
Craft a Brew

$176.97
1pc Commercial Keg Manifold 2" Tri Clamp,Ball Lock Tapping Head,Pressure Gauge/Adjustable PRV for Kegging,Fermentation Control
hanhanbaihuoxiaoshoudian

$28.98
Five Star - 6022b_ - Star San - 32 Ounce - High Foaming Sanitizer
Great Fermentations of Indiana

$53.24
1pc Hose Barb/MFL 1.5" Tri Clamp to Ball Lock Post Liquid Gas Homebrew Kegging Fermentation Parts Brewer Hardware SUS304(Liquid Hose Barb)
yunchengshiyanhuqucuichendianzishangwuyouxiangongsi

$20.94
$29.99
The Brew Your Own Big Book of Clone Recipes: Featuring 300 Homebrew Recipes from Your Favorite Breweries
Amazon.com

$33.99 ($17.00 / Count)
$41.99 ($21.00 / Count)
2 Pack 1 Gallon Large Fermentation Jars with 3 Airlocks and 2 SCREW Lids(100% Airtight Heavy Duty Lid w Silicone) - Wide Mouth Glass Jars w Scale Mark - Pickle Jars for Sauerkraut, Sourdough Starter
Qianfenie Direct

$53.24
1pc Hose Barb/MFL 1.5" Tri Clamp to Ball Lock Post Liquid Gas Homebrew Kegging Fermentation Parts Brewer Hardware SUS304(Gas MFL)
Guangshui Weilu You Trading Co., Ltd

$76.92 ($2,179.04 / Ounce)
Brewing accessories 1.5" Tri Clamp to Ball Lock Post Liquid Gas Homebrew Kegging Fermentation Parts Brewer Hardware SUS304 Brewing accessories(Gas Hose Barb)
chuhanhandianzishangwu

$7.79 ($7.79 / Count)
Craft A Brew - LalBrew Voss™ - Kveik Ale Yeast - For Craft Lagers - Ingredients for Home Brewing - Beer Making Supplies - (1 Pack)
Craft a Brew

$58.16
HUIZHUGS Brewing Equipment Keg Ball Lock Faucet 30cm Reinforced Silicone Hose Secondary Fermentation Homebrew Kegging Brewing Equipment
xiangshuizhenzhanglingfengshop
J-Malone
Well-Known Member
Just to prove I am not making it up that I am building one of these:
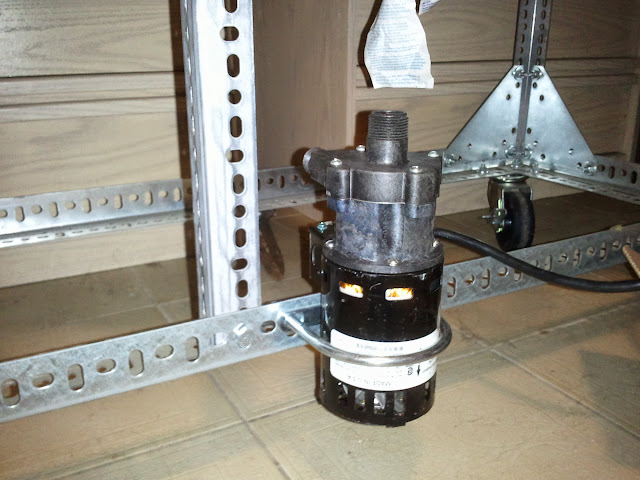
Just based on the research I have done, you are going to want to reposition that pump. I am fairly certain you will have priming issues if you orient it that way. Standard orientation is inlet down or straight out...if you leave it like that I am certain that you will get air in the line and lose prime. Just a tip
Supposedly the beauty of the top inlet pump is ease of priming. The liquid will flow straight down into the pump head, and any air bubbles should be fairly unrestricted in flowing upwards and out of the way. I have since repositioned the head on the pump so that the outlet is pointing to the left instead of back into the stand.
Supposedly the beauty of the top inlet pump is ease of priming. The liquid will flow straight down into the pump head, and any air bubbles should be fairly unrestricted in flowing upwards and out of the way. I have since repositioned the head on the pump so that the outlet is pointing to the left instead of back into the stand.
I think it will work just fine the way you have it now. IMO, it doesn't make any difference how you position the pump so long as you have a way to purge the pump head such as with a bleeder valve or simply detaching a hose on the outlet side. I think Walter of March Pumps said that the pump head should not be positioned at the bottom when mounting the pumps vertically. IIRC, the reason for this was the potential for air to become trapped in the impeller magnet pocket and this would deprive the impeller shaft of lubrication. I think there was something about excessive wear on the thrust bearings too, but I'm not sure about that. I have my Little Giant mounted vertically with the pump head down and have had no problems at all. I think there is a difference in the thrust bearings though which might have something to do with that. LG told me that the pump could be mounted in any position so I went with that. This position puts the pump head at the lowest level possible and both ports are nearly in the same horizontal plane. Plumbed properly, a pump should be very easy to prime. Mine is.
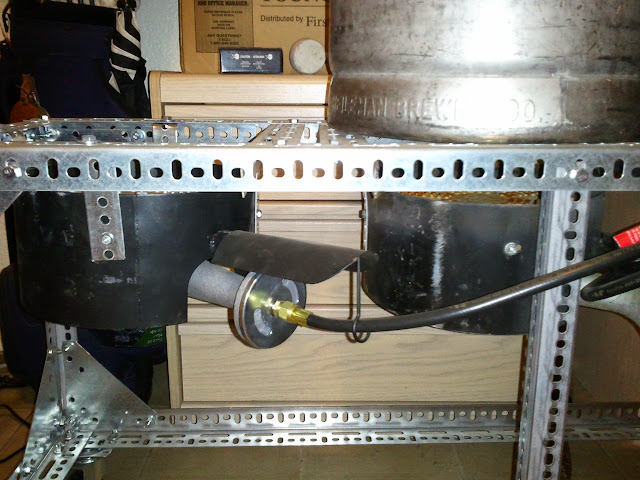
I put the fittings on my pump tonight. I'm a little concerned about the proximity of the inlet tube to the burner and the chance of melting the tubing, but I can probably bolt on a metal plate as a heat shield.
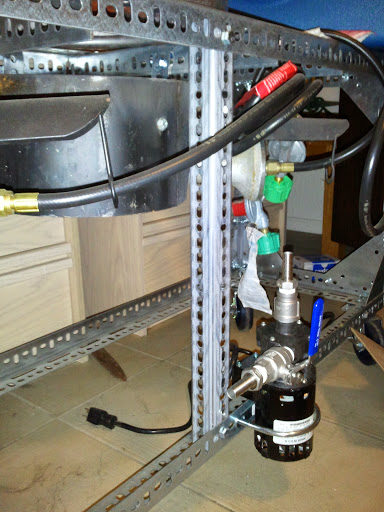

Decided to make a thread for my build as a whole rather than flood this post with pics:
https://www.homebrewtalk.com/f51/my-brew-stand-fermentation-chamber-build-234387/
https://www.homebrewtalk.com/f51/my-brew-stand-fermentation-chamber-build-234387/
sam
Well-Known Member
Sam listed 1 pack. I can tell you from experience you need two. I don't remember the pricing.
Whoops, yes... sorry. The quantity I listed was wrong. The price I listed was for 2 packs. It cost me $12.90 for 2 packs and I think I used just about every single bolt so buying a third pack is probably a good idea.
-Sam
Mike_A
Well-Known Member
Figured I'd post this up here as a "thanks" to Sam for being the inspiration for my brew stand as well! I scaled Wallace up a little bit to accommodate my 25gal kettles, hope you don't mind.
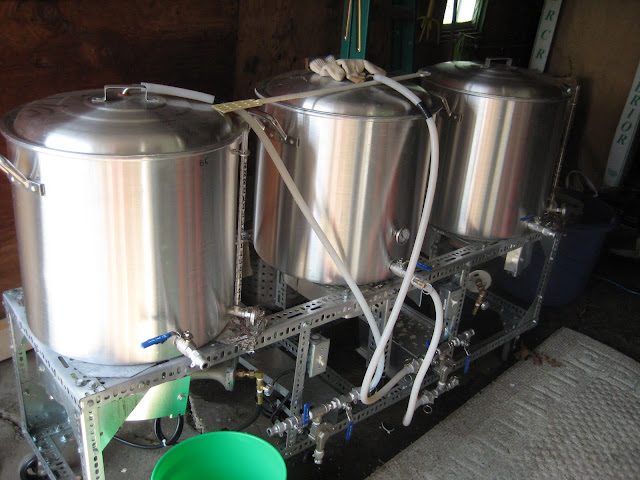
For reference, I used a ton of bolts, nuts, washers and lock washers since I noticed the bolt heads are barely wider than the holes/slots on the steel. I probably went through the equivalent of 4 or 5 packs.

For reference, I used a ton of bolts, nuts, washers and lock washers since I noticed the bolt heads are barely wider than the holes/slots on the steel. I probably went through the equivalent of 4 or 5 packs.
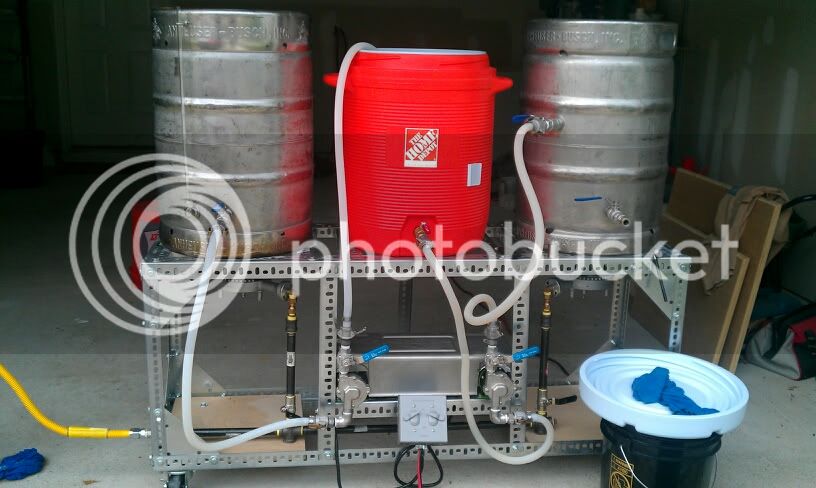
Thought I''d post a shot of my rig I just completed (still waiting for a few more quick disconnects and silicon tubing). Basically, a "Brutus 10" leveraging Sam's "Wallace" idea of using slotted angle. I was going to build a welded square tube design but liked the flexibility that the slotted angle offered (wanted the option to adjust things if needed).


Strongbad52
Well-Known Member
While not as blingy as all the diamond plate, i finally got the propane hard plumbed
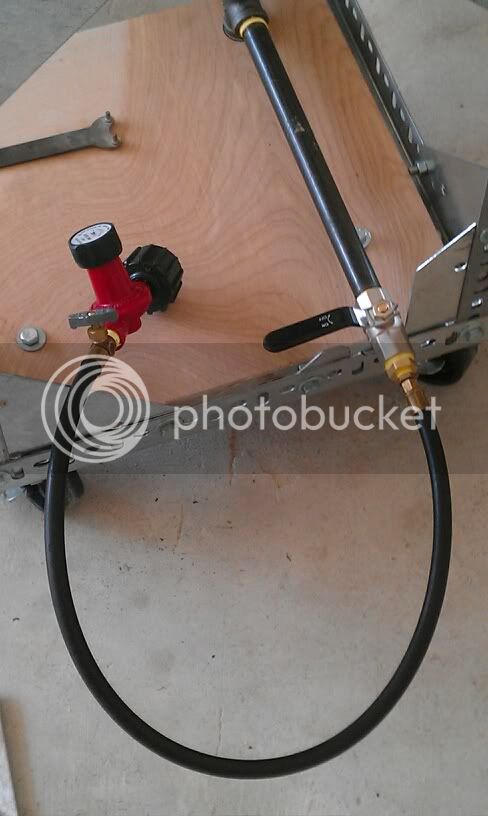
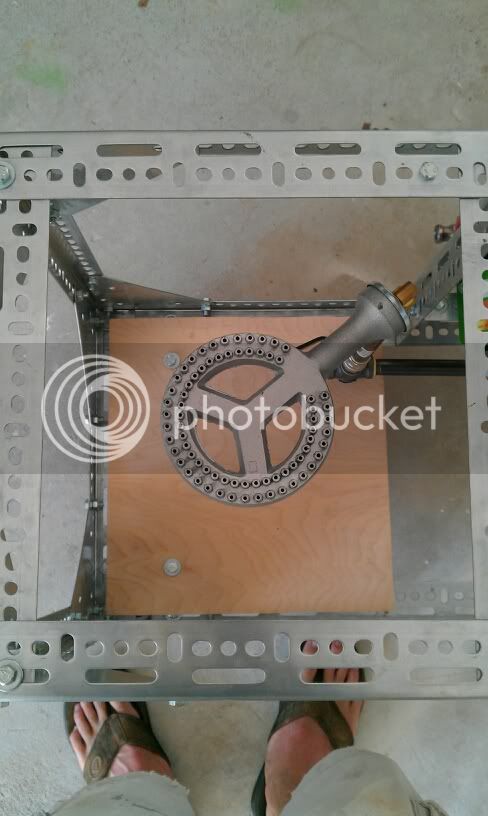
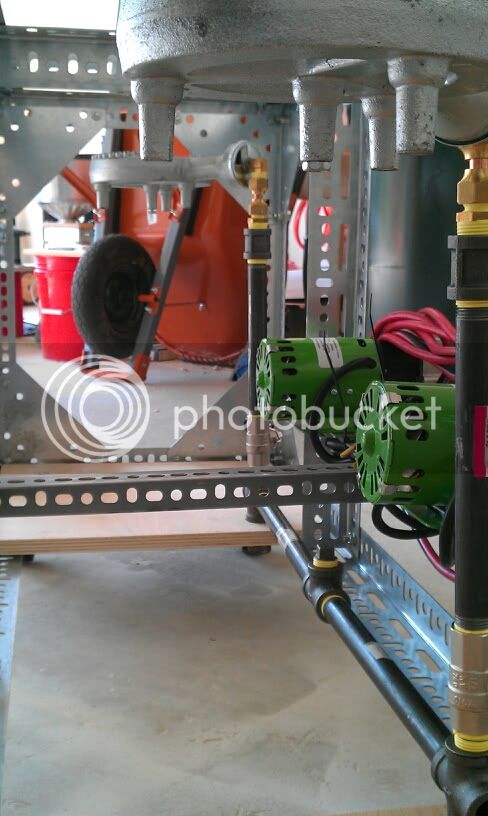


sam
Well-Known Member
Wow! I'm loving all the pictures. Anyone have some pictures of their stand in action?
Here's one from last August... A true "no-pants" brewer (OSHA would not approve), my 4-year-old helping me dough-in.

Here's one from last August... A true "no-pants" brewer (OSHA would not approve), my 4-year-old helping me dough-in.

Biscostew
Well-Known Member
Lots of nice rigs in this thread. I have a question in regards to direct fire mashing and temperature control. I have been looking into threads on thermocouplers, would this be the approach to monitor the temp leaving the ball valve at the bottom and returning throught the top of the mash tun? Two different thermomcouplers hooked up to a digital thermometer of some sort? I can't tell if these are used for non automated systems like mine or the more traditional Brutus 10 automated type stand. Any info would be greatly appreciated on how you regulate mash temps with this set up.
Strongbad52
Well-Known Member
1 new gasline and 2 homedepot trips later finally got a leak free propane test. Going to do the zinc coating burn off later today and then do a 10 gallon break-in batch of Hopsecutioner.
Thought I''d post a shot of my rig I just completed (still waiting for a few more quick disconnects and silicon tubing). Basically, a "Brutus 10" leveraging Sam's "Wallace" idea of using slotted angle. I was going to build a welded square tube design but liked the flexibility that the slotted angle offered (wanted the option to adjust things if needed).


love the set up. I decieded to do a brutus 10 welded rig but still looking over this thread and might change my mind again.
Can you give some detail on your temp control? I don't see the gas line control, are you turning on and off the burners?
I pretty much have duplicated the typical Brutus 10 (outside of slotted angle iron). I have two Asco valves that are controlled via thermal probes from each of my Runco controllers.
Nice. What's the regulator looking device you are using for the pilots?
agezzi
Well-Known Member
V-Twin said:I use standing pilots and my burners are connected to Asco valves for the HLT and Mash tun.
Did you use compression fittings or flared fittings for the pilots. I'm about to this point in my build.
I used brass compression fittings and aluminum tubing (vs. copper). I just drilled small holes on each side of a brass plug for each pilot. I have needle valves for each pilot so I can adjust the flame. Initially I was worried about how I was going to build the pilots as I couldn't find much info in the forums. Turned out to be pretty easy.
Found my next project, subscribed.
Strongbad52
Well-Known Member
Excellent build!
That's pretty similar to mine (in construction materials, anyway):
http://www.lancedrolet.com/?p=7
But I didn't want to shell out for the pumps, so mine is a 3 tier...
Thanks man, I especially appreciate the detailed measurements.
Similar threads
- Replies
- 1
- Views
- 1K
- Replies
- 12
- Views
- 2K
- Replies
- 73
- Views
- 8K


![Craft A Brew - Safale BE-256 Yeast - Fermentis - Belgian Ale Dry Yeast - For Belgian & Strong Ales - Ingredients for Home Brewing - Beer Making Supplies - [3 Pack]](https://m.media-amazon.com/images/I/51bcKEwQmWL._SL500_.jpg)


