• Please visit and share your knowledge at our sister communities:
  • If you have not, please join our official Homebrewing Facebook Group!

    Homebrewing Facebook Group

Unboxing the Nano from CO Brewing

Homebrew Talk

Help Support Homebrew Talk:

This site may earn a commission from merchant affiliate links, including eBay, Amazon, and others.
I'm not sure why you think that whirlpooling under the kettle results in dirty wort but I can assure you that is not the result. I don't think you're understanding what is actually happening.

Are people confusing whirlpooling post chill to cone up break material and hops with "whirlpooling" during re-circulation of the mash? Indeed - two completely different processes with two completely different expected results.

I would say there are three different kinds of whirlpooling...
1. inside the mash basket (as per original co-brewing)
2. Inside kettle, after boil to pile up hops and break material.
3. inside the kettle, under the basket during mashing.

And my look at it is that number 1 is a design flaw - That is because of that whirlpooling alot of dirt from the malt ends up around the element and inside the kettle.. which is one of the reasons it does scorch easily.
Number 3 is a fix for a too high watt density heating element and the problem with junk from mash that ends up around the element (that number 1 is causing).

So what i'm really saying is that it seems the system was not tested enough before they started selling it. Another element and another mash recirculation device would have solved the big bugs before they started selling it. I'm also quite certain that my 600 micron-bottom basket will give even better result to preventing stuck mashes.
 
No, that was not what im saying.. if you re-read my last post i say that whirlpooling the grains inside the basket gives dirty wort.
The whirlpooling under the basket i understand move the wort to prevent scorching.. but my thought is that it shouldnt even be needed if the right element was beeing used from the beginning.

Who is whirlpooling inside the basket? You'd need an extremely thin mash for that.
 
Who is whirlpooling inside the basket? You'd need an extremely thin mash for that.

Call it what you want - i call the original recirculation design for "mash whirlpooling", since that is what co-brewing did show on their original demo video. With thicker mashes i understand it doesn't form a whirlpool, but i'm still calling it that.. And even if it spins or not - it seems to give very dirty wort (probably because of tunneling at thicker mashes).

The whole point of what i'm saying is that the original unmodified Co-brewing setup is flawed at two points..
1. Element is too high watt density
2. Recirculation should have been something more in style of the SS Brewtech, Ultimate sparge arm or similar.

If both these points was solved, you wouldn't need to whirlpool under the basket while mashing, because you wouldn't have alot of junk sitting around the elemen - and the element would be ultra low watt density.

And i'm saying this, because i have same system design, but ULWD element and proper recirculation device(= very very clean wort).
I have only gotten dirty wort once after mashing - and that was in a major stuck mash where i had to stir during the whole mashing. Still not even close to scorching.

I think we all want to get to the same point - and i'm just telling you what my conclusion is after using this system for a while.
 
I think it may have been the case that after switching to the Ss manifold, my wort was more clear. I've only used it once so I can't be sure about my memory, but will pay attention to that next time.
 
it seems to give very dirty wort (probably because of tunneling at thicker mashes).

Single vessel brewing produces cloudier wort as a general rule. Doesn't matter if we brew in a bag or a basket, we don't set the grain bed and lauter like one would in a traditional 3V rig, and the result is that more fines escape into the wort. IMHO, it's only an aesthetic thing. The beer will clear in time.

I also believe that scorching is due to defective elements. Maybe your definition of scorching is different from mine. Scorching comes from hot spots in defective elements that super heat the wort and carmelize sugars onto the element. Scorching looks like black tar on the element and you almost need a chisel to remove it. Baked on wort that you have to use a bit of elbow grease to remove is not scorching. A 5000 w ripple element will not scorch wort if your PID is properly tuned and you don't boil at 100% output.
There are some things that I would change in the CBS rigs, but i would not describe any issues that I have with them as design flaws. Maybe single vessel brewing isn't for everybody. I certainly love the heck out of my setup.

You are probably right about the scorching - i have never had that trouble with my setup. Also, i can agree that there is probably better calling it issues rather than flaws. But still i think this should have been checked better before starting to sell the setups.
But i don't agree that single vessel systems give cloudy wort. Because i have very clear wort every time - except when i have gotten a stuck mash and have to stir all the time. This is also my reason for trying different baskets - to get rid of the risk of a stuck mash, and still have clear wort and high efficiency.

Of course it is alot easier with 3-V rigs, because in the mash-tun you have the pump helping to suck the wort through the grain-bed, while on single vessel systems we have to rely on gravity - which is also why it is more easy to get a stuck or slow mash with single vessel system.
When we have better flow through the malt basket, there less risk of exposuring the heating element since it does not drain the kettle all way down as fast (if not doing a full batch).
 
Call it what you want - i call the original recirculation design for "mash whirlpooling", since that is what co-brewing did show on their original demo video. With thicker mashes i understand it doesn't form a whirlpool, but i'm still calling it that.. And even if it spins or not - it seems to give very dirty wort (probably because of tunneling at thicker mashes).

The whole point of what i'm saying is that the original unmodified Co-brewing setup is flawed at two points..
1. Element is too high watt density
2. Recirculation should have been something more in style of the SS Brewtech, Ultimate sparge arm or similar.

If both these points was solved, you wouldn't need to whirlpool under the basket while mashing, because you wouldn't have alot of junk sitting around the elemen - and the element would be ultra low watt density.

And i'm saying this, because i have same system design, but ULWD element and proper recirculation device(= very very clean wort).
I have only gotten dirty wort once after mashing - and that was in a major stuck mash where i had to stir during the whole mashing. Still not even close to scorching.

I think we all want to get to the same point - and i'm just telling you what my conclusion is after using this system for a while.

I do not disagree with this. I dont know if I would call it a flaw so much as it could be improved. The system should absolutely come with a ULWD element. and in fact maybe two of smaller wattage but that is more complicated to run and runs the cost up. I do think this has made a big difference (the addition oif a ULWD element). To be certain the ONLY time I have had any scorch etc is with wheats and beers that contains flaked grains to some extent. The manifold is better Im convinced and yes it should come with something similar to that instead of the tube which definitely does NOT have the umpf to "cyclone" a mash bed of any size. It mostly just blows a hole to the bottom. I definitely do not have cloudy wort anymore. The key to getting clear wort for me was to not raise the malt pipe too fast. Take your time allow it to drain very slowly. ESPECIALLY as it come out of the wort. While its mashing the wort is crstal clear about mid way through. It get cloudy of I raise the malt pipe too fast. Did I get clearer wort with my 3 vessel system? yes in general Id say I did but the wort I am getting now is in no way excessive cloudy at all and the system is making amazing beer. If I had a piece of advice to new guys reading this for using this system its, slow down. if your goal is to make beer as fast as you can you can do it fast with this system. if your goal is to make the best beer you can. Slow down a bit. Ive also said before you have to find what works best for you, and honestly that's kind of cool to me. I think Im really dialing mine in now.
 
I brewed a blond ale yesterday and raised the basket very slowly. It seemed that when the basket finally broke the surface, a puddle of cloudy wort flooded out. That doesn't worry me so much. The beer will clear. I agree that an ULWD element would be an improvement. I run one now and and am more than happy with it, but like it has been said, multiple lower watt elements will drive the cost of the system up and I think CBS was very conscious about putting out a system at an affordable price point. I'm fine with the rig as delivered. If I could make a change, I would spec a narrower diameter kettle to reduce the dead space below the basket, but any kettle that I have seen with a narrower diameter is spendy. Concord kettles are really a pretty good value.
 
The fix for heating element is not very complicated.. instead of using "off-the-shelf" units, CBS could custom order elements which are three phase (or possibility of splitting like 3x1800W so one can choose to turn on/off each of the heating tubes of the element).
The elements look like this - https://sc01.alicdn.com/kf/HTB1tiG2...-Phase-380v-Electric-Heater-Element-Water.jpg
Today i have one which is 1" NPS, and with 3x 8mm diameter 400mm long heating rods... the bad thing is that it is hard to clean, because there is no space between the rods... so i have now ordered one which is directly 2" tri clover (no NPS to Tri clover adaptor/housing needed). That one will have 10mm rods, 400mm length of the rods, and alot of space in between - so it will be really easy to clean also.
This is the look of the elements which is directly tri-clover - https://www.aliexpress.com/item/3-0...2801929022.html?spm=2114.40010408.3.25.abIGxL

The problem with many finished elemets is that they are shorter than i would like - so that is why i have custom ordered 400mm length instead.

By the way - my new kettle is 400mm diameter and 550mm height - this is to make the dead space volume smaller. legs of my new filter basket is 67mm - so with the rubber feet approx 72mm height. This means about 2.5Gallon below the basket.
 
For those on the fence reading this thread wondering if any of us would buy again, I'm probably going to pick up the dual 25 gallon (1bbl) unit by year's end.

Can hopefully work on some modifications with Tim.
 
Id buy again yes, this forum for me is not a gripe section etc. its a place to share ideas about how to improve the system. the system by itself is fully functional. A few tweaks simply make it better IMHO. If CBS were smart they would be aware of this post and take some notes. LOL
 
My 2 cents and I love mine. Only modification I have done was to swap out sight glass for whirlpool valve. I also added big casters to the frame which are great. I run the system the way Tim demos in the video. Maybe I got lucky with my element but no issues with scorching. Only time I have had issues it is usually dialing in the right flow vs. the amount/type of grain.

That being said, if I was more handy I might do more modifications. I spend most of my modification time on the recipe side, recently I did a margarita sour and a 10 gallon NWIPA that I split into two batches half traditional yeast the other half with Brett. Amazing how different they taste!
 
I would absolutely buy this system again if I had to do it over. My modification would be to have an element with integral TC fitting which can be unplugged at the kettle. I have one now and it makes cleanup a whole lot easier. Bought it from Brewhardware. Other than that, I have no real issues. Single vessel electric brewing beats the snot out of 3V brewing on propane hands down.
 
Brewed again today and things went very smoothly. I think I am zeroing in on what works for me. Mash efficiency was 78.6% and I did not have to babysit the mash and poke at it. While it is possible to get better efficiency, I'm happy with anything in the 70s as long as it is consistent and easy!

This batch used 11.3 lbs of grain, double-milled on my shop's mill which they say is gapped to .045". I added 1/2 lb of rice hulls to the mash. I did not enter the rice hulls into BeerSmith, so it did not calculate any water absorption for them. I did this because I'd rather come up a bit short on the post-mash volume and do a mini-sparge than end up with more volume than I wanted.

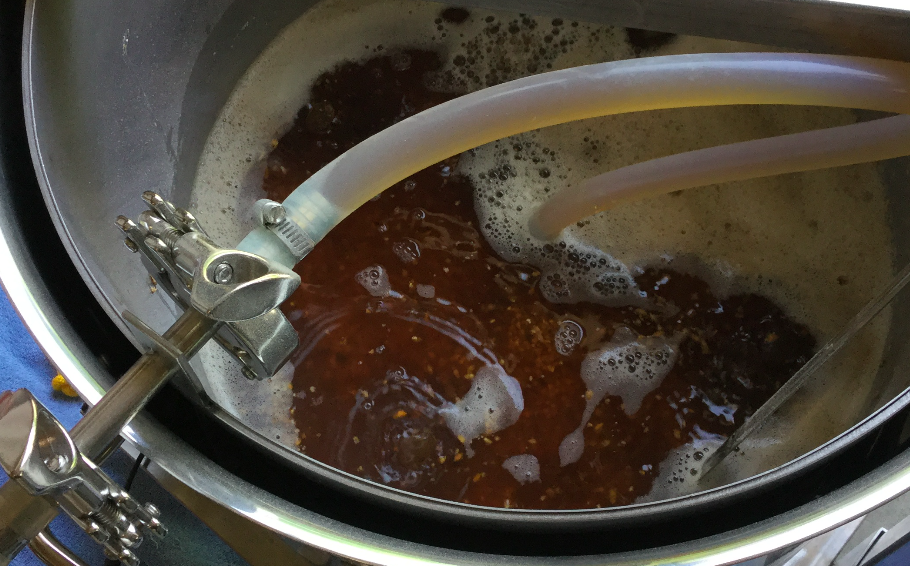
I used the Ss manifold, and placed it on top of the grain. I had to start the pump slow, but after 15-20 minutes the grain bed had settled more and I was able to turn it up to about 2/3 speed. I only stirred the grain bed once, at about the 5 minute mark--otherwise, it was hands off other than fiddling with the pump speed. You really have to be patient... You can't just max out the pump from the beginning, at least with my grain:water ratio.

I have no way of knowing for sure if there was any channeling going on, but the wort became very clear, which made me think there was good flow and self-filtering going on. It almost looked like a couple inches of tea with the grain bed underneath it. This isn't a great picture but you get the idea.

lCPjhM4.png


I came up about .3 gallons short after the mash, and poured that amount through the grain bed after lifting the basket. (I mash the grain with a pot lid to help squeeze out the wort.)

I hit my desired volume into the fermenter of 5.75 gallons. Mash efficiency was 78.6%, brewhouse efficiency 77%. This was my easiest brew so far, too, because I committed to letting the manifold and pump do all the work.

Takeaways:

- Double-mill or crush fine--double-milling @ .045" made big difference for me.
- Put the manifold on top of the grain and run the pump as fast as you can without overdoing it.
- Rice hulls? I say yes. I'm going to standardize on 8 oz for a typical batch.
- Don't stir the grain, trust the pump and manifold.

These are my BeerSmith settings for the 20 gallon system with the solid-sided basket.

Brewhouse Efficiency: 75%

BIAB Grain Absorb: 0.4960 fl oz/oz (default is .586, find this in Preferences/Advanced)

Equipment profile:

Batch Size: 5.75 gal
Mash Volume: 15.00 gal
Boil Volume: 7.74 gal
Mash Tun Weight: 25 lbs
Evaporation Rate: 17.2 % (1.33 gal/hr when boiling ~7 gallons at 55% power)
Mash Tun Specific Heat: 0.12 cal/g-deg C (doesn't really matter as I dough-in under PID manual control)
Boil Time: 60
Mash Tun Deadspace: 0.01 gal (may as well be zero I guess!)
Top-up for Boiler: 0.00 gal
Equip Hop Utilization: 100.00 %
Losses to Trub/Chiller: 0.40 gal (increase this if you want more leftover wort safety margin)
Cooling Loss (%): 4.00
Top up water for Fermenter: 0.00 gal

Hope this helps someone! :mug:
 
Last edited:
For my 6th batch on this system I made an Imperial Stout using the stock 20gal Nano Home (gave up on the Brew Bag and the mash manifold was supposed to arrive on brew day but was delayed; excited to try that out next time). By milling at 0.045" and running the pump as slow as possible during the mash I finally did not have a stuck recirculation/burning element. I didn't have to stir the mash the entire time but I did have to watch it like a hawk and help it out about every 10 minutes or the liquid level would've gotten too low. Also my efficiency was only in the high 50s. I'm really hoping this manifold helps increase efficiency and allows me to not constantly babysit the mash.
 
I figured more filtration would be better but you're probably right in that the mash basket is unnecessary with the bag. If I can find something to prop the grain-filled bag up off of the heating element (any suggestions?) I'll likely try that next time.

What you want is a false bottom that sits above the heating element but also has very wide mesh. I was going to explore this with Utah Biodiesel but I never got around to pulling the trigger. You definitely want to use something like that with a brew bag (and nothing else).
 
What you want is a false bottom that sits above the heating element but also has very wide mesh. I was going to explore this with Utah Biodiesel but I never got around to pulling the trigger. You definitely want to use something like that with a brew bag (and nothing else).

could you buy some stainless expanded metal and bend it curved shape to fit over the element? Not sure you need a false bottom so much as a shroud
 
I received my 20gal kettle and everything looks great, except the recirculation tube is not what is shown in the pics online. It is very short and would never make it down into the mash for a 5 gallon batch. Thoughts?
 
I received my 20gal kettle and everything looks great, except the recirculation tube is not what is shown in the pics online. It is very short and would never make it down into the mash for a 5 gallon batch. Thoughts?

None of the tubes I've seen with the 20 gallon will make it to the mash of a 5 gallon batch. You need to run a piece of tubing down to it.
 
I got mine months ago and it was the same way. You can do a 5 gal batch in the 20 but you need to modify the return. The first thing I did was jam some silicone tubing on the return to lengthen it. If you wrap some copper wire around it you can aim the tube fairly well. However several of us are happier using this instead of the recirc tube:

https://www.ssbrewtech.com/products/re-circulation-manifold-for-infussion-mash-tuns
 
I'm getting ready to order a system from CBS. I haven't gone through every post of this thread, but is there anything I should have them change at the factory? Anything I should change when I get it? Think I might get a ssb manifold.
 
I'm getting ready to order a system from CBS. I haven't gone through every post of this thread, but is there anything I should have them change at the factory? Anything I should change when I get it? Think I might get a ssb manifold.


Get the whirlpool valve! My 2 cents
 
Good choice. If I had it to do over I'd go dual. I have limited time and lots of friends who like my beer. It'd be nice to do two batches or 20 gallons finished at once
 
Good choice. If I had it to do over I'd go dual. I have limited time and lots of friends who like my beer. It'd be nice to do two batches or 20 gallons finished at once

I'm going to get another with the dual 25's around Christmas time. I never make anything less than 10 gallons so I'd even go dual 30's if he had them.
 
I've actually been thinking about getting the dual, but swapping out one of the 25's for a 20gal. That way I can easily do 5gal batches for new recipes.
 
Back
Top