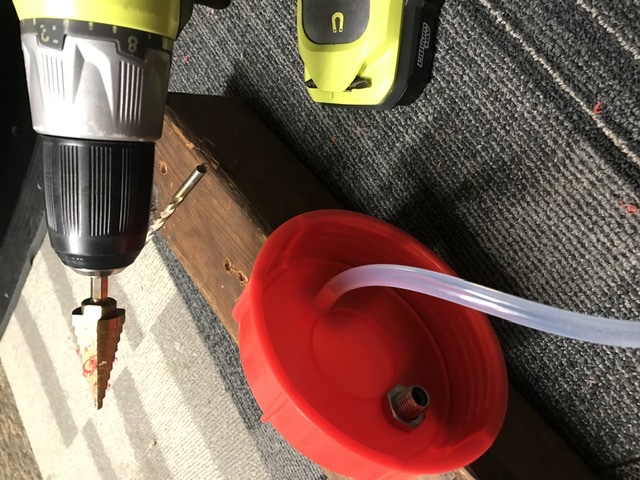
Turning your Fermonster into a complete closed transfer system for cheap!

Homebrew Talk - Beer, Wine, Mead, & Cider Brewing Discussion Forum

Help Support Homebrew Talk - Beer, Wine, Mead, & Cider Brewing Discussion Forum:

This site may earn a commission from merchant affiliate links, including eBay, Amazon, and others.
Yes the floating dip tube is harvestable. The oring isn’t the best by any means and can fall out of not properly installed. I actually put the oring in the freezer for about 10 mins before I insert it. That way it’s stiffer and can be pushed into the lid easier and tighter.

I modified the lid specifically to brew NEIPAS. if you haven’t had a way to close transfer or coldcrash without o2 pick up previously, than you Are going to see night and day improvements in your ipas

Thanks for the quick response! Now if only I can complete the order without the wife seeing what I'm doing we'll be in business!

Does line size matter at all? I wouldn't think so as long as it fits on the QD barbs, right? Also, just to make sure, I need 2 each of the Gas and Liquid QDs for this to function. Correct?

Thanks again, Cheers!
 
These are all pretty cool ideas for sure. I have the modified lid the way @Dgallo describes here. My thinking is that with any sort of TC fitting, T fitting, etc, if you can't configure some sort of dry hopper to add to it and you still need to unscrew the fermonster lid in order to dry hop, I don't think that setup would be any better from a minimizing oxygen point of view. Certainly curious to see what other setups peeps come up with though.


True, but my past experiences with mine were the lids can be a bit of a b!tch to unscrew, even if you lightly tighten them. The TC fitting seems easier as it would be just a matter of undoing the clamp and removing the cap (or gas post), pitch the hops, then reclamp.

Of course, I'm not suggesting to buy a Fermonster and a bunch of TC fittings to fab up a dry hopper and all that. You might as well just splurge for a few more dollars and get a SS Brew Bucket or Flex (or maybe even the Fermzilla). If you already have those parts because they are used in other parts of your brewery, then yeah have at it and give it a whirl.
 
I’ve found the lids really hard to open after ferm starts as well. Going to throw one of these into my cart on my next order:

https://www.morebeer.com/products/f...V3tJmZoQtKx5q1p0nyxe0jnjwV0snq5xoCFiAQAvD_BwE
Yup I think these are necessary. Have one myself and makes for a nice uniform torque on the lid. However I just noticed that morebeer states these should not be used to tighten, only loosen, because the oring makes the seal. Hmm. I always give a tiny screw with this tool once it’s hand tight when sealing it up.
 
Funny because I barely even hand-tighten mine before ferm (just enough to seal) and it’s always like I cranked it on as hard as possible after ferm.
Yeah I don’t even come close to cranking on it after hand tight. It’s usually not much of anything really. But when I go to dry hop after fermentation is over it’s like I cemented the darn thing shut lol
 
Is there any reason I couldn't use my speidel to do this? I could screw the solid cap on the top and drill my holes for the QD right in the shoulder of the fermentor...? What are the issues I could run into doing this? Other than drilling holes into a $60 fermentor, that is..
 
Is there any reason I couldn't use my speidel to do this? I could screw the solid cap on the top and drill my holes for the QD right in the shoulder of the fermentor...? What are the issues I could run into doing this? Other than drilling holes into a $60 fermentor, that is..
As long as the cap has enough real estate it should be absolutely fine.
 

The cap is pretty limited. I was wondering about mounting the QDs onto the shoulder of the fermentor itself. The more I think about it though the more I think it is a silly idea so I will likely just stick to the Fermonster as I had planned. Thanks again for answering my questions and posting this 'How-to' in the first place. I haven't been this excited about something in quite a while! (I live a pretty boring life lol) Cheers!
 
The cap is pretty limited. I was wondering about mounting the QDs onto the shoulder of the fermentor itself. The more I think about it though the more I think it is a silly idea so I will likely just stick to the Fermonster as I had planned. Thanks again for answering my questions and posting this 'How-to' in the first place. I haven't been this excited about something in quite a while! (I live a pretty boring life lol) Cheers!
The only problem I see is that by mounting on the shoulder, you loose about 1.5" of headspace. Most of the Speidel's look like they have room on the lid though.
 
Well..since I can’t delete the post figured I’d explain WTH I was requesting an underside pic.

I tend to “order” extra parts, mostly o-rings and such. I have a couple extra plastic keg land carbonation caps, which are used in the “molded”version of the fermzilla pressure kit and could not figure why the hell there was talk of drilling +1/2” holes. And I have an extra bulkhead gas post that I at one point considered installing in my anvil kettle lid.

Combined with thinking that the stainless kit used a identical post (just stainless) or bulkhead post and...yeah. Mass confusion ensued, had a HB and I’ve figured it out....I think. But it ain’t pretty...
9EA9B583-2068-417F-8E2C-3F79328E0529.jpeg
 
Well..since I can’t delete the post figured I’d explain WTH I was requesting an underside pic.

I tend to “order” extra parts, mostly o-rings and such. I have a couple extra plastic keg land carbonation caps, which are used in the “molded”version of the fermzilla pressure kit and could not figure why the hell there was talk of drilling +1/2” holes. And I have an extra bulkhead gas post that I at one point considered installing in my anvil kettle lid.

Combined with thinking that the stainless kit used a identical post (just stainless) or bulkhead post and...yeah. Mass confusion ensued, had a HB and I’ve figured it out....I think. But it ain’t pretty...
View attachment 694963
As long as it holds pressure and can be easily clean, that’s all that matters.
 
My question is what pressure is required to push out 5 gallons of Star san? it seems to me that the weight of the star san would be a lot in the beginning of the process and fermentation gases don't produce the pressure needed. Am I missing something? I mean sometimes if I put the blow-off tubing too far into a gallon jug the co2 struggles to make bubbles. :oops:
 
My question is what pressure is required to push out 5 gallons of Star san? it seems to me that the weight of the star san would be a lot in the beginning of the process and fermentation gases don't produce the pressure needed. Am I missing something? I mean sometimes if I put the blow-off tubing too far into a gallon jug the co2 struggles to make bubbles. :oops:

I haven't flushed a keg with fermentation CO2 yet but I imagine an active fermentation will have plenty of PSI to push it as long as the tubing isn't way too long. I've had yeast blow the lid off of a bucket I would otherwise need a 'lid wrench' to pry off. Granted, I mostly brew Saisons in the ~1.065 range and fermentation is ROLLIN'...hope this is some sort of help. Can't wait to get this thing set up!
 
Am I missing something? I mean sometimes if I put the blow-off tubing too far into a gallon jug the co2 struggles to make bubbles. :oops:
I would imagine your having leaks somewhere if that’s happening, Because fermentation create a lot of pressure. Think about it, if you over prime bottles, you can blow the glass and they’re Rated to 40+ Psi.

that being said, 5 psi or less is all it takes to move liquid out of the keg
 
Last edited:
Thanks for the responses. I'm definitely interested. I have one fermonster and a couple of the floating diptubes, so all I need are the solid lid and the posts. I'll go back to the first post and see what kind of posts I need. :mug:
 
Is there a way to safely pressure test this setup at home? On one of the youtube video they guy said he tested with 20 psi and was pretty good...

And, actually, I am interested in the 3 gallons version, which if I read well the reviews is made of a bit thinner plastic :(. I would love to use a fermonster to force carbonate around 14 psi or put a spunding valve on it. If it can really hold 20 psi safely, it would be amazing... Cheap 2L pet bottles can hold over 100 psi, so it does not sound impossible though.
 
What kind of post do I need to buy? I have a fermzilla, but those posts don't have anything to connect them to the fermonster lid once the holes are drilled. Thanks
 
Is there a way to safely pressure test this setup at home? On one of the youtube video they guy said he tested with 20 psi and was pretty good...

And, actually, I am interested in the 3 gallons version, which if I read well the reviews is made of a bit thinner plastic :(. I would love to use a fermonster to force carbonate around 14 psi or put a spunding valve on it. If it can really hold 20 psi safely, it would be amazing... Cheap 2L pet bottles can hold over 100 psi, so it does not sound impossible though.

So I have gone as high as 15 - 18 during transferring, which is different than holding it for 5-7 days in order to carb it. Since it is not actually rated to be pressurized, for holding pressure i’d error on the side of caution personally—mainly for safety and also to not deal with the rathe of my wife if that thing exploded on isle 10 lol
 
Last edited:
What kind of post do I need to buy? I have a fermzilla, but those posts don't have anything to connect them to the fermonster lid once the holes are drilled. Thanks
I bought the fermentassaurus pressure kit for this which is ~$25-30 from morebeer. The posts come with an o-ring and a nut to secure to the fermonster lid.
 
I fermented with my one gallon at 15psi. It held the pressure fine, but it did warp the bottom of the fermenter. Don’t plan to do it again and will also only keep my 3 gallon under low pressure for cold crashes and closed transfers. It does help that I now have a fermzilla all rounder and a repurposed keg both equipped to do pressure ferments so I don't feel the need to do so with the fermonsters.
 
That will work but you will need a female threaded barb to attach to the underside in order to attach the floating dip tube To it.
 
I fermented with my one gallon at 15psi. It held the pressure fine, but it did warp the bottom of the fermenter. Don’t plan to do it again and will also only keep my 3 gallon under low pressure for cold crashes and closed transfers. It does help that I now have a fermzilla all rounder and a repurposed keg both equipped to do pressure ferments so I don't feel the need to do so with the fermonsters.
Thanks, useful info! So I will keep it only under a few psi, for easy cold crashing and to kickoff the transfer.
 
1) 7 Gallon Fermonster with spigots (makes hydro samples easy)

Like many others have already said, thank you for putting this into a thread! Most of my questions have been answered at this point and I've even developed a few ideas after seeing things I never thought of - nice!

One question, though: what is the best way to grab a hydro sample using the spigot? It seems like this would clog with trub rather easily.
 
I grab samples all the time from the spigot, for my beers the trub isn't anywhere near high enough to be an issue... Your results may vary depending on style (I don't brew many dry hopped beers).
 
Like many others have already said, thank you for putting this into a thread! Most of my questions have been answered at this point and I've even developed a few ideas after seeing things I never thought of - nice!

One question, though: what is the best way to grab a hydro sample using the spigot? It seems like this would clog with trub rather easily.
There are two ways I’ve done it. I’ll prop up the Front of the fermenter at dryhoping so when the hops settle the spigot is still accessible.

I’ve also put a hose clamp at the end of an open ended line and have run it off the floating dip tube
 
Got my first brew in this setup, also hooked it into the keg full of starsan and it pushed all 5 gallons plus still plenty of co2 bubbling out, only a 3 gallon batch too, thanks! Now just need some volunteers to try spunding at like 10-12 psi...
 
Got my first brew in this setup, also hooked it into the keg full of starsan and it pushed all 5 gallons plus still plenty of co2 bubbling out, only a 3 gallon batch too, thanks! Now just need some volunteers to try spunding at like 10-12 psi...
I've got my first batch in one of these modded fermonsters, now, too.

However, I'm racking to secondary and dry hop in a corny keg, and spunding in that.
 
That sounds like a really good idea, do you just transfer a couple points before final gravity? Any worry about hops clogging dip tube or grassy off flavors for serving on top of hops for a while?
So, this is my first time EVER dry hopping.

My first time ever doing secondary in corny keg.

My hops will in a mesh tube, I'll leave it dry hopping for five days, then transfer to another corny keg.

I'll be using a floating dip tube for serving.
 
So, this is my first time EVER dry hopping.

My first time ever doing secondary in corny keg.

My hops will in a mesh tube, I'll leave it dry hopping for five days, then transfer to another corny keg.

I'll be using a floating dip tube for serving.
Make sure every vessel you transfer to is completely purged of oxygen or all you will be doing is diminishing the quality of your beer in every transfer
 
Back
Top