You are using an out of date browser. It may not display this or other websites correctly.
You should upgrade or use an alternative browser.
You should upgrade or use an alternative browser.
Turning your Fermonster into a complete closed transfer system for cheap!
- Thread starter Dgallo
- Start date

Help Support Homebrew Talk:
This site may earn a commission from merchant affiliate
links, including eBay, Amazon, and others.
LostHopper
Well-Known Member
- Joined
- Sep 3, 2014
- Messages
- 313
- Reaction score
- 136
Yesterday was my first transfer attempt with Dgallo's fermonster lid adaptation. Commando dry hops, screened floating dip tube. It worked perfectly.
Clean up time seemed to the only downside. Also, if I have beer left in fermenter after filling keg I usually bottle it. This was a challenge but I just swapped out the transfer tubing to a party tap I already had made up. Yes oxygen got in the bomber bottle but hopefully the bottle conditioning will reduce that.
The liquid post that came with the Fermentasauras pressure kit does not seem to disassemble like a typical keg post. Any hints?
Don't see that it's been mentioned here, but there's another method for adding dry hops; and no opening of the lid is necessary. Buy some sous vide magnets (Amazon has them for cheap, but so does Fred Meyer or your local equivalent). One magnet in the muslin bag with the hops, and one on the outside of the fermonster, set up after you pitch yeast. If you're dry hopping with more than 2oz, use multiple bags/magnets; the most I will go in one bag is 3oz. Once you're ready to dry hop, either move the outside magnet down the outside of the fermonster so the bag is under the beer, or just pull it off altogether so it plops down. No oxygen, and saves a bit of time, if like me, you suddenly look at the calendar and realize it's time to dry hop RIGHT NOW and have to get it all set up quickly.
I did this a few batches ago when I fermented in my 6g Torpedo keg. I since switched back to popping the lid while running CO2 to reduce how much o2 gets in, followed by multiple purges.Don't see that it's been mentioned here, but there's another method for adding dry hops; and no opening of the lid is necessary. Buy some sous vide magnets (Amazon has them for cheap, but so does Fred Meyer or your local equivalent). One magnet in the muslin bag with the hops, and one on the outside of the fermonster, set up after you pitch yeast. If you're dry hopping with more than 2oz, use multiple bags/magnets; the most I will go in one bag is 3oz. Once you're ready to dry hop, either move the outside magnet down the outside of the fermonster so the bag is under the beer, or just pull it off altogether so it plops down. No oxygen, and saves a bit of time, if like me, you suddenly look at the calendar and realize it's time to dry hop RIGHT NOW and have to get it all set up quickly.
https://www.homebrewtalk.com/threads/upcoming-single-hop-neipa-brew-day.697951/post-9224231
Although I have switched to Fermzilla all-rounders, I did a triple brew day this month, and broke out my modified Fermonster for the third batch. It still worked great.
However, my fermonster has the spigot, which I no longer use because I transfer through the liquid post on top. Is there a "good way" to just block/plug the spigot port? I know I can just leave the spigot attached and not use it, but is there a better way to just plug it and still hold a low 2-3 psi of pressure for transfers?
However, my fermonster has the spigot, which I no longer use because I transfer through the liquid post on top. Is there a "good way" to just block/plug the spigot port? I know I can just leave the spigot attached and not use it, but is there a better way to just plug it and still hold a low 2-3 psi of pressure for transfers?
Maybe you can find a stainless round T style fitting/bolt, and use a silicone gasket/washer on the inside to seal it and a washer and bolt on the outside to secure it. Or, just buy the solid version, they are relatively cheap and you won't need to worry about infection or leaks.
Last edited:

$22.00 ($623.23 / Ounce)
AMZLMPKNTW Ball Lock Sample Faucet 30cm Reinforced Silicone Hose Secondary Fermentation Homebrew Kegging joyful
无为中南商贸有限公司


$53.24
1pc Hose Barb/MFL 1.5" Tri Clamp to Ball Lock Post Liquid Gas Homebrew Kegging Fermentation Parts Brewer Hardware SUS304(Liquid Hose Barb)
yunchengshiyanhuqucuichendianzishangwuyouxiangongsi

$159.99 ($26.66 / Count)
3M High Flow Series System BREW120-MS, 5616001, For Brewed Coffee and Hot Tea, Valve-in-Head Design
SpaceCityProviders

$20.94
$29.99
The Brew Your Own Big Book of Clone Recipes: Featuring 300 Homebrew Recipes from Your Favorite Breweries
Amazon.com

$28.98
Five Star - 6022b_ - Star San - 32 Ounce - High Foaming Sanitizer
Great Fermentations of Indiana

$10.99 ($31.16 / Ounce)
Hornindal Kveik Yeast for Homebrewing - Mead, Cider, Wine, Beer - 10g Packet - Saccharomyces Cerevisiae - Sold by Shadowhive.com
Shadowhive


$7.79 ($7.79 / Count)
Craft A Brew - LalBrew Voss™ - Kveik Ale Yeast - For Craft Lagers - Ingredients for Home Brewing - Beer Making Supplies - (1 Pack)
Craft a Brew


$76.92 ($2,179.04 / Ounce)
Brewing accessories 1.5" Tri Clamp to Ball Lock Post Liquid Gas Homebrew Kegging Fermentation Parts Brewer Hardware SUS304 Brewing accessories(Gas Hose Barb)
chuhanhandianzishangwu


$719.00
$799.00
EdgeStar KC2000TWIN Full Size Dual Tap Kegerator & Draft Beer Dispenser - Black
Amazon.com


$44.99
$49.95
Craft A Brew - Mead Making Kit – Reusable Make Your Own Mead Kit – Yields 1 Gallon of Mead
Craft a Brew

$176.97
1pc Commercial Keg Manifold 2" Tri Clamp,Ball Lock Tapping Head,Pressure Gauge/Adjustable PRV for Kegging,Fermentation Control
hanhanbaihuoxiaoshoudian

$58.16
HUIZHUGS Brewing Equipment Keg Ball Lock Faucet 30cm Reinforced Silicone Hose Secondary Fermentation Homebrew Kegging Brewing Equipment
xiangshuizhenzhanglingfengshop


![Craft A Brew - Safale S-04 Dry Yeast - Fermentis - English Ale Dry Yeast - For English and American Ales and Hard Apple Ciders - Ingredients for Home Brewing - Beer Making Supplies - [1 Pack]](https://m.media-amazon.com/images/I/41fVGNh6JfL._SL500_.jpg)
$6.95 ($17.38 / Ounce)
$7.47 ($18.68 / Ounce)
Craft A Brew - Safale S-04 Dry Yeast - Fermentis - English Ale Dry Yeast - For English and American Ales and Hard Apple Ciders - Ingredients for Home Brewing - Beer Making Supplies - [1 Pack]
Hobby Homebrew

$1.91
$29.95
Mastering Homebrew: The Complete Guide to Brewing Delicious Beer (Beer Brewing Bible, Homebrewing Book)
Goodwill Retail Services, Inc.


$33.99 ($17.00 / Count)
$41.99 ($21.00 / Count)
2 Pack 1 Gallon Large Fermentation Jars with 3 Airlocks and 2 SCREW Lids(100% Airtight Heavy Duty Lid w Silicone) - Wide Mouth Glass Jars w Scale Mark - Pickle Jars for Sauerkraut, Sourdough Starter
Qianfenie Direct


$53.24
1pc Hose Barb/MFL 1.5" Tri Clamp to Ball Lock Post Liquid Gas Homebrew Kegging Fermentation Parts Brewer Hardware SUS304(Gas MFL)
Guangshui Weilu You Trading Co., Ltd

$479.00
$559.00
EdgeStar KC1000SS Craft Brew Kegerator for 1/6 Barrel and Cornelius Kegs
Amazon.com


Just trying to get my fermonster set up for pressure transfer and it seems like the popular fermentasaurus pressure kit is no longer available to scavenge parts from. Does anyone know of a different pressure kit that has parts that would work, or a particular set of bulkheads that have been tried and are know to work on the fermonster lid? Thanks
LostHopper
Well-Known Member
- Joined
- Sep 3, 2014
- Messages
- 313
- Reaction score
- 136
I would check with brewhardware.com
They make a pressure transfer kit on a Fermonster lid that has a single gas post but uses a racking cane through the lid.
They probably have the parts.
(Their kit works well too)
They make a pressure transfer kit on a Fermonster lid that has a single gas post but uses a racking cane through the lid.
They probably have the parts.
(Their kit works well too)
I bought these, there's a bev out and gas in version. Use this in combination with a solid lid that you drill holes in for these bulkheads. You just need to be relatively gentle when securing/removing the QD lines to avoid breaking the seal. I'm trying to find larger and firmer gaskets, maybe silicone, so I can really tighten them to the lid. The included rubber ones squeeze out if tightened too much.
https://www.morebeer.com/products/ball-lock-bulkhead-bev.html
https://www.morebeer.com/products/ball-lock-bulkhead-bev.html
VikeMan
It ain't all burritos and strippers, my friend.
- Joined
- Aug 24, 2010
- Messages
- 5,963
- Reaction score
- 6,212
Cautionary Tale?
I am a few batches into my modded Fermonster, which I've been using as an occasional backup fermenter. Today, I kegged a batch and had to apply 10 PSI for a bit to dislodge gunk clogged in the floating dip. Then, part way through the xfer, I noticed a hairline crack on the outside surface of the side of the fermenter. (Pic below. Crack is visible, but fuzzy.) I'm pretty sure it wasn't there before, because I inspect the fermenter pretty thoroughly before each batch. I guess I was probably pretty lucky that it didn't crack the whole way through. Anyway, this fermonster has been retired to the trash can.
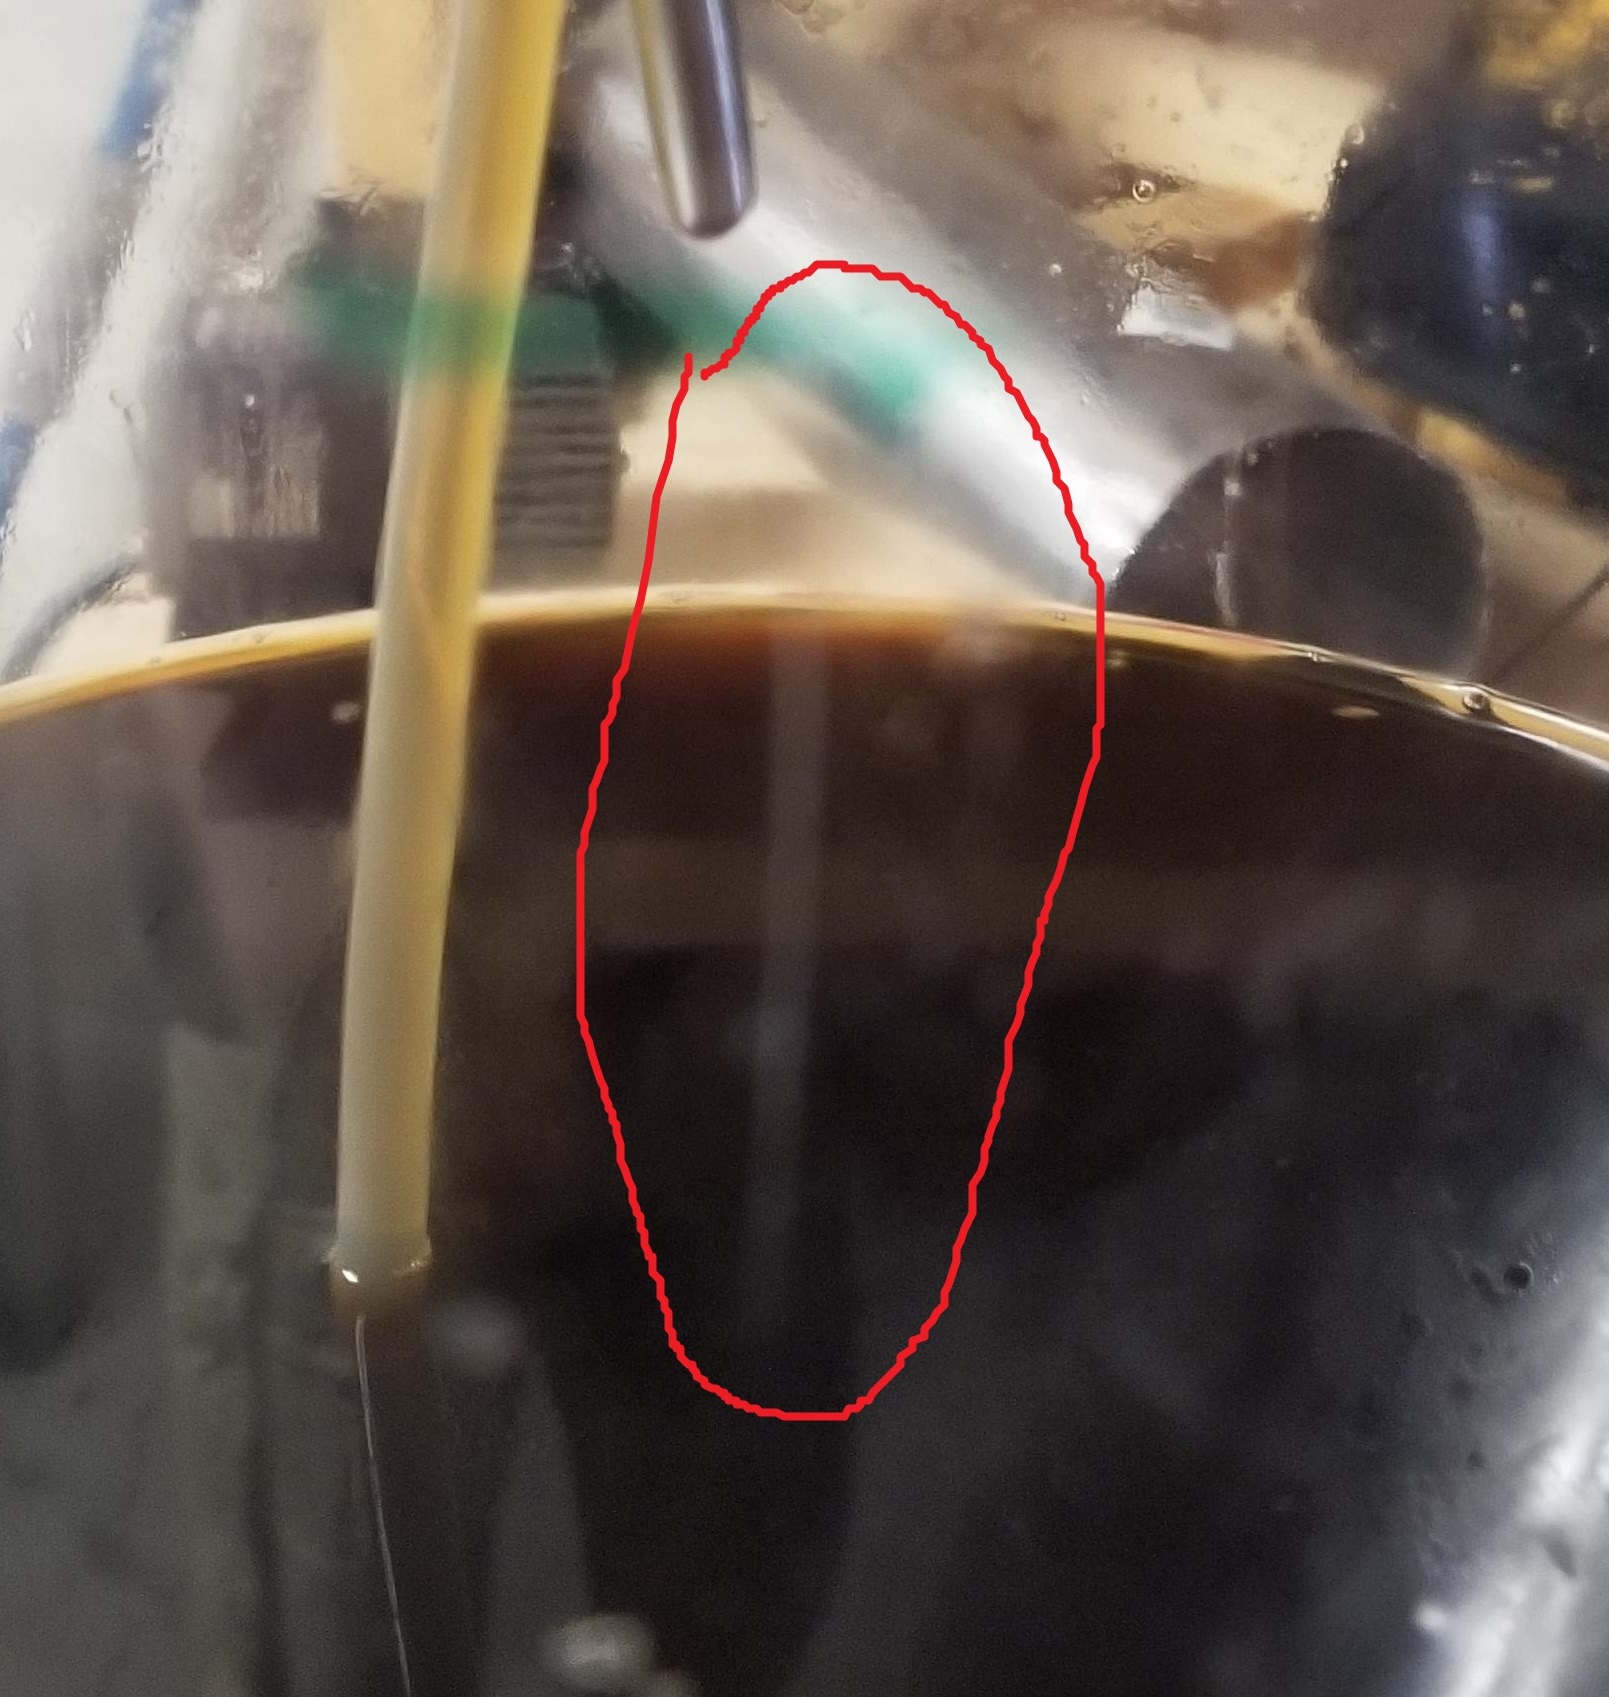
I am a few batches into my modded Fermonster, which I've been using as an occasional backup fermenter. Today, I kegged a batch and had to apply 10 PSI for a bit to dislodge gunk clogged in the floating dip. Then, part way through the xfer, I noticed a hairline crack on the outside surface of the side of the fermenter. (Pic below. Crack is visible, but fuzzy.) I'm pretty sure it wasn't there before, because I inspect the fermenter pretty thoroughly before each batch. I guess I was probably pretty lucky that it didn't crack the whole way through. Anyway, this fermonster has been retired to the trash can.
Isn't that a reflection of your floating dip tube tubing? It even has the the same curve.I noticed a hairline crack on the outside surface of the side of the fermenter. (Pic below. Crack is visible, but fuzzy.)
If that's not it, I really don't see a crack.
And would a crack not show on the outside after emptying it?
They're made of PET, not acrylic, I don't think it can have hairline or spider cracks (crazing).
OP
OP
Dgallo
Instagram: bantam_brews
I’d be surprised if the fermonster itself cracked from pressure. Usually if the pressure gets too high, the lid will crack right above the threads on the flat surface. I’ve had 2 crack on me with wayCautionary Tale?
I am a few batches into my modded Fermonster, which I've been using as an occasional backup fermenter. Today, I kegged a batch and had to apply 10 PSI for a bit to dislodge gunk clogged in the floating dip. Then, part way through the xfer, I noticed a hairline crack on the outside surface of the side of the fermenter. (Pic below. Crack is visible, but fuzzy.) I'm pretty sure it wasn't there before, because I inspect the fermenter pretty thoroughly before each batch. I guess I was probably pretty lucky that it didn't crack the whole way through. Anyway, this fermonster has been retired to the trash can.
VikeMan
It ain't all burritos and strippers, my friend.
- Joined
- Aug 24, 2010
- Messages
- 5,963
- Reaction score
- 6,212
Isn't that a reflection of your floating dip tube tubing? It even has the the same curve.
If that's not it, I really don't see a crack.
And would a crack not show on the outside after emptying it?
They're made of PET, not acrylic, I don't think it can have hairline or spider cracks (crazing).
The thing that looks like a reflection in the pic is definitely a crack. Or if there's a reflection, it's right where the crack is. Or a gouge, but if so, I have no idea how that would have happened. For whatever reason, I couldn't get the camera to focus on it. I could easily feel it on the outside. But I could not feel it on the inside.
Ok, I just now took it out of the trash and got a pic with a solid background behind it (i.e. construction paper inserted into the fermenter)...
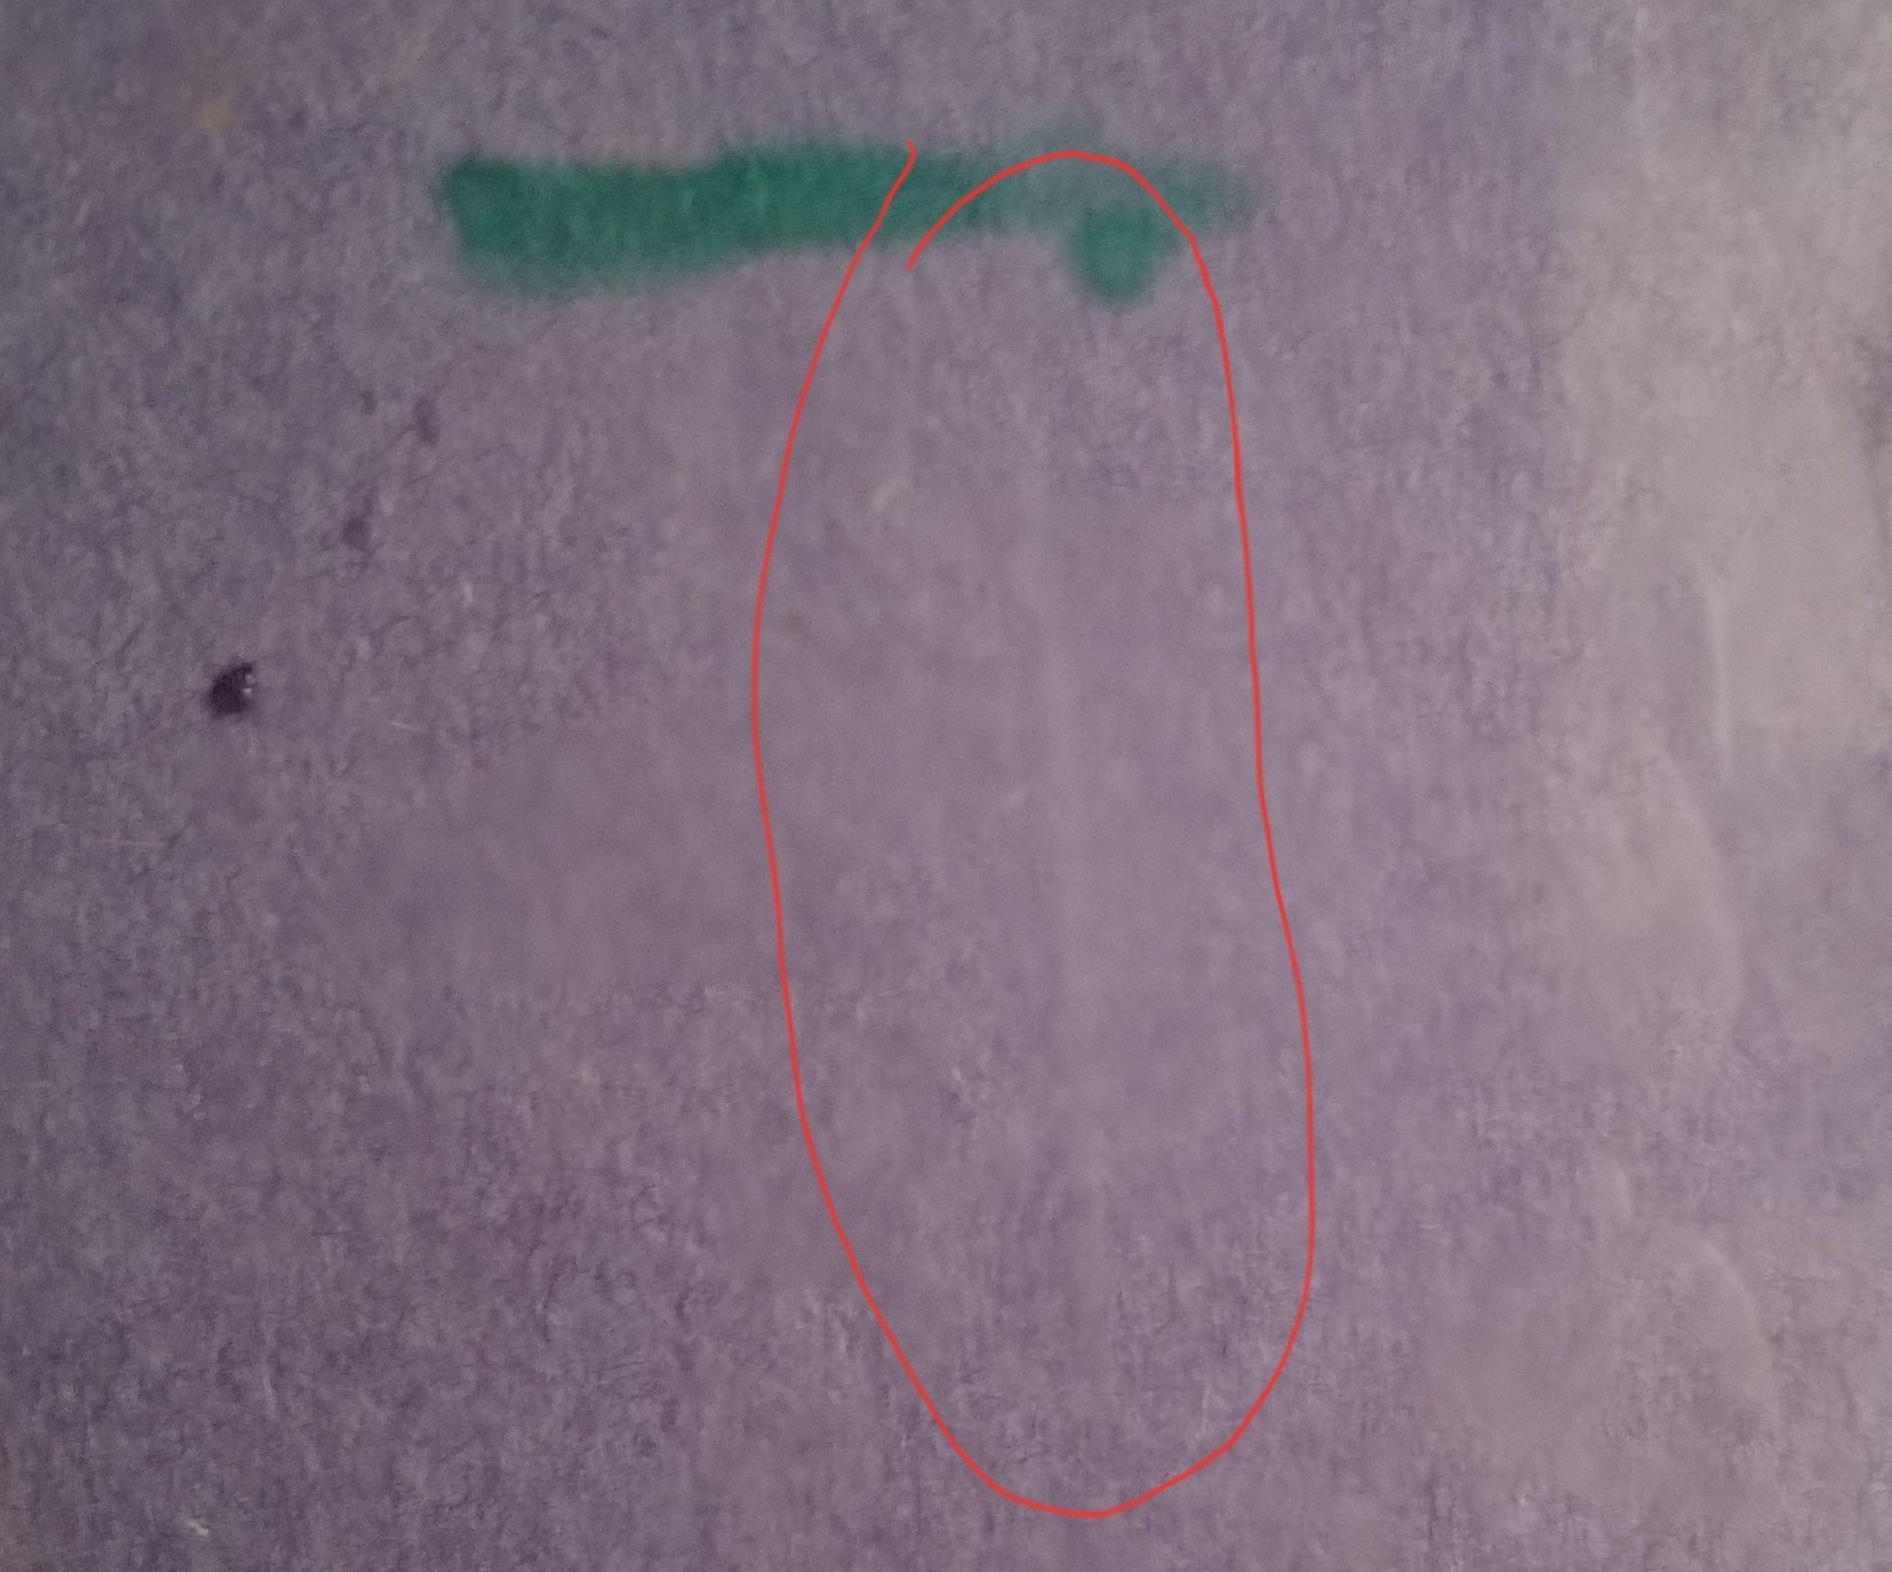
Still inconclusive, at least to me. ^
Can you take a picture a bit from the side, with light coming from the opposite side? You should be able to see the crack that way.
Put a piece of masking tape in the middle of the crack, with an arrow on it pointing to the crack (thin sharpie), so your camera will focus on that. Background paper should not be needed.
VikeMan
It ain't all burritos and strippers, my friend.
- Joined
- Aug 24, 2010
- Messages
- 5,963
- Reaction score
- 6,212
Still inconclusive, at least to me. ^
Can you take a picture a bit from the side, with light coming from the opposite side? You should be able to see the crack that way.
Put a piece of masking tape in the middle of the crack, with an arrow on it pointing to the crack (thin sharpie), so your camera will focus on that. Background paper should not be needed.
Sorry. It's in the trash for for the second and final time. The outside is cracked enough to catch a perpendicular fingernail swiped across it. That's conclusive enough for me.
Well, yeah...The outside is cracked enough to catch a perpendicular fingernail swiped across it. That's conclusive enough for me.
I saw a guy hulking a Fermonster half full with Starsan in the parking lot at a Big-Brew event, a few years ago). When he lost grip, it bounced several times on the tarmac. No cracks, no leaks, lid was still on... let's fill it!
I reckoned, they are indestructible!
Last edited:
wsmith1625
Well-Known Member
I have 2 Fermonsters with a spigot and they've held up pretty well. So far I 've only cracked 1 lid in about 15 batches. I imagine the weakest points are the spigot, lid, and the 2 seams from the injection molding process. A random crack in the side of the fermenter is likely not the norm.
DarrellQ
Well-Known Member
Mine bulges from the bottom if the pressure gets up around 10-12 and I have never cracked a lid or the vessel. As far clearing out a clogged dip tube, I vent from the gas port into Starsan and put a few lbs of Co2 pressure from the out port through the dip tube. Clears it out every time.
I just don't apply more than 3-4 psi. But my fermonster is ported, so it has a lower threshold (I presume).
secretlevel
Well-Known Member
I just don't apply more than 3-4 psi. But my fermonster is ported, so it has a lower threshold (I presume).
How does does it take you to transfer ~5 gallons at this pressure?
I've cracked my second lid the other day by overtightening the posts, going to have to get a third... I always run into issues of the liquid or gas post leaking CO2 so I have to mess with them to get them tighter or looser. Eventually I either crack the lid or crack/squish the O-ring and have to replace the lid. What I think happens is I end up turning the posts when I put on or take off the disconnects. Sometimes they're hard to come off, so I end up turning them a bit and the posts get unscrewed.
I also tend to get clogs when initiating the transfer. Once it's going I'm good. I think it's a little krausen or some gunk that gets in there when I add the hops. Maybe a small mesh filter is a solution...
DarrellQ
Well-Known Member
I find it tedious to be sure. Regarding leaking of Co2, overtightening seems to be much worse than undertightening. I always use a little lube around the o-rings and there is a definite sweet spot. Unfortunately, I tend to only find the leaks with a surprisingly empty Co2 tank while putting a few lbs of pressure on the carboy overnight while cold-crashing. Regarding transfers, I would say it takes me on average 30 minutes to transfer 5 gallons at about 7 psi. If it gets hopelessly clogged, I put a few lbs of Co2 thru the liquid port to 'blow it out."How does does it take you to transfer ~5 gallons at this pressure?
I've cracked my second lid the other day by overtightening the posts, going to have to get a third... I always run into issues of the liquid or gas post leaking CO2 so I have to mess with them to get them tighter or looser. Eventually I either crack the lid or crack/squish the O-ring and have to replace the lid. What I think happens is I end up turning the posts when I put on or take off the disconnects. Sometimes they're hard to come off, so I end up turning them a bit and the posts get unscrewed.
I also tend to get clogs when initiating the transfer. Once it's going I'm good. I think it's a little krausen or some gunk that gets in there when I add the hops. Maybe a small mesh filter is a solution...
Ridenour64
Well-Known Member
- Joined
- Sep 29, 2012
- Messages
- 603
- Reaction score
- 249
Run CO2 through the liquid post prior to starting your transfer. This should solve your clogging problems. Sediment will end up in the floating dip tube during fermentation. I don’t use a wrench to tighten my post. Actually my post are less than 100% hand tight even and leaking has not been an issue for me.
secretlevel
Well-Known Member
Run CO2 through the liquid post prior to starting your transfer. This should solve your clogging problems. Sediment will end up in the floating dip tube during fermentation. I don’t use a wrench to tighten my post. Actually my post are less than 100% hand tight even and leaking has not been an issue for me.
I have and I think this is part of the problem... Since CO2 disconnect doesn't exactly "fit" the liquid post, it never comes off easy, so I have to yank on it and twist it, which is what I think breaks my lid in the end. I might have to add a CO2 hose with a liquid disconnect on it...
VikeMan
It ain't all burritos and strippers, my friend.
- Joined
- Aug 24, 2010
- Messages
- 5,963
- Reaction score
- 6,212
I have and I think this is part of the problem... Since CO2 disconnect doesn't exactly "fit" the liquid post, it never comes off easy, so I have to yank on it and twist it, which is what I think breaks my lid in the end. I might have to add a CO2 hose with a liquid disconnect on it...
You might consider using disconnects with threaded swivel nut connections, which makes swapping between liquid and gas disconnects easy.


Ridenour64
Well-Known Member
- Joined
- Sep 29, 2012
- Messages
- 603
- Reaction score
- 249
You should connect a black liquid ball lock to your co2 line to do this. Never force a grey ball lock on a liquid post. If you have swivel nut fittings, this is extremely easy. If your using fixed barb ball locks, I would change over to swivels.I have and I think this is part of the problem... Since CO2 disconnect doesn't exactly "fit" the liquid post, it never comes off easy, so I have to yank on it and twist it, which is what I think breaks my lid in the end. I might have to add a CO2 hose with a liquid disconnect on it...
OP
OP
Dgallo
Instagram: bantam_brews
Are you using duotight fitting? If so, tie in a dedicated line on the regulator that has a liquid balllock on it. That or just unscrew the gas fitting from one of your regulator lines and throw on a liquid for thatI have and I think this is part of the problem... Since CO2 disconnect doesn't exactly "fit" the liquid post, it never comes off easy, so I have to yank on it and twist it, which is what I think breaks my lid in the end. I might have to add a CO2 hose with a liquid disconnect on it...
Last edited:
Just curious why some are installing a floating dip tube through the cap if they have a spigot. Why not just install a gas QD on the lid and use the spigot for samples and transfer?
Spigots are harder to keep sanitary and can leak. I would trade my ported fermonster for solid body for this closed transfer set-up if I could.
Also, floating diptube draws off the near-top, avoiding a lot of the trub and gathering clearer beer (until the end) than low-positioned spigots.
OP
OP
Dgallo
Instagram: bantam_brews
Spigot pulls from the bottle where your trub and dryhops are, the floating diptube draws from the top. Originally I loved the spigot for pre dryhop gravity samples, plus I already had 3 ported fermonster so that what the build was based on.Just curious why some are installing a floating dip tube through the cap if they have a spigot. Why not just install a gas QD on the lid and use the spigot for samples and transfer?
now looking back, I could have gone none ported and used a picnic tap from the liquid side to take the samples.
For my past 6 or so batches I've fermented and served from the same keg using a floating dip tube. The beers taste great down to the last serving. So far I've done it with 5 batches of NEIPA and one stout. If you've haven't done it yet, give it a try.
That is what I do. I have a solid lid with just one disconnect and I transfer out the spigot. For me it just seem easier to use gravity and not have to mess with using extra CO2 to push out the top. I could see some benefits of having both ports though.Just curious why some are installing a floating dip tube through the cap if they have a spigot. Why not just install a gas QD on the lid and use the spigot for samples and transfer?
OP
OP
Dgallo
Instagram: bantam_brews
I’m hoping the fine folks that used this build can help me out. I was asked to write a DIY column for a brewing publication for this build with step by step instructions switch pictures. One of the pictures needs to be an “Action shot” of a closed transfer in progress using this lid. I don’t have any great pictures of my self doing it nor do I have anything in fermenters now.
Would anyone like to pm me with some pictures of them using this lid to transfer that has good lighting? If I use your picture I will give you credit on the photo.
Would anyone like to pm me with some pictures of them using this lid to transfer that has good lighting? If I use your picture I will give you credit on the photo.
Brewer Mike
Well-Known Member
- Joined
- Sep 27, 2021
- Messages
- 142
- Reaction score
- 112
I'm crashing a batch now. I can get you some pics when I transfer on Monday or Tuesday, if no one gets you any earlier.
ihavenonickname
Well-Known Member
I recently listened to a Brülosophy podcast with Martin Keen and he describes this exact method for pressure transfers. I kept waiting for him to give you or at least HBT credit for the idea… still waiting… he’s even got a video coming out on it, maybe he will give credit then. The podcast episode was not really worth listening to btw.
@Dgallo
@Dgallo
Last edited:
LostHopper
Well-Known Member
- Joined
- Sep 3, 2014
- Messages
- 313
- Reaction score
- 136
Just missed a transfer by 24 hours.
And thank you for originally describing this technique here. It's been a game changer for me especially with hoppy beers but it's so simple I do it with all beers .
And thank you for originally describing this technique here. It's been a game changer for me especially with hoppy beers but it's so simple I do it with all beers .
- Joined
- Oct 12, 2020
- Messages
- 3,542
- Reaction score
- 6,804
This might not be of any use, but I love my take on it..My 'FermHead', I didn't want to be putting a strain on the lid while connecting and disconnecting, I didn't want krausen gunking up my poppets during blow-off and I wanted a single unit I could make for either my Fermonster or a sankey (with the valve-rim cut out):


And in action, not with beer but Star San while sanitizing kegs:

If it's any use to you, feel free to use any pics without credit.
And in action, not with beer but Star San while sanitizing kegs:
If it's any use to you, feel free to use any pics without credit.
Would anyone like to pm me with some pictures of them using this lid to transfer that has good lighting? If I use your picture I will give you credit on the photo.
PM sent.

If it's any use to you, feel free to use any pics without credit.
So initially you connect a blow off tube to the ball valve? Seems like an interesting design.
OP
OP
Dgallo
Instagram: bantam_brews
Thanks for sharing but I specifically need pictures from the original build as that’s what the article is on.This might not be of any use, but I love my take on it..My 'FermHead', I didn't want to be putting a strain on the lid while connecting and disconnecting, I didn't want krausen gunking up my poppets during blow-off and I wanted a single unit I could make for either my Fermonster or a sankey (with the valve-rim cut out):
View attachment 810553
View attachment 810554
And in action, not with beer but Star San while sanitizing kegs:
View attachment 810555
If it's any use to you, feel free to use any pics without credit.
Certainly clever way to do it though!
Similar threads
- Replies
- 2
- Views
- 310
- Replies
- 18
- Views
- 836
- Replies
- 14
- Views
- 717
- Replies
- 3
- Views
- 817
