Awesome! Trying the maiden batch tonight. Share some pics of your first brew.
You are using an out of date browser. It may not display this or other websites correctly.
You should upgrade or use an alternative browser.
You should upgrade or use an alternative browser.
Spike Solo Owner's Thread
- Thread starter RichardU
- Start date

Help Support Homebrew Talk:
This site may earn a commission from merchant affiliate
links, including eBay, Amazon, and others.
So I’ve been brewing for a few years: small batch, all-grain stovetop BIAB. Bought a used CF-5 but never used it as my 1 to 1.5 gal batches didn’t make the effort worth it. Fast forward to the 2021 holidays and I decided to spring for a 220v, 10 gal, NPT Spike Solo system out of Spike’s bargain cave. I added a Blichmann Riptide pump and an Exchilerator CFC to round out the system.
Last week I finally finished up a DIY glycol chiller build so decided to fire up the Solo, autotune the PID and get some volumes on system losses and boil off to fine tune the BeerSmith equipment profile. I have 220v 50amp circuit with a 3-prong (nema 6-50) in my garage and had bought a 3-prong to 4-prong (14-30) adapter cable but the system wouldn’t turn on with it. So I had to head to the laundry room and try the dryer outlet which is a 14-30–success!
I really didn’t want to brew in my laundry room, but over the weekend as I contemplated what to do, I figured I could go ahead and do the inaugural brew until I got a permanent electrical solution in place. So yesterday, since I was teleworking, I went ahead and knocked at some firsts—My first brew on the Solo, my first 5 gal batch, my first lager (a Dos Equis clone), and my first use of the CF-5.
All in all it was an awesome experience!
Attachments


Cool set up! Look forward to hearing how it turns out.
I ended getting electric installed in the garage and it was only around $160.00.
I ended getting electric installed in the garage and it was only around $160.00.
Just completed my autotune and I tested temps after it was finished using two different thermometers. Both thermometers read ~5 degrees higher than the pid. Is there a way to account for this or is my 5000' elevation causing this?
Cool set up! Look forward to hearing how it turns out.
I ended getting electric installed in the garage and it was only around $160.00.
Thank! I’m gonna rewire my garage 50 amp circuit and replace the 8/2 wire with 8/3 and replace the 6-50 receptacle with a 14-50. I’ll still have to use an adapter but that shouldn’t be an issue.
Just kegged a 5 gal batch of a Dos Equis clone that I brewed on my 220v, NPT 10 gal Solo and fermented in a CF-5. This was my first time using both the Solo and the CF-5 so I thought I'd do a write-up on the experience. So I got my Solo out of Spike's bargain cave so I had to add my own pump and chiller (I opted for a Blichmann Riptide and the Exchilerator CFC). I bought a cheap SS table off Amazon to place all the gear on. I used RO water from a 3-element BuckeyeHydro RO system. And for software, I use Bru'n Water to make water adjustments, and BrewSmith for everything else regarding the brew.
The recipe itself, besides being a kit, wasn't anything remarkable but I should note that I opted to use dry yeast (SAFLAGER-S23).
To get some initial equipment profile settings, using water, I auto-tuned the PID and then ramped up to a boil. From this I got my initial boil-off rate, and system losses that I input into BrewSmith and modified the generic 10gal Solo profile.
I milled my grain bill using a 2-roller Cereal Killer mill set to .035. Just did one pass. I mention that because when I was doing stovetop BIAB I had to do 2 passes to get anywhere near the expected SG so I wanted to see how the Solo performed. I forgot to write it down but the pre-boil gravity was right on target so very happy in that regard with the Solo.
The boiloff ended up being higher than my test. I initially started at 100% power then ramped down to 55% once the boil got going, the same as my test. On my next brew I'm going to see how low I can actually go and keep a rolling boil going. As a result, my OG was a couple of points higher than the target. As my volume ended up being lower than expected, I added about a 1/2gal of topoff water after I transferred to the conical.
I transferred to the conical using the dump port, so filled the conical from the bottom up. The CFC got my wort temp down to 78*F -- not bad as I live in Tampa FL and even in January our water temps aren’t the coldest. After the transfer was complete I aerated the wort for 1 minute using the Spike carb stone and an O2 bottle from Lowes. I then pitched one 11.5g sachet of SAFLAGER directly onto the wort with no prior rehydration. I inserted my temp coil in the conical and turned my DIY glycol chiller with a set temp of 56*F (middle of the fermentation temp range for this strain) and a glycol temp of 28*F. I'm using the WiFi version of the Inkbird 308 temp controller to control the conical temps-- it’s real neat being able to monitor the fermenter temp from anywhere using my phone.
I checked the FG on day 9 and it was the same the next day (1 point above the target). When corrected for alcohol using Sean Terrill's refractometer calculator (Refractometer Calculator « SeanTerrill.com ) it came out to 5.2%ABV. I would have started checking the FG a little sooner but I was out of town so couldn’t. I wanted to do a diacetyl rest and was concerned I might have waited too long, but went ahead and raised the temp to 68*F and got immediate activity via the blowoff bucket. I kept it at 68*F to 2 days, did a final FG check (no change) then did a rapid cold crash to 37*F after pressurizing the conical to 5psi. When the wort reached 40*F I reversed the glycol hoses at the temp coil to deal with the expected temp inversion inside the CF-5. I let it sit at 37*F for roughly 2-1/2 days then did the pressure transfer to a corny.
I placed the corny in a fridge and I'm slow carbing. I'll start checking it for taste in about a week but I'm planning on lagering for at least 3 weeks before calling it ready for consumption. This is new territory for so I'm feeling my way.
Takeaways:
1. The Solo and CF-5 function as advertised. I followed Spike's instructions pretty much verbatim for every process (both on the Solo and CF-5) and got the expected results.
2. It takes a bit of practice/technique to not make a mess swapping hoses around from port to port. I'm gonna use a spring clamp next time to help contain wort in the hose.
3. I had mounted my pump and CFC to my table's shelf with machine screws. That contributed to my hose swapping issue as the connections were at weird angles, mainly on the CFC due to its design. The pump is OK where it's at, but I need to be able to move the CFC around to make getting to it easier so I'm gonna unmount from the shelf and leave it unmounted.
4. This brew being my first lager, in addition to being the first time using all of this equipment, I followed what I consider to be traditional lager temp and lagering schedule. IOW I didn't rush anything.
Anyway, my apologies for the long the post-- thanks for bearing with me! I'll post on the final outcome good or bad, in the future.


$176.97
1pc Commercial Keg Manifold 2" Tri Clamp,Ball Lock Tapping Head,Pressure Gauge/Adjustable PRV for Kegging,Fermentation Control
hanhanbaihuoxiaoshoudian


$53.24
1pc Hose Barb/MFL 1.5" Tri Clamp to Ball Lock Post Liquid Gas Homebrew Kegging Fermentation Parts Brewer Hardware SUS304(Gas MFL)
Guangshui Weilu You Trading Co., Ltd

$76.92 ($2,179.04 / Ounce)
Brewing accessories 1.5" Tri Clamp to Ball Lock Post Liquid Gas Homebrew Kegging Fermentation Parts Brewer Hardware SUS304 Brewing accessories(Gas Hose Barb)
chuhanhandianzishangwu


$33.99 ($17.00 / Count)
$41.99 ($21.00 / Count)
2 Pack 1 Gallon Large Fermentation Jars with 3 Airlocks and 2 SCREW Lids(100% Airtight Heavy Duty Lid w Silicone) - Wide Mouth Glass Jars w Scale Mark - Pickle Jars for Sauerkraut, Sourdough Starter
Qianfenie Direct


$44.99
$49.95
Craft A Brew - Mead Making Kit – Reusable Make Your Own Mead Kit – Yields 1 Gallon of Mead
Craft a Brew

$20.94
$29.99
The Brew Your Own Big Book of Clone Recipes: Featuring 300 Homebrew Recipes from Your Favorite Breweries
Amazon.com


$7.79 ($7.79 / Count)
Craft A Brew - LalBrew Voss™ - Kveik Ale Yeast - For Craft Lagers - Ingredients for Home Brewing - Beer Making Supplies - (1 Pack)
Craft a Brew

$53.24
1pc Hose Barb/MFL 1.5" Tri Clamp to Ball Lock Post Liquid Gas Homebrew Kegging Fermentation Parts Brewer Hardware SUS304(Liquid Hose Barb)
yunchengshiyanhuqucuichendianzishangwuyouxiangongsi

![Craft A Brew - Safale S-04 Dry Yeast - Fermentis - English Ale Dry Yeast - For English and American Ales and Hard Apple Ciders - Ingredients for Home Brewing - Beer Making Supplies - [1 Pack]](https://m.media-amazon.com/images/I/41fVGNh6JfL._SL500_.jpg)
$6.95 ($17.38 / Ounce)
$7.47 ($18.68 / Ounce)
Craft A Brew - Safale S-04 Dry Yeast - Fermentis - English Ale Dry Yeast - For English and American Ales and Hard Apple Ciders - Ingredients for Home Brewing - Beer Making Supplies - [1 Pack]
Hobby Homebrew


$22.00 ($623.23 / Ounce)
AMZLMPKNTW Ball Lock Sample Faucet 30cm Reinforced Silicone Hose Secondary Fermentation Homebrew Kegging joyful
无为中南商贸有限公司


$49.95 ($0.08 / Fl Oz)
$52.99 ($0.08 / Fl Oz)
Brewer's Best - 1073 - Home Brew Beer Ingredient Kit (5 gallon), (Blueberry Honey Ale) Golden
Amazon.com

$479.00
$559.00
EdgeStar KC1000SS Craft Brew Kegerator for 1/6 Barrel and Cornelius Kegs
Amazon.com


$58.16
HUIZHUGS Brewing Equipment Keg Ball Lock Faucet 30cm Reinforced Silicone Hose Secondary Fermentation Homebrew Kegging Brewing Equipment
xiangshuizhenzhanglingfengshop


Homebrew54
Beer Alchemist of Coastal Carolina
How did you mount the lock line? Picture does not show.Second brew day under my belt with the Spike solo. I have resolved my mash re-circulation problem with the hose falling into the grain bed with a Lock Line manifold, it worked really well. As for the hoist, I will never lift the basket alone again. I used my deer hoist to lift the basket and I didn't even use the basket hooks, I just left the basket hanging on the hoist. It worked well, I was able to dump the basket into wheel barrow while the basket was hanging from the hoist after it was done draining into the boil kettle.
The last detail was my system profile, because I was under target volume into the fermenter. I am trying to get 11 gallons of wort at the end of the day, I split my batches into two fermenter and I lose about .5 gallons to each fermenter. I added 1.00 gallon to loss in the hoses and trub which yielded about 11.6 gallons after the boil. I did compress the grain bed to get a little extra liquid from the grains but it wasn't much. All-in-all, it was a very good brew day with a lot less stress from from the first brew day. I did miss my OG before boil by about 0.006 too high but at the end of the day, so I may tweek my efficiency up a little in Brewsmith for the next batch, I need more data points at this time.
I am checking out CuS.S. Brewing for a chiller, I used my old 25' immersion chiller to cool the beer and it took about 45 minutes to reach 70. It was a lot less stressful however, than the plate chiller which plugs up a little too easily. Here are photos from Brew Day 2.
View attachment 696262View attachment 696263
Mac MacFarlane
Well-Known Member
- Joined
- Apr 22, 2020
- Messages
- 82
- Reaction score
- 57
Would adding a bag to the basket help with the stuck sparge im getting. Most of my base malt on hand is all ready milled could I use a bag for now until what I have is gone and I mill my own.
Last edited:
Rice hulls will help considerably
Last edited:
Mac MacFarlane
Well-Known Member
- Joined
- Apr 22, 2020
- Messages
- 82
- Reaction score
- 57
I’ll give that a try next time, thanks
Dave King
Member
- Joined
- Jan 1, 2018
- Messages
- 7
- Reaction score
- 0
I'm very interested in your pulley unistrut rail system, please post the sources. Thanks very much.While I don't have a Spike Solo, I use a 'homemade' version (I like to think Spike used my idea!) that's pretty much the same thing - Blichmann electric kettle with custom stainless steel basket.
I too have to control my recirc speed depending what I'm mashing/grist size/etc., balancing the level between the basket and kettle level. I've 'stuck' a mash due to some very finely ground grains, however stuck mashes are a thing of the past with these. I lifted the basket and it took over an hour to drain out instead of ~10-15 minutes. However no mess or extra work with a 'stuck' mash, only extra time.
On the pulley note - I installed a unistrut rail on the ceiling in the garage with some rollers and an electric hoist. To lift the basket out I just push a button and let it hang to drain out while I'm sparging. I'll let it drain until the boil starts. Then move the basket out of the way on the rollers and lower. The hoist has other benefits I use it for as well - I hang a grain hopper with my milled grain on it, the hopper has a slide gate on the bottom so I can control the rate at which I'm adding grist. Makes it nice and easy to stir vigorously and stabilize temperatures of the mash. Also hang the hop spider on it toward the end of the boil so that drains completely as well.
My maximum capacity is about a 27lb grain bill with 1.8L/lb grain strike water for a 10 gallon batch for the mash. *Note - prior to mashing in, I heat water and pump it to a cooler above the kettle (sparge water, extra hot water for whatever).
Ha, nice work on the sous vide! I did a brisket in the brew kettle that was amazing...no knife needed - it cut easily with the fork!
Wouldn't that stop the condensing?Cheap Bastard's Hop Spider Hack for the condenser lid
No just put the cover and clamp over it.Wouldn't that stop the condensing?
Dave King
Member
- Joined
- Jan 1, 2018
- Messages
- 7
- Reaction score
- 0
I did my 1st Solo 10 gal. brew, and got 52% extraction efficiency, which shocked me. I've been brewing for 26 years, with a cooler mash tun, usually getting around 69 to 72% efficiency. This was an Imperial Stout, with 35.88 lb. of grain, milled as always, about 0.040"gap. I used the max. water volume of 16.5 gal., and was going to add sparge water with the basket raised, but when I checked the preboil gravity, it was so low, I just went with it, and got about 9.5 gal. in the fermenter, instead of the 10.5 gal. I planned on. I got an O.G. of 1.065, not imperial. I added table sugar to get the O.G. to 1.078, still not very high, but it tastes good. My concern is, how should I estimate my efficiency to shoot for a 1.065 O.G. IPA, my next brew. Thanks!7 Batches into brewing with the Spike Solo 20 and I feel like I'm getting this down. Yesterday's brew day was 5 hours long start to finish and I have 11 gallons fermenting away. This is about 2-3 hours shorter than my previous 3 vessel system. I thought I would share a few of my problems and solutions to date.
Overall, I am really happy with the Spike Solo system. First, I really like the speed of heating wort with the electric element vs. using gas. BIAB or multi-vessel brewing, doesn't matter what the method is, Electric is the way to go. I'm pretty much resigned to the fact that I will not be getting 80% efficiency with the Solo system but that is about $3 worth of grain. The amount of time saved from my cleaning time and taking advantage of the power of the electric vs. gas heating more than offsets my lower efficiency.
- Stuck Mash - Crush of the grain is everything. Solution: I've stuck the mash and burned up a heater (and the beer) and it was due to a fine crush. My mill gap was about 0.028" which basically made flour. I've got the mill set to 0.035" and it is working great. My efficiency is between 69% and 73% on the last three batches I run my pump about 50% open. I also push on the grain bed (squeeze) when it is nearly done draining and I get a few points higher efficiency.
- Low Efficiency - Crush of the grain is everything. Solution: Get the crush right, I did a batch at 0.042" and it came out at 63%, well below my expectation of 68-70% finer crush obviously improves the efficiency but this must be balanced with your recirculation volume for the mash.
- The Electric element is in the way of my immersion chiller - Solution: I figured out how to hang the chiller and prevent it from sitting on the heater element. Previously I brewed with gas and just rested the chiller on the bottom of the kettle. This doesn't work now that I have the electric element in the way, so I purchased a Blichmann plate chiller. This worked but it created a lot of extra cleaning and made it more difficult to whirlpool my hops. I solved this by placing a heavy zip tie on the Immersion Chiller and now hang the chiller from the edge of the kettle with a hook that hangs from the zip tie and the kettle rim. I chill 10 gallons from boil to 70 F in about 15 minutes with only a few minutes of cleaning with my C.U.S.S. immersion chiller. The chiller plate worked well, it took about 10 minutes to chill from boil to 70 but it also took about 30 minutes to clean the plate chiller. I feel better with the immersion chiller being clean and now have a Blichmann plate chiller gathering dust on the shelf.
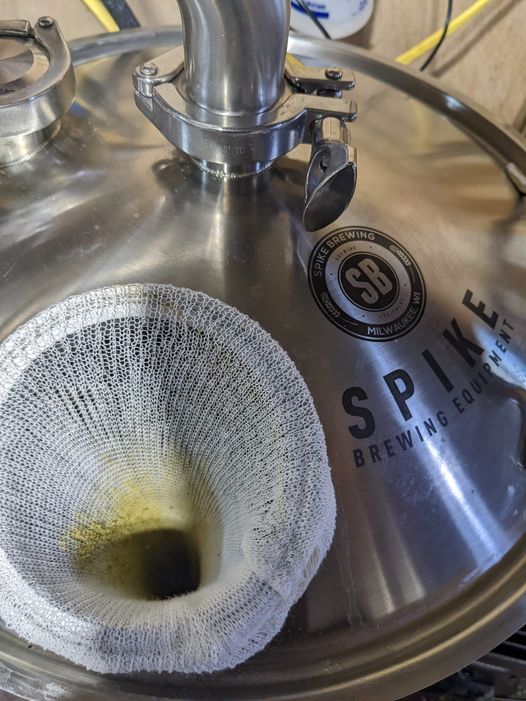
- Draining my hop screen was a PIA with new kettle. Solution: I used to rest my hop screen on the top of the immersion chiller when it was sitting in the kettle but this was with a gas fired system. Now that I have an e-kettle with the element in the way, the chiller can no longer support the weight of the chiller and the weight of the hop screen. Enter the cheap clamp, it holds the hop screen perfect to drain wort from the hops. See photo of the clamp on the edge of the kettle with the filter resting on the clamp handle.
- The Mash basket is heavy to lift out of the kettle! Solution: I know they say you can empty this yourself but like many here on the forum I wanted no part of slowly lifting 20 lbs of grain and 8 gallons of wort slowly to hang the basket on the kettle rim. I went to Sportsman's Warehouse and purchased a deer gambrel and now use this to hang the basket from the pulley system.
- Moving and storing the system is a problem, this thing is massive compared to the 10 gallon kettles I was used to dealing with. Solution: I bought a 24" x 30" SS table with casters from Amazon. See the picture below, I paid $110 for the table and $60 for the heavy duty casters and now it's easy to brew and deal with the system. I'm a garage brewer, my wife is never going to let me take this inside the house.
- Recirculation tube falls into mash bed and results in channeling. Solution: I went with a Loc-Line and it works great, I have pictures in an earlier post is this thread if you want to see it. It works well and it stops the channeling I was getting with the hose Spike says to use. The hose works at low flow rates but then my grain bed runs at different temperatures throughout the bed. Around the hose is warmer than in the opposite side of the grain bed where it is 2-3 degrees cooler.
- Joined
- Apr 7, 2021
- Messages
- 56
- Reaction score
- 48
I did my 1st Solo 10 gal. brew, and got 52% extraction efficiency, which shocked me. I've been brewing for 26 years, with a cooler mash tun, usually getting around 69 to 72% efficiency. This was an Imperial Stout, with 35.88 lb. of grain, milled as always, about 0.040"gap. I used the max. water volume of 16.5 gal., and was going to add sparge water with the basket raised, but when I checked the preboil gravity, it was so low, I just went with it, and got about 9.5 gal. in the fermenter, instead of the 10.5 gal. I planned on. I got an O.G. of 1.065, not imperial. I added table sugar to get the O.G. to 1.078, still not very high, but it tastes good. My concern is, how should I estimate my efficiency to shoot for a 1.065 O.G. IPA, my next brew. Thanks!
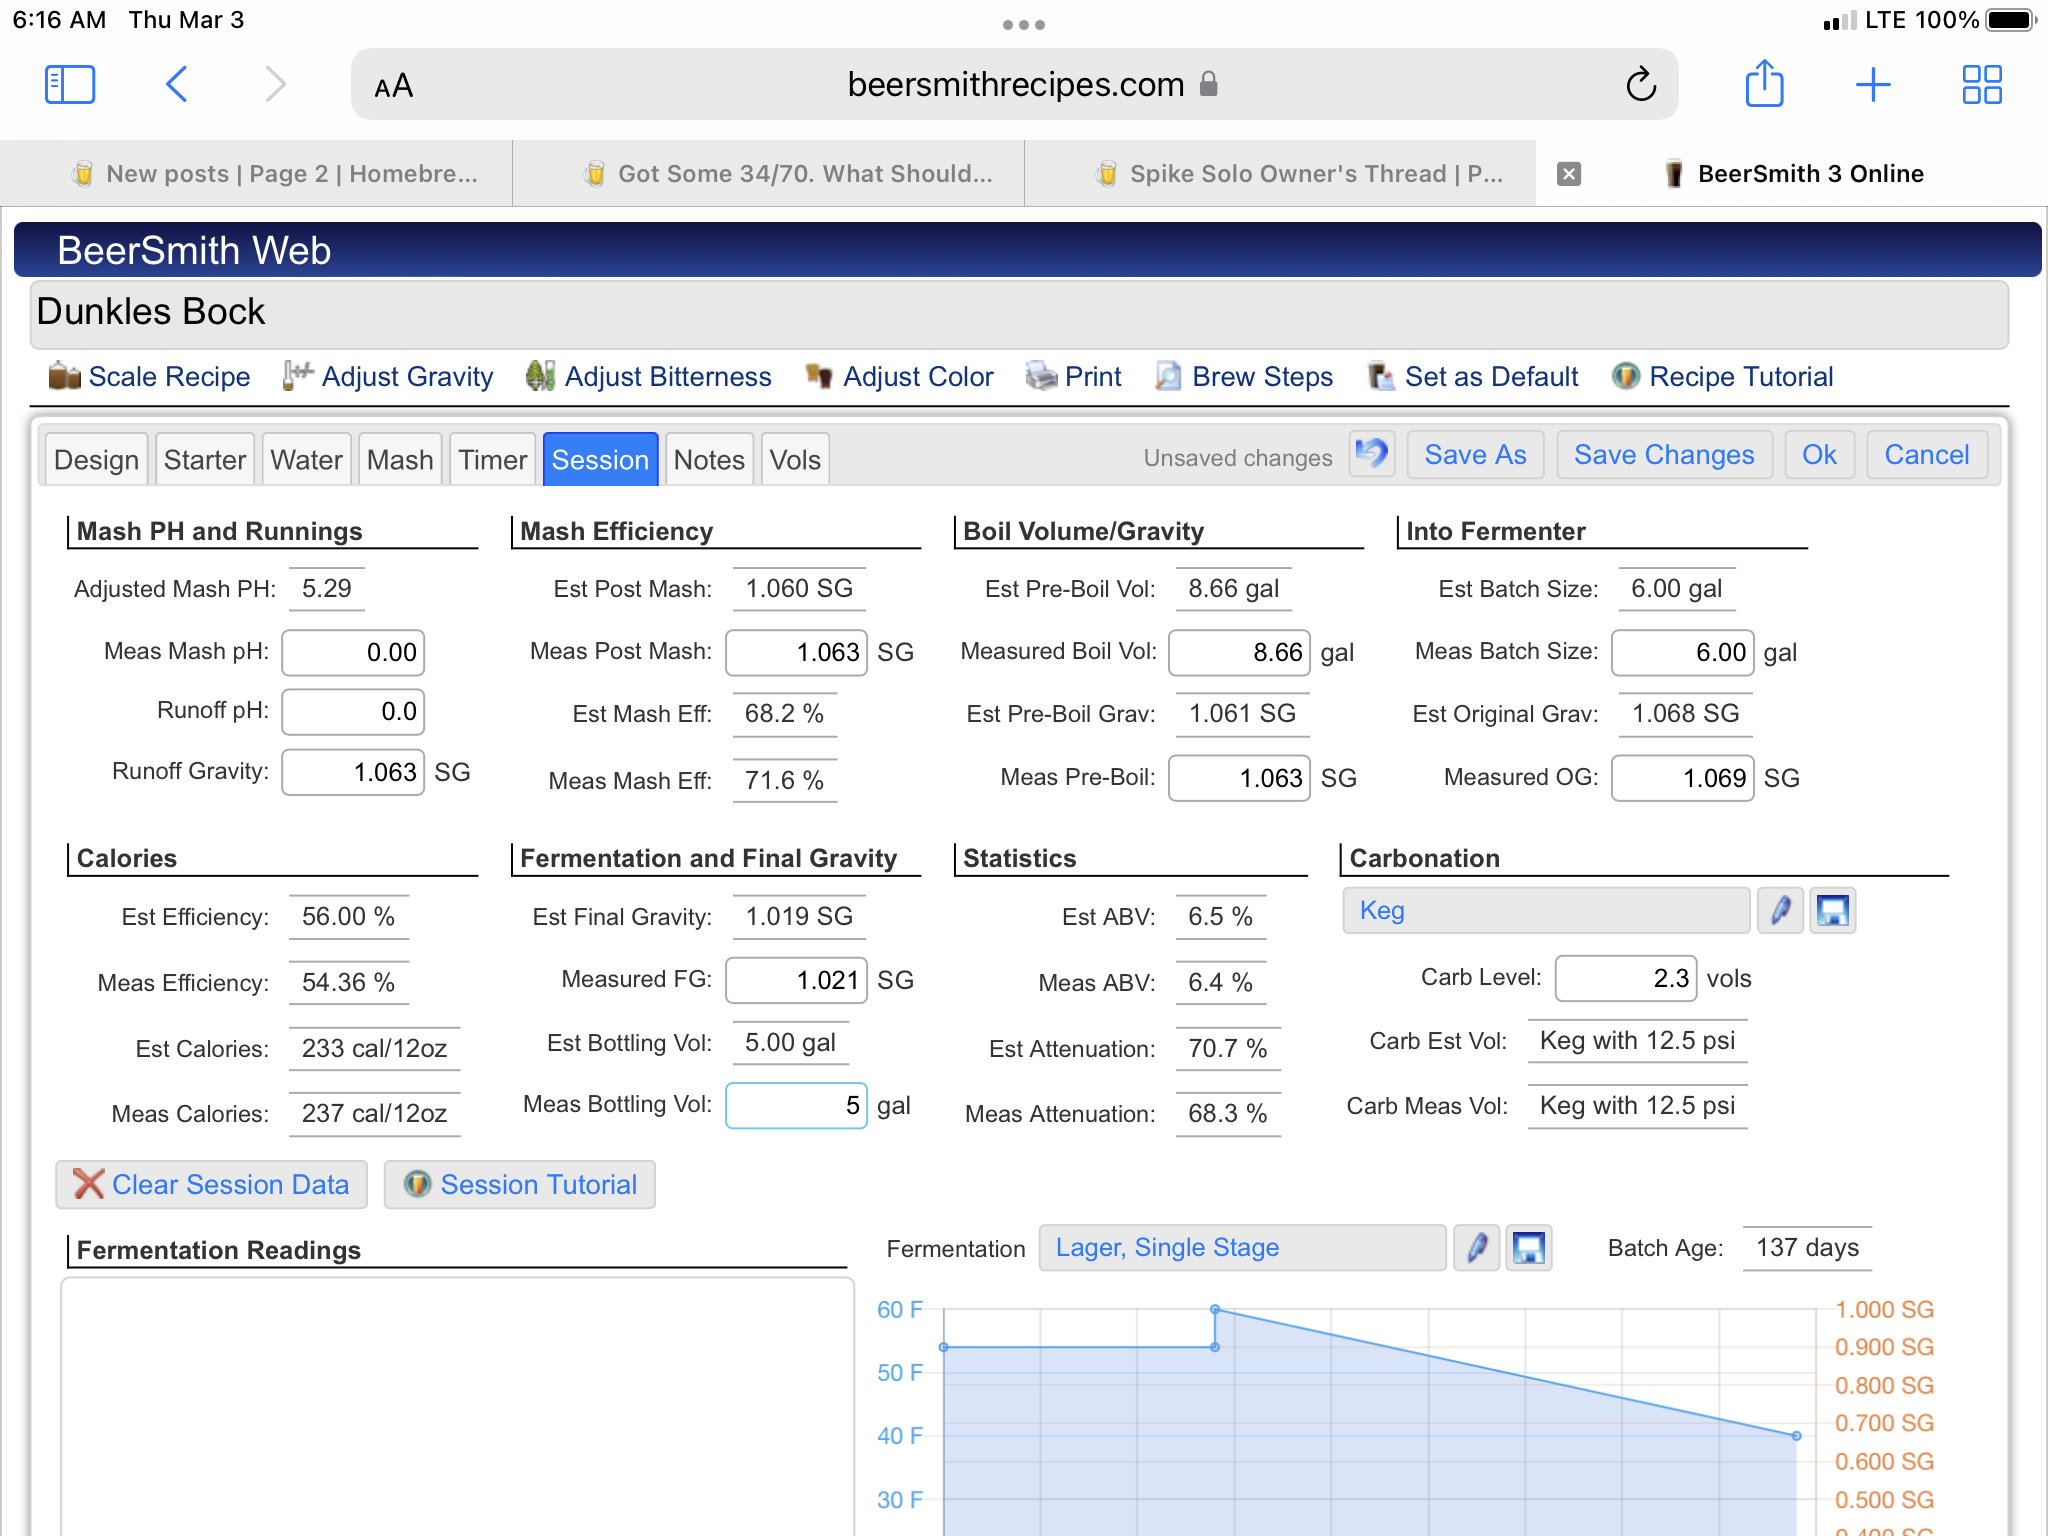
Dave, here’s the session data from my last brew. 71.6% mash efficiency. That’s about what I usually get with the Solo. I raise the mash temperature to 168 and hold it there for 10 minutes before raising the basket. Then I vorlauf for 15 minutes. This seems to help pull my efficiency up. If you are using brewing software, it takes a few brews to get your equipment profile dialed in. I like your “go big, or go home” approach to your first brew on new equipment.
Attachments
Dave King
Member
- Joined
- Jan 1, 2018
- Messages
- 7
- Reaction score
- 0
Thanks, Roger. I skipped the mash out, which I always did on my old system, it might help dissolve some more sugars. I circulated the 50 min. after resting the 1st 10 min. Maybe I got channeling. I don't recall how much stirring I did. I think I'll hold back a gal. or so, and sparge the hanging basket with it. Brew On!Dave, here’s the session data from my last brew. 71.6% mash efficiency. That’s about what I usually get with the Solo. I raise the mash temperature to 168 and hold it there for 10 minutes before raising the basket. Then I vorlauf for 15 minutes. This seems to help pull my efficiency up. If you are using brewing software, it takes a few brews to get your equipment profile dialed in. I like your “go big, or go home” approach to your first brew on new equipment.
Last edited:
- Joined
- Sep 1, 2019
- Messages
- 206
- Reaction score
- 101
Joining the crew. 20G Solo inbound, with a CF10 and second TC100. Game on ")
- Joined
- Sep 1, 2019
- Messages
- 206
- Reaction score
- 101
EDIT: Scratch that.. I'm an idiot haha..
Last edited:
Nice setup. Where did you get the spreader bar to lift the Spike basket ?Second brew day under my belt with the Spike solo. I have resolved my mash re-circulation problem with the hose falling into the grain bed with a Lock Line manifold, it worked really well. As for the hoist, I will never lift the basket alone again. I used my deer hoist to lift the basket and I didn't even use the basket hooks, I just left the basket hanging on the hoist. It worked well, I was able to dump the basket into wheel barrow while the basket was hanging from the hoist after it was done draining into the boil kettle.
The last detail was my system profile, because I was under target volume into the fermenter. I am trying to get 11 gallons of wort at the end of the day, I split my batches into two fermenter and I lose about .5 gallons to each fermenter. I added 1.00 gallon to loss in the hoses and trub which yielded about 11.6 gallons after the boil. I did compress the grain bed to get a little extra liquid from the grains but it wasn't much. All-in-all, it was a very good brew day with a lot less stress from from the first brew day. I did miss my OG before boil by about 0.006 too high but at the end of the day, so I may tweek my efficiency up a little in Brewsmith for the next batch, I need more data points at this time.
I am checking out CuS.S. Brewing for a chiller, I used my old 25' immersion chiller to cool the beer and it took about 45 minutes to reach 70. It was a lot less stressful however, than the plate chiller which plugs up a little too easily. Here are photos from Brew Day 2.
View attachment 696262View attachment 696263
- Joined
- Sep 1, 2019
- Messages
- 206
- Reaction score
- 101
Here’s another question. The main power plug that goes into the he back of the controller: it comes out very easy. Some mentioned it is a twist lock but it clearly is not. It shifts no more than a 1/16” and still will unplug from that position. What have you guys done to keep it from unplugging during a brew?
- Joined
- Apr 7, 2021
- Messages
- 56
- Reaction score
- 48
I had trouble with this at first, too. I wasn’t getting the plug all the way into the socket. Once I juggled and wiggled it into place, I could get it to twist slightly and it has been fine ever since. It doesn’t twist vey much…a few degrees is all.Here’s another question. The main power plug that goes into the he back of the controller: it comes out very easy. Some mentioned it is a twist lock but it clearly is not. It shifts no more than a 1/16” and still will unplug from that position. What have you guys done to keep it from unplugging during a brew?
- Joined
- Sep 1, 2019
- Messages
- 206
- Reaction score
- 101
I finally got it to twist. 1/16” of an inch max. Would feel better if it was a better lock but should hold.I had trouble with this at first, too. I wasn’t getting the plug all the way into the socket. Once I juggled and wiggled it into place, I could get it to twist slightly and it has been fine ever since. It doesn’t twist vey much…a few degrees is all.
Tobin Bottman
Member
- Joined
- May 5, 2022
- Messages
- 15
- Reaction score
- 5
Hi all, new to this thread and Homebrewtalk generally. Some quick background for reference. I have been homebrewing for five years, only getting more and more avid, with 62 brews completed. I share a 15 gallon system I built over the years with a friend, but have been using a Brewzilla for the last couple of years for solo, experimental batches. Given my predilection to brewing, I decided to invest in the 20 G Spike Solo + recently to take advantage of the 220V power and the potential of larger batches. Got a great bargain bin deal but do wish I had just gone with the 15...prior to purchasing I didn't think I could do full 10 gallon batches in the 15 not realizing I just couldn't do HUGE 10 gallon batches. Oh well. I have done 5 batches in the Solo and am starting to learn its ways. I have a couple of overarching thoughts and some questions I thought I would pose to the group.
Thoughts:
-Brewing 5 G batches on the 20 is tricky. I switched to no sparge for the first time ever using Brewsmith software for grain/water estimates. Otherwise the grist was so dry it was ridiculous.
-I just always mash for 90 minutes now - especially if using Pilsner malt. Otherwise my mash efficiency was spotty as others have noted.
-Doing a 90 minute boil is also tricky. My wort gravity is always way below the Brewsmith or my own estimate or previous experience, but my OG is way high (and wort volume way low) after a 90 minute boil, even if I lower the element to 70% as recommended by Spike. So I end up adding even more water to the mash, which lowers the wort gravity even more! This thing is tricky...my Brewzilla and the big 15 gallon system are just so reliable and predictable....
-End of boil waste is so high. Between the kettle deadspace and hoses, it really compounds the above issues. I read some folks actually drain the kettle through a strainer to up fermenter volume. Lifting the 20 with a couple gallons of liquid in it alone seems daunting though.
So, on to questions:
-Has anyone attached their pump directly to the kettle output? Would have to remove the butterfly valve and rely upon the pump valve I guess? The Uni-Brau is set up this way.
-I use an Exchilerator and like the water savings by racking directly into the fermenter rather than recirculating...but since the whirlpool never gets a nice chill to it, my kettle is full of loose trub at the end of the boil that I either pump into my fermenter or have a BUNCH of waste. What do you all do about this?
-Has anyone come up with a good hop/trub blocker for the outlet of the kettle to help alleviate this? My first batch I used whole cone hops thrown into the kettle and the Exhilerator clogged within about 15 milliseconds. THAT was quite the first brew day on the Solo.
-And has anyone made some sort of sparge fitting for it? Given relatively low mash efficiency, coupled with a clear (no pun intended) need of a good long vorlauf to keep the boil relatively free of husk material, it seems like it would be a good thing.
-Lastly, Spike, if you ever look at these posts, have you considered a kettle hop/trub attachment for the kettle output or a sparge fitting like some of your competitors have? If not, you might want to consider it...
All for now, thanks in advance for the information dump! Super excited to be part of this.
And total side note - if you are in the Portland, OR area and are interested in setting up a yeast sharing program, let me know. I hate to dump great yeast just because I won't be brewing a certain style for a while. I have a conical so harvesting healthy and happy yeast is super easy and I am happy to share.
Thanks all,
Tobin
I think that spreader bar is actually a gambrel that is usually bundled with a hunters game hoist. That thing looks perfect for hoisting the basket. I like the looks of this one - game hoistNice setup. Where did you get the spreader bar to lift the Spike basket ?
- Joined
- Sep 1, 2019
- Messages
- 206
- Reaction score
- 101
Can any share any changes to the baselineBeersmith Profile for the 20G? I've seen variances and going to adjust, but my grain absorption was more than calculated so my pre boil volume was about a half gallon too low I also need to adjust loss to fermenter to about .25 gallons on the CF10 vs the baseline of 1G. After all set and done I had 9 gallons into the fermenter so adjustments definitely needed. Hopefully that is all I need.
Tobin Bottman
Member
- Joined
- May 5, 2022
- Messages
- 15
- Reaction score
- 5
Hi all. To reduce waste, especially when brewing 5 gallon batches on my 20 G Solo, I was toying with attaching the pump directly to the kettle outlet. Has anyone else tried this? It would mean deleting the kettle outlet valve but I figure I can rely on the pump valve instead? Would appreciate any input others might have.
Thanks !
!
Thanks
!I've attached my pump straight to the kettle before. It worked fine, but with the pump, my 3 way valve and ball valve it seems quite heavy and didn't feel comfortable putting all that weight on the TC weld on the kettle. I'm sure it would be fine but I just didn't feel comfortable doing it.Hi all, new to this thread and Homebrewtalk generally. Some quick background for reference. I have been homebrewing for five years, only getting more and more avid, with 62 brews completed. I share a 15 gallon system I built over the years with a friend, but have been using a Brewzilla for the last couple of years for solo, experimental batches. Given my predilection to brewing, I decided to invest in the 20 G Spike Solo + recently to take advantage of the 220V power and the potential of larger batches. Got a great bargain bin deal but do wish I had just gone with the 15...prior to purchasing I didn't think I could do full 10 gallon batches in the 15 not realizing I just couldn't do HUGE 10 gallon batches. Oh well. I have done 5 batches in the Solo and am starting to learn its ways. I have a couple of overarching thoughts and some questions I thought I would pose to the group.
Thoughts:
-Brewing 5 G batches on the 20 is tricky. I switched to no sparge for the first time ever using Brewsmith software for grain/water estimates. Otherwise the grist was so dry it was ridiculous.
-I just always mash for 90 minutes now - especially if using Pilsner malt. Otherwise my mash efficiency was spotty as others have noted.
-Doing a 90 minute boil is also tricky. My wort gravity is always way below the Brewsmith or my own estimate or previous experience, but my OG is way high (and wort volume way low) after a 90 minute boil, even if I lower the element to 70% as recommended by Spike. So I end up adding even more water to the mash, which lowers the wort gravity even more! This thing is tricky...my Brewzilla and the big 15 gallon system are just so reliable and predictable....
-End of boil waste is so high. Between the kettle deadspace and hoses, it really compounds the above issues. I read some folks actually drain the kettle through a strainer to up fermenter volume. Lifting the 20 with a couple gallons of liquid in it alone seems daunting though.
So, on to questions:
-Has anyone attached their pump directly to the kettle output? Would have to remove the butterfly valve and rely upon the pump valve I guess? The Uni-Brau is set up this way.
-I use an Exchilerator and like the water savings by racking directly into the fermenter rather than recirculating...but since the whirlpool never gets a nice chill to it, my kettle is full of loose trub at the end of the boil that I either pump into my fermenter or have a BUNCH of waste. What do you all do about this?
-Has anyone come up with a good hop/trub blocker for the outlet of the kettle to help alleviate this? My first batch I used whole cone hops thrown into the kettle and the Exhilerator clogged within about 15 milliseconds. THAT was quite the first brew day on the Solo.
-And has anyone made some sort of sparge fitting for it? Given relatively low mash efficiency, coupled with a clear (no pun intended) need of a good long vorlauf to keep the boil relatively free of husk material, it seems like it would be a good thing.
-Lastly, Spike, if you ever look at these posts, have you considered a kettle hop/trub attachment for the kettle output or a sparge fitting like some of your competitors have? If not, you might want to consider it...
All for now, thanks in advance for the information dump! Super excited to be part of this.
And total side note - if you are in the Portland, OR area and are interested in setting up a yeast sharing program, let me know. I hate to dump great yeast just because I won't be brewing a certain style for a while. I have a conical so harvesting healthy and happy yeast is super easy and I am happy to share.
Thanks all,
Tobin
I use an exchillerator as well and I recirculate back into the kettle. Once cooled, I'll then recirculate without going through the exchillerator for about 10 minutes then I let it sit for 10 minutes with the pump off. This gives me a nice compact cone of trub and hop debris in the center of the kettle and super clear wort going to my fermenter.
See my point above about keeping that stuff out of my pump. Now, as far as whole cone hops go I haven't used those yet and will 100% take your experience into mind. I think I'll use a hop spider or a bag for whole cones. Blichmann has a hop shield that goes on the pickup tube, wonder if it will fit our spike kettles.
I personally don't sparge and I actually got rid of my spike basket. It was a pain to deal with the stuck mashes and low efficiencies so I bought a custom stainless steel mesh basket that fits perfectly inside of my kettle from Utah Biodiesel/ArborFab. Best decision I've made yet with this system. I'm getting mash efficiencies of 85% and Brewhouse Efficiencies of close to 75% (lower because the amount of work I leave behind in kettle).
PINbeer
Active Member
- Joined
- Dec 28, 2020
- Messages
- 26
- Reaction score
- 17
Anyone gotten one of the newer baskets with holes on the sides (original like mine only has on the bottom) and done a comparison? I'm wondering if it's worth purchasing one. I'm also wondering whether Spike would add the holes as a mod if you sent back your original. Will be asking them.
SpikeBrewing
Well-Known Member
We would love to sell you another one however save your money. There is no brewing benefit other than one more protection to frying your element.Anyone gotten one of the newer baskets with holes on the sides (original like mine only has on the bottom) and done a comparison? I'm wondering if it's worth purchasing one. I'm also wondering whether Spike would add the holes as a mod if you sent back your original. Will be asking them.
PINbeer
Active Member
- Joined
- Dec 28, 2020
- Messages
- 26
- Reaction score
- 17
Thanks for the quick response and saving me a call.We would love to sell you another one however save your money.
After a long hiatus from brewing (went from home brewer, to pro, to failed pro, and now back to home brewing, that's for another thread), and exhaustive research on the state of home brewing today, the Spike Solo+ 20g was my choice! I've watched every video and trolled every thread and it just met every criteria I had for managing wort production in a simpler set up (my pilot system at Heroic was a Spike 50g e-herms). Can't wait to get my first batches in to start establishing my numbers. Thanks to all here for the input.
My primary question is why everyone is so focused on increasing efficiency versus establishing consistency? The experiments in getting 5-10% more out of a system designed to hit 70% sound interesting, and there are some great ideas for getting a more consistent conversion, but it all sounds like a lot of work with the wrong goal in mind. Pro brewers are aiming at 80-90% total depending on style brewed. Chasing over 90 with longer sparges can lead to quality issues (tannin extraction, polyphenols, grain bitterness). What I haven't seen are consecutive brews at the same numbers or what techniques were used to ensure consistency. If you dial it in at 70% and you get within a point or two above or below every time, what is the point of chasing numbers that don't impact the quality of the beer?
My plan is to do 3 simple brews with similar gravities (thinking porter, pale, and a helles), nothing sticky or dense, nothing with a ton of hops to effect post boil volumes, work the profile in Beersmith, and work the SOP so that I'm not the variable. Water chemistry, proper ph, consistent crush, and consistent mash temps are where I usually focus. Any ideas on other techniques to get consistency?
Tobin Bottman
Member
- Joined
- May 5, 2022
- Messages
- 15
- Reaction score
- 5
Interesting! I have not had the stuck mash issues others have had (yet!) but am brewing an oatmeal stout tomorrow so will report back. I have not made the switch to a direct mount pump yet but I think I will at a minimum I will set up a three way valve so I can recirculate and whirlpool prior to chilling without the hose swapping I currently do resulting in wort loss and potential pump cavitation.I've attached my pump straight to the kettle before. It worked fine, but with the pump, my 3 way valve and ball valve it seems quite heavy and didn't feel comfortable putting all that weight on the TC weld on the kettle. I'm sure it would be fine but I just didn't feel comfortable doing it.
I use an exchillerator as well and I recirculate back into the kettle. Once cooled, I'll then recirculate without going through the exchillerator for about 10 minutes then I let it sit for 10 minutes with the pump off. This gives me a nice compact cone of trub and hop debris in the center of the kettle and super clear wort going to my fermenter.
See my point above about keeping that stuff out of my pump. Now, as far as whole cone hops go I haven't used those yet and will 100% take your experience into mind. I think I'll use a hop spider or a bag for whole cones. Blichmann has a hop shield that goes on the pickup tube, wonder if it will fit our spike kettles.
I personally don't sparge and I actually got rid of my spike basket. It was a pain to deal with the stuck mashes and low efficiencies so I bought a custom stainless steel mesh basket that fits perfectly inside of my kettle from Utah Biodiesel/ArborFab. Best decision I've made yet with this system. I'm getting mash efficiencies of 85% and Brewhouse Efficiencies of close to 75% (lower because the amount of work I leave behind in kettle).
And a total side note: For users of BrewSmith, does the program seem to under estimate wort gravity (to a worrying level) and under-estimate OG? That is routinely the case for me. I am enough of a luddite that I am not sure if that is something I can tweak in the settings but it is certainly way less accurate then the Brewzilla and three vessel equipment profile presets.
Thanks all. Also, currently bottle conditioning my third annual batch of brett 11 month aged Columbia River Gorge peach saison. So if you are in the Portland (OR) area and have a fun bottle to trade am happy to share.
Cheers,
Tobin
- Joined
- Apr 7, 2021
- Messages
- 56
- Reaction score
- 48
HopChef, you are a real brewing master. This is the great advice and is one of the best posts I have read on this forum. Thank you! As for other ideas, consider environmental factors if you are brewing outside. Temperature and humidity can affect your boil off rate. That’s one of the reasons I moved inside and use a steam condenser lid.After a long hiatus from brewing (went from home brewer, to pro, to failed pro, and now back to home brewing, that's for another thread), and exhaustive research on the state of home brewing today, the Spike Solo+ 20g was my choice! I've watched every video and trolled every thread and it just met every criteria I had for managing wort production in a simpler set up (my pilot system at Heroic was a Spike 50g e-herms). Can't wait to get my first batches in to start establishing my numbers. Thanks to all here for the input.
My primary question is why everyone is so focused on increasing efficiency versus establishing consistency? The experiments in getting 5-10% more out of a system designed to hit 70% sound interesting, and there are some great ideas for getting a more consistent conversion, but it all sounds like a lot of work with the wrong goal in mind. Pro brewers are aiming at 80-90% total depending on style brewed. Chasing over 90 with longer sparges can lead to quality issues (tannin extraction, polyphenols, grain bitterness). What I haven't seen are consecutive brews at the same numbers or what techniques were used to ensure consistency. If you dial it in at 70% and you get within a point or two above or below every time, what is the point of chasing numbers that don't impact the quality of the beer?
My plan is to do 3 simple brews with similar gravities (thinking porter, pale, and a helles), nothing sticky or dense, nothing with a ton of hops to effect post boil volumes, work the profile in Beersmith, and work the SOP so that I'm not the variable. Water chemistry, proper ph, consistent crush, and consistent mash temps are where I usually focus. Any ideas on other techniques to get consistency?
You're using the prebuilt spike equipment profiles correct? If so, have to make sure you set your elevation correctly in the equipment profile. Also, what % power do you have your controller set to during the boil? Are you using a steam condenser?And a total side note: For users of BrewSmith, does the program seem to under estimate wort gravity (to a worrying level) and under-estimate OG? That is routinely the case for me. I am enough of a luddite that I am not sure if that is something I can tweak in the settings but it is certainly way less accurate then the Brewzilla and three vessel equipment profile presets.
I personally ditched the spike basket because of exactly what you're saying. Consistency was non-existent. Post mash gravities were all over the place and I never knew if I was going to have a stuck mash or not. Had to babysit the thing the entire time because there's no "overflow" holes in the basket to prevent scorching the element. Now that I've switched to a custom stainless mesh basket, I don't have to babysit it anymore, I can stir my mash whenever I want without worry of grain in my wort, my mash efficiencies are now pushing 85% (from sub 70% with the spike basket) and I don't have to vorlauf for 15 minutes because I can just "squeeze" my mash bed to get the remaining wort out. So though I do have higher efficiencies it wasn't my goal, consistency was and just so happened to get a good bump in my efficiencies as well. I would say ultimately I'm much happier with the mesh basket because it improved basically everything about my brew day, I save time (shorter mashes, no vorlauf, can multitask because I don't have to babysit for a element dry fire), I get higher efficiencies and I am waaaay more consistent batch to batch.My primary question is why everyone is so focused on increasing efficiency versus establishing consistency? The experiments in getting 5-10% more out of a system designed to hit 70% sound interesting, and there are some great ideas for getting a more consistent conversion, but it all sounds like a lot of work with the wrong goal in mind. Pro brewers are aiming at 80-90% total depending on style brewed. Chasing over 90 with longer sparges can lead to quality issues (tannin extraction, polyphenols, grain bitterness). What I haven't seen are consecutive brews at the same numbers or what techniques were used to ensure consistency. If you dial it in at 70% and you get within a point or two above or below every time, what is the point of chasing numbers that don't impact the quality of the beer?
That was just my experience and thought processes that got me to where I am today. Some things that annoyed me may by no big deal to others so to each their own and YMMV.
Tobin Bottman
Member
- Joined
- May 5, 2022
- Messages
- 15
- Reaction score
- 5
Hi Biggz1313. I am using the 20 G Solo equipment profile. I am at a whopping 125' elevation! Once boiling I reduce the power to 70% per Spike's recommendation. I do not have a steam condenser lid. For the 5 gallon batch brew I just finished today, I added 8 gallons to the kettle, boiled for 60 minutes and ended up with about 5.75 gallons left in the kettle which ended up being about 5.5 gallons in the fermenter - as hoped. I still can't get the 90 minute boil volumes dialed in. So BeerSmith estimated my wort gravity as 1.050 and I hit 1.048 - close enough. BUT BeerSmith estimated my OG was going to be 1.062. My actual OG was 1.058. And this is after adding about 2 pounds of grain on top of the original recipe that I made on my old Brewzilla (which had an OG of 1.065 btw).You're using the prebuilt spike equipment profiles correct? If so, have to make sure you set your elevation correctly in the equipment profile. Also, what % power do you have your controller set to during the boil? Are you using a steam condenser?
Hey, the beer tastes good so at least there is that. I would just love some better predictability.
Thanks for your input!
Tobin
Would you be willing to share screen shots of your equipment profile for both the 60min and 90min boils? Also if you're always missing your OG low but your expected/predicted volumes throughout the brew are accurate then you have some mash issues to clear up. Could be your crush (grain mill gap too wide), could be channeling in your grain bed. Just trying to think of all the possibilities here.Hi Biggz1313. I am using the 20 G Solo equipment profile. I am at a whopping 125' elevation! Once boiling I reduce the power to 70% per Spike's recommendation. I do not have a steam condenser lid. For the 5 gallon batch brew I just finished today, I added 8 gallons to the kettle, boiled for 60 minutes and ended up with about 5.75 gallons left in the kettle which ended up being about 5.5 gallons in the fermenter - as hoped. I still can't get the 90 minute boil volumes dialed in. So BeerSmith estimated my wort gravity as 1.050 and I hit 1.048 - close enough. BUT BeerSmith estimated my OG was going to be 1.062. My actual OG was 1.058. And this is after adding about 2 pounds of grain on top of the original recipe that I made on my old Brewzilla (which had an OG of 1.065 btw).
Hey, the beer tastes good so at least there is that. I would just love some better predictability.
Thanks for your input!
Tobin
Adam Zerwick
Well-Known Member
- Joined
- Apr 13, 2018
- Messages
- 78
- Reaction score
- 35
I personally ditched the spike basket because of exactly what you're saying. Consistency was non-existent. Post mash gravities were all over the place and I never knew if I was going to have a stuck mash or not. Had to babysit the thing the entire time because there's no "overflow" holes in the basket to prevent scorching the element. Now that I've switched to a custom stainless mesh basket, I don't have to babysit it anymore, I can stir my mash whenever I want without worry of grain in my wort, my mash efficiencies are now pushing 85% (from sub 70% with the spike basket) and I don't have to vorlauf for 15 minutes because I can just "squeeze" my mash bed to get the remaining wort out. So though I do have higher efficiencies it wasn't my goal, consistency was and just so happened to get a good bump in my efficiencies as well. I would say ultimately I'm much happier with the mesh basket because it improved basically everything about my brew day, I save time (shorter mashes, no vorlauf, can multitask because I don't have to babysit for a element dry fire), I get higher efficiencies and I am waaaay more consistent batch to batch.
That was just my experience and thought processes that got me to where I am today. Some things that annoyed me may by no big deal to others so to each their own and YMMV.
Would you mind attaching a pic of your custom basket? I'm also going the route of ditching the Spike basket and was planning on the whole false bottom + brewbag... Never even considered a different basket.
I will try and do this tomorrow. I'm out of town at the moment. I bought it from Utah Biodiesel who I think had a sister company ArborFab make it and ship it cuz I'm in Ohio. But here's a link to their sites: Stainless Brewing Filters For Beer, Wine, Coffee, Tea and More! - Hop Spider, Hops Holder, Hop Strainer Cup, Keg Filter, Kettle Screens, Stainless Steel Mesh, Custom - Utah Biodiesel Supply or Welcome to Arbor Fabricating - Specializing in Stainless Steel Mesh and Perforated FiltersWould you mind attaching a pic of your custom basket? I'm also going the route of ditching the Spike basket and was planning on the whole false bottom + brewbag... Never even considered a different basket.
Similar threads
- Replies
- 6
- Views
- 503
- Replies
- 2
- Views
- 493
- Replies
- 10
- Views
- 2K
- Replies
- 1
- Views
- 2K
