Spike Solo Owner's Thread

Homebrew Talk - Beer, Wine, Mead, & Cider Brewing Discussion Forum

Help Support Homebrew Talk - Beer, Wine, Mead, & Cider Brewing Discussion Forum:

This site may earn a commission from merchant affiliate links, including eBay, Amazon, and others.
Well I believe I've identified the problem that was causing stuck mashes.

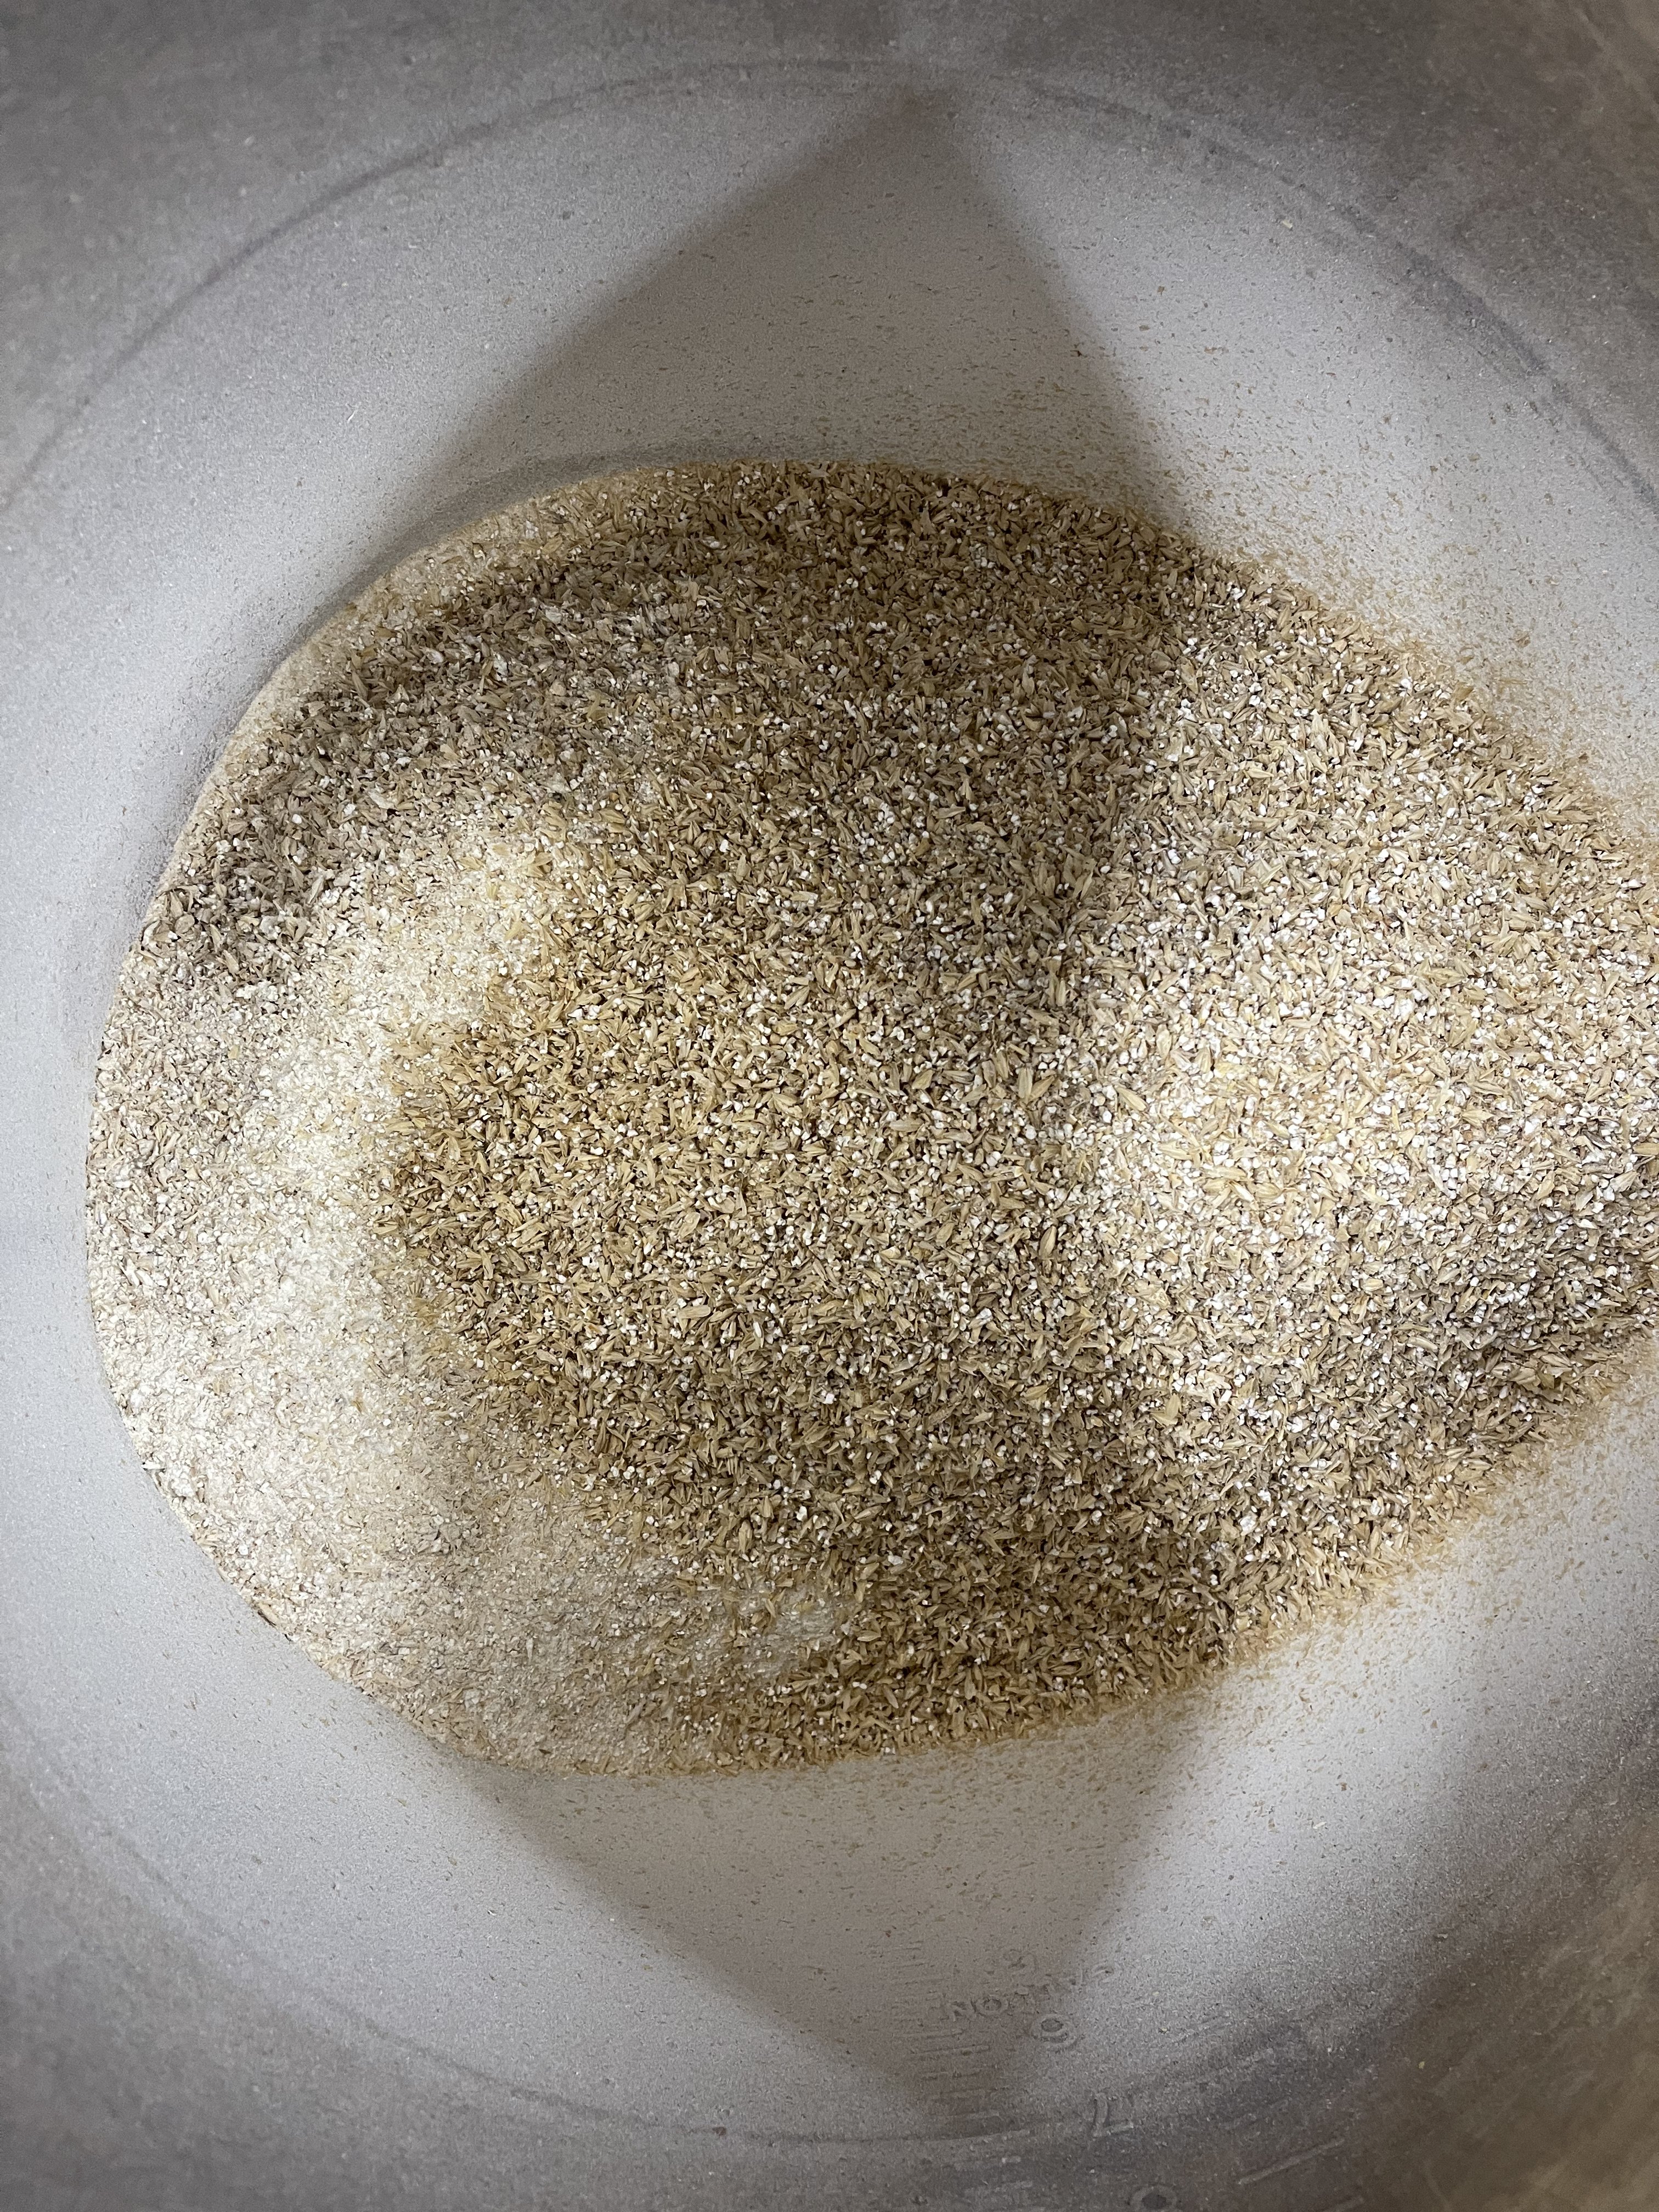
This is the Maltzilla "grinding" my grain at 0.041". Notice it's pure dust!
IMG_3505.jpeg


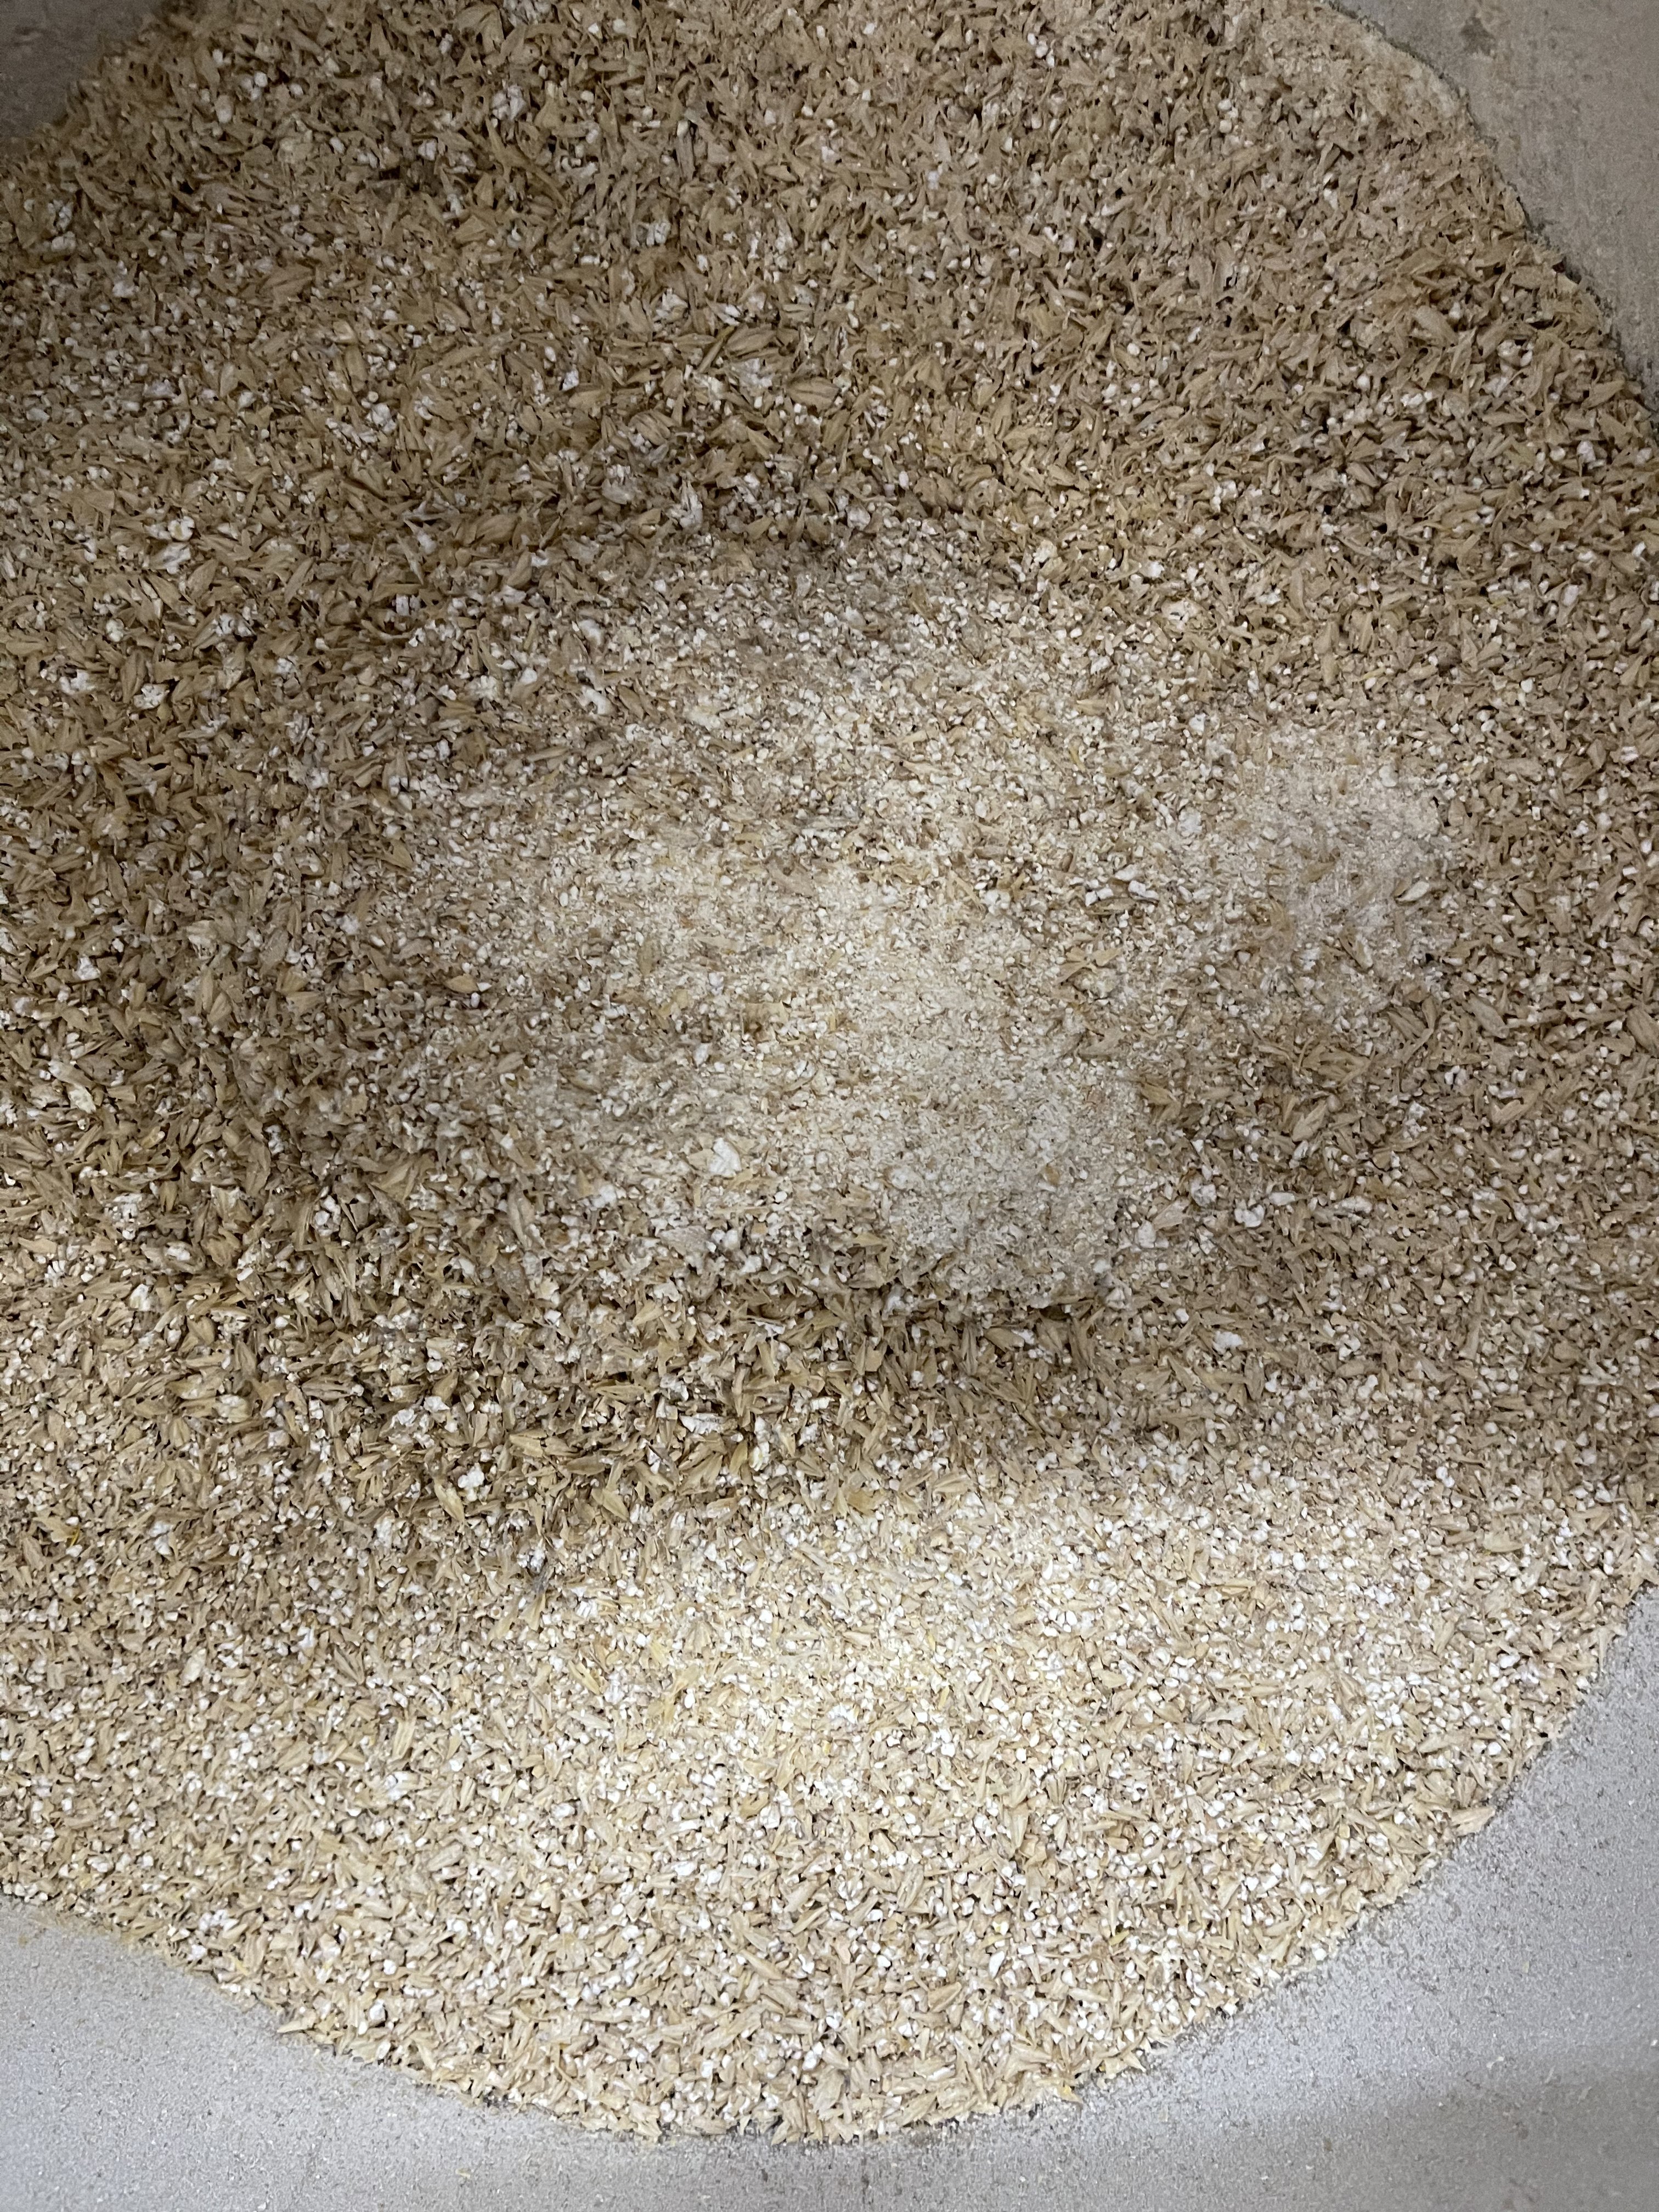
So then I get out my trusty old Cereal Crusher set to 0.038" and notice the grain on top of the dust.
IMG_3506.jpeg


So I got back to my Maltzilla and lower the voltage to 12v (from 24v) so it grinds slower: (notice the center of the picture...mostly dust again)
IMG_3508.jpeg


I used a pound of rice hulls in this last batch and that was barely enough to prevent a stuck mash. Problem found! It's the Maltzilla. Or course, I'm not sure where to go from here. I can't find anyone that has experience with the Maltzilla to see if there is somehow something I"m doing wrong but I'm thinking I might try and return it and buy a better system...or just keep using the trusted Cereal Grinder.
 
Conditioning your grain before milling and grinding slowly will help with drainage by keeping the hulls intact. It also keeps the dust down when milling.
 
Thanks for the tip about Conditioning 9Kegs. I looked that up and it looks like adding 2% water weight per weight of grain so I'll give that a shot. My problem was actually caused by the Maltzilla as the dials on the sides of the unit determine grain crush while most every other grinder on the market uses actual gap sizing. So while my Maltzilla had a gap that was ACTUALLY 0.041", the dials were telling me it was .5mm and .75mm and that's probably what caused all the powder...an extremely fine crush. So I'm going to try again with the dials set at 1.0mm which equals 0.040" even though the ACTUAL gap size is now 0.058"

I won't know for sure until my next brew but I'm glad I find that youtube video that did the review of the Maltzilla else I never would have known to look for the little dials.
 
Last edited:
checking into this thread!
I have a 10 gallon clawhammer 120V system, but decided it was time to upgrade to 240V.

I recently got a spike solo kettle, with a few extra custom ports. Went to do my first brew day yesterday, stepped upstairs for about 5-10 minutes after mash in and returned to a scorched element and the gfci had tripped. 28 pounds of grain in the trash in only 10 minutes! Must be a record. On the plus side its nice to know the GFCI works as intended.

Looking forward to my first successful brewday!
 
Did you destroy the heating element as well? I have to imagine that most people experience a burnt element with the spike system as you can’t tell where the wort line is with the lid on and you’ll have issues if you blindly follow their brewing advice. I used a quick disconnect and length of hose to watch the wort level from outside the kettle and I was able to stop the flow as soon as I got in the “danger zone” so to speak. I was dealing with a slow mash due to 10 pounds of the grain being milled into dust on the last batch and even a pound of rice hulls wasn’t enough to allow more than a 10-20% flow rate. The slow flow rate also cases a large delta in temperate in the mash tun so it wasn’t a very enjoyable brew day.
 
I broke down and added a bag to my Solo basket. Now, I crush the ever-loving-jesus out of my grain, mash, lift the basket to drain, then squeeze the bag into the kettle and manage to break the 75% efficiency barrier I had encountered just using the basket.

The real driver for the bag was solid matter in the boil causing scorching on the element, even after a conservative crush on conditioned grain.

The basket is still useful for not disturbing the grain when starting to drain. I get fairly clear wort in the kettle (not like my 3v system, but what you gonna do) this way, and scorching isn't as much of a problem as it was. Still seem to pick up more material on the element through the brew than I used to with my 3v system and home-build AuberIns controller though.
 
Did you destroy the heating element as well? I have to imagine that most people experience a burnt element with the spike system as you can’t tell where the wort line is with the lid on and you’ll have issues if you blindly follow their brewing advice. I used a quick disconnect and length of hose to watch the wort level from outside the kettle and I was able to stop the flow as soon as I got in the “danger zone” so to speak. I was dealing with a slow mash due to 10 pounds of the grain being milled into dust on the last batch and even a pound of rice hulls wasn’t enough to allow more than a 10-20% flow rate. The slow flow rate also cases a large delta in temperate in the mash tun so it wasn’t a very enjoyable brew day.

That was something I experienced too. Got set up to use the Blichmann AutoSparge from my 3v system in the basket... no more over-run mash for me.

123766966_3587465117977395_10697805563250655_o.jpg


That's 40lbs of grain to run a partigyle for 5g of Rye Wine and 10g of Rye Mild. I've use loc-line off of the autosparge for smaller grain bills, but this was a good picture of how it sits in the basket.
 
Did you destroy the heating element as well? I have to imagine that most people experience a burnt element with the spike system as you can’t tell where the wort line is with the lid on and you’ll have issues if you blindly follow their brewing advice. I used a quick disconnect and length of hose to watch the wort level from outside the kettle and I was able to stop the flow as soon as I got in the “danger zone” so to speak. I was dealing with a slow mash due to 10 pounds of the grain being milled into dust on the last batch and even a pound of rice hulls wasn’t enough to allow more than a 10-20% flow rate. The slow flow rate also cases a large delta in temperate in the mash tun so it wasn’t a very enjoyable brew day.
It appears that the fuse tripped in time to save the element, it did get a fairly nice scorch on it I have yet to clean with barkeepers friend.

I also plan to purchase a brew bag for this to hopefully help with this issue. I used to use a brew-bag on my clawhammer system just to aid in cleanup.
 
I broke down and added a bag to my Solo basket. Now, I crush the ever-loving-jesus out of my grain, mash, lift the basket to drain, then squeeze the bag into the kettle and manage to break the 75% efficiency barrier I had encountered just using the basket.

Do you think you can share which bag you are using? As far as the mesh size and the size of the bag itself?
 
checking into this thread!
I have a 10 gallon clawhammer 120V system, but decided it was time to upgrade to 240V.

I recently got a spike solo kettle, with a few extra custom ports. Went to do my first brew day yesterday, stepped upstairs for about 5-10 minutes after mash in and returned to a scorched element and the gfci had tripped. 28 pounds of grain in the trash in only 10 minutes! Must be a record. On the plus side its nice to know the GFCI works as intended.

Looking forward to my first successful brewday!

Sorry about the trouble! We highly recommend turning the element off when mashing in and then letting the mash rest for about 5-10mins. This allows the grain to absorb the liquid and prevents stuck mashes. I've brewed about 10 times over the last couple months and have not had a stuck mash. A few of these were with a double crush since our local store's mill isn't great.
 
Sorry about the trouble! We highly recommend turning the element off when mashing in and then letting the mash rest for about 5-10mins. This allows the grain to absorb the liquid and prevents stuck mashes. I've brewed about 10 times over the last couple months and have not had a stuck mash. A few of these were with a double crush since our local store's mill isn't great.
Wow didn't expect a reply from Spike themselves! Have to say working with you guys for my custom kettle was amazing. Already eyeing a CF5 or CF10 in the near future.

I am sure it was user error on my part, I will try turning off the heating element on my next brew. The 5-10 minute rest is a great idea as well. Planning a second attempt either tomorrow or Saturday and will report back.

Overall I am super impressed by the system itself, just a few hiccups on the learning curve!

Thanks for your response and kind words!

Best of luck on your next brew day!!
 
I wanna say I remember Short Circuited brewer just attaching a spare hose to the whirlpool and hanging it over the kettle handle as a sort of sight glass.

I took a brief look through his videos though and couldn't find it.
 
Not sure if people realize this, but tapering the grain bucket like Spike did on the Solo is terrible for causing mashes to stick. At any point in the bucket there is more area above trying to drain into less area below, meaning there is more and more flow resistance the deeper you go into the bed.

At the perforated bottom you've got a 40% decrease in flow area compared to the top. (12^2 / 15.7^2) Decreased flow area means increased flow velocity equals increased pressure on the bed the deeper you go in the bed. Increased pressure = increased compaction = increased chance of stuck mash.
 
I wanna say I remember Short Circuited brewer just attaching a spare hose to the whirlpool and hanging it over the kettle handle as a sort of sight glass.

Sight glasses on mash tuns are an excellent way to gauge the hydrostatic head on the mash bed. They should be standard on every mash setup.
 
I brewed my first batch with the 20 gal and I have setup a tube that I hooked up to the whirlpool port and tied to the handle to monitor liquid level when recirculating so that is helpful. I am concerned about the even liquid distribution over the grain bed though and have heard of some people having uneven temperatures across it. I did seem to be having trouble with the grain bed compacting. When I would stir it and mix it up a lot of liquid would rush to the bottom and the temp would drop a couple degrees. I am thinking of attaching something like a fly sparge rig to help keep the liquid distribution consistent when recirculating. Good idea?
 
I wanna say I remember Short Circuited brewer just attaching a spare hose to the whirlpool and hanging it over the kettle handle as a sort of sight glass.

I took a brief look through his videos though and couldn't find it.
That’s where I got the idea. I think it was his video of the spike solo while still a prototype. He had the tube come out and bend up and tied to the handle which I did, but I noticed the bend rate really changed the water level so I was looking for a 90 degree 5/8” ss fitting I could use for a temporary sight glass during the mash. That or a more solid tube that I could just attach and then remove at mash out.
 
Has anyone tried making a sight glass for the Spike solo?

I was thinking of using this and attaching some silicone tube secured to the handles on the grain basket.
https://www.brewershardware.com/1-1...-with-90-Bend-TC15B58-90.html?category_id=276

I think a simple sight "glass" implemented with two 1/2" TC flanges, two 1/2" TC x hose barb 90* elbows, and a length of silicon tubing would be the most reliable, easiest to maintain method. Have the flanges welded into the extremes of the kettle (near the interior lip on the bottom and the exterior lip on the top), and it would make use easier during the mash as well as during the boil if using a steam condenser.

I've been exploring the cost of having such a setup incorporated into my system so I don't have to lift the lid during the boil just to check volume when using a condenser.
 
That’s where I got the idea. I think it was his video of the spike solo while still a prototype. He had the tube come out and bend up and tied to the handle which I did, but I noticed the bend rate really changed the water level so I was looking for a 90 degree 5/8” ss fitting I could use for a temporary sight glass during the mash. That or a more solid tube that I could just attach and then remove at mash out.

Spike brewing posted a pic to their instagram page showing the use of a sight glass. The thought of doing something similar has been bouncing around in my head.
 

Attachments

  • Screenshot_20210127-053653.png
    Screenshot_20210127-053653.png
    2.3 MB · Views: 309
Here's how to build a sight gauge. Costs about $15 and takes an hour or so. It uses 1/2" poly carbonate racking cane. Doesn't stain easily, tough, readily available and cheap to replace.
20190303_143345.jpg
20190303_144251.jpg
20190303_144818.jpg
20190303_145708.jpg
 
No leaks.

You can back flush it after brewing a dark beer by putting a hose over the open end and circulating PBW through it. Takes less time than disassembliing a TC fitting and washing it by hand.

20190303_145736.jpg
20190303_150623.jpg
20190305_191237.jpg
20190306_121301.jpg
 
Did another brew on the solo!

Much smoother sailing this time around.

Brewfather

I added a SSbrewtech mash manifold and a Brew-Bag 400 micron this time around.

First time using the steam slayer and newly installed winch. Also first time using no hop spider and whirlpooling!

I used the hose-whirlpool sightglass trick during mash, which worked pretty well!
PXL_20210129_221747759.jpg
PXL_20210129_221751836.jpg
PXL_20210129_221758018.jpg
PXL_20210130_001014960.jpg
PXL_20210130_014745486.MP.jpg
PXL_20210130_014749072.jpg
PXL_20210130_014952062.jpg


Everything worked out well!
 
Appreciating all the posts. I'm 4 batches in and did spring for a CF wort chiller - specifically the Exchillerator. Love it! Amazing to go straight into the fermenter at pitching temps. I'm sure the Spike version is great, but the Exchillerator is much cheaper and works great.

Regarding the rising water level during the mash. I've watched this more carefully and haven't really had an issue, though I have scraped the bottom a bit during the first part of the mash. On a fluke I was re-reading the FAQs on the Spike site regarding a stuck mash. Not sure if this is a new addition or I just missed it the first time, but it says:

  • When mashing in, turn the pump off before pouring in your grain. After stirring in the grain, let the grain bed rest 5-10mins before turning on the pump. This allows the grain to fully absorb the liquid and expand which prevents grain from going through the baskets bottom filter.
I haven't been doing this, but will definitely try it in the future. I'm also going to send Spike a question about rice hulls. They aren't needed ideally, but do they actually cause an issue? My next batch is a hazy w/ flaked wheat, so I'm a bit anxious.

I'm intrigued by Rubberband's solution on recirculation outflow. I feel like the current design puts the recirculation only in a very specific spot on one side of the kettle, especially when you have to run the pump at only 25% as is recommended. Wondering if that's impacting my efficiency (which isn't great). Anyone using other options that you would recommend that get the recirculation outflow more evenly distributed or at least more centered?

Still thinking about exhaust options. I'm really close on the Condenser Lid. Just have 2 concerns that I'm struggling to get comfortable with. But the condenser lid is a different thread, so I'll save the discussion for there.
 
Update: Heard back from Spike on the rice hulls. Very fast and professional reply. I won't quote it here since it was a direct mail to me, but the gist was that (a) they aren't necessary based on the design and (b) they don't test with them. My interpretation is that there was nothing specific that they know would be problematic, but they don't recommend since they haven't be tested and they just aren't required. Couldn't imagine what harm could be done by them, but just wanted to be sure. I'll reserve the right to ignore this advice in the future 😁, but for now I'll trust and throw in my flaked wheat without the rice hulls in my next batch.

Also, realized when I returned to this thread that Spike had mentioned the 5-10 min rest approach on page 2 of the topic and I hadn't noticed. So maybe this is a good reinforcement for anyone who missed it the first time.
 
Has anyone tried making a sight glass for the Spike solo?

I was thinking of using this and attaching some silicone tube secured to the handles on the grain basket.
https://www.brewershardware.com/1-1...-with-90-Bend-TC15B58-90.html?category_id=276

I essentially have a Spike Trio and had them install custom TC ports. I use these sight glass valves and 3/4" borosilicate (pyrex) glass that i got from glacier tanks. They work really well and easy to soak/clean afterwards. You probably don't need the top valve. I think it would take a lot of force to knock it over if you only used the bottom valve with open top. You could put it on the end of the whirlpool valve during mash. An option for less than $100.
Sight Level Valves | Tri Clamp 1.5 in. - Upper - SS304

ps: i'm thinking about getting the Spike basket and switching from the 3V Herms to save time
 

Attachments

  • MLT Sight.jpg
    MLT Sight.jpg
    97.8 KB · Views: 147
  • Sight Glass.jpg
    Sight Glass.jpg
    71.4 KB · Views: 149
That was something I experienced too. Got set up to use the Blichmann AutoSparge from my 3v system in the basket... no more over-run mash for me.

123766966_3587465117977395_10697805563250655_o.jpg


That's 40lbs of grain to run a partigyle for 5g of Rye Wine and 10g of Rye Mild. I've use loc-line off of the autosparge for smaller grain bills, but this was a good picture of how it sits in the basket.
What length auto sparge rod is that?
 
Put together a brown ale today. I've come to the conclusion that the solo basket really needs a bag in it to shine. Made 77-78% efficiency into the fermenter without any silly tricks (long mash, lots of stirring, long boil, etc). The bag allows a very fine crush without getting a bunch of solids to the element.
148962648_3849107628479808_4405210788136157800_o.jpg
149743435_3849107615146476_2308916538026190581_n.jpg
150687751_3851084501615454_3481868442576734272_o.jpg
150551298_3851084668282104_5985762979438969584_o.jpg

150479540_3851084634948774_6315542366115983953_o.jpg
148402427_3851084651615439_3858815758735346709_o.jpg
150863048_3851084618282109_606780579971955902_o.jpg
150848631_3851084524948785_370600791751303734_o.jpg

149277824_3851084708282100_5125707224386246883_o.jpg
151430119_3851203374936900_5567805243475319465_o.jpg
 
Take this for what it's worth. I've only been brewing for 11 months and have 25, 5g batches under my belt. Switched from BIAB to the Spike basket with propane. I have 7 spike basket batches complete. Each batch I've increased my efficiency. First batch was awful at 62% but yesterday's batch was 78% without any effort trying to 'press' the grains for those final drippings or volume. I have started using enzymes. I do a fresh water sparge with ~170 degree water to arrive to the expected pre-boil wort volume. Normally about a gallon to a gallon and a half of sparge water.

Keg King 3-Roller Grain mill. One pass. I don't have a gauge, but estimate based on the Keg King dial somewhere around .035. (One credit card (.0299") will slip in without touching rollers, two credit cards (.05984") need to be 'forced' between.

I have modified my pump recirculation by placing a 3-way valve on my whrilpool TC. Therefore, I am returning wort over the grains but also underneath the basket simultaneously. The flow under the basket, helps stir up and remove a majority of grains that do slip through the baskets false bottom. If I ever do go electric, this supposedly will help me not to scorch an element. (First couple of batches without this modification resulted in close to cup of grains pulled from the wort through a kitchen chinois. (See below))

PROCESS
Mash water to strike temperature with recirculating pump on. Revert pump to under the basket as I dough-in, verify I have no dough balls, let it sit for 10 minutes. After 10 minutes, I do a quick temperature check and have found there is a significant temperature difference between the center of the grain bed and the walls. (I do keep propane low flame lit during mash.) perform a quick stir trying NOT to scrape the bottom of the basket. Temperature check, start ultra slow recirculation, lid and leave it alone for 15 minutes. I'll take a peak around the 25m mark, check flow and for stuck mash. If it's a slow/stuck mash, I'll perform a quick stir. Lid it and leave it be.

Been performing iodine conversion tests around 45 minutes with completion results.

Hoist basket above wort level to continue vorlauf. Modify recirculation flow rate to only flow over grain create a situation where I do NOT have a layer of wort on top of grain bed. I then further lift the basket so I can get a paddle in to stir the wort. Stiring the wort, while the basket is lifted and still recirculating assists in removing much of the grain that may have passed through the false bottom. (Not all, just most).

Once I've vorlaufed and feel my wort is a clear/clean as possible. Pump re-routed to whirlpool only. Raise the basket, well above kettle allow it to continue to drip into kettle. At this point I'll sparge. I'll remove my basket supply hose and run that through a kitchen chinois for a few minutes, again while stirring the wort. This results in about a <1/4 cup of grain being removed and what I believe is as 'clean' wort as possible. (This process is not for the LODO brewers out there).

I leave the basket hanging for those final dripping over the kettle until the final 15 minutes of the boil, it's removed as I begin the sterilization of the chiller, pump, hoses, etc.
 
I recently picked up a few valves to make a 3 way valve setup for mashing and bypassing my exchillerator during whirlpool. I also plan to try my next batch with a bag and a finer grind.

My 2nd batch with the SSbrewtech mash manifold well. Not rocking crazy efficiency yet, but I am really enjoying the spike system and 240V in general.
 
I'm about 6 brews in on the solo 20g. I cannot for the life of me break 63% mash efficiency. I've tried everything, 10 min rest, stirring every 10 minutes, faster/slow recirc, crushed all the way down to .35. I don't get it.
 
Are you guys pressing the basket?
I squeezed the bag sometimes and didn't others brewing biab. I plan to press the basket for sure.
Also on the grains in the bk issue has anyone ever done a 10 minute vorlauf with a tc inline filter? I already own one that I use when kegging but figured it could be worthwhile for this purpose as well. Crazy? Good idea?
I wanna start with no bag and on spike's recommend crush first. See how it goes.
Pic is the filter in question. It's just ss mesh inside.
 

Attachments

  • PXL_20210212_203142874.jpg
    PXL_20210212_203142874.jpg
    1.8 MB · Views: 103
Last edited:
I have a
Are you guys pressing the basket?
I squeezed the bag sometimes and didn't others brewing biab. I plan to press the basket for sure.
Also on the grains in the bk issue has anyone ever done a 10 minute vorlauf with a tc inline filter? I already own that I use when kegging but figured it could be worthwhile for this purpose as well. Crazy? Good idea?
I wanna start with no bag and on spike's recommend crush first. See how it goes.
Pics is the filter in question. It's just as mesh inside.

I have a similar TC filter that I plan to try to use either for final kettle filtration or for vorlauf as you described.

I once tried to use it with my clawhammer system to prevent the recirc sprayer from clogging. The filter clogged and was a PITA to disconnect at 150+ degrees.

I have a bypass valve setup now to prevent this issue, which is why I'm thinking of trying again
 
If anyone with a solo+ is using a 3 way valve to split the outflow between recirculation and whirlpool I'd love to see it. This is what intend to do but I can't even figure out what 3 way valve I need. I already have a riptide and plan to use it. It's an npt riptide so I THINK I need an L type 3 way valve with another ball valve on the recirculation out of the 3 way. (Or should I just throttle with the riptides valve?)
Sorry for all the stupid and thanks for any help.
Perhaps it'll just make more sense when I have it from of me
This is how I’m setup currently.
 

Attachments

  • FB30CEA6-070B-40EB-9ED6-90DA1BF7B4F3.jpeg
    FB30CEA6-070B-40EB-9ED6-90DA1BF7B4F3.jpeg
    1.7 MB · Views: 230
  • 9B82FF0B-1CAC-45E0-BC78-01C401C3BE70.jpeg
    9B82FF0B-1CAC-45E0-BC78-01C401C3BE70.jpeg
    1.5 MB · Views: 229
This is how I’m setup currently.

Will need to check out options and costs for these parts. I do like to run wort through the chiller for sterilization during the boil and then to drop the temp ~10-20 degrees for the real whirlpool. But the flow is too weak when going through the exchillerator to get an effective whirlpool. Last time I moved my hoses in the middle of the process, which makes a bit of a mess and you have to be careful as the connectors are hot. This is a much better solution.
 
I wanted to put the 3 way on my riptide.
I have mine oriented vertically where inlet is into the bottom and outflow is on top.
I use ball lock QDs and figures I'd put the valve directly onto the pump out and then male ball lock fittings on the valve.
That'd be fine too, right?
 
Back
Top