• Please visit and share your knowledge at our sister communities:
  • If you have not, please join our official Homebrewing Facebook Group!

    Homebrewing Facebook Group

Speidel Braumeister (brewmaster)

Homebrew Talk

Help Support Homebrew Talk:

This site may earn a commission from merchant affiliate links, including eBay, Amazon, and others.
Thanks Obliviousbrew,
I have the 5gallon malt pipe.
Fallowing your addvise, I will put a little less than max grain in for a 5g batch, mash in, mash, then remove the 5g mp, place the 10g mp in with the rest of the grain.
Top up with cold water then mash in, mash and mash out. As for SRM, as long as the flavor is there I won't mind a darker beer. There are many black IPA's being brewed these days. The next trick will be fermenting this bad boy and being patient with the conditioning phase.
All part of the game...... If you have any more thoughts, please post.
Oh I had another idea, I could do 3 complete five gallon batches with a third of the grain each time, add them together and boil them down.......Just kidding.
Thanks for your help.

I´m hoping this turns ok never tried it yet... you are a brave man:D.
Let us know how it went.
 
Has anyone tried an overnight mash or setting their braumeister to mash-in temperature the night before? I suspect running the pumps all night wouldn't be well-advised, but perhaps setting the target temp might be ok?
 
i certainly haven't. the 20L doesn't take very long to get up to temp; less than 40 minutes to get my chilly tap water to a reasonable mash temp say 65, is the 50L so sluggish? for me there is plenty of stuff to be done while it's heating strike water
 
dinnerstick said:
i certainly haven't. the 20L doesn't take very long to get up to temp; less than 40 minutes to get my chilly tap water to a reasonable mash temp say 65, is the 50L so sluggish? for me there is plenty of stuff to be done while it's heating strike water

I have the 50 and it doesnt take very long, while is heating I crush my grain, clean, organize etc etc
 
Hello Guys,

I am living in Switzerland and thinking of buying the Braumeister to start to brew my own beer. I have a couple of questions to help me determine which would be the right one to buy.

1. Is there a significant size difference between the 20l and 50l?
2. where do you typically wash the Braumiester? in kitchen sink or in Bathtub? Does it scratch the bathtub enamel?
3. Do you need a winch or leverage to operate and pull out the pipes in the 20 and 50l or can I easily to a brew on the balcony of my apartment?
4. I would probably prefer to brew 20-30l most of the time. Is there any advantage to going with a 50l to brew 20l of beer? Can I do beers in a 50l that would not be possible in a 20l?
5. As I will very likely need to do the brewing on the balcony, does anyone else have experience brewing outdoors in the winter? Would it work? I am afraid the wife will not like it in the kitchen, but the bathroom could be an alternative - praying :)

Anything else that clearly helps make a decision between the 20l and 50l - besides costs?
 
chiming in as a happy owner of a 20L
1. 30 L difference! sorry- couldn't resist. don't know
2. i wash in the kitchen, i can tip it into the kitchen sink, i have a hose on the tap and spray it out after an oxyclean soak and a bit of a scrub. cleans remarkably easily but you need to fuss over the heating element a bit, and i blow out the pump with a hose. as you will see described earlier in this long thread the feet are raw cut steel and could scratch the enamel (or cut your hands). but you could duct tape the hell out of them or rubber coat them somehow and you'd be grand.
3. with the 20L, you don't need anything. you should pull the pipe up slowly so that it starts to drain as you lift it, then you aren't lifting as much weight. easier with two people but practical enough for one.
4. dunno but you can certainly brew more than 20L in the 20 if you get pretty good efficiency. for medium sized beers < 1.060 25L is easily done. yesterday i did 23 liters post-boil of 1.068 and there was room to spare in the malt tube.
5. i have used mine outdoors in summer only. buy or make an insulating jacket, as long as you have the capacity to cool wort and the power to run the machine and it's not raining on the electronics i don't see why not. you really don't need a lot of space, when i'm indoors i use it in the kitchen in a corner, on a little folding work bench. crack the window to let out steam, no problems.
 
i swear i'm not usually this stupid, but yesterday i did something very stupid! stone sober, as well. i had a very precise schedule, planned it so that i would mash, sparge and let the thing drain while i had to rush out to be somewhere else. grains ground the day before, got my strike water to temp, doughed in and mixed everything very well, was just reaching for the top screen and plate when i happened to notice that there were two (2) plates and two (2!) screens on the table. idiot filled the malt tube with no bottom. let out a string of curse words, paused the machine, drained the water to the fermenter, scooped out the malt with a coffee cup to a kettle. cleaned everything quickly, flushed the pump, reassembled. correctly this time. made a giant mess but somehow only lost about 10 minutes and surprisingly little grain. the malt got an extra ten minutes at strike temp of mid 50's, we'll call it a protein rest. hit all my numbers, actually came out 3 points above target. felt pretty stupid. made it to my appointment on time.

I've done that also. Good to hear you were able to recover also. Just takes some extra time to clean out the grains and restart.
 
@xraptorx about your questions from a very happy 50l user.
1- Well the 50 l it´s a 25 kilos piece of equipment, but for it capabliities a very compact and easy to handle equipment of course you can beat the small footprint of the 20L unit.
2- I wash in the bathroom, I don´t put the unit in the bathtub (it barely fits in mine anyway) I just take the showerhead and clean it inside with a soft sponge rinse it and dump the dirty water in the bathtub and repeat as necessary. As dinnerstick said both the 20l and the 50l have sharp edges of stell (only in the legs actually) and they can scratch you enamel.
3. It depends how strong you are :D whit the short malt pipe no problem at all, the big malt tube its heavier but managable, I mostly brew 6 gallon batches (and I brew every week and two times a week if I have the time) if I started to make all 12 gallon batches I´ll make a pulley or something for it. Brewing outside: did it only once and I prefer indoors, the unit is very silent and I have an spare room for it.
4- You can make make the same beers on the two systems, the 50l has two pumps and the heating element is twice the size of the 20l that gives you more power for recirculation when brewing batches with the short malt pipe, but I´m not sure is there is any difference in the performance of both units.
5- I mostly brew indoors and here its very warm most of the time so very little help with that.

If you live in an apartment with no spare room or guest room that you can use like your "brewing shelter" I would go for the 20l don´t be afraid of not been able to brew bigger beers with the 20l I´m sure and certain that it´s possible.
But as I said I´m a happy 50l user so my choice was the 50l even knowing that I would not brew 12 gallon batches very often.

And I´m sure that when your wife see that the braumesiter is a silent machine and the smell of malts and hops it´s great she will not oppose to you brewing in the kitchen.
 
I guess I’m now a paid-up member of the Braumeister club – I took my 20L for the maiden voyage on a Wheat Beer earlier today. What a relaxed brew-session.

I conditioned 4.72kg of grain with about 80-90ml of water and let it sit for 10-15 mins before I put it through my BarleyCrusher on the 1mm (0.039”) default setting. Some grains did not split open, so next time I’m going to set the rollers a little closer. Maybe a Bohemian Pilsner (Urquel wannabe) will be my second brew later this week.

Can’t complain though – Beersmith is showing my mash efficiency at 84.9%. Not too shabby for a first run. :ban:

Welcome to the braumeister family!
And I have a question for you guys/girls: did you aver give your braumeister a hug? If ever becomes legal I´ll marry my 50l setup. (I´m sorry her name is Braulia she hates when I don´t call her by her name). Do you consider this normal or should I stop drinking for a season.?:drunk:
 
Thanks for the welcome Oblivious brew.

I have read and re-read this thread several times over the past few months and I am very grateful for all the pooled knowledge. Thanks everyone.

Brewed a Kolsch this morning. Tightened the BarleyCrusher down to 0.7mm (0.028"). Mash efficiency fell to 80.8% and I saw some obvious channeling - an almost-fountain? Definitely too tight this time. I should have milled the barley at the default setting - or maybe wider - closing the gap for wheat when I use it. I'm going to play with crush size some more. What do others find the best?

I have been filling to 27L and rinsing with the volume of grain absorption + 2L @ 77-78*C. A 90min boil leaves around 24-25L in the BM after cooling.

Grain is getting past the fine mesh SS, so I'm thinking about using 3/8"ID, 1/2"OD - slit lengthwise - to hold it in place and seal against the malt pipe:

http://www.northernbrewer.com/shop/3-8-clear-hi-temp-tubing.html

Thoughts? Is there a better solution?
 
Grain is getting past the fine mesh SS, so I'm thinking about using 3/8"ID, 1/2"OD - slit lengthwise - to hold it in place and seal against the malt pipe:

http://www.northernbrewer.com/shop/3-8-clear-hi-temp-tubing.html

Thoughts? Is there a better solution?

Good idea, many in Australia use a similar idea, rubber seal edge. However, it can be a very tight fit so the grill is not able to move in the pipe up and down with the wort/pump.
 
My Braumeister Brothers (all of you are men as far as I know):

I've got some great results to report. This is my 5th or 6th brew on the braumeister 50L, and they've all been fantastic 10 gallon batches. I've had so much fun splitting the beer and pitching different yeasts. I've made a pilsner and a saison out of the same batch, and both have been phenomenal (yet very different for obvious reasons). If you need ideas for recipes you could split a 10 gallon batch to make, I'm your man.

I've also played with a couple of tweaks and mods, trying to improve my efficiency. The single biggest factor that has improved my BREWHOUSE efficiency, is learning how to minimize waste/trub. My first brew, I left behind 3+ gallons of wort/trub and that was no good. Next, I soldered together a copper diptube, and also made some copper elbows for the dual pumps to see if I could create a nice whirlpool in the middle of the kettle during cooldown, and concentrate the trub in a cone in the middle. To strengthen the current of the whirlpool, I even purchased a whirlpool chiller from morebeer. The results were not impressive at all. Trub was still widely distributed on the bottom of the kettle. This is probably partly due to it being virtually impossible to get a really good whirlpool going in the braumeister because the heating elements interfere with it.

I have found, however, that after I let the trub settle for about 20-30 minutes without running the pump, after I have gotten to about 18C or so, I can the first carboy (5 gallons) with virtually no trub. For the second carboy, I simply tip the braumeister slowly, and stick a small paint can underneath the back leg (opposite the valve). The braumeister looks as though it will tip over, but balances sturdily. I let it settle for another 15 minutes or so, and then pump out the remaining 5 gallons into the 2nd carboy (I also replaced the stock ball-valve with an american 3-piece stainless ballvalve with a quick disconnect for my external march pump). The high position of the drain inside the braumeister lends itself VERY well to this method, and I get almost no trub in my 2nd carboy, while leaving behind ONLY about 2.2 Liters of wort!

What helped me the most with my MASH efficiency was hitting my mash PH, and dialing in my crush coarseness.

I have to share one more finding, and I hope some of you will have the courage to try this: an overnight mash. This shaved about 4-5 hours off my brew day. The night before my brew day, I crushed my grain, adjusted my water (salts, phosphoric acid, etc.). I preheated my water while doing all this to 120F. Got all my grain in there, and waited about 15 minutes for it to hydrate. I mixed it real good with the mash paddle, then put the screen on, and started the cycle. I did my protein rest for about 20-30 minutes while doing other stuff. Next, I took the mash up to my sacchrification rest. I let that run for about 30 minutes or so on manual mode. Next, I shut off the pump (didn't want it running all night) but left the heat on at the sacchrification temperature setpoint. I closed the lid and went to sleep. Next morning, I ran the pump for another 30 minutes or so, and it was crystal clear converted. I proceeded with the rest of my brew day from there.

Feel free to ask me any questions about my setup. I'm looking forward to brewing some big belgians for this winter&#8212;so I'll be trying the double mash technique as well as simply boiling my wort down to a 5 gallon batch (I think this will go much quicker than most people think).

Brew Strong!
 
Good idea, many in Australia use a similar idea, rubber seal edge. However, it can be a very tight fit so the grill is not able to move in the pipe up and down with the wort/pump.

Thanks DG I'm going to try this - just gotta find some thin-wall, food-safe, hi-temp plastic tube.

@Soviet:

What gap are you setting your grain crusher? I have found that conditioning the grain gives a far better crush - but I'm still experimenting with my BC for optimum settings for the Braumeister.
 
Soviet: I concur your findings. I have been trying to work out the best way to cool wort quickly and get the benefits of a wirlepool. It sounds as if we had the same idea. Cool the wart in two ways and get a whirlpool going at the same time. I bought a second march pump and two 1/2 inch IC's thinking I could pump the wort out and through the 1/2 inch IC (placed in a bucket of ice water) and back into the kettle to create a whirlpool and cooing as well. Then using the second pump, to cool the wart, by pumping ice water through the second 1/2 inch IC in the kettle. The March pump has been a disappointment in that it is not a very strong pump. I believe there is a lot of surface tension created between the length of the hose and length of the ICs. It sounds as if you have tried my next idea of using the two pumps together to get the velocity needed for a decent whirlpool. As you say, this was disappointing as well. So now I have two March pumps and three IC&#8217;s (my original is a 3/8 inch) and two ½ inch by 50 ft. units. And I am no closer to my goal. As I see it, the only choice I have left is to use what I have and be satisfied. I will use the original 3/8 inch IC in a bucket of ice water re-circulating the wart through and back into the kettle for a cooling / weak whirlpool. And the two ½ inch IC&#8217;s together, one in a bucket of ice water and the other in the kettle using ground water.

This Saturday I will be brewing a DFH 90 minute IPA clone with a double mash as stated in an earlier post. I figure at the very least the cooling part will go very well as I know I have a bunch of cooling surface area.

Wasp: I am curious about the method of conditioning the grain with water before grinding. Would you please explain your technique?

Thanks to all
 
@ Redstag

Braukaiser.com has an excellent section dealing with Malt Conditioning:

http://www.braukaiser.com/wiki/index.php?title=Malt_Conditioning

75-90ml (2.5-3.0oz) works well for 4 to 5kg (9-11lb) grist. I use a graduated spray bottle to fire maybe 5 shots of water onto the top of my grain in a pail and I use my hands to stir it in. I repeat until 75+ml (2.5+oz) has been sprayed. Let stand for 5 minutes.

Stir again and leave for a further 5 mins.

The grain should now feel "silkier" but it should not stick to your hands. Milling will now result in more-intact husks, and IMHO it results in better extraction and efficiency because it allows you to tighten the crush while maintaining "lauterability" - improving extraction/efficiency for us Braumeisterers. A handful of unconditioned grain could be held back to thoroughly dry the rollers if you are worried about rust forming on them.

I have a lot of experimenting to do with the settings on my BarleyCrusher for use in the Braumeister. The default 1mm/0.039" setting works well with a conditioned grain crush but 0.7mm/0.027" was too fine. I intend to work with settings from 0.8mm through 1.3mm (0.030" through 0.050").

What setting/gap works well for others? I sure would appreciate any input. :)
 
This Saturday I will be brewing a DFH 90 minute IPA clone with a double mash as stated in an earlier post. I figure at the very least the cooling part will go very well as I know I have a bunch of cooling surface area.

would love to see the recipe and to learn how it goes for you!
 
just completed the brew on a split brew, 40 litres to a basic american golden ale style, put into 2 fermenters one with Cal V yeast, and a second with a Belgian Trappist. Dry hopped the Cal batch with nelson Sauvin, got about 78 brewhouse efficiency. the brau has just made my brewing such a delightful exercise! such a pleasure to kick back with a beer watching my brau steam away into the brisk night air, then yield up its rich golden brew.
anyone have a good porter recipe to share?
 
SFBrewer,

I have been delayed on brewing the DFH 90 Minute Clone.

Here is the link to the recipe.

https://www.homebrewtalk.com//f69/dogfish-head-90-minute-clone-260675/

After reading the full thread there have been some changes worth noting from the folks who have brewed this recipe.
Use English Maris Otter instead of American two row and ferment at 68 instead of 64.

I will post when I get'r done.
 
Still loving the Braumeiester and thought I'd check in with the group. I've changed my process a bit and seem to get the clearest wort and the least stray grains by doing the following.

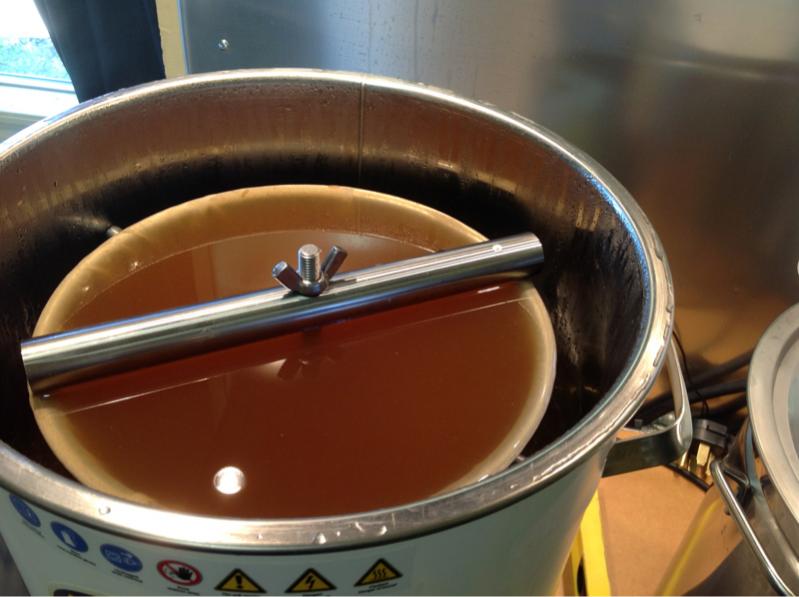
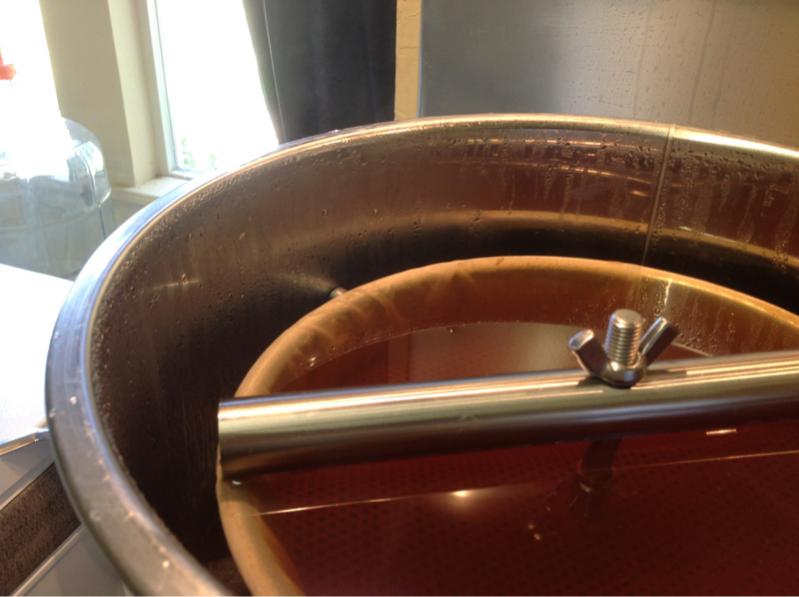
Get a large paint strainer bag from Lowes - wash it thoroughly and cut a small hole in the bottom that will allow the center rod to slide through it. I put the malt pipe in, slide my bag down the rod, then put the bottom plate in the bag making sure it slides down. Pull the top of the paint strainer bag up around the lip of the malt pipe with its elastic holding it in place. Do not use the bottom screen. I then fill with grain by recipe, add 1/2 lb of rice hulls, poking in the mash to insure its good and mixed. Then put the top screen and to plate on - gently moving them in place to avoid snagging the bag.

This setup really catches the stray grains and also eliminated my early "fountain" problems. I usually net 77% efficiency +\- 1 or so which is perfectly acceptable, and most important for me, repeatable.
 
Thought I would take a picture of my paint strainer process that I'm using but it doesn't show up very well. Brewing a light saison in my air conditioned garage brewery. Gotta love brewing indoors when it's 100+ degrees outside!

image-1129595361.jpg


image-3251920313.jpg
 
How big of a paint strainer bag do you use? Seems like a great idea. I get way to much grain sneaking past my mesh screens. Thanks
 
Back
Top