• Please visit and share your knowledge at our sister communities:
  • If you have not, please join our official Homebrewing Facebook Group!

    Homebrewing Facebook Group

Show us your sculpture or brew rig

Homebrew Talk

Help Support Homebrew Talk:

This site may earn a commission from merchant affiliate links, including eBay, Amazon, and others.
Y'all check out my lil brew rig. Not a real good picture and it needs cleaned up a bit, but what do y'all think about it?

That's pretty cool, I like the single pump manifold system. Are those 3-way valves or just T's? Are your burners controlled by the panel via solenoid valves?What are you using for the liquid plumbing? Sorry, If you post it, the questions will usually follow.
 
I'm using 316 stainless compression fittings inside and out. 316 ballvalves at the top and bottem of keggles. Yes there are sellanoid valves for each 10 inch banjo burner each controlled by their own pid.
There is no 3 way valves
The manafold works with 3 inputs and 3 outputs.
 
15497121074_92dd66f1d8_k.jpg


Still assembling the brew kettle here..
 
This is my two teir single pump Herms system I designed and built with a good friends help. - decided to have it powder coated gloss black to showcase the copper clad burners. Designed to be universal, compact, and Mobil.


That's a pretty looking rig; the visual appeal is striking for a BIAC system. Nice work. Did you fab the steel?
 
Here is my rig ... many thanks to Derrin over at Brewer's Hardware for all the help!!

I am on a natural gas hookup, with 2 burners and 2 chugger pumps. I'm about to switch over to a 2 T-valve manifold to eliminate hose switching from pump to kettles. Doing 11-gal batches and loving it! :)
--LexusChris

brewstand_ready.jpg
 
Here is my rig ... many thanks to Derrin over at Brewer's Hardware for all the help!!

I am on a natural gas hookup, with 2 burners and 2 chugger pumps. I'm about to switch over to a 2 T-valve manifold to eliminate hose switching from pump to kettles. Doing 11-gal batches and loving it! :)
--LexusChris

Nice looking rig! I can never get my (little) head around t-valves. Your stand as an example, where are they going and what are they eliminating? I'm almost done with my stand. Loooong project finalizing all the little details (it's automated, well - will be).

Todd
 
Hey Todd,

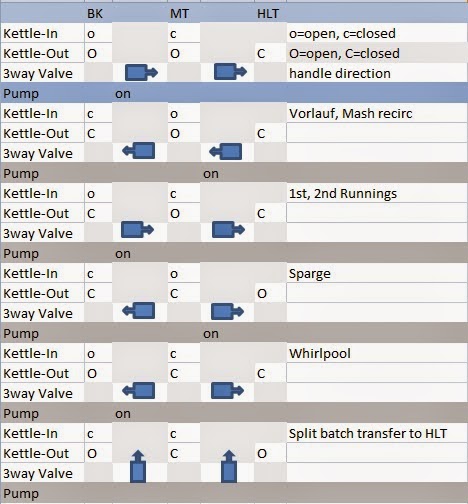
Yeah, the 3-way 'T-valve' gives my head a spin too... until you start to play with one .. then it makes more sense. This description at Brewershardwared.com helps clarify the options.

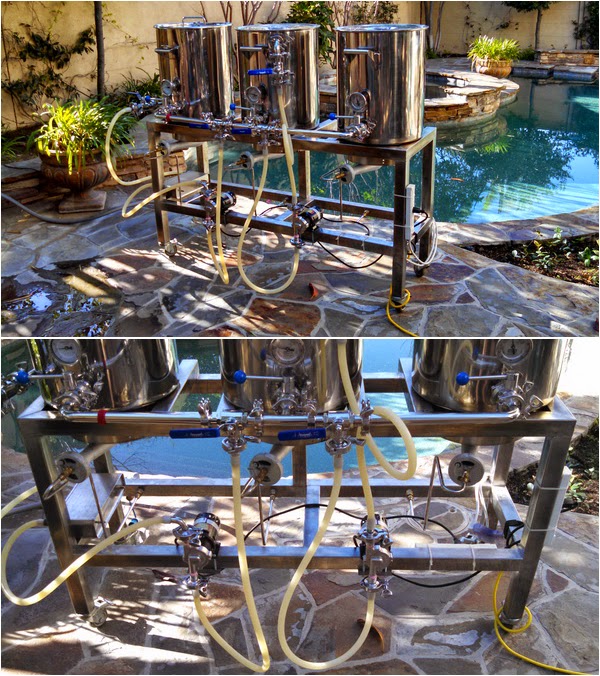
The photo I uploaded shows the hoses without the manifold, and in a straight through setup. Good for pushing cleaner solution from HLT (right), into the MT (middle), then into the BK (left). However, on a brew day, I will recirculate my runnings on the MT before going into the BK, so that is a hose change. Same for the whirlpool on the BK at the end of the boil,

The PDF attached is a diagram of the manifold. When assembled, it fits on the ball valve port out on the bottom of the 3 kettles. The 2 3-way valves are in between each kettle, with a port going down to the pumps. Clamp on the manifold to the kettles, then the down ports to the pump inlets. The pump outlets go into the MT & BK as normal.

With this setup, I can change the flow to handle recirc on either MT or BK, or even move wort from the BK back into the empty HLT if I am doing a split batch. My only hose change at the moment should be when I finish whirlpol and want to go into the fermenter, and that is an easy one. :)
:mug:
--LexusChris

View attachment manifold.pdf
 
I would recommend putting valves on the output of the pumps. Those silicone hoses don't hold much pressure, especially when hot. The pressure made by a chugger pump can possibly explode a silicone hose.
 
A valve won't reduce pressure, it will only throttle flow. The pump will still produce full dead head pressure through a partially opened valve if there is a downstream obstruction.
 
Santa was good to me this year. Son in Law built the stand at the manufacturing company where he works. Wife went overboard on the Kettles (lol)!!! I was looking for 20 gal and 30 gal was all she could find in stock. The LHBS guy gave her a good deal on them.... or so she says!!!!! Unfortunately I am back overseas and I haven't gotten a chance to complete the build.... I'll need to replace the propane system first.... then probably add a second pump! My pantry is full of brew gear.... The only down side to this hobby is it takes up a lot of space (lol)!!!!!

Butch's Brew Stand.jpg


Butch's Brew Stand 1.jpg


Butch's Brew Stand 2.jpg
 
I made mine with the intentions of keeping a small footprint when not in use, so the control panel rotates. 17"x36" footprint when packed up. Pics are from before I finished wiring.

Heis Brewery Build 1-2015 (1).jpg


Heis Brewery Build 1-2015 (2).jpg
 
I designed this 1 BBL brew sculpture. It has an on demand water heater for the strike and sparge that is controlled by flow control in the control panel. The mash tun is mounted in a tippy dump with locking mechanisms to hold the mash tun in 2 different positions. The stand also features an automated rims mounted under the mash tun controlled by a temperature controller in the control panel. All the water is piped through copper piping with sanitary tri claps. The 210,000 btu burner is lit with an electric igniter. the 45 gallon kettle also has a probe installed to display the temp in the control panel. A plate chiller is mounted under the kettle and is hard piped into the copper water line. It also has a filter mounted before the on demand water heater and the stand is piped in a way to allow this to be bypassed when running the chiller. It also has a temp prob on the water input to get accurate reading of ground water temp. The stand also has a car media player installed in the control panel with two 6x9 speakers mounted on the bottom of the stand. I also mounted a tablet under the control panel to run Beer Smith and Pandora. I added USB chargers to charge all my brew day devices. I call it the NINKASI 30!

20141023_141133.jpg


20141024_102013.jpg
 
I designed this 1 BBL brew sculpture. It has an on demand water heater for the strike and sparge that is controlled by flow control in the control panel. The mash tun is mounted in a tippy dump with locking mechanisms to hold the mash tun in 2 different positions. The stand also features an automated rims mounted under the mash tun controlled by a temperature controller in the control panel. All the water is piped through copper piping with sanitary tri claps. The 210,000 btu burner is lit with an electric igniter. the 45 gallon kettle also has a probe installed to display the temp in the control panel. A plate chiller is mounted under the kettle and is hard piped into the copper water line. It also has a filter mounted before the on demand water heater and the stand is piped in a way to allow this to be bypassed when running the chiller. It also has a temp prob on the water input to get accurate reading of ground water temp. The stand also has a car media player installed in the control panel with two 6x9 speakers mounted on the bottom of the stand. I also mounted a tablet under the control panel to run Beer Smith and Pandora. I added USB chargers to charge all my brew day devices. I call it the NINKASI 30!

Well done.
 
Here is my rig ... many thanks to Derrin over at Brewer's Hardware for all the help!!

I am on a natural gas hookup, with 2 burners and 2 chugger pumps. I'm about to switch over to a 2 T-valve manifold to eliminate hose switching from pump to kettles. Doing 11-gal batches and loving it! :)
--LexusChris

Finally got my 1st brewday in with the new manifold. Here are some pictures from that day with the manifold hooked up.

Manifold_s.jpg


The Boil Kettle (BK) is on the left, Mash Tun (MT) in the middle, and Hot Liquor Tank (HLT) on the right. The BK has a tangential inlet for whirlpooling, and the MT has a inlet near the top for the sparge/vorlauf steps. I have my plate chiller inline before it hits the BK inlet.

Here are the port/valve states for the different parts of the brewday.

Manifold_states.bmp


I am still working through the settings for the CIP steps after brewday, but it is essentially following the brewday. Put the PBW in the HLT and work it through the major steps of the day. I just need to make sure to spin the 3-way valves when the manifold is static and full of solution. That way all sides of the valve head get cleaned.

:mug:
--LexusChris
 

Latest posts

Back
Top