BrewerofBeer
Member
Cant upload via mobile???? Hmmm...

I thought i'd whored my rig out in every thread possible, don't know how I missed this one.

_
oh come on! You can't be plastering swmbo all over the place! It's a right of passage so to speak!


Oh come on! You can't be plastering swmbo all over the place! It's a right of passage so to speak!
And while your at it, I would also like to know what SWMBO stands for, again have deduced that it is a reference to the significant other, but cant figure out the ackronym
 Why didn't you just Google it?
Here's my homemade sparge setup. Just an old pie plate that I drilled holes in.
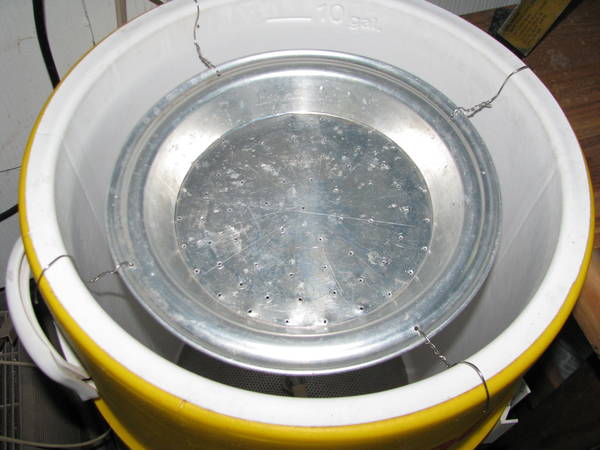


I really like this idea!!!


.jpg")
.jpg")

.jpg")
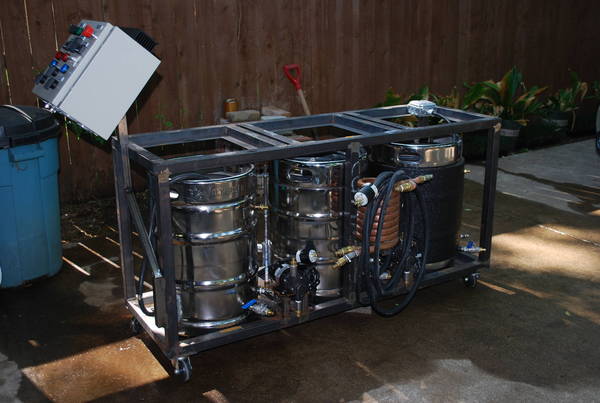
It has been months since I started. I added a bunch of things, since the original wet test drive reared several design flaw monsters I went back and welded steel tops and reinforced burner cages/supports. I added a water filter that I had laying around. I am ready to brew. Let me know what you guys think. Thanks to all that have helped me with this project.
Front View
Lid additions to all keggles. MLT loc line for sparge arm through top for heat retention while mashing
New top plates with heat shield to protect heat exchanger wires. The wires are wrapped in silicone hose in the tube
new sparge arm I made to replace original design
Control panel. QD for temp sensor on left side
40 plate heat exchanger. O2 setup with SS QD for easy removal of unit from heat exchanger
New mash paddle I made out of maple
Top view of burner plates. Below the 10" I had to make some reinforcements out of 1/2" x 2 flat stock. On my first test runm the flame was lapping up the keg. I added the 1/8" steel plates with 10" circles plasma cut out of them and fired it up...the steel was melting and I about cried. I added the supports between the original burner cage and the 1/8" steel and welded them up...fired it up and no more melting.
Two 6' sections of silicone 1/2" hose eah with a female SS QD are all I require for fluid transfer. Everything is SS or copper...no brass anywhere except for the two flared end caps. It took me a few months of seperate purchases but I managed to get rid of all brass.
This thing should give me years of trouble free service.
Runtgun said:I've been a long time lurker of this forum and I finally registered with HBT. After seeing others build functional and often beautiful brewstands, I decided to take the plunge. I've never welded before, so I watched a few youtube videos and took some advice from older HBT posts. I picked up a mig welder and some stainless tubing. My plan is to control the morebeer low pressure propane burners with auber PID's and honeywell intermittent pilots. For now, I'll do the pumping manually (meaning with pumps, but without electric valves).
I'll post some more pics once I've ground out the welds and mounted the burners.
Thanks to all of you who went before and posted pictures of your rigs - I've taken ideas from lots of people.


After nine months of messing around I finally got to the point where I could do some sea trials ...
... I'm using a CFC as an external pseudo HERMS heat exchanger:
Just added the plate chiller. I think its finally finished.

Kind of like having a baby?
That's a great idea!
Do you run the wort pump to heat the HERMS with one of the Love switches?
Nice work on the panel also!
The water pump on the left looking at the front of the rig continually circulates the HLT through the annulas of the CFC. One PID controls the heating element for the HLT the other PID controls the wort pump on the right for the mash tun which flows through the inner tubing of the CFC. Worked pretty well. It brought 5 gal of 71* water in the MLT to 150* in less than 30 minutes with the HLT set at 170*.
How do you use the chiller to cool wort?
Just added the plate chiller. I think its finally finished.


My "ghetto fabulous" brew rig made from old metal bed frames and self drill screws. Very sturdy. Practiced welding on the joints since the build and it is now even more sturdy. Cost of frame...about $30.


![Craft A Brew - Safale BE-256 Yeast - Fermentis - Belgian Ale Dry Yeast - For Belgian & Strong Ales - Ingredients for Home Brewing - Beer Making Supplies - [3 Pack]](https://m.media-amazon.com/images/I/51bcKEwQmWL._SL500_.jpg)


