• Please visit and share your knowledge at our sister communities:
  • If you have not, please join our official Homebrewing Facebook Group!

    Homebrewing Facebook Group

Show us your panel

Homebrew Talk

Help Support Homebrew Talk:

This site may earn a commission from merchant affiliate links, including eBay, Amazon, and others.
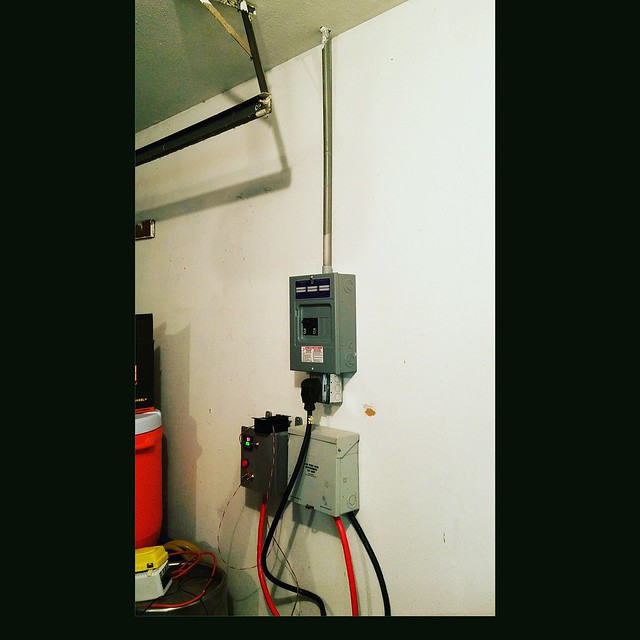
So, if you have a failure between your panel and the wall, the control panel will assume everything is ok, relying on the non-GFCI breakers in your house's panel to trip? Am I reading that correct? That seems a bit dangerous as regular breakers are NOT designed to protect human life, but save wires from burning.

I'd rather have my GFCI protection AT THE SOURCE of power. I have actually had a GFCI trip while brewing in a slight spill situation and I'm glad the power tripped at the wall.

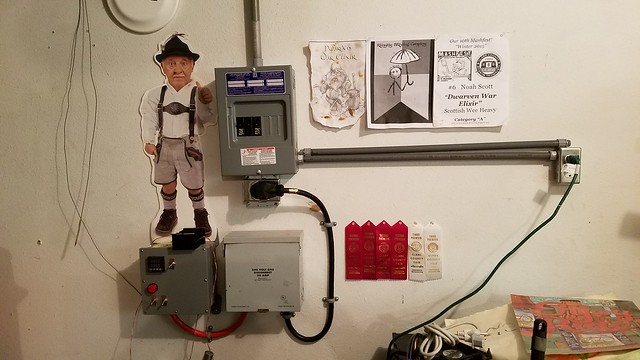
You missed Devildog's other post... he has two 60a spa panels that are feeding the control panel; so he does have his GFI's in the proper orientation.

That said, Devildog, not to be a naysayer, but if you do eventually go "Pro" like you state, I really believe you are going to have to redo this panel if you want to use the mechanicals; mainly because having 2 feeds to your panel probably won't cut muster. Things might be different with your local codes, but I wouldn't bet on it.
 
Cyber backpacker you are correct that the panel will possibly need modifications to pass an inspector. My brother is an inspector in another state and he looked at it and said that it could pass. The electrician I had look at it said it was wired cleanly and looked to be a sound panel. With that being said I am still thinking about separating the breakers on the inside of the panel to minimize how many are operating on each spa panel. This would require a separate box that I would mount to the back of the panel just to house the breakers. I just started looking into the cost and requirements to have it UL tested. All of the parts are UL listed parts so that was a big step. If I read it correctly it's going to cost about $5k to get it tested. I have an electrical engineer that is coming over tomorrow night to do a brew session with me and see how it works and give me any thoughts he might have on changes that might need to be done. I'll keep you updated as I venture down this road.
 
Here's my hosehead clone - finally found a use for my UDOO Quad (RPi + Arduino). I wanted proper powercon connectors and the ability to run 2x120V elements or 1x240V for a single eBIAB setup. It is definitely tight on space - I would have got a bigger enclosure if I didn't pay to have the panels cut already :( In hindsight, I would have added USB+HDMI for the Udoo - if I swap wifi networks, I have to open the whole thing up.

Panels:
00_panel_back.jpg
00_panel_front.jpg

Arduino proto shield: 2x CT monitors, 1x DS18B20, 3.3V->12V Level Shifter for relays/SSR
01_proto.jpg

Original placement (swapped out the bus bar with Wago connectors for space)
02_test_fit.jpg

All wired up:
03_wired.jpg

Enclosed:
04_fin.jpg

Here's a price breakdown:
price.PNG
 
No worries! Was curious as I know the two fans will help immensely (I wouldn't built anything this high current with an enclosed SSR without a fan or two like you did so good thinking ahead!) ;)

Kal
 
Bought a house about 2 months or so ago... Finally got all the parts together recently for the sub panel and conduit and plugs and such.

House had a hot tub that was removed, so i was left with a 50 amp circuit. I have no real need to go to a back to back setup, so i put in a 30 amp circuit for the brewery and a much needed 20 amp circuit for some extra plugs in the garage as well.. only had time to wire up one, but going to put in one more some time down the line once i get all the other projects out of the way... i'm just glad to be able to brew again!

t minus 2 weeks to brew day!

20160326_213302 by Noah Scott, on Flickr

20160326_144251 by Noah Scott, on Flickr

After i first got the sub panel, GFCI and panel wired up just to make sure there was no magic smoke

IMG_20160326_000242 by Noah Scott, on Flickr
 
Recently finished and used in anger for the first time last Sunday.

View attachment ImageUploadedByHome Brew1461795430.459752.jpg

Two PIDs for the HLT and RIMS, two switched outlets for pumps, all running from a 30A circuit

View attachment ImageUploadedByHome Brew1461795461.694124.jpg

Two Mager SSRs for element fine control, contactors for element on/off. The RIMS contactor is interlocked to the pump switch, so you can't fire the element without the mash recirculating.

Of course I'm already planning the next additions...
 
I realized the other day that I started this thread some years ago, yet never posted pics of my simple but effective set-up. As so many before me have done, I say "Thank you" to the community. Were it not for all of you I certainly would not have embarked on this project. In the end, I could not be happier with my results. For the record mine is a eBIAB set-up which should be obvious from the pics.

20160226_170349[1].jpg


20160430_124626[1].jpg


20160504_133842[1].jpg


20160504_133906[1].jpg


20160504_133914[1].jpg
 
The panel hasn't changed, only the wall its mounted to in the brew room. Air brushed lightning bolts have been added, and Arguably, this has improved the beer production by 8.5 %.

Wall is awesome. But I love how the focal point of the brewery is the pool table. Is that a Brunswick Gold Crown? What year?
 
Wall is awesome. But I love how the focal point of the brewery is the pool table. Is that a Brunswick Gold Crown? What year?

Its a 10' snooker table, not a pool table. Big difference. Its actually a Gandy big G, built in Georgia in the '70s. The company went out of business years ago. Similar to the Gold Crown in design, but more heavy duty.
 
Its a 10' snooker table, not a pool table. Big difference. Its actually a Gandy big G, built in Georgia in the '70s. The company went out of business years ago. Similar to the Gold Crown in design, but more heavy duty.


My dad has the same table. If you can play on that you can play on anything.
 

Latest posts

Back
Top