RIMS for Dummies

Homebrew Talk - Beer, Wine, Mead, & Cider Brewing Discussion Forum

Help Support Homebrew Talk - Beer, Wine, Mead, & Cider Brewing Discussion Forum:

This site may earn a commission from merchant affiliate links, including eBay, Amazon, and others.
I run my pump and PID seperately, there is a risk of dry fire, but most LWD elements can withstand dry firing. I know mine has before...
 
I dry fired a 5500w element that said LWD on the package and was not the squiggly shape. It got white hot before I realized what was happening and shut it down, it ran for less than 30 seconds, but it survived and I've brewed with it since.
 
I'm trying to piece together my system and have read this thread start to finish a couple of times. There doesn't seem to be a concensus on the "best" element for use with Brewers Hardware RIMS tube. I spoke to Derrin and he said most are going with 4500W 240V LWD and running it at 110V. The posts on here about corrosion / gunk on element are making me think a stainless / incoloy elelment is the way to go. I found this

http://plumbing.hardwarestore.com/5...inless-steel-water-heater-element-684528.aspx

but at 13 -1/2" length it will be touching the temp probe at the other end (total length of RIMS tube from Derrin is 16") - I'm using this probe

Good luck getting an answer! If you read back i have been trying to get this same answer but I never got anything solid. I think the reason is because everyones system is so different and there really are a bunch of different options out there that will work. If people start to respond to your question there will be tons of different answers..

I have the same RIMS tube as you and i think I am going to go with a 1440w LWLD SS heating element from boston heating supply.

Thanks for the lead - but it looks like that is a HWD element, not LWLD?

http://bostonheatingsupply.com/rheemelectricelements.aspx
 
There is one on there, I will try to find it. if you read back a couple pages a member posted a link to that website and another one. Thats how I found it.
 
Hey. Need some input.

Today I got around to testing my RIMS unit.

Tested for leaks. None

Plugged heating element into control box. Set SV value to 150.

Figured out how to start Auto Tune and ran it. After about 20 minutes, it
it finished (Stoped blinking At ) In doing so. raised my "test water" from about 130ish to the 150. I let in run a while longer, and it maintained fine. Nothing seemed to be wrong at all.

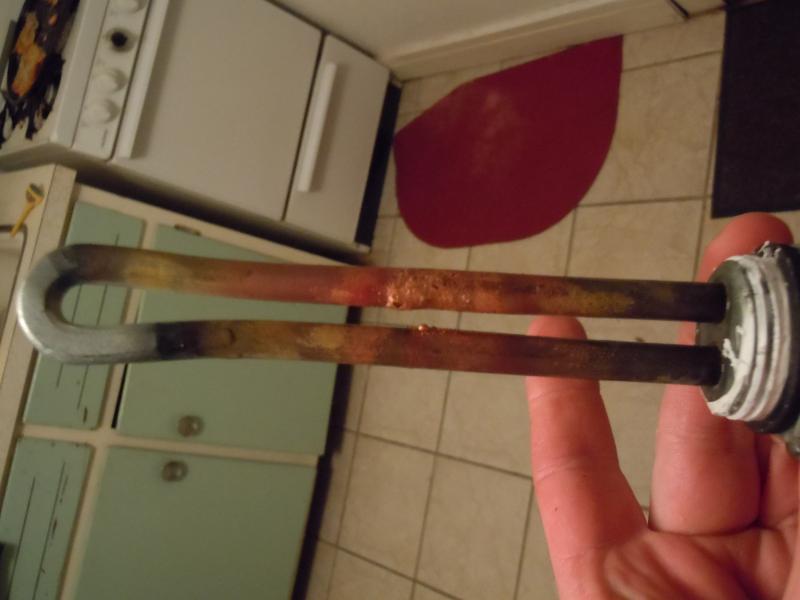
Decided to test "Mash out" temp. Raised it to 170. After about 10 minutes or so it got to about 168 and I then noticed a burning rubber smell. Shut everything down. Checked inside controller, not there. None of the power chords felt warm at all. Turned out inside my "Cover" for the element was lightly smoking. Unscrewed cover and noticed The element had melted. The outlet box was HOT. Any insight on what went wrong, any idea's? It never tripped the CFCI it all was plugged into.

RIMS MESS UP 004.jpg


RIMS MESS UP 006.jpg
 
If I had to guess I'd say there was an air pocket in the tube and you basically dry fired the element. How do you have the tube oriented when in operation?

Ed
 
It was horizontal while I operated it. I only ran water through it, here's what the element looks like now....


Should it look like this after 1 use, and only it water? Or does it indeed look to be dry fired?

That sucks. I made sure to run water through first for awhile, to get any air out. Oh well. Got the element from Lowe's, only 9 bucks or so.

RIMS MESS UP 007.jpg


RIMS MESS UP 008.jpg
 
This is the element

...

How can you tell it's High Watt? because it's shorter than most?
Yes. It is a short element and chrome plated.

I posted a reference to this element:
Rheem SP10868GL LWD 120V 2000W SS element
That you might want to consider for your replacement. It's a few poste earlier in this thread.
 
big_al_in_k-zoo said:

The watt density has nothing to do with the element burning up. Theoretically it could cause scorching but not element failure. With the tube mounted horizontally is there any chance you had an air bubble trapped inside? I still think this may be your problem.
 
Ed,
Another possibility with my warped thinking: The element is really short (6 inches?) and most of it would be in an area where there is low or no flow within the RIMS tube. It failed when he jumped the temp so the element was at full power for some time.

Don't know. Just thinking out loud.
 
I guess it could've gotten air in it. It just seemed to work fine. Then I raised the temp to 170, and maybe ten minutes later it bonked out. Seems like maybe what P-J says. Seemed to wig out then.

Might just buy another one, do the same thing and see if it does it again. Keeping an eye on the outflow back into the tun. 9 bucks isn't to much. I'll take a video when I do so you get more info on my "test" setup......
 
Is there something against mounting the unit vertically with the heating element on the bottom? I am new to the RIMS system but I do work at a power plant so I do have some experience with heating liquid. That way your element would always be submerged. The hot wort should also move to the top of the RIMS so that your cooler wort coming in would travel over the element. By the way your element has blistering on it which indicates that the area with the blistering probably had air around it. It happens to boiler tubes here when the tube loses contact with the cooling medium, in your case wort.
 
Wouldn't mounting it vertically work be better since all the air in the tube would want to rise to the top or "get out of the tube"
 
I guess it could've gotten air in it. It just seemed to work fine. Then I raised the temp to 170, and maybe ten minutes later it bonked out. Seems like maybe what P-J says. Seemed to wig out then.

Might just buy another one, do the same thing and see if it does it again. Keeping an eye on the outflow back into the tun. 9 bucks isn't to much. I'll take a video when I do so you get more info on my "test" setup......

Are the input/outputs of the tube pointing in the same direction (Up or Down)? It is possible that you can have air in the tube and still have flow.
If the element is submerged in liquid, it will not get hotter than the liquid. My suspicion is the the element or part of it was in an air bubble and was in trouble the entire time and it may have eventually failed even at the lower temp. Raising the temp may have hastened it's demise or the temp change may have just be a coincidence.

Ed
 
Wouldn't mounting it vertically work be better since all the air in the tube would want to rise to the top or "get out of the tube"

That's my opinion too. Perhaps it is unpractical or inconvenient to have it vertical in some circumstances, for example when mounted on a tool box. I would at least have a slant on it with the element at the lower end and the outlet at the highest point.
 
No, didn't think about that. =(

Here's how I had it

That orientation is not bad (better than both input and output pointing down). I think vertical with the element and Input on the bottom and Output near the top is best but not required.

I think your tube should be below the liquid level in both your input and output vessels to prevent it from siphoning dry.

Based on the looks of your element, I'm still thinking part, but not all of the element was in an air pocket inside the tube. But the way you have it oriented, its hard to see how you could have enough air to cause a problem and still have liquid flow.

Ed
 
I think vertical with the element and Input on the bottom and Output near the top is best but not required.

Thats how I roll...I really stay mindful of keeping the element covered...in fact I don't switch it on until I know it is completely submerged (i.e. strike water is flowing out of the outlet and into the MLT)
 
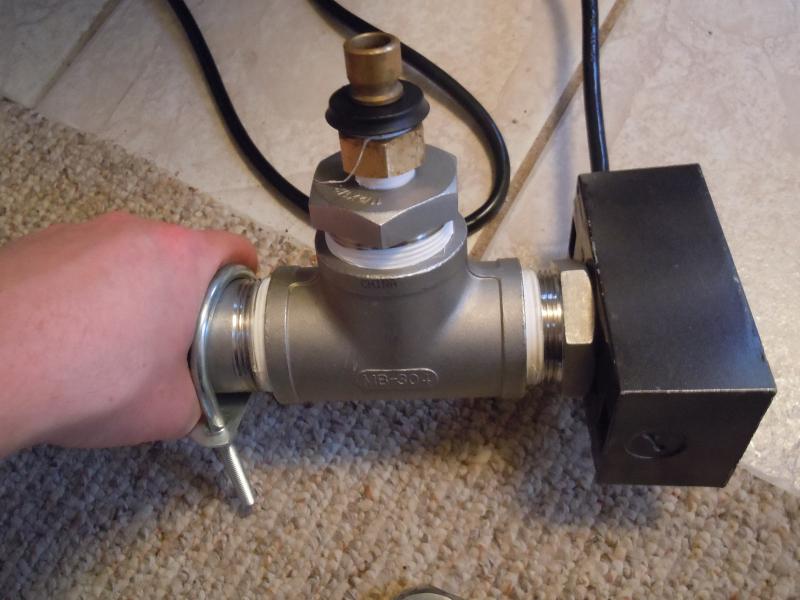
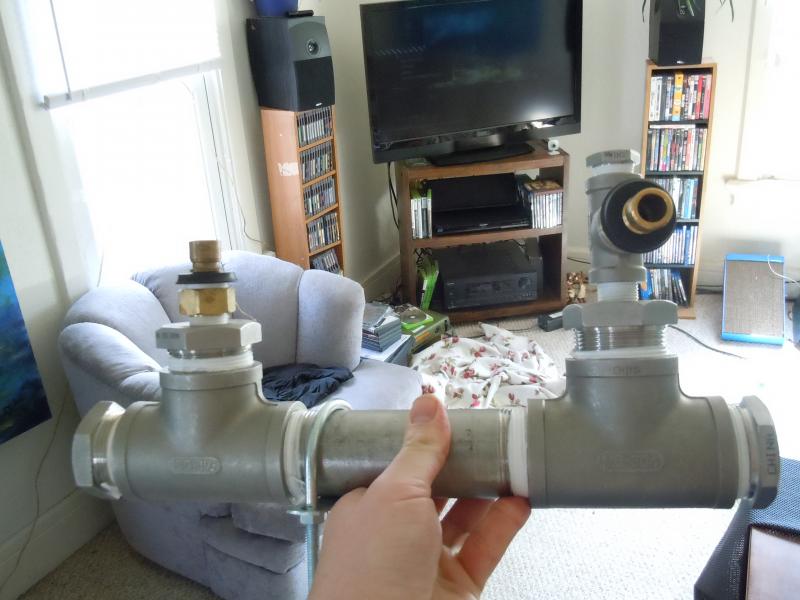
I swapped out a tee for a cross to hold the element, the inlet, and a dump valve. This ensures I can empty the tube after cleaning. Also mounted it at an angle with the outlet up so air bubble buildup is at a minimum.

IMG00103-20110214-1146.jpg
 
I would think a horizontal tube with I/O pointed up would be best. If the tube is vertical, you'll always have a bubble at the base of the sensor. And if the sensor isn't submerged, you'll have problems as well.
 
I would think a horizontal tube with I/O pointed up would be best. If the tube is vertical, you'll always have a bubble at the base of the sensor. And if the sensor isn't submerged, you'll have problems as well.

Just my opinion, but I/O both pointing up make it difficult to drain the tube. You are correct that there is a good chance of a bubble at the top if mounted vertically, but should not be a problem (depending on the length of temp probe).
 
It'd be optimal to have a drain, or some sort of toggle clamp on the U-bolts so you can turn the I/O downward to drain.
 
It'd be optimal to have a drain, or some sort of toggle clamp on the U-bolts so you can turn the I/O downward to drain.

If you're referring the pic I posted, there is a cross on the left hand side. The bottom opening of which has a ball valve on it. This works great for draining the tube.
 
I would think a horizontal tube with I/O pointed up would be best. If the tube is vertical, you'll always have a bubble at the base of the sensor. And if the sensor isn't submerged, you'll have problems as well.

Depends on the configuration of the tube. If the outlet is on top then there will be no air bubble. This probe is mounted at upper left, it is always submerged.

 
I wanted to share some pics of my RIMS setup since I relied so much on the information in this thread to build it.

100_3802.jpg
Front of control box, the PID is a SYL-2362 from auberins.com. There is a 25A SSR and a heatsink in the control box. The two switches control the PID and the pump.

100_3796.jpg
RIMS tube purchased from brewershardware.com using camlock quick disconnects, a 1500 watt low-density heating element from plumbingsupply.com, and an RTD sensor from auberins.com.

100_3797.jpg
Plug that is connected to the PID/element switch.

100_3798.jpg
Plug that is connected to the pump switch.

I wanted to send out a huge thank you to everyone who has shared information on this thread, there is no way I would have been able to do this without this thread.:mug::mug:
 
The pic of the rims tube. Is that how you keep it orientated when you use it? If so, have you had any problems as the gentleman did a few posts ago? Such as have air in it, etc. Do you have a diagram of how you wired the pid? I have the same one, or where did you find your diagram?


For everyone else, i also have a rims tube from brewers hardware as well and i would really like to leave my rims tube in the horizontal position based on my setup. (i have not used it yet) For sake of operating correctly i would rather have it vertical and i can but i want to prevent going down that road. So, i would like your opinion. Stpats.com sells a sight gauge that is only 4" or so long but its the same dia as the rims tube. I was thinking about buying one and placing it between the 2 halfs of the rims tube. This would allow you to see if wort has completely filled up the rims tube and to obviously see if there is any air in it. Is this a good idea? Would there be a downfall for making the rims tube longer? The idea would be to run wort through it until you see it completely full and then kick on the element. I think its a good idea but i may not be seeing the bigger picture. Thanks guys
 
The pic of the rims tube. Is that how you keep it orientated when you use it? If so, have you had any problems as the gentleman did a few posts ago? Such as have air in it, etc. Do you have a diagram of how you wired the pid? I have the same one, or where did you find your diagram?

I do keep it horizontal when I use it. The pic was taken during the mash and I did not have any problems with air getting in. My biggest problem was too fine of a crush that caused my grain bed to get a little compacted during the recirculation. Next time I am going to open the gap on my mill a little bit more. As far as wiring, I used the wiring diagrams on this thread. I'm not sure which one but I'm pretty sure there is one that has the 2362. If you can't find it let me know and I'll open my box up and walk you through what I did.
 
The pic of the rims tube. Is that how you keep it orientated when you use it? If so, have you had any problems as the gentleman did a few posts ago? Such as have air in it, etc. Do you have a diagram of how you wired the pid? I have the same one, or where did you find your diagram?


For everyone else, i also have a rims tube from brewers hardware as well and i would really like to leave my rims tube in the horizontal position based on my setup. (i have not used it yet) For sake of operating correctly i would rather have it vertical and i can but i want to prevent going down that road. So, i would like your opinion. Stpats.com sells a sight gauge that is only 4" or so long but its the same dia as the rims tube. I was thinking about buying one and placing it between the 2 halfs of the rims tube. This would allow you to see if wort has completely filled up the rims tube and to obviously see if there is any air in it. Is this a good idea? Would there be a downfall for making the rims tube longer? The idea would be to run wort through it until you see it completely full and then kick on the element. I think its a good idea but i may not be seeing the bigger picture. Thanks guys

I bought the same site glass offered by St.Pats off ebay and installed it in the middle of my Brewers Hardware RIMs tube.

It's actually a Glacier Tanks product:
http://cgi.ebay.com/ws/eBayISAPI.dll?ViewItem&item=200586400450

My tube is mounted vertically and worked flawlessly after I Installed the site glass.

Ed
 
Ed do you have a picture of it? Also how did just adding a sight glass make it work better. Or did it make it easier for you to know it was working well.

Wow, if you thought about it then someone else has too or already done it. Or however that saying goes.
 
Ed do you have a picture of it? Also how did just adding a sight glass make it work better. Or did it make it easier for you to know it was working well.

Wow, if you thought about it then someone else has too or already done it. Or however that saying goes.

Picture of the site glass is in the link. I don't have a pic of MY tube with it installed. I wanted to get a pic of it in operation during my last brew but just never grabbed the camera, sorry.

I had been considering the one from St. Pats for sometime when SawDustGuy posted the link to this one on Ebay. At the time, the auction said there was 2 available. I snatched one immediately. Looks like they have plenty and keep re-listing them in small quantities.

The site glass did not improve the RIMs tube. I used to have a section of 1/2" polycarbonate inline as a site glass and replaced it with this siteglass. I like to see how well the grain bed is filtering during recirculation.

Ed
 
Ed,

Thanks for the link to Glacier Tanks! If I would have known about this website before I purchased all $500 worth of tri-clamp gear, I would have save about 35-40%. They sell all their tri-clamp products are very low prices and I would be willing to put money on it that a lot of the brewing websites that sell tri-clamps buy them from Glacier and re-sell them.

I got the sight glass on order, I will post pics after it's installed. I hope this will get rid of my fear that air can still be in the chamber by just looking through the rims tube. This will also be great to see how clear the wort is running before sparge.
 
So, I think I found the heating element I want to use. I found it on boston plumbing supply and here is the description.

Rheem SP10868KL 120V 1700W 12-1/2" LWD Resistored Stainless Steel Heating Element

Anyone see a problem with 1700 watts?
 
Would having a threaded terminal welded to my rims tube be a sufficient means of grounding it? Also I'm thinking of having the welder weld a small length of tube to the electrical end of the element and then covering the terminals with jb weld. Is that an ok way to pot the elenent?
 
Back
Top