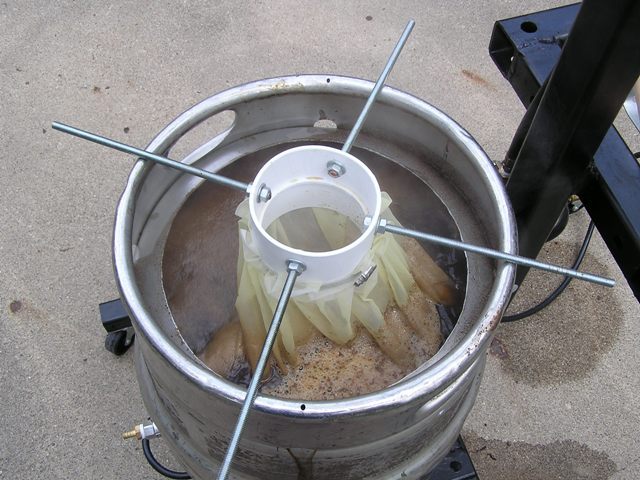
recommendations for HLT & keggle diptube assemblies

Homebrew Talk - Beer, Wine, Mead, & Cider Brewing Discussion Forum

Help Support Homebrew Talk - Beer, Wine, Mead, & Cider Brewing Discussion Forum:

This site may earn a commission from merchant affiliate links, including eBay, Amazon, and others.

elpresidente

Well-Known Member
Joined
Jul 12, 2008
Messages
170
Reaction score
0
Location
Virginia Beach, VA
Hello,

I am currently converting 2 sanke kegs over for the HLT and boil keggle to get another step closer to all grain, woohoo! I already have all the ss valves but I was wondering if there were any recommendations for the diptube setups for both?

I found a bunch of different ways that people have done it. My basic assumption for the HLT is to have a straight copper tube from the coupling with a 90 bend towards the middle/bottom. For the boil keggle I have seen the "bazooka t", the mesh hop stopper, the ss brillo pad approach, etc. Which route should I go? I like the bazooka t idea, it looks pretty clean and simple...I just want something that will not give me too much of a hassle and is efficient because I read a few threads where people have had trouble from hops getting clogged, etc. Any input appreciated, thanks!
 
For the HLT you have the right idea.

For your kettle, I like the method I found on these forums. I haven't been able to find it again, but I'll try to explain it.

You basically have a copper piece that extends about 3-4" into the keg from the ball valve. There's a copper 'T' attached to the end of the 3-4" piece.

You'll need to then add an inch or so piece of copper to each end of the 'T'.

Then add 90* elbow to each end of the extentions and aim them toward the side of the keg. They should be at about a 45* angle toward the bottom side of the keg. Add another copper tube to each of the 90* elbows and get them as close to the side of the keg as you can without actually touching the keg. This will prevent any hops from getting in and it's great because you're acually sucking the wort from the side instead of the center where all the break material settles.
 
That sounds like a possiblity too, I am honestly not sure which way to go...there are so many different options. Can you find some pictures of the setup you were talking about?
 
I've been looking around for one and can't seem to find it. When I brew this weekend, I'll try and remember to snap a picture of mine.
 
I use a dip tube to the bottom center of everything. Filter the hops with a hanging hop bag and you can suck every ounce out of your BK.

hop%20filter.jpg
 
For the HLT you have the right idea.

For your kettle, I like the method I found on these forums. I haven't been able to find it again, but I'll try to explain it.

You basically have a copper piece that extends about 3-4" into the keg from the ball valve. There's a copper 'T' attached to the end of the 3-4" piece.

You'll need to then add an inch or so piece of copper to each end of the 'T'.

Then add 90* elbow to each end of the extentions and aim them toward the side of the keg. They should be at about a 45* angle toward the bottom side of the keg. Add another copper tube to each of the 90* elbows and get them as close to the side of the keg as you can without actually touching the keg. This will prevent any hops from getting in and it's great because you're acually sucking the wort from the side instead of the center where all the break material settles.

Here's the one I made that is similar to what you describe. Note the trub cone from the whirlpool stays untouched in the middle,
I also capped the ends of the copper and drilled 3/6" holes inthe caps.
first_brewday_032.jpg
 
I use a dip tube to the bottom center of everything. Filter the hops with a hanging hop bag and you can suck every ounce out of your BK.

hop%20filter.jpg

That actually seems like the most easiest way to both filter out particles as well as siphon out the most liquid when ready...I will probably go this route and just create 2 dip tubes the same way for both the HLT and Boil Keggle with the 90* angle straight down to the middle bottom.

Are there any drawbacks to doing it this way?
 
Here's the one I made that is similar to what you describe. Note the trub cone from the whirlpool stays untouched in the middle,
I also capped the ends of the copper and drilled 3/6" holes inthe caps.
first_brewday_032.jpg

This seems like another great option too if you would like to make sure you siphon without the trub, but is that really neccessary? What about a hybrid with the hop bag and this dip tube? That sounds like a great setup.

P.S. this "whirlpool" you are talking about is that just swirling the wort with a spoon of some sort?
 
I have a SS dip tube that 90's down to the bottom of the keggle base. I took a bazooka screen and cut it down so it fits over the tube for a couple inches. I use the lil sparky treatment for hops. I leave no more than a cup full of wort at the bottom when done. Almost all the hop material stays in the paint strainer bags and I don't worry too much about the cold break. I do like the whirlpool method in the pic above.
 
Almost all the hop material stays in the paint strainer bags and I don't worry too much about the cold break. I do like the whirlpool method in the pic above.

As far as the cold break, what are the +/- of worrying about that? Do you really have to separate that? Also, how does one create the whirlpool if I did want to leave the cold break behind?
 
No need to worry about separatng the cold break. In fact, the only reason I bother with filtering the hops out is because it will clog my pump and chller. It doesn't hurt to have any of that in the fermenter though.

If you want to whirlpool, swirl the kettle fast and then leave it for 20-30 mins while the trub settles.
 
Here's the one I made that is similar to what you describe. Note the trub cone from the whirlpool stays untouched in the middle,
I also capped the ends of the copper and drilled 3/6" holes inthe caps.
first_brewday_032.jpg

This is exactly what I was trying to describe. Thanks for the pic! I might have to try capping my ends too. I never thought about that since mine doesn't have much space between the side of the keg and the copper.
 
Okay, here goes:

-You can go with the copper fittings, a bazooka T will work well (I have/use one), but you have to make sure your connections are tight so you don't lose siphon.

-The Lil' Sparky "hop hanger" works really well (I have/use one), but I got away from using it because I realized my hop utilization and overall hoppiness was suffering. My beer was clear as hell, though! The bags need to be changed out every 3rd brew or so because they clog/melt, but they are cheap.

Allowing your hops to float free during the boil is the best way IMHO to get the best hop flavor/aroma, but cleanup is more difficult and you have to worry about clogs. SO, IMHO the false bottom with a diptube (just bought 2 nice ones) is the best way (or better yet put your ball valve on the bottom of the keg, under the FB for 100% drainage/cleanup). In conjunction you can get a LARGE boil basket, line it with screen and use it as a hop hanger if cleanup is really an issue. It'll be much more durable than a nylon bag and will allow more mingling with the wort. Hops can be a PITA to clean up, so I understand the need for an easy drop in/pull solution.....

Phew! Sorry for the novel, I'm just particularly interested in this aspect of the process.....
 
I am kinda confused, is there a reason to have hot/cold break if it doesn't matter if it ends up in your fermenter? I always thought that people tried to separate it by whirlpooling.
 
I am kinda confused, is there a reason to have hot/cold break if it doesn't matter if it ends up in your fermenter? I always thought that people tried to separate it by whirlpooling.

Yes, I am wondering too...does it really matter if you separate the break material before putting it in the fermenter? This is what I am trying to determine before I decide on my boil keggle dip tube setup.

Technically, no. You don't HAVE to seperate either, but you'd be wise to continue doing so. While hot break consists mainly of protein/tannin complexes,it also contains measurable amounts of lipids and other substances. Many of these break components can be harmful to either the fermentation or the flavor of the finished beer. These don't need to be filtered out because they will eventually settle out, but why not filter and not have to deal with as much trub?

As for cold break...unless you want chill haze in your final product, it needs to be filtered.
 
I ladle hot break off for all the reasons above plus it helps to minimize boil overs, at least for me. For me not much of the cold break passes through to my fermenters but whatever does seems to settle out due to the carageenan(irish moss) that binds to the proteins while in the last 15 m in of the boil. I don't ever get any chill haze but that may be due to the week of cold crashing in the corny before force carbing. I get crystal clear beer once i pour off the first pint.
 
As for cold break...unless you want chill haze in your final product, it needs to be filtered.
Sorry, I disagree. If you use a plate chiller (and don't recirculate), the cold break forms on the way to the fermenter. I filter out the hop material, but have never worried about filtering break material. I have crystal clear light ales that you can read through - no chill haze here.
 
I am kinda confused, is there a reason to have hot/cold break if it doesn't matter if it ends up in your fermenter? I always thought that people tried to separate it by whirlpooling.
You want the break meterial. Without it you will have hazy beer - especially if you don't get a good cold break. It will all settle out in the bottom of the fermenter, though, given enough time like everything else. Cold crashing can really help if you've still got chill haze problems.

I've even read that some of the break material can be helpful to the yeast.
 
Here's the one I made that is similar to what you describe. Note the trub cone from the whirlpool stays untouched in the middle,
I also capped the ends of the copper and drilled 3/6" holes inthe caps.
first_brewday_032.jpg

annasdadhockey, I'm curious what type of whirlpool you use. Do you use a Jamil whirlpool chiller?
 
Back
Top