Questions about eBIAB systems

Homebrew Talk - Beer, Wine, Mead, & Cider Brewing Discussion Forum

Help Support Homebrew Talk - Beer, Wine, Mead, & Cider Brewing Discussion Forum:

This site may earn a commission from merchant affiliate links, including eBay, Amazon, and others.

WildTurkey81

Member
Joined
Apr 22, 2020
Messages
7
Reaction score
0
Hello everyone!

This will be my first post on this forum after lurking on various fora for a few weeks, reading and gathering as much information as I could before the answers to my questions became too difficult to understand without help - so here I am :ban:

As the title indicates I am rather keen on the idea of allgrain, eBIAB systems as they seem to fit my personal preferences for the brewing process the most (brewing inside is the primary reason, as the winters can potentially produce temperatures in the range of -20 degrees Celsius). Ideally, my system would be a simple DIY 35-50L kettle, or 10-15 gallons if you're not metrically inclined, with an installed 3000-4500W heating element - preferably an ultra low watt density kind. Recirculation (with a pump) is not important right now as it seems to be an extra, unnecessary step that I can always add later down the line. The same goes for cooling as I aim to make a concentrated wort and add cold water after the boil to get it down below ~80 degrees Celsius, to avoid any noticeable isomerization/off-flavors, which I've read can be done with a 20-25% cut to the target boil (or batch?) volume.

My essential questions to this would be:
  1. should i add a basket (with feet to act as a false bottom) so I dont scorch my bag/wort? It probably wont scorch either way, but something about having my grains resting directly on top of the element irks me.
  2. controlling the temperature: should I install a PID controller to manage the temperature of my mash and boil or is a PWD more suitable? good sources on these are much appreciated as I know very little of these
  3. Is it possible to dump the thermocouple from the controller directly into the mash/bottom of the kettle and still get a good reading?
  4. I found this plug-n-play PID but can it power a +3000W element without a solid state relay/no heatsink? https://www.ebay.co.uk/itm/STC-1000...Thermostat-Regulator-Dual-Relay-/263944078924

Any and all questions and answers are welcome - and sorry for the wall of text!


Sincerely,
A newbie from Scandinavia
 
Hello everyone!

This will be my first post on this forum after lurking on various fora for a few weeks, reading and gathering as much information as I could before the answers to my questions became too difficult to understand without help - so here I am :ban:

As the title indicates I am rather keen on the idea of allgrain, eBIAB systems as they seem to fit my personal preferences for the brewing process the most (brewing inside is the primary reason, as the winters can potentially produce temperatures in the range of -20 degrees Celsius). Ideally, my system would be a simple DIY 35-50L kettle, or 10-15 gallons if you're not metrically inclined, with an installed 3000-4500W heating element - preferably an ultra low watt density kind. Recirculation (with a pump) is not important right now as it seems to be an extra, unnecessary step that I can always add later down the line. The same goes for cooling as I aim to make a concentrated wort and add cold water after the boil to get it down below ~80 degrees Celsius, to avoid any noticeable isomerization/off-flavors, which I've read can be done with a 20-25% cut to the target boil (or batch?) volume.

My essential questions to this would be:
  1. should i add a basket (with feet to act as a false bottom) so I dont scorch my bag/wort? It probably wont scorch either way, but something about having my grains resting directly on top of the element irks me. Many brewers use baskets, but they can be tricky to get to work well. Lot's of threads here on baskets, and their issues.
  2. controlling the temperature: should I install a PID controller to manage the temperature of my mash and boil or is a PWD more suitable? good sources on these are much appreciated as I know very little of these You need a PID type controller. If you are going to control both mash and boil with a single controller, I highly recommend using an Auber EZBoil. The DSPR120 is the low end model if you don't care about extra features like external alarms or automatic step mashing. If you want an off the shelf solution, the Auber Cube is a good choice. Blichmann also offers the BrewCommander (people like them, but I consider them to have a design deficiency that only shows up under fault conditions.) If you want to build your own control panel, I can help with designs for that.
  3. Is it possible to dump the thermocouple from the controller directly into the mash/bottom of the kettle and still get a good reading? You really need to have the temperature probe in a fixed location to get consistent results. Ideally the probe is mounted close to the element so that wort near the element won't get overheated before the controller can react. Overheating wort can cause enzymes to denature, or in extreme cases scorch the wort.
  4. I found this plug-n-play PID but can it power a +3000W element without a solid state relay/no heatsink? https://www.ebay.co.uk/itm/STC-1000Pro-EU-Digital-Temperature-Controller-Thermostat-Regulator-Dual-Relay-/263944078924 This controller is not suitable for controlling a heating element, as the rapid switching will cause the mechanical relays in the controller to fail early. You really need a controller that uses an SSR (solid state relay) to switch the element on and off.

Any and all questions and answers are welcome - and sorry for the wall of text!


Sincerely,
A newbie from Scandinavia
Making concentrated wort, and then diluting will cause your efficiency to be lower (you will need more grain to achieve the same OG.) You really should get a chiller, or go to a no chill process.

If you want to do BIAB without sparging, your kettle should be at least twice the volume as your batch size.

You will also need good ventilation in your brewing area to deal with all the steam, or you can use a steam condenser instead of ventilation.

Brew on :mug:
 
Second everything Doug said.

1- I used a steamer basket with a bag in it. My pot came with it so I am using it. You may just try bag only first and see how that goes before investing in a basket. Many people in the forums reported no issue with the bag directly on the element.

2- I use a dspr120. It works great. The controller itself will need to be hooked up to an SSR so it’s more than just a matter of buying the PID. You’ll need to wire a few things up in some kind of enclosure. Alternatively you can find pre built solution using an ezboil but expect to pay a minimum of 200$.

3- you’ll want some kind of thermowell attached to your pot. There are weldless solution that will just require that you drill a hole in your pot and install the hardware. There are also wellness probes that can be installed. They just need to be wired up to the controller. I don’t know about dumping a probe directly into the wort. I’m sure it can work but it’s probably pretty annoying to have wires in the way when you may try to stir, take sample, etc...

4- as Doug mentionned, this is a mechanical relay and not suited well for the needs of maintaining a mash temperature or a boil. A PWM is needed for any kind of reliable temperature control. An SSR coupled with an ezboil will achieve that. The SSR is usually an optically controllers solid strength switch so there’s no mechanical switching. It ca ln this switch rapidly without wearing out. I also doubt this would handle 3kW. The American one is rated at 1kW. I doubt the European one would be 3x.

I documented a full eBIAB build on this website, it may give you some ideas and background info.
 
Agree with Doug and Jakub. And to add a few thoughts:

1. I had the same feelings as you with not wanting to rest directly on the heating element. I found a stainless stand-off. (mine is Stainless Steel False Bottom for Brew In a Bag (BIAB) - 14.75'' Diameter )

2. I built mine with a PID from Auber. It works, but took me a while to dial in. If I had to do it again, I'd base it off ezboil.

3. Dropping temp probe in should work, but is not optimal. Where you measure will matter for consistency and accuracy.

4. see previous posts.
 
I second the false bottom from brewhardware.com. The feet are SS bolts that screw into nuts welded to the bottom. You can swap in different length bolts for whatever size feet you need. I bought an assortment at the HW store (all stainless) so that I have whatever length I need. I actually set mine up so that it's higher where the dip tube is and lower opposite it since I'm using an induction burner (so no element to have clearance for).
 
Have you considered a all in one system like the anvil foundry or the one of the other ones? If I was buy a system now I would seriously think about getting one of these. I hear the Anvil can keep mash temps within one degree. :mug:
 
Hello again

Thanks for all the insightful comments (and your offer to help with designing a control panel, @doug293cz ), you've given me something to think about - and @jdudek, your website is pretty damn informative, big thumbs up!
@cmac62, that is true - I could opt for a premade system from Brewtech, Anvil etc. but I can't help but think that I would be robbing myself of an opportunity to build something I would be proud of.

I have been researching a bit since my original post and I've run into a problem that has made me rethink the feasibility of the project: unfortunately it turns out the outlets in my apartment is only rated at 10A, 230V which doesn't leave a lot of juice to power anything beer-related (please do correct me if I'm wrong). I'll have to ask the landlord whether or not it is permitted to upgrade anything and then visit my local electrician to see if my panel can even be upgraded - hopefully to 16A (as a +16 amp outlet seems to be a heavy investment).

So, depending on the outcome, the plan is to make a PID-controller from scratch, get me a stock pot (50-58 L) along with a 3000W element and cutting out some holes. I'll keep you posted.

Cheers! :drunk:
You could run a 5 gal brew system with a 2200W element. It will heat up relatively slowly but still be workable. @Bobby_M has a nice chart on his site about element power and heating times. The hard part might be finding an element rated 2200W at 230V.

Brew on :mug:
 
I use 2200W for 5G batches and it's really not bad. The other nice thing about going electric is that you can warm up your mash water "whenever" during the day, well ahead of starting your actual brew. The controller will get it up to temp and hold it there until you're ready to proceed. Maintaining the temperature will not use any significant amount of electricity... so even if it sits there for hours at mash temp, it's no big deal.
indeed finding a ~2000W element at 230V is another story...
 
Hello again!

So, a month has passed since the last time I was here and I've been researching a bit since then; it turns out some of the outlets installed can actually handle 13 amps at 230 Vac (yay!) which is perfect for a heating element I found from Dernord on AliExpress rated at 2500W:

"/https://www.aliexpress.com/item/4000465404690.html?spm=a2g0o.cart.0.0.4fdd3c00rR7gEK&mp=1/"

I have also settled on a design for my kettle: no false bottom; no recirc (right now) as I intend to batch sparge + fine grind with a coronamill; a thermowell; a ball valve and the wilserbrew bag for the BIAB bag. Not too many bells and whistles just yet.

So, the final thing I need to get started is Your input on the PID-controller. I have an acquaintance from whom I can get help with electrical matters, but I'd like to assemble it myself and only have him review the wiring so as not to trouble him too much.

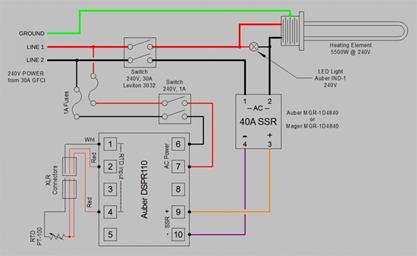
I have browsing around the web and found this diagram:
1590670990841.png

It seems to fit the bill with the exception of the thermocouple as I've chosen a K-type, and not an RTD, because I can get an Inkbird itc106 for ~half the price of an Auber:

"/https://www.aliexpress.com/item/32798114423.html?spm=a2g0o.cart.0.0.4fdd3c00rR7gEK&mp=1/"

I've read that an automatic breaker would ensure a great deal of safety, should anything go wrong, so how and where would I go about installing such a thing in the system?

And lastly, the ground-wire on the diagram is confusing me - shouldn't it go through the system in some way rather than straight from outlet to element?

I would kindly like to ask for your opinion on the things I've written.

PS. My electrical grid is rated at 230Vac, 50 hz, the lines are Ground, Neutral and Phase (Denmark)

Thanks! :bigmug:
 
Oh, and in regards to the SSR, I've gathered as much that I shouldn't rely on the cheap Foteks that are thrown at you from amazon, ebay etc. - but, in actuality, is there any cause for concern when the amperage is only ~10,87 amps and they include a 40amp SSR?
 
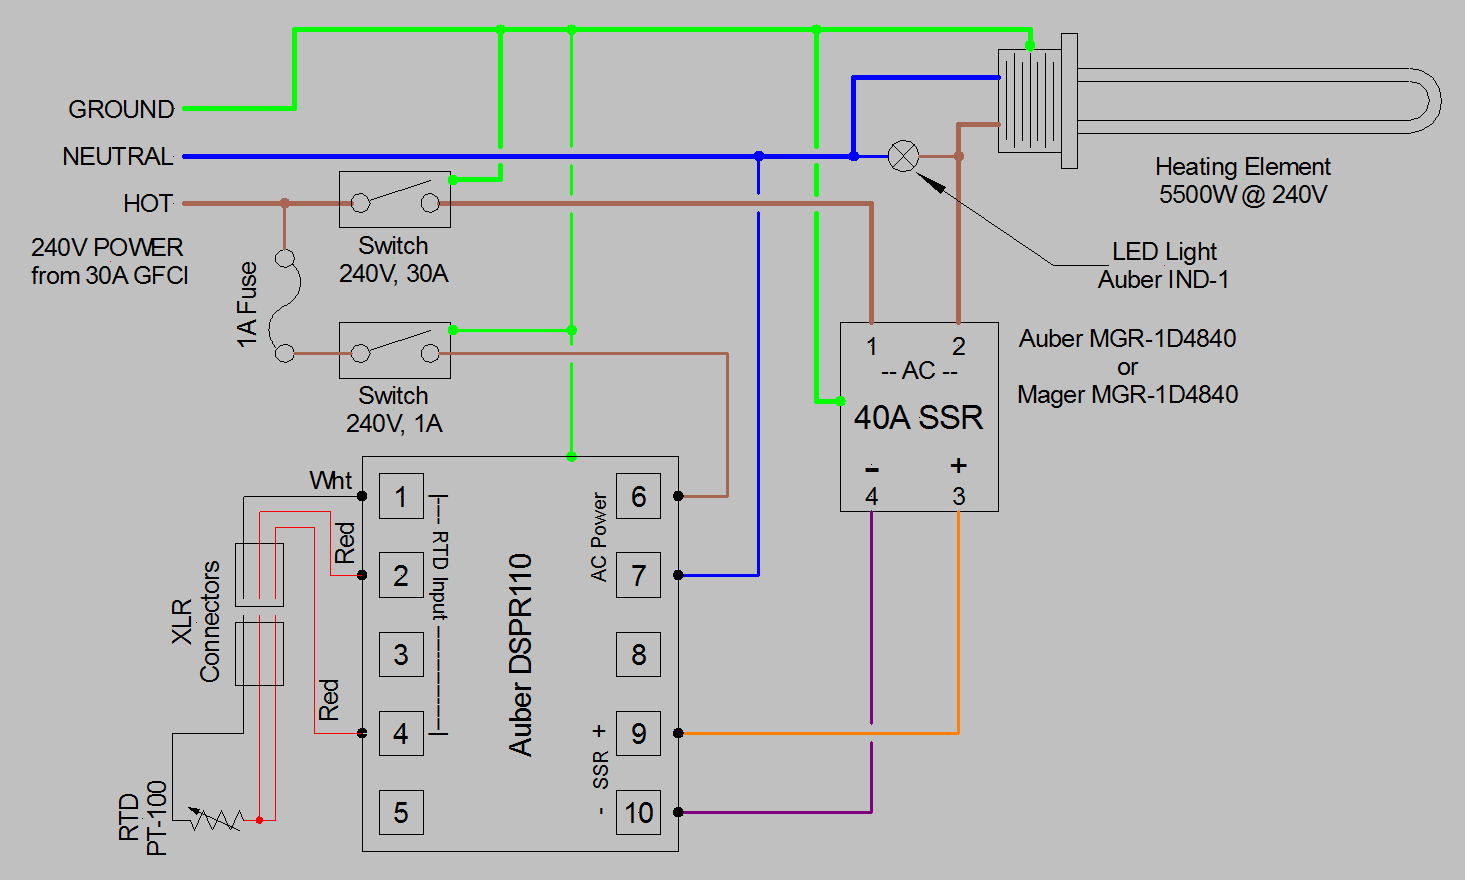
The above design is for USA (and similar) split phase 240V power systems, and the switching and fusing is more than is needed for a European single phase 230V system. Here's the equivalent of the above design intended for European style power systems:

Minimal DSPR110 240V only EU.png


Since you will be running on a circuit limited to 13A, a 15A rated switch may be substituted for the 30A switch shown in the diagram.

You are correct than the first drawing above doesn't show the complete grounding scheme. If you use a metal enclosure for the controller, then the main box and door/cover need to each be grounded. The SSR base plate should be grounded (can be grounded by contact to non-painted area of a metal enclosure.) Any internal components that have ground terminals or tabs should also be grounded. Most important is that you have a solid, reliable connection between the ground going to the element and the kettle.

You may substitute any generic PID, with manual mode, for the EZBoil (DSPR), but you will need to look at the PID manual to figure out where to connect power, temp probe, and SSR control outputs.

Many of the counterfeit "Fotek" SSR's are known to use inadequately rated components internally (for example TRIAC's rated at only 10A in higher rated SSR's.) Sometimes they work reliably and sometimes they don't. I won't tell you it's ok to use them, nor will I tell you you can't use them.

You need to be careful when using thermocouples, since the temp signal is created by having two different metals in contact. So connectors, that are not made of special compatible materials, can cause thermocouples to read incorrectly.

Brew on :mug:
 
Doug, you're making this look like child's play! ;) But thanks for the input, it reassures me I'm onto something and not stumbling around completely blind. However, could you kindly clarify the bit about the TCs and TWs in regards to their respective metallic makeup; are you referring to something along the lines of e.g. installing a brass TW and SS TC? It is my understanding that a SS 304 TC transducer and TW is compatible.

Thanks for all the help and input guys - I'll hopefully get to brewing soon! :cask:
 
Last edited:
A thermocouple is a temperature measuring device made with wires of two different metals or alloys, and a junction between the two wires. When the junction is at a different temperature than the opposite ends of the wires, a voltage is generated. The higher the temperature difference, the higher the generated voltage. For certain pairs of wire types, the variation of voltage with temperature is well characterized, and thus can be used to measure temperature. A type "K" thermocouple happens to be made with wires of chromel and alumel alloys.

One consideration with thermocouples is that the voltage signal varies not only with the temp at the active junction (the tip if you will), but also with the temp at the junctions (terminal connections) at the measuring device, and any junctions formed by any connectors or splices in the signal leads. For this reason there are special connectors and extension wires made for use with thermocouples to prevent offset errors created by extra junctions.

When a thermocouple sensor says something like "SS 304 TC transducer" that means that the actual thermocouple junction (tip) is encased in an SS sheath to provide environmental protection. The thermocouple itself is not SS. A sheathed thermocouple does not require a separate thermowell, since the sheath is basically a self contained thermowell.

Pt100 RTD is a precision resistor with a nominal resistance value of 100 ohms. The resistance value varies with temperature, and the temperature is calculated from the resistance. The resistance depends only on the temp at the active tip, and not the temp at the other ends of the wires, as is the situation with thermocouples. The use of 3 or 4 wires with the RTD allows the meter to compensate for the resistance of the leads, which is needed to get accurate resistance measurements with low value resistors. For extension wires it is only critical that all the wires be the same (length, material, cross section) so that each wire in the extension bundle has the same resistance.

Brew on :mug:
 
I use 2200W for 5G batches and it's really not bad. The other nice thing about going electric is that you can warm up your mash water "whenever" during the day, well ahead of starting your actual brew. The controller will get it up to temp and hold it there until you're ready to proceed. Maintaining the temperature will not use any significant amount of electricity... so even if it sits there for hours at mash temp, it's no big deal.
indeed finding a ~2000W element at 230V is another story...

Use heater from cheap tea kettle.
See this video.
 
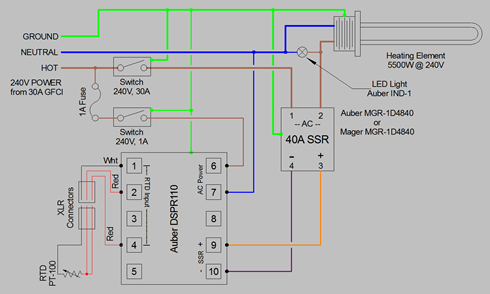
Hello again everyone, I have made it back to hbt after a long detour - life happened and all that - but I haven't been resting on my laurels and I thought you guys might want an update on what your help enabled me to do! Since the last time I wrote I've received the last packages (ordered june 6th - got it in my mail today.. yup.) for my BIAB system. As such, I've been busy tinkering during the last few weeks and I'm almost done. However, I've hit a bit of a snag with my ammeter; I've been blowing the fuse on my relay - twice.. So, before I go blowing any more fuses could any of you guide me with the final wiring?
ammeter wiring.jpg
1601504597895.png


I'll be sure to post pictures once the setup is complete.

Bonus question:
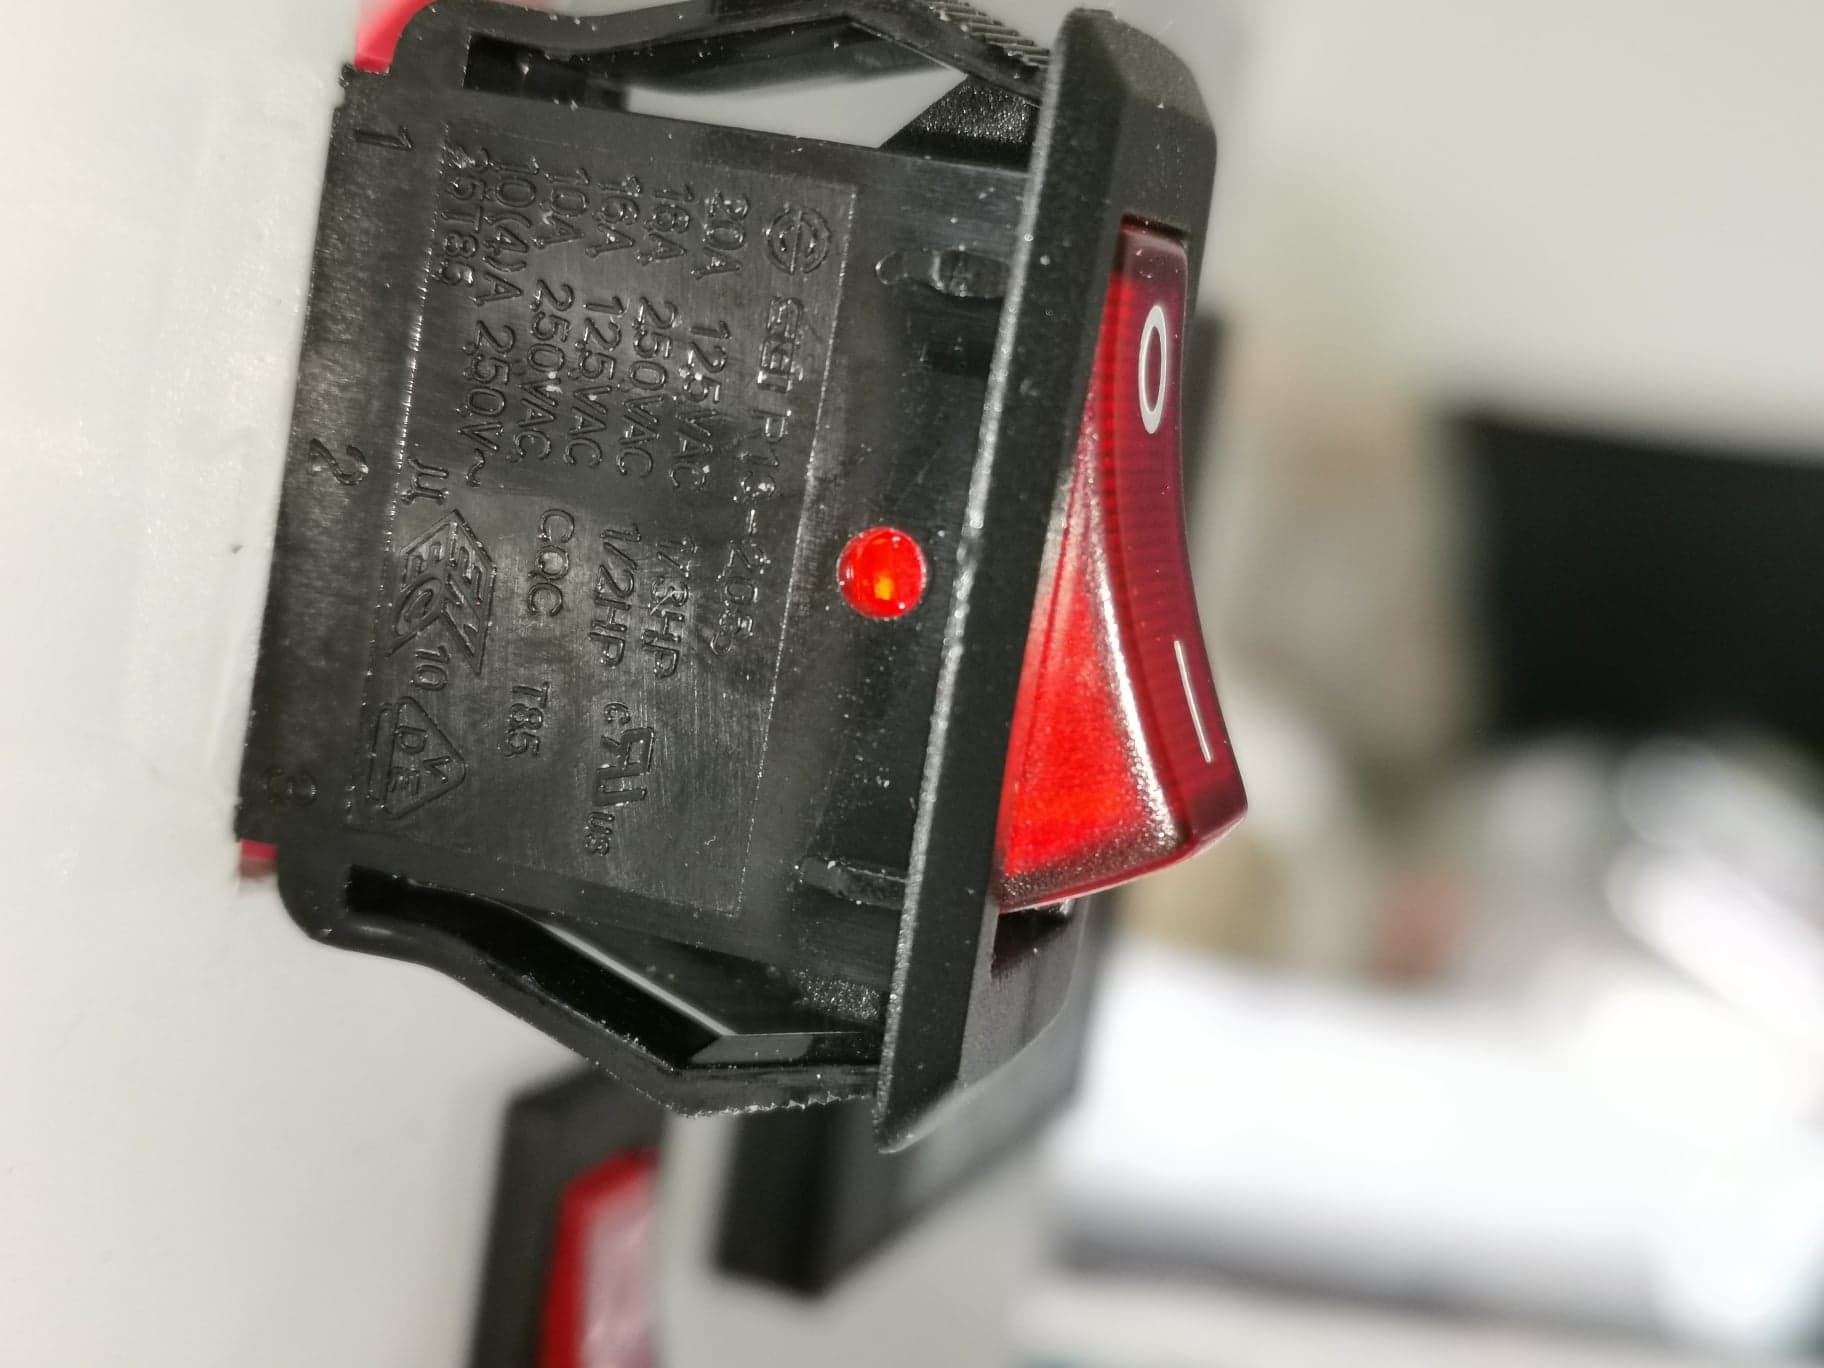
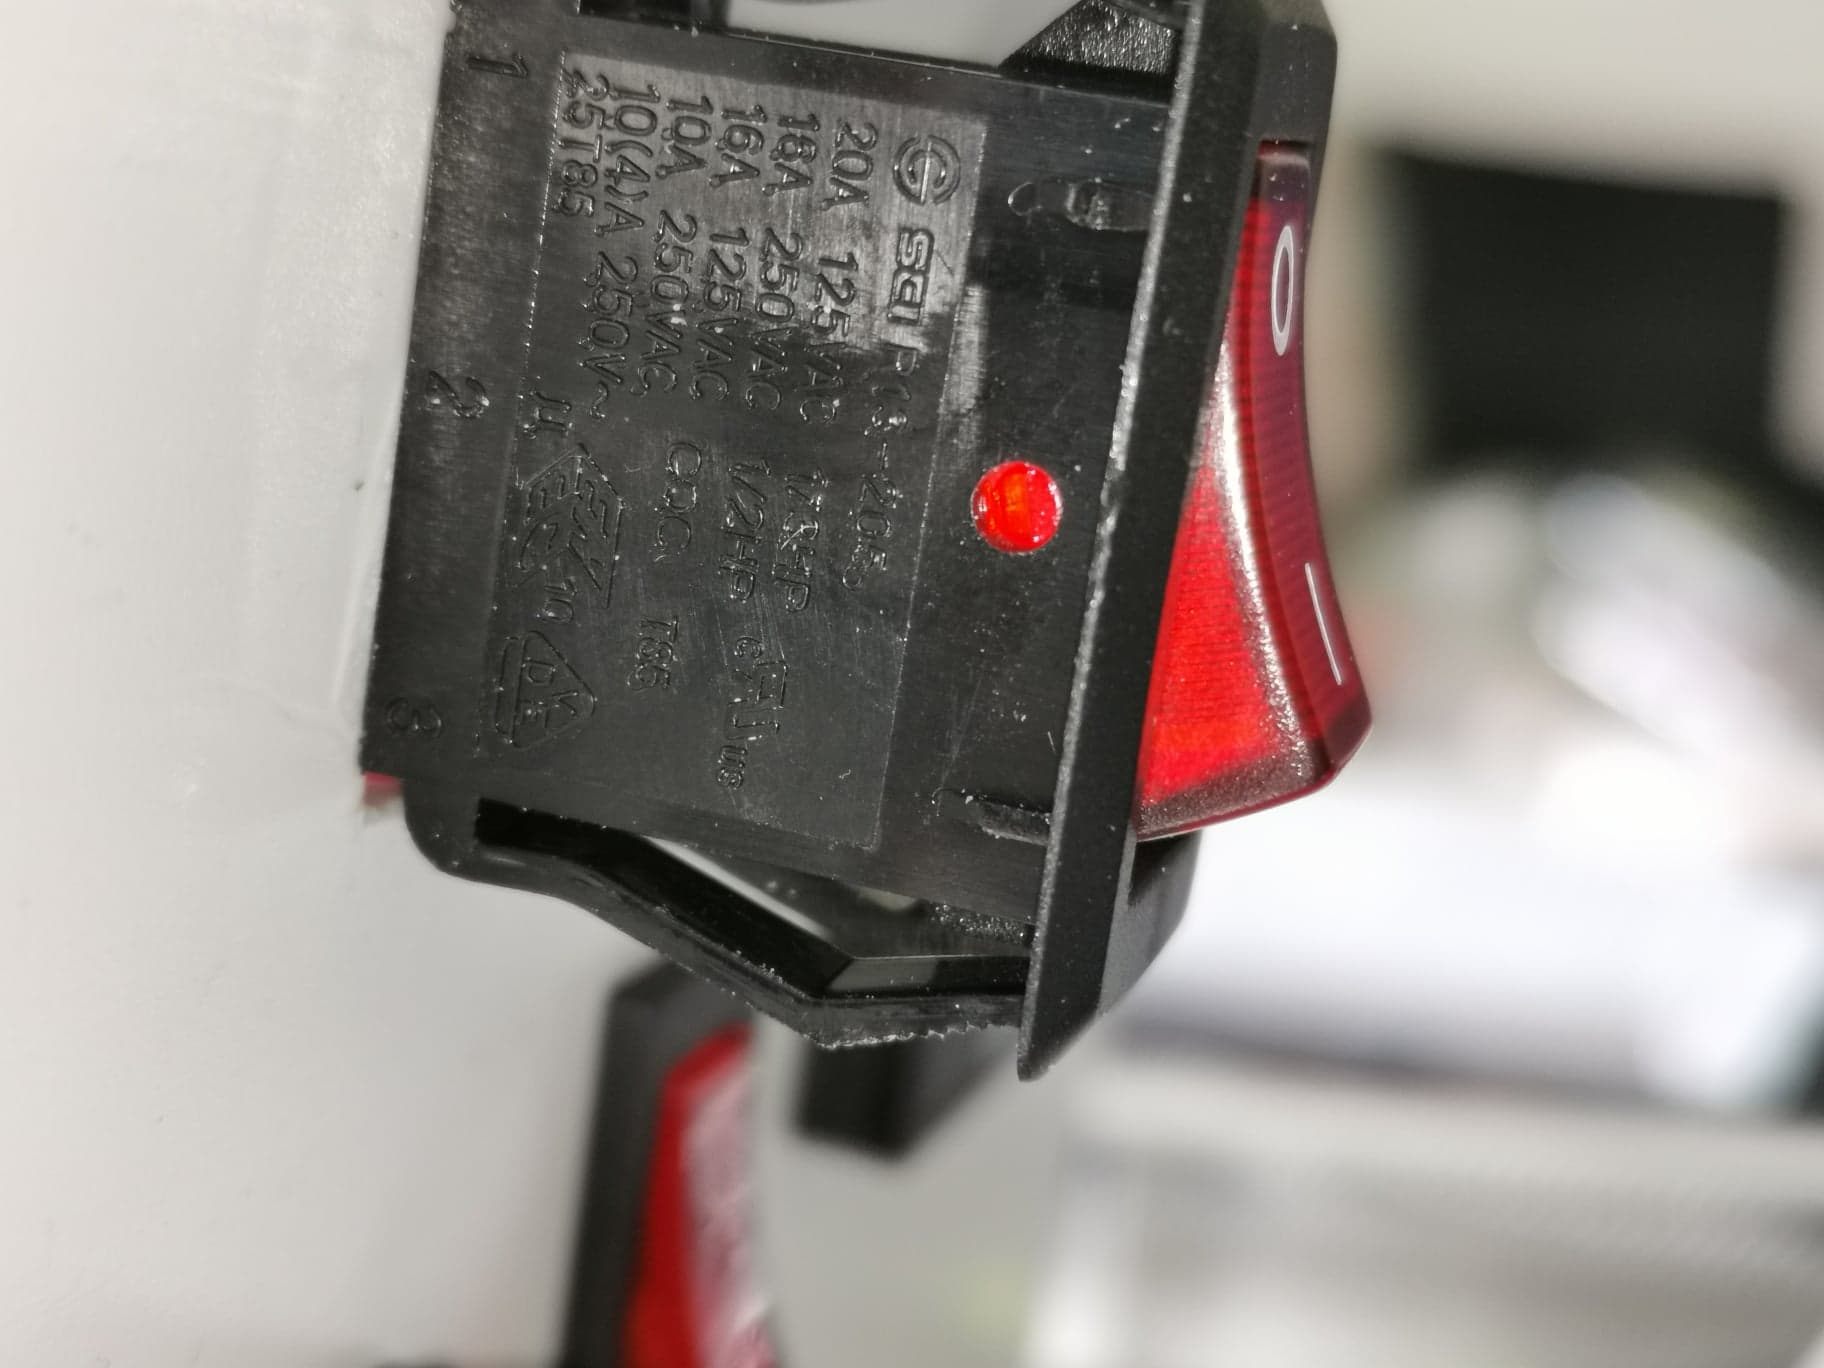
the single throw-switches on my controller are lighted but they do not behave as how they should: when one is on and the other off they both are lighted clearly; when they both are on they are dimly lit (see picture below) - any suggestions as to what can cause this 'leaky current'-phenomenon?
switches.jpg


Cheers.
 
Hello again everyone, I have made it back to hbt after a long detour - life happened and all that - but I haven't been resting on my laurels and I thought you guys might want an update on what your help enabled me to do! Since the last time I wrote I've received the last packages (ordered june 6th - got it in my mail today.. yup.) for my BIAB system. As such, I've been busy tinkering during the last few weeks and I'm almost done. However, I've hit a bit of a snag with my ammeter; I've been blowing the fuse on my relay - twice.. So, before I go blowing any more fuses could any of you guide me with the final wiring?
View attachment 700692View attachment 700694

I'll be sure to post pictures once the setup is complete.

Bonus question:
the single throw-switches on my controller are lighted but they do not behave as how they should: when one is on and the other off they both are lighted clearly; when they both are on they are dimly lit (see picture below) - any suggestions as to what can cause this 'leaky current'-phenomenon?
View attachment 700698

Cheers.
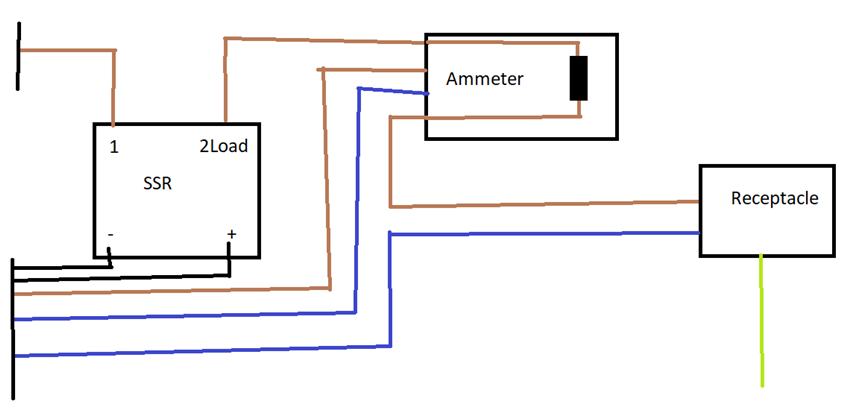
Need to know how the PZEM-021 meter is connected to the rest of the circuitry in order to diagnose your problem.

Also, need to know the manufacturer and part number of the lighted switches that you are using to figure out their behavior.

Brew on :mug:
 
I chose to connect the ammeter like this (got nothing better than a terrible paint-drawing) but it didn't pan out. Everything else is connected just like the original diagram shows.

Data for my spst rocker switches (notoriously difficult to photograph with even with proper lighting):
SCI R13-205 Series SPST Rocker Switch 250Vac 16A.

I've connected them like this:
pin 1 = power in
pin 2 = power out
pin 3 = grd

switch1.jpg
switch2.jpg

1601649579974.png


I hope this makes sense to you.

Cheers.
 

Attachments

  • wiring.png
    wiring.png
    13.2 KB · Views: 6
Back
Top