You are using an out of date browser. It may not display this or other websites correctly.
You should upgrade or use an alternative browser.
You should upgrade or use an alternative browser.
"polishing your keg" is more than a clever euphemism
- Thread starter Bobby_M
- Start date

Help Support Homebrew Talk:
This site may earn a commission from merchant affiliate
links, including eBay, Amazon, and others.
copper2hopper
Well-Known Member
I'm super frustrated. Nothing like spending the entire day working slow and deliberate to reach the home stretch and have your project feel completely derailed... any help would be appreciated. I've done a bunch of research on my own. I've watched Bobby M's videos, dug through a bunch of threads on here, referenced a bunch of instructional tutorials else where.
Bottom Line Up Front:
I've spent the entire day polishing it trying to obtain an immaculate shine following this guy's instructions. My problem is no matter what I tried I ended up with a black smudgy result instead of the reflection I was hoping to achieve. My gator polishing pad looks destroyed. I've done all the research I can find and some people said it's removable with paint thinner. I tried it without a whole lot of luck. I plan to try again with a little paint thinner, but is there anything else I'm missing? Should I buy some metal polish and try just buffing it by hand? I mean I pretty much followed the link below (beer syndicate) with everything except the polish brands because I can't find them anywhere.
Should I redo the polish using the kit I bought at lowes (see below) and use the #2 polish first?
Is my technique off? I thought I had a really smooth process for the initial polishing just letting the weight of my grinder act as the pressure as I guided it in small circular motions.

I also tried Bar Keepers Friend to try and clean off the black smudge hoping the shine was hiding underneath. That didn't do me much good.

http://www.beersyndicate.com/learning_resources/beer_tutorials_view.asp?id=17
My goal was to get it too look like Lars's as shown here.
I spent a deliberate amount of time buffing the keg with the initial polish. I used the Ryobi E grade compound and got a nice dull gloss to it smoothing out the uneven scratches and such.

Then I used my (next to impossible to find) polishing pad as recommended in the instructions. Initially I tried it with the Ryobi compound which to my dismay started turning black immediately. So I stopped, changed back to the fine pad and cleaned up the black scuffs I just created. Then I ran to Lowes. At Lowes I found these items.
I took my 2nd polishing pad and applied the #5 High gloss compound with optimistic hopes that it would clean up brilliantly and give me the shine I'd worked all day for.

https://www.homebrewtalk.com/f51/keggle-polish-help-239804/
I just ordered a restock of polishing equipment to include the fine and polishing pads. I'm looking into more polish. Hopefully some feedback will stop me from being frustrated and just throwing money at the problem.
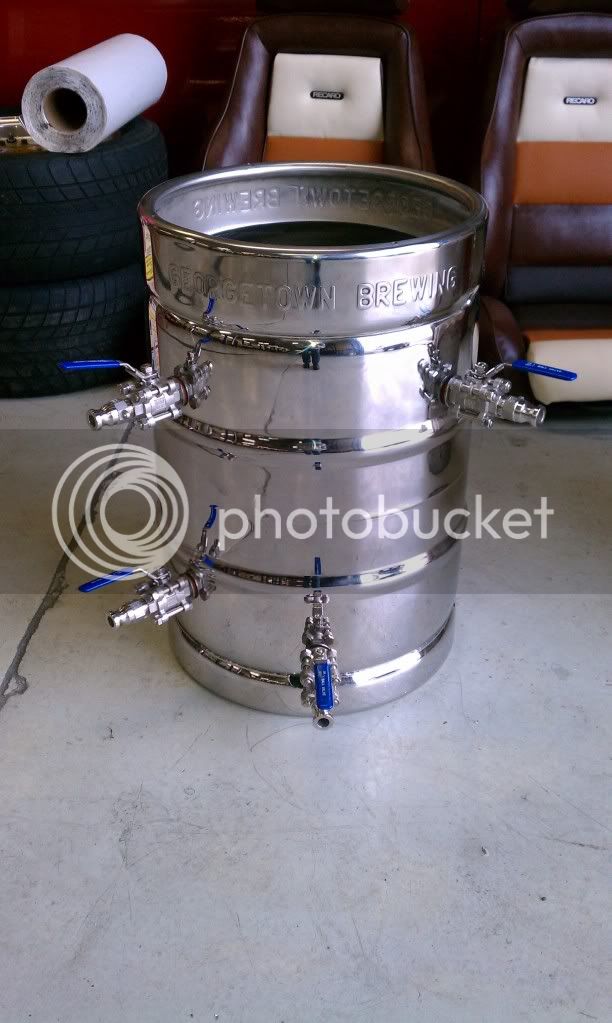
Hey I noticed 4 ports/valves on one keggle in that one pic. Why so many? I'm curious
FiddlersGreen87
Well-Known Member
- Joined
- Jun 9, 2014
- Messages
- 298
- Reaction score
- 70
Port/valves? Or do you mean the shiny keg with the blue ball valve handles. If so that's then two things. 1) You're guilty of just looking at the pictures.  2) That one belongs to Lars so you'd have to ask him. There's only two punched holes. One for the ball valve and one for the sight glass/thermometer.
Thanks Lars. I dunno if you're just saying that after my rage and frustration, but I appreciate it either way lol. Now that I have a better idea of how to do it I'm sure the next one would go much faster. I think I became more determined to make it as close to perfect as I could because I kept falling short. Definitely a project for the stubborn.
2) That one belongs to Lars so you'd have to ask him. There's only two punched holes. One for the ball valve and one for the sight glass/thermometer.That looks awesome !!!!!!!!!!!!!!
Thanks Lars. I dunno if you're just saying that after my rage and frustration, but I appreciate it either way lol. Now that I have a better idea of how to do it I'm sure the next one would go much faster. I think I became more determined to make it as close to perfect as I could because I kept falling short. Definitely a project for the stubborn.

FiddlersGreen87
Well-Known Member
- Joined
- Jun 9, 2014
- Messages
- 298
- Reaction score
- 70
May god have mercy on your soul if you are attempting to polish this. Say good bye to your loved ones because you won't see them for several days.


$58.16
HUIZHUGS Brewing Equipment Keg Ball Lock Faucet 30cm Reinforced Silicone Hose Secondary Fermentation Homebrew Kegging Brewing Equipment
xiangshuizhenzhanglingfengshop


$53.24
1pc Hose Barb/MFL 1.5" Tri Clamp to Ball Lock Post Liquid Gas Homebrew Kegging Fermentation Parts Brewer Hardware SUS304(Liquid Hose Barb)
yunchengshiyanhuqucuichendianzishangwuyouxiangongsi

$28.98
Five Star - 6022b_ - Star San - 32 Ounce - High Foaming Sanitizer
Great Fermentations of Indiana

$7.79 ($7.79 / Count)
Craft A Brew - LalBrew Voss™ - Kveik Ale Yeast - For Craft Lagers - Ingredients for Home Brewing - Beer Making Supplies - (1 Pack)
Craft a Brew


$10.99 ($31.16 / Ounce)
Hornindal Kveik Yeast for Homebrewing - Mead, Cider, Wine, Beer - 10g Packet - Saccharomyces Cerevisiae - Sold by Shadowhive.com
Shadowhive

$159.50 ($26.58 / Count)
3M High Flow Series System BREW120-MS, 5616001, For Brewed Coffee and Hot Tea, Valve-in-Head Design
Amazon.com

$479.00
$559.00
EdgeStar KC1000SS Craft Brew Kegerator for 1/6 Barrel and Cornelius Kegs
Amazon.com

![Craft A Brew - Safale BE-256 Yeast - Fermentis - Belgian Ale Dry Yeast - For Belgian & Strong Ales - Ingredients for Home Brewing - Beer Making Supplies - [3 Pack]](https://m.media-amazon.com/images/I/51bcKEwQmWL._SL500_.jpg)


$33.99 ($17.00 / Count)
$41.99 ($21.00 / Count)
2 Pack 1 Gallon Large Fermentation Jars with 3 Airlocks and 2 SCREW Lids(100% Airtight Heavy Duty Lid w Silicone) - Wide Mouth Glass Jars w Scale Mark - Pickle Jars for Sauerkraut, Sourdough Starter
Qianfenie Direct


$719.00
$799.00
EdgeStar KC2000TWIN Full Size Dual Tap Kegerator & Draft Beer Dispenser - Black
Amazon.com

$53.24
1pc Hose Barb/MFL 1.5" Tri Clamp to Ball Lock Post Liquid Gas Homebrew Kegging Fermentation Parts Brewer Hardware SUS304(Liquid Hose Barb)
Guangshui Weilu You Trading Co., Ltd


$176.97
1pc Commercial Keg Manifold 2" Tri Clamp,Ball Lock Tapping Head,Pressure Gauge/Adjustable PRV for Kegging,Fermentation Control
hanhanbaihuoxiaoshoudian


$44.99
$49.95
Craft A Brew - Mead Making Kit – Reusable Make Your Own Mead Kit – Yields 1 Gallon of Mead
Craft a Brew


$76.92 ($2,179.04 / Ounce)
Brewing accessories 1.5" Tri Clamp to Ball Lock Post Liquid Gas Homebrew Kegging Fermentation Parts Brewer Hardware SUS304 Brewing accessories(Gas Hose Barb)
chuhanhandianzishangwu


$20.94
$29.99
The Brew Your Own Big Book of Clone Recipes: Featuring 300 Homebrew Recipes from Your Favorite Breweries
Amazon.com

$22.00 ($623.23 / Ounce)
AMZLMPKNTW Ball Lock Sample Faucet 30cm Reinforced Silicone Hose Secondary Fermentation Homebrew Kegging joyful
无为中南商贸有限公司


FiddlersGreen87
Well-Known Member
- Joined
- Jun 9, 2014
- Messages
- 298
- Reaction score
- 70
If you're interested in the products I can easily list them all off where to get them for you. I spent a lot of time repurchasing them because I didn't do it effectively the first time lol.:cross:
FiddlersGreen87
Well-Known Member
- Joined
- Jun 9, 2014
- Messages
- 298
- Reaction score
- 70
Polish - Either Compound works
http://www.amazon.com/gp/product/B00FGUJ4OM/?tag=skimlinks_replacement-20
Item ID: 002-8166203-6830637
Item: Porter Cable Iron/Steel Rapid Cut Cleaning Compound- PCPC2
Lots Purchased: 1
Total Price: $8.10
Ryobi 4 oz. Stainless Steel "E" Buffing Compound Tube
http://www.ebay.com/itm/Ryobi-4-oz-...1106392523?pt=Power_Tools&hash=item1c3280e5cb
Pads-
http://www.farmandfleet.com/
Gator
4-1/2" Finishing Discs 2 Pack
Type: Polishing
Blain #742013
Gator
4-1/2" Quick Change Backer Pad
Blain #595812
Gator
4-1/2" Finishing Discs 2 Pack
Type: Fine
Blain #742010
Final Polishing Compound - Bought this at the local auto parts store
Finishing Metal Polish
http://www.meguiars.com/en/automotive/products/g15605-finishing-metal-polish/
Last edited by a moderator:
FiddlersGreen87
Well-Known Member
- Joined
- Jun 9, 2014
- Messages
- 298
- Reaction score
- 70
It depends entirely on your technique. I'm Bobby M could knock out several, while I used almost 3/4 in my debacle while I learned how to do it properly. Then again I spent hours going over my first one time and time again only to discover that with a little elbow grease it's far more effective.
Now that I understand the technique I'm sure I could do 2, possibly 3+.
Realistically, 2 would probably be a good guess.
Now that I understand the technique I'm sure I could do 2, possibly 3+.
Realistically, 2 would probably be a good guess.
smellie_hippie
Junior Member
So I have read through the thread several times, watched Bobby's videos (and read his article) and purchased everything I need to polish my kegs. Except for one thing.
Where the hell are the finishing pads?!? Got the grinder, medium and fine pads, cutting wheel, polishing compound. But where are the finishing pads?!
Maybe Tennessee is woefully inept at meeting my needs for mirror shined keggles, but this is frustrating.
To be clear... I have shipped at Lowes, Home Depot, Ace Hardware, Northern Tool, Napa Auto Parts, WalMart... And the online options for these stores as well. The closest I have come is a pad that fits on a bench grinder, but it maxes at 7500 RPM.
Would that pad work on a cordless drill set at highest speed? Any other suggestions of where I can look for the right pads for my Hitachi Angle Grinder?
I am hoping to polish them up on Saturday and order parts from Bobby to finish.
Sent from my iPhone using Home Brew
FiddlersGreen87
Well-Known Member
- Joined
- Jun 9, 2014
- Messages
- 298
- Reaction score
- 70
Scroll up 4 posts.
Pads-
http://www.farmandfleet.com/
Gator
4-1/2" Finishing Discs 2 Pack
Type: Polishing
Blain #742013
smellie_hippie
Junior Member
Scroll up 4 posts.
You know what... I read your post, and tried to browse the Farm and Fleet website... but didn't actually think about putting in the friggin part # you had listed.
I'd like to blame my dear friend alcohol... but she wasn't even involved with this ridiculous oversight.

edit: Well crap. Looks like Farm and Fleet is a "northern store" and I would have to get the parts shipped to Tennessee...
FiddlersGreen87
Well-Known Member
- Joined
- Jun 9, 2014
- Messages
- 298
- Reaction score
- 70
Yea good luck finding the parts anywhere locally. I had to order everything as well. I'm in GA and I checked Harbor Freight, Walmart, Home Depot, Lowes, and Ace with no luck. Anyways, I will say they do arrive quickly, but yea you'll probably have to ship them.
smellie_hippie
Junior Member
Yea good luck finding the parts anywhere locally. I had to order everything as well. I'm in GA and I checked Harbor Freight, Walmart, Home Depot, Lowes, and Ace with no luck. Anyways, I will say they do arrive quickly, but yea you'll probably have to ship them.
I guess I better bake some damn cookies for the FedEx man then... :cross:
homebrewed505
Well-Known Member
- Joined
- Mar 30, 2011
- Messages
- 79
- Reaction score
- 2
Can someone that has been successful please post a video of the actual process demonstrating how to use each of the pads and what compounds worked. If someone has already posted a video can someone post a link. Please
So my question, which I think I know the answer too, is should I go ahead and have my holes and couplers welded in before I take on this project. My actual plan as of right now was to run the fine pads thru this week. Since I have to order polishing pads/compounds I was gonna send my keg over to my Father in law shop to drill holes and weld couplers in. Then when I get it back I will be ready to polish. Good idea? Bad idea?
Stealthcruiser
Well-Known Member
If it were me, and I wanted them shiny, I would polish first, tape over the areas you plan to add couplings, etc., lay out hole locations, drill through tape, ( tape will protect the work areas already polished), remove the tape, weld in the couplings.
If you do it after welding, then you have all the protrusions, ( couplings), to polish and buff around, which may make a noticeable effect, in your patterns produced when working from coarser to finer grits.
If you do it after welding, then you have all the protrusions, ( couplings), to polish and buff around, which may make a noticeable effect, in your patterns produced when working from coarser to finer grits.
*Blows dust off of thread*
Lots of reading going on.. I'm slowly building my single tier keggles! So many questions but im starting here polishing the kegs that took me 6 years to find legally.
Anyways.. I've polished my first keg with med then fine pads. Easily noticed that med pad I needed 1 and had to start a second pad as it ate it away.. I then moved on to a fine pad. A single fine pad was able to bring the swirly shine out. I then hoped I could hook my buffer wheel up to polish it to no avail.
Seems I need to pick up a few polishing gator pads from blains farm and fleet.. My question is I need to know how many I need to order! They're in 2 packs.. and I noticed then fine pad lasted a whole keg as opposed to the med pad.. Will I get 2 kegs polished with a single pack or should i order 3? I'm debating whether to polish my mash tun keg since I'll most likely be wrapping it to keep warm. So possibly how many gator polishing pads would i need to do 3 keggles?
Lots of reading going on.. I'm slowly building my single tier keggles!
So many questions but im starting here polishing the kegs that took me 6 years to find legally.Anyways.. I've polished my first keg with med then fine pads. Easily noticed that med pad I needed 1 and had to start a second pad as it ate it away.. I then moved on to a fine pad. A single fine pad was able to bring the swirly shine out. I then hoped I could hook my buffer wheel up to polish it to no avail.
Seems I need to pick up a few polishing gator pads from blains farm and fleet.. My question is I need to know how many I need to order! They're in 2 packs.. and I noticed then fine pad lasted a whole keg as opposed to the med pad.. Will I get 2 kegs polished with a single pack or should i order 3? I'm debating whether to polish my mash tun keg since I'll most likely be wrapping it to keep warm. So possibly how many gator polishing pads would i need to do 3 keggles?
Stealthcruiser
Well-Known Member
Order more than you think you'll need, that way when you get burned out and nasty, dirty, grimy from polishing, you'll have stock to start again, with no excuses for not finishing!
Seriously, only you know your polishing style and method........Someone who does it for a living, and knows all the tips and tricks, could probably call it on the nose!

Seriously, only you know your polishing style and method........Someone who does it for a living, and knows all the tips and tricks, could probably call it on the nose!
OP
OP
Besides, you'll find all kinds of things to polish afterwards. More is better.
Besides, you'll find all kinds of things to polish afterwards. More is better.
very true went ahead and order plenty to get the job done and then some since they're not locally available. Wish I would have noticed this idea before i polished my cornys on my stationary buffer. That was a workout to say the least..
jrstaples1
Well-Known Member
Forgive me if it has already been addressed, I didn't read all 66 pages of this thread. I'm wondering if anyone had problems getting the backing plate onto your grinder spindle? The fit is so tight on mine I can't get the backing plate down to get the nut even close to the threads. What am I doing wrong?
OP
OP
You have to remove all the backing hardware that is typically used for holding grinding and cutting wheels.
metalgrease
New Member
- Joined
- Aug 14, 2015
- Messages
- 1
- Reaction score
- 0
Forgive me if it has already been addressed, I didn't read all 66 pages of this thread. I'm wondering if anyone had problems getting the backing plate onto your grinder spindle? The fit is so tight on mine I can't get the backing plate down to get the nut even close to the threads. What am I doing wrong?
the backing pad sucks. only way i could get it to work on my Dewalt was to use another backing pad from 3m
http://www.amazon.com/gp/product/B000BQP0FI/?tag=skimlinks_replacement-20
Last edited by a moderator:
Just wanted to let everyone know that all the pads are on sale right now through 10/22 at Blains farm & fleet. In case anybody was waiting to pull the trigger. I just did.
http://www.farmandfleet.com/products/742013-gator-4-1-2-finishing-discs-2-pack.html
http://www.farmandfleet.com/products/742013-gator-4-1-2-finishing-discs-2-pack.html

Similar threads
- Replies
- 32
- Views
- 2K
- Replies
- 23
- Views
- 2K
- Replies
- 8
- Views
- 3K
- Replies
- 106
- Views
- 14K
