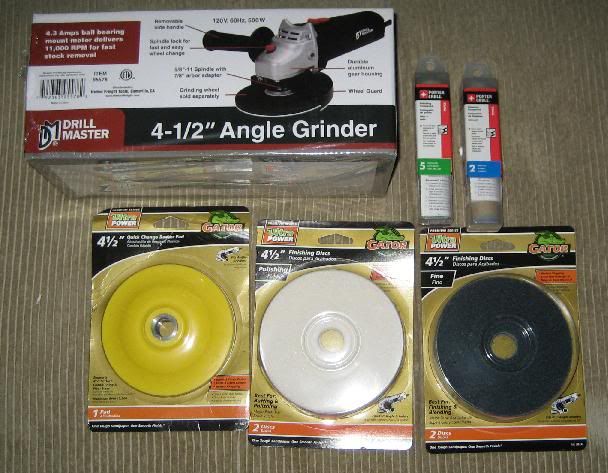
• Please visit and share your knowledge at our sister communities:
  • If you have not, please join our official Homebrewing Facebook Group!

    Homebrewing Facebook Group

"polishing your keg" is more than a clever euphemism

Homebrew Talk

Help Support Homebrew Talk:

This site may earn a commission from merchant affiliate links, including eBay, Amazon, and others.
Took about 20 min per keg. I used one gatorgrit pad per keg.
To keep swirling down use a light touch and keep the grinder moving.
Real easy!
 
What is the list of stuff you guys used? Scanned all 34 pages and never came acrost a list post.
 
All at Lowes, however, the polish compound is not in the same place as the pads.

Step 1. Gator grit backer + Gator Grit fine pad, gets them shiny.

Step 1.5 If you are seeing black streaks, you are melting the backer, use paint thinner or wire cleaner or some other solvent and a rag to wipe it clean.

Step 2. Gator grit backer + Gator grit polish pad + #5 polishing compound adds the mirror finish.

The mirror finish from the polishing pad and the #5 compound takes about 2-3x longer than the general "shine" from the gator grit fine pads, however, ... WOW.. that mirror finish is awesome.

Pics of what you want are in here.. someplace.
 
I am at lowes right now . The blue "fine” pad looks like it's going to scratch the **** out of the keg. the polishing pad looks nice and

-=Jason =-
 
33 pages of comments can't be wrong. :D

The blue fine pad is what you want if the keg is real nasty (see my pics from a few posts ago) The polishing pads by themselves will do not what you want.
 
yeah just when I was in the store looking I was thinking to my self man thats going to scratch the crap out of it, but then you have your polishing pad and mirror finish #5 to be applied.

I just didn't have $30 to drop at the moment so I didn't buy anything.

-=Jason=-
 
Here is my loot for the project. Everything was about $50 in total. I picked up the grinder from Harbor Freight for about $15.

They did not have the polishing compound at my Lowes which is featured in the pics on this thread. But I believe the stuff I got is basically the same thing.

polishingstuff.jpg

I was just at lowes today and that is indeed what you need.

pricing off the top of my head rounded up to the nearest dollar

Yellow backing disk $11
Blue "FINE" pads 2 pack for $9
white soft "polishing" pad 2 pack for $6
#2 regular polish $3
#5 Mirror Finish polish $3

total: $32

couple hours of back breaking labor Priceless.


-=jason=-
 
Sorry for resurrecting an old thread but I was wondering if there was an attachment I could make for a dremel that would give the same result? Or multiple attachments like Bobby did even. Being as though I don't have an angle grinder it would save me some dough.
 
There's no way a dremel would get you there in any reasonable amount of time. The way that I get that final mirror is by putting a lot of pressure on the buffing pad. It's so much that even my decent grinder nearly stalls out. There's just way to much surface to cover also. Get a harbor freight grinder with a 20% off coupon and burn it up on the project.
 
Sorry for resurrecting an old thread but I was wondering if there was an attachment I could make for a dremel that would give the same result? Or multiple attachments like Bobby did even. Being as though I don't have an angle grinder it would save me some dough.

If you're tight on cash, don't bother. It's just botox for your keggle.
 
Sorry to drop a turd in the shiny keg rainbow but I didn't see any mention of personal protective equipment... On a thread about turning the surface of a toxic material into ultrafine dust I would think someone would have stressed the importance of wearing a full-face mask with chemical canisters.
 
It's sad that people have to be told to preserve their own health every 5 seconds but I suppose you're right. This here procedure is dangerous, Mkay? In fact, here's a blanket disclaimer. Don't run power tools without hearing, eye and lung protection. Oh, and don't forget to check your balls for lumps and get your cholesterol level tested.
 
You can make light of it all you like but Stainless is a much more dangerous material than plain carbon steel, and if you think that $.30 paper mask from bargain bin depot is going to help you're kidding yourself. Chromium exposure is bad, bad stuff. I just figure if you're going to tell someone how to do something: tell them how to do it properly and safely. Not everyone on this site knows what they are doing, I think that plainly obvious - otherwise asking how to polish metal wouldn't be a topic worthy of 350 posts. I mean no disrespect to anyone, I just everyone to get all of the info they nee before starting a project. It's the diference between how to gut a kitchen and how to gut a kitchen with asbestos laden walls. If you don't know, you don't know.
 
No, I really do appreciate your point. Even without understanding the particular danger with Chromium dust, it's a nasty enough job to realize you shouldn't be breathing it in. Even with the full canister respirator, I've had black snot from when the seal wasn't perfect. To prove that I'm not kidding, I'll add a note about it on my website article on the same topic and link to this MSDS on chromium if anyone is wondering what the fuss is about. http://www.caledonlabs.com/upload/msds/3150-1e.pdf

According to that info, chemical absorption canisters aren't necessary but a fine particulate dust filter like the P100 might be in order. At the very least, I appreciate this being brought up as a reminder to reorder some replacement carts before I run out.
 
Which one of you guys is this?


Based on how filthy my garage gets during polishing, I really have to wonder about this being done in what looks like a living room.
 
Last edited by a moderator:
I spent a total of about 2 hrs on this keggle, although I haven't yet used the last polishing stick that is supposed to make it the final stage of bling bling shiny. Forgot to take a absolute 'before' pic, but stopped and took one before I touched the top.
The only difference in items utilized was the pad backer- the yellow one was too thick for my HF grinder and I had to use the similarly priced black one.

Looking forward to utilizing this:)

DSC00957.jpg


DSC00952.jpg


DSC00953.jpg


DSC00955.jpg


DSC00958.jpg
 
Bobby, Thanks a million for sharing your polishing tips and also damn you for sharing. I polished two kegs this weekend and I thought that was going to kill me. Two down and one to go. Thanks again :)

polishedkegs1.jpg


kegh3.jpg


keg2.jpg
 
Wow these things are pissing me off. The last thing I want to do on a Saturday afternoon is kill my back polishing 2 kegs. But they look so pretty!.
 
Wow these things are pissing me off. The last thing I want to do on a Saturday afternoon is kill my back polishing 2 kegs. But they look so pretty!.

maybe tackle 1/3 of a keg at a time?

I might try my luck and some polishing tonight after work. I have the polish and pads, just been a lazy ass.

-=Jason=-
 

Latest posts

Back
Top