• Please visit and share your knowledge at our sister communities:
  • If you have not, please join our official Homebrewing Facebook Group!

    Homebrewing Facebook Group

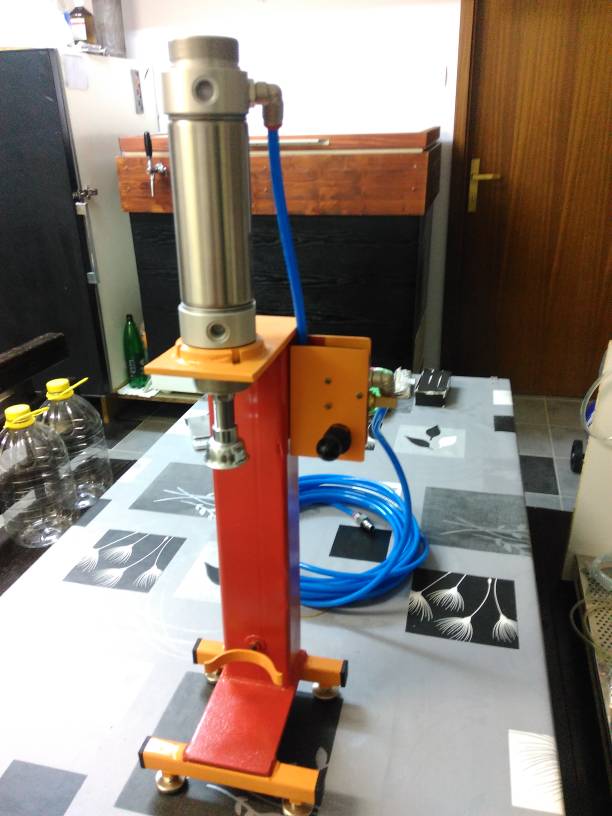
Pneumatic Bottle Capper - Just...because.

Homebrew Talk

Help Support Homebrew Talk:

This site may earn a commission from merchant affiliate links, including eBay, Amazon, and others.
In the Philippines, Stealthcruiser. Craft beers are still pretty new here and we only have a handful of active brewers but we're chugging along. Thanks guys, I think I'll take my chances with a cheap direct drive and hope it lasts a year or until I can get a quality belt-driven one. Oh, and happy international IPA day!
 
So I managed to throw together the parts for a test run but capping has been inconsistent. My compressor is a direct drive 2.5hp 145FAD w/ 40L tank. I'm also using a double acting cylinder. Could either be a cause for low pressure? Maybe shorten my tubes? I get around 100 psi max on my regulator, is that enough? Anyone else have problems capping consistently?
 
So I managed to throw together the parts for a test run but capping has been inconsistent. My compressor is a direct drive 2.5hp 145FAD w/ 40L tank. I'm also using a double acting cylinder. Could either be a cause for low pressure? Maybe shorten my tubes? I get around 100 psi max on my regulator, is that enough? Anyone else have problems capping consistently?

What is the bore diameter of your cylinder??
 
I've been assembling my parts to do this and came up with an easy way to fill most of my bottles. I'm wondering if anyone has made one of these in a 2 capper configuration by just doubling the cylinder and such?
 
Late to the party I know, but very cool builds so far. So it looks like the AutoCad files are no longer available. I was wondering more about the stands people are using. Were they mostly built or made by someone?
 
I made mine out of the electrical strut material everyone builds their brew sculptures out of now a days. That way I didn't have to weld anything.
 
Late to the party I know, but very cool builds so far. So it looks like the AutoCad files are no longer available. I was wondering more about the stands people are using. Were they mostly built or made by someone?

made my own measurements, then bought in small pieces (Online Metals, if I recall) and I took it to a local welder, then a local powder coat guy. I'm sure I spent too much, but I love my capper !
 
Ok, pardon my ignorance on how the spring loaded air cylinder works: when You step on the pedal, is it tap once and release or step on it til the cylinder drops completely and then let off? Basically, does it go until it exerts it's pressure by capping and then back off or so you need to keep pushing? How do the automatic ones work with different height bottles?
 
On mine, I hold the pedal - a tap would make it retract instantly. But it isn't a long hold - half a second to a second - It comes down and crunches the crown, then I release it. Because the stroke is 2 inches long, slightly different bottle heights is not a problem - the shaft stops when it cannot go any further.
I built a couple of wood blocks for the base of mine - if I'm doing shorties, or bombers, I can change the bottom block.
 
Ok, pardon my ignorance on how the spring loaded air cylinder works: when You step on the pedal, is it tap once and release or step on it til the cylinder drops completely and then let off? Basically, does it go until it exerts it's pressure by capping and then back off or so you need to keep pushing? How do the automatic ones work with different height bottles?

The foot pedal valve supplies compressed air to the cylinder only while the foot pedal is pressed down. The cylinder is a single-acting, spring-return air cylinder which means that when you supply compressed air to the it, the piston+rod will extend until it reaches the end of its stroke, or until it hits something to stop it (like a bottle cap on a bottle at any point within its stroke). When you quit supplying compressed air to it (like by letting your foot off the foot pedal), the spring inside the cylinder makes it retract (assuming air is allowed to be released freely out of the cylinder - the foot pedal valve should allow for this).

Hope that makes sense...

Perfect sense thanks. That's how I figured it would work but I wanted to make sure. I'm thinking this could be a fun little automated project with an Ariduno, but cost of solenoids, etc. could make it cost prohibitive.
 
So I have a question. If I have a cylinder that's say 1.5 bore.... can I just up the psi to say 150 to get the same result or will that make it actuate to fast.
 
So I have a question. If I have a cylinder that's say 1.5 bore.... can I just up the psi to say 150 to get the same result or will that make it actuate to fast.

Does your compressor go up to 150? Also you might want to check your cylinder and tubing to make sure they are rated for pressure up to 150.

Assuming all of that is true, a 1.5 bore has a piston area of pi*.75^2 = 1.77 sq.in. At 150 psi that would be 150*1.77 = 265 lbs of force which isn't too far off my 314 lbs and I would think would work alright. As far as actuation speed, you will most likely need to restrict air flow to slow down the actuation since I had to as well.

Good luck!
 
Do you have any kind of pressure relief valve that cuts the air when the cap is on? Or do you just manually control it with a on/off valve?
 
Awesome project! Im from Brazil and cant find the 2" x 2" pneumatic cylinder, how i do the rate psi necessary for the 1" x 2" cylinder?

Thanks!
 
Your first and second links link to the same post: 161.
To quote the post that talks about the force needed:
The cylinder has a 2" stroke and I'd say I'm only using 1" of that with my bottles.

The cylinder is 2" bore (NOT 3" like I first posted - fixed now) so at 100psi I'm getting 100 x pi x (1^2) = 314 pounds. This sounds like a lot but my bench capper has a lever that multplies force by 8 (10 / 1.25), so I can get the same force by exerting 39.25 lbs on the lever. I'm sure people do that all the time without breaking bottles. Just to be safe though I want to make sure my bottles are lined up correctly every time:D. I will probably run it at more like 80-90psi when bottling a whole batch.


I am looking into making something like this for myself. Ideally, I'd like to spend less than $70, so I'm looking at getting stuff from aliexpress and salvaging some stuff like the iron for the body.

Would something like this work? I figure since the body is that small, it would run the entire time, but if it does its job then I'm fine with it.

As for the cylinder. Would something like this work?

I know the measurements may be off, but it's to get a rough estimate of the available parts and the capacity that's needed.
Thanks!

The compressor says it provides a pressure of .06 MPa which equals 8.7 psi. The cylinder has a 20mm bore which has a piston area of .49 sqin. So the capping force would be 4.2 pounds. So unless my calculations are off, I don't think this would be near enough force to cap a bottle.
 
So I would be looking at a more expensive compressor, right? I guess I'm looking into getting one second hand.

Would going the route of mechanical (just via a motor) capper work and be cheaper? I don't really NEED one, so spending $200 on a pneumatic capper isn't logical for me.
 
So I would be looking at a more expensive compressor, right? I guess I'm looking into getting one second hand.

Would going the route of mechanical (just via a motor) capper work and be cheaper? I don't really NEED one, so spending $200 on a pneumatic capper isn't logical for me.


Nail on the head - not logical, and don't NEED one -
neither did I. I am old, have the benefit of many things paid off, more disposable income - so I'm just having fun...

I asked around post 42 about a 1 1/2" pneumatic cylinder and was told that I'd need twice the air pressure as a 2" = so your 20mm (under 1") will need over 4 times the air pressure to perform the task as the original post. I don't know if a homeowner can buy a compressor that hits close to 400 psi -

so, the low, attractive price just isn't practical for this particular application. We don't need a small lever moved with no friction, we need FORCE...
 
Do you guys think a Linear actuator motor of 1500N 330lbs would do the job?
I was planning already a drill & a car jack system, but gave up that crazy idea ;)
 
I recently built one of these bad boys. I'm presenting my built with my sources for pieces as I believe that a pneumatic capper can be built under 100$ (and I'm talking Canadian money here). But first, a video of it in action. Note that it's not perfect and still needs some work (especially the base) but it get the job done.

https://youtu.be/IdOMow8CjH8

The cylinder has a 10cm (4") stroke so I can manage different bottle heights. It's also strong enough to manage both regular and twist caps (note that I'm using special caps that are design for twist cap bottles).

Now the parts sources.

Frame: aluminum rails and hdpe plastic from a friend (free, or a couple homebrews)

Rest of the parts are from China...

Cylinder:
Single Rod Double Action 63mm Bore 100mm Stroke SC Standard Pneumatic Cylinder SC63-100 High Quality
http://s.aliexpress.com/VzIzyyaa
I took the 63mm (which is a bit overkill I guess) because it has a M16 threaded rod on which the capper bells fit perfectly. No need for a fancy adapter here.
(46.19$ yep price for a new pneumatic cylinder shipped from China....)

Fittings:
5PCS 8mm 3/8 inch air straight pneumatic tube plastic fitting PC8-03 One touch hose quick exhaust pipe connector
http://s.aliexpress.com/EbeIveUj
(4.37$)

Pneumatic tubing:
5 meters 8mm(OD) x 5mm(ID) Air Tubing Pneumatic Pipe Tube Hose OD 8mm ID 5mm PU Polyurethane Flexible Tube
http://s.aliexpress.com/36VVBb6v
(9.24$)

Valve / lever
4H310-10 2 Position 5 Way PT 3/8" Port Hand Pull Pneumatic Mechanical Valve
http://s.aliexpress.com/3qeMJnuI
(13.66$ I paid 8$ in december... maybe worth a bit of research for a better price)

Mufflers / flow control
4 Pcs Pneumatic 1/4" PT Male Thread Noise Reduce Exhaust Silencer Muffler
http://s.aliexpress.com/RRBbEzyi
(from AliExpress Android)
(10.34$ note that I ordered enough for two cappers as I made one for a friend. You only need two of these)

Some pneumatic fittings to hook to your compressor and voila! (I had those lying around).

If you have any questions feel free to ask.
 
Just another capper for us, lazy brewers..

Thanks to all who participated in thread.
6321eaa3e339c785f3f314bc74f60cbe.jpg
 
I just finished building mine, and only after discovered a 2" bore is insufficient to properly crimp the cap. I had to raise the pressure to 165 psi to get a crimp within specs. This was verified when I found a Google patent for Crown caps stating an average crimp pressure of 518 lbs was required. Luckily I found a 2-1/2" cylinder on eBay that'll bolt right on for $40.00, but I strongly suggest anyone looking to build one of these use a 3" bore.
view

https://drive.google.com/file/d/1RZUFhu-Gk4P_rQZupqzIwRgalzDnO-GC/view?usp=sharing
 
A few notes... I decided to index the neck of the bottle as I found bottles from the same batch to have necks off center as much as 1/4". I hinged the index to move out of the way in the event of a stuck bottle, having seen this occur on other cappers, but I found that with the correct crimp this sticking will NOT occur. I also had the idea of trying to inject exhausted cO2 into the bottle as the capper bell came down, but have since removed the LineLoc and will just cap on foam. Removing the top aluminum spacer will allow me to cap 22 oz bottles.
 
Yes, 3/4" square tubing and some 1/4" plate. The stand was easy, the tough part for me was finding a bullet-proof way to index the bottles.
 
Back
Top