New England IPA "Northeast" style IPA

Homebrew Talk - Beer, Wine, Mead, & Cider Brewing Discussion Forum

Help Support Homebrew Talk - Beer, Wine, Mead, & Cider Brewing Discussion Forum:

This site may earn a commission from merchant affiliate links, including eBay, Amazon, and others.
There is NO doubt that it helps to settle hop matter and maybe some yeast. It makes racking a lot easier. The risk is oxygen exposure (not sure it is significant or not.)

well, not to say there isn't such a thing, as there obviously is in some circumstances, but I have never had an issue and my process is as follows:

-After fermentation, I auto-siphon to a cleaned and sanitized secondary
-Dry hop after 3 days in secondary (for usually 5-7 days)
- COLD CRASH for 48-72 hours
-clean/prep serving keg, and auto-siphon beer into keg
-close keg, hit with 35PSI, wait 30 seconds, then bleed that off, then hit with 35 again, once it is pressurized, I turn my keg on its side and roll back and forth for about 30 seconds, then set the regulator to 12PSI and sit in the keezer for 3 days before I get the first pour (which I usually pour 1/2 glass and dump, then start serving).

My process may be way wrong however, I have done all my beers this way, and no one has ever complained, or told me they had the cardboard taste, and I have never noticed it either....although my kegs usually only last about 2 weeks, maybe 3 at most.
 
Last edited:
My thoughts are that the oxygen may react with some of the surface beer, but I just don't think it is that big of a deal. I'd have to do a side-by-side to say for sure. I've just been too lazy to use my pressure-transfer setup, and it kind of worries me pressurizing my carboy (maybe irrationally.)

This is my thinking as well. The top surface gets exposed but your pulling beer from the bottom leaving the top (exposed area) gallon to 1/2 gallon behind. There is always the anti-oxygen people though...;)
 
I am much more afraid of oxygen than bacteria/yeast at that point, so I just put a solid stopper into the carboy when I start the cold crash. I leave it that way until I am ready to keg. Right before I rack to the keg, I pull out the stopper (it has a pretty big negative pressure in the carboy, so it is hard to pull out sometimes), a rush of air swooshes into the carboy, and then I put in my racking cane and rack.

My thoughts are that the oxygen may react with some of the surface beer, but I just don't think it is that big of a deal. I'd have to do a side-by-side to say for sure. I've just been too lazy to use my pressure-transfer setup, and it kind of worries me pressurizing my carboy (maybe irrationally.)

Are you using a glass carboy? I used to use a solid stopper during cold crashing but read somewhere not to so I stopped. Can't remember the exact reason it wasn't recommended. Something about the carboy breaking.
 
I've been meaning to share a technique I've been using recently to cold crash with virtually no oxygen exposure. It doesn't require hooking up CO2, a second regulator, or any extra equipment other than $2 worth of drilled stoppers.

I think cold crashing this beer is important. Before I started cold crashing, I would get at least a week or two of harsh bite from suspended hop particles. Sometimes it never really went away. I would also have a bunch of sludge at the bottom of the keg when it kicked, which would mess up my beer lines, etc.

I also think avoiding oxygen exposure is very important to this style, and I'm just not OK with sucking a bunch of air into the headspace while cold crashing. Before I started doing this, I could actually see a thin dark layer of oxidized beer forming at the top of the fermentor while crashing.

So, here's what I came up with for storing some CO2 from fermentation, and feeding it back into the primary while cold crashing. I had seen some other threads on this talking about mylar balloons and all kinds of stuff, but I think this is a more elegant, sanitary approach.

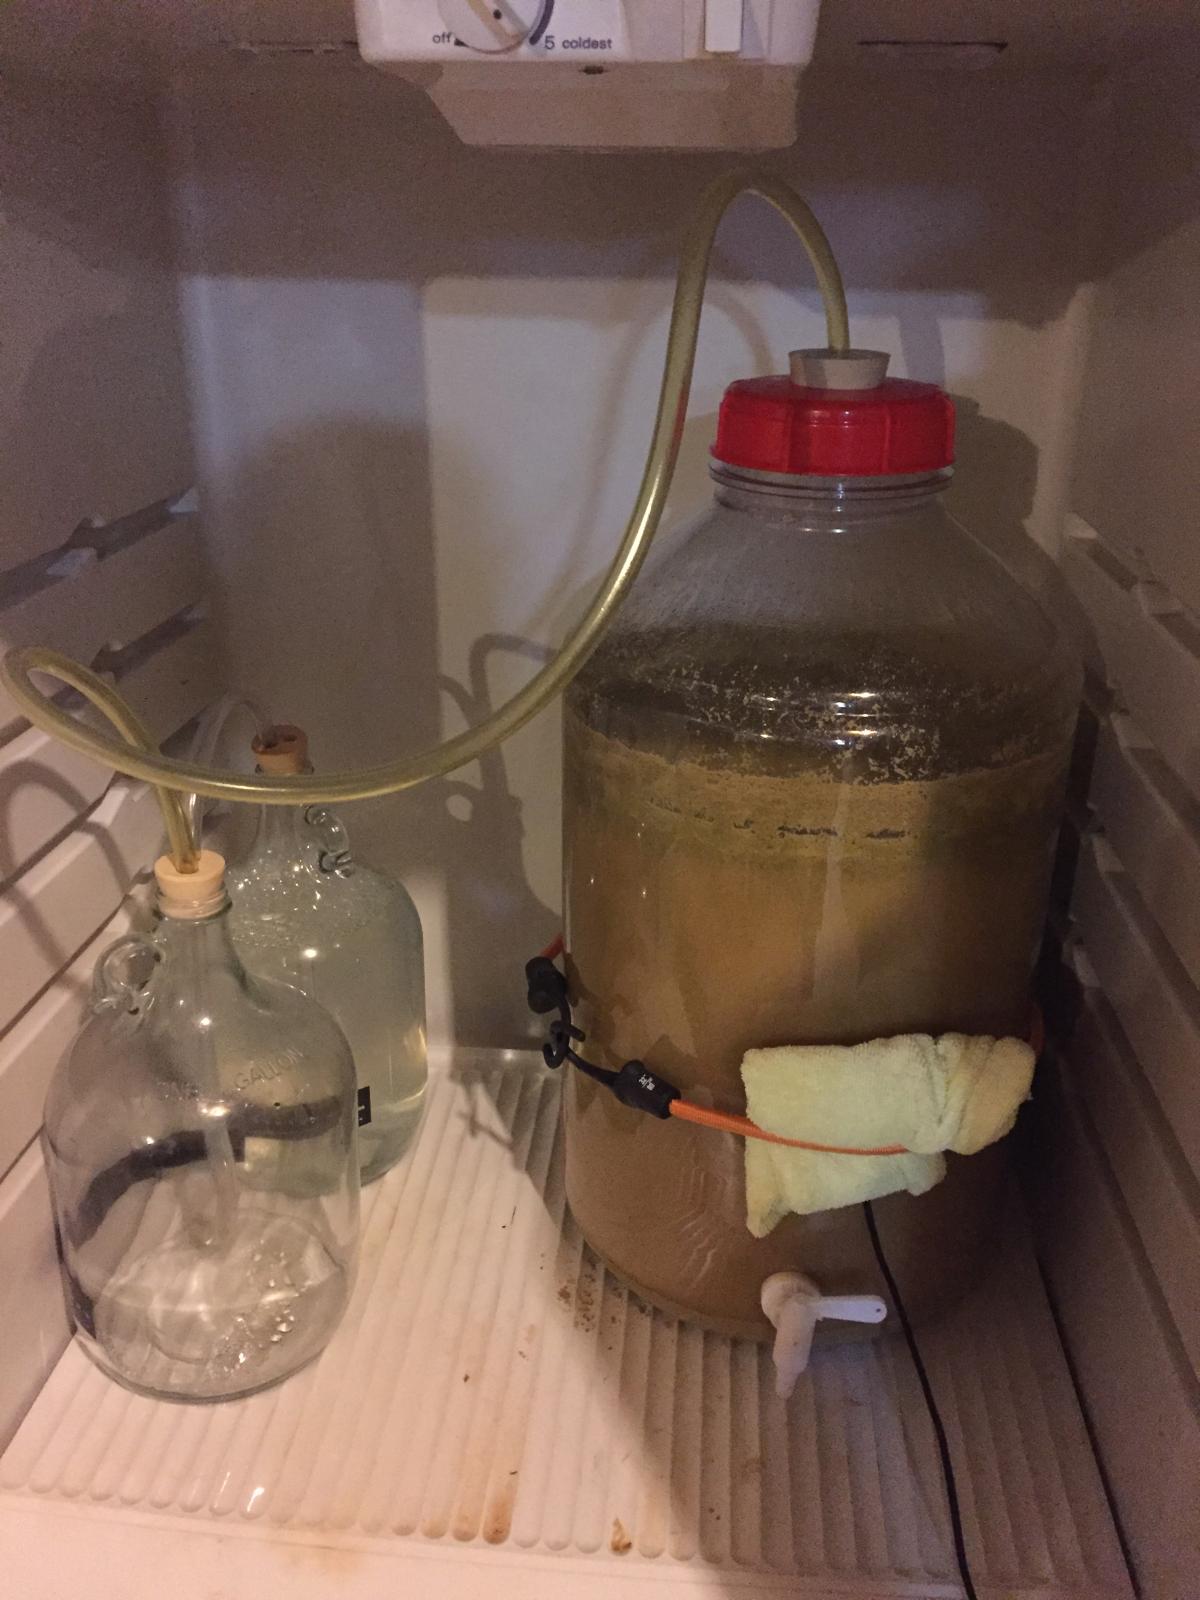
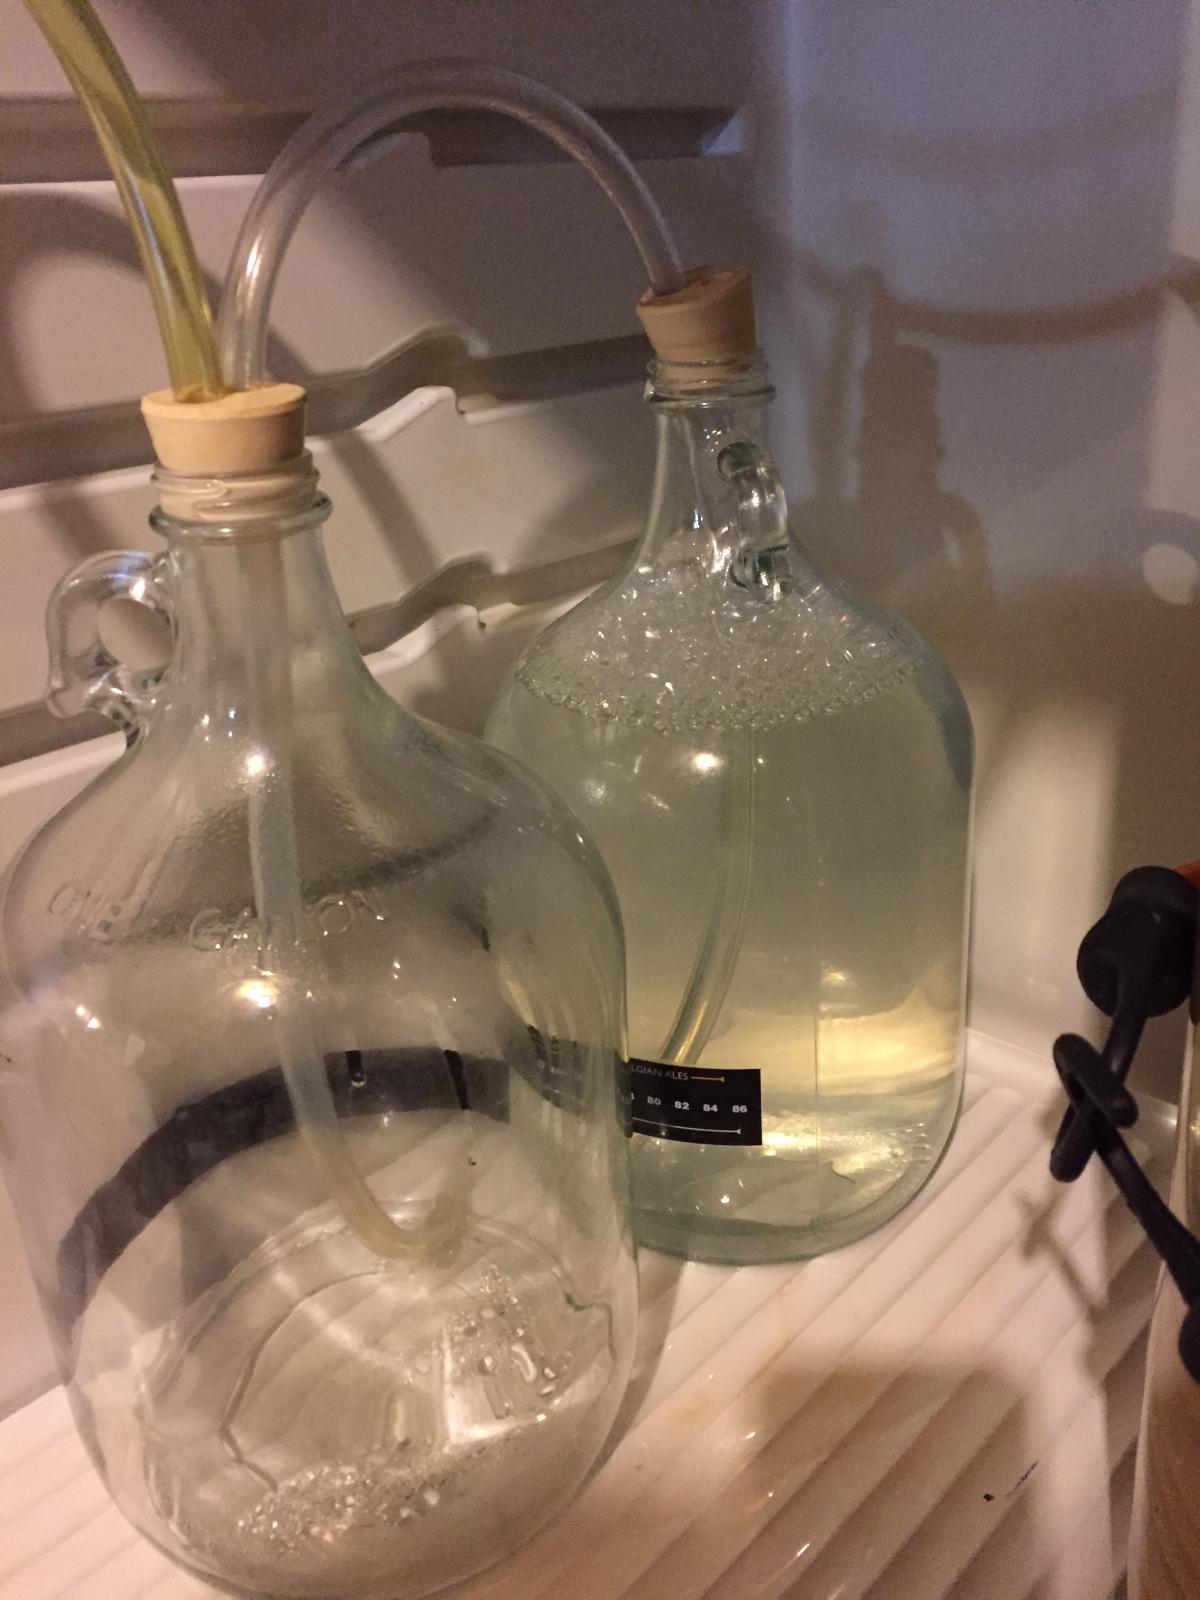
Here's how it works: I start off with the blowoff tube (the yellowed one) in a normal jar or whatever. Once I am past any potential blowoff risk, but still actively fermenting, I put that hose into the top of the first jug, which starts off filled to the top with star san. The CO2 pressure pushes that star san through the jumper line into the second jug, which fills up and then just allows excess CO2 to bubble out into the atmosphere. The first jug is now full of CO2. This is what's pictured below.

When I start to cold crash, the headspace contracts, which sucks star san from the second jug back into the first, and CO2 from the first jug back into the fermentor. That fermentor is a thin-walled plastic Fermonster, and there's little enough negative pressure that it doesn't even buckle. At the end of the cold crash, the first jug is filled back up about 1/2 to 2/3 of the way.

When I'm done cold crashing, I just take the stopper out of the fermentor and hang a CO2 line in there, trickling CO2 to maintain positive pressure as the beer siphons out. There's no rush of air when I take the stopper out because there's no negative pressure. I siphon into a keg that has been filled with star san and purged with CO2, so the beer comes into no contact with oxygen.

I do all of my dry hopping loose in primary, but by cold crashing I get almost no trub or hop matter into the keg. When the keg kicks, the bottom is nearly clean.

The one thing that may be tricky is finding a double-drilled stopper. The guy at my LHBS has a drill bit in the back that does it, so he just gave me those two stoppers for $1 each. I think I've seen threads about people doing it themselves with a piece of copper pipe or something. I guess a normal drill bit doesn't work too well. The jugs are 1-gallon fermentors I had lying around.

Anyway, hope someone finds this helpful. This is the best balance I've found between (relative) simplicity and feeling like I'm doing the best I can do avoid O2 and improve my beer. :mug:

IMG_2545.jpg


IMG_2547.jpg
 
I've been meaning to share a technique I've been using recently to cold crash with virtually no oxygen exposure. It doesn't require hooking up CO2, a second regulator, or any extra equipment other than $2 worth of drilled stoppers.

I think cold crashing this beer is important. Before I started cold crashing, I would get at least a week or two of harsh bite from suspended hop particles. Sometimes it never really went away. I would also have a bunch of sludge at the bottom of the keg when it kicked, which would mess up my beer lines, etc.

I also think avoiding oxygen exposure is very important to this style, and I'm just not OK with sucking a bunch of air into the headspace while cold crashing. Before I started doing this, I could actually see a thin dark layer of oxidized beer forming at the top of the fermentor while crashing.

So, here's what I came up with for storing some CO2 from fermentation, and feeding it back into the primary while cold crashing. I had seen some other threads on this talking about mylar balloons and all kinds of stuff, but I think this is a more elegant, sanitary approach.

Here's how it works: I start off with the blowoff tube (the yellowed one) in a normal jar or whatever. Once I am past any potential blowoff risk, but still actively fermenting, I put that hose into the top of the first jug, which starts off filled to the top with star san. The CO2 pressure pushes that star san through the jumper line into the second jug, which fills up and then just allows excess CO2 to bubble out into the atmosphere. The first jug is now full of CO2. This is what's pictured below.

When I start to cold crash, the headspace contracts, which sucks star san from the second jug back into the first, and CO2 from the first jug back into the fermentor. That fermentor is a thin-walled plastic Fermonster, and there's little enough negative pressure that it doesn't even buckle. At the end of the cold crash, the first jug is filled back up about 1/2 to 2/3 of the way.

When I'm done cold crashing, I just take the stopper out of the fermentor and hang a CO2 line in there, trickling CO2 to maintain positive pressure as the beer siphons out. There's no rush of air when I take the stopper out because there's no negative pressure. I siphon into a keg that has been filled with star san and purged with CO2, so the beer comes into no contact with oxygen.

I do all of my dry hopping loose in primary, but by cold crashing I get almost no trub or hop matter into the keg. When the keg kicks, the bottom is nearly clean.

The one thing that may be tricky is finding a double-drilled stopper. The guy at my LHBS has a drill bit in the back that does it, so he just gave me those two stoppers for $1 each. I think I've seen threads about people doing it themselves with a piece of copper pipe or something. I guess a normal drill bit doesn't work too well. The jugs are 1-gallon fermentors I had lying around.

Anyway, hope someone finds this helpful. This is the best balance I've found between (relative) simplicity and feeling like I'm doing the best I can do avoid O2 and improve my beer. :mug:

Ha..... I have to say - that is a pretty damn good idea!
 
Are you using a glass carboy? I used to use a solid stopper during cold crashing but read somewhere not to so I stopped. Can't remember the exact reason it wasn't recommended. Something about the carboy breaking.

Yes, sorry, forgot to say that I use a glass carboy. I think I have used a better bottle though. can't remember though. I try to use glass and plastic only as a back-up.
 
I've been meaning to share a technique I've been using recently to cold crash with virtually no oxygen exposure. It doesn't require hooking up CO2, a second regulator, or any extra equipment other than $2 worth of drilled stoppers.

I think cold crashing this beer is important. Before I started cold crashing, I would get at least a week or two of harsh bite from suspended hop particles. Sometimes it never really went away. I would also have a bunch of sludge at the bottom of the keg when it kicked, which would mess up my beer lines, etc.

I also think avoiding oxygen exposure is very important to this style, and I'm just not OK with sucking a bunch of air into the headspace while cold crashing. Before I started doing this, I could actually see a thin dark layer of oxidized beer forming at the top of the fermentor while crashing.

So, here's what I came up with for storing some CO2 from fermentation, and feeding it back into the primary while cold crashing. I had seen some other threads on this talking about mylar balloons and all kinds of stuff, but I think this is a more elegant, sanitary approach.

Here's how it works: I start off with the blowoff tube (the yellowed one) in a normal jar or whatever. Once I am past any potential blowoff risk, but still actively fermenting, I put that hose into the top of the first jug, which starts off filled to the top with star san. The CO2 pressure pushes that star san through the jumper line into the second jug, which fills up and then just allows excess CO2 to bubble out into the atmosphere. The first jug is now full of CO2. This is what's pictured below.

When I start to cold crash, the headspace contracts, which sucks star san from the second jug back into the first, and CO2 from the first jug back into the fermentor. That fermentor is a thin-walled plastic Fermonster, and there's little enough negative pressure that it doesn't even buckle. At the end of the cold crash, the first jug is filled back up about 1/2 to 2/3 of the way.

When I'm done cold crashing, I just take the stopper out of the fermentor and hang a CO2 line in there, trickling CO2 to maintain positive pressure as the beer siphons out. There's no rush of air when I take the stopper out because there's no negative pressure. I siphon into a keg that has been filled with star san and purged with CO2, so the beer comes into no contact with oxygen.

I do all of my dry hopping loose in primary, but by cold crashing I get almost no trub or hop matter into the keg. When the keg kicks, the bottom is nearly clean.

The one thing that may be tricky is finding a double-drilled stopper. The guy at my LHBS has a drill bit in the back that does it, so he just gave me those two stoppers for $1 each. I think I've seen threads about people doing it themselves with a piece of copper pipe or something. I guess a normal drill bit doesn't work too well. The jugs are 1-gallon fermentors I had lying around.

Anyway, hope someone finds this helpful. This is the best balance I've found between (relative) simplicity and feeling like I'm doing the best I can do avoid O2 and improve my beer. :mug:

you sir, are a genius. I am going to try this with my current beer, I just need to go get some stoppers...hmmm
 
I've been meaning to share a technique I've been using recently to cold crash with virtually no oxygen exposure. It doesn't require hooking up CO2, a second regulator, or any extra equipment other than $2 worth of drilled stoppers.

I think cold crashing this beer is important. Before I started cold crashing, I would get at least a week or two of harsh bite from suspended hop particles. Sometimes it never really went away. I would also have a bunch of sludge at the bottom of the keg when it kicked, which would mess up my beer lines, etc.

I also think avoiding oxygen exposure is very important to this style, and I'm just not OK with sucking a bunch of air into the headspace while cold crashing. Before I started doing this, I could actually see a thin dark layer of oxidized beer forming at the top of the fermentor while crashing.

So, here's what I came up with for storing some CO2 from fermentation, and feeding it back into the primary while cold crashing. I had seen some other threads on this talking about mylar balloons and all kinds of stuff, but I think this is a more elegant, sanitary approach.

Here's how it works: I start off with the blowoff tube (the yellowed one) in a normal jar or whatever. Once I am past any potential blowoff risk, but still actively fermenting, I put that hose into the top of the first jug, which starts off filled to the top with star san. The CO2 pressure pushes that star san through the jumper line into the second jug, which fills up and then just allows excess CO2 to bubble out into the atmosphere. The first jug is now full of CO2. This is what's pictured below.

When I start to cold crash, the headspace contracts, which sucks star san from the second jug back into the first, and CO2 from the first jug back into the fermentor. That fermentor is a thin-walled plastic Fermonster, and there's little enough negative pressure that it doesn't even buckle. At the end of the cold crash, the first jug is filled back up about 1/2 to 2/3 of the way.

When I'm done cold crashing, I just take the stopper out of the fermentor and hang a CO2 line in there, trickling CO2 to maintain positive pressure as the beer siphons out. There's no rush of air when I take the stopper out because there's no negative pressure. I siphon into a keg that has been filled with star san and purged with CO2, so the beer comes into no contact with oxygen.

I do all of my dry hopping loose in primary, but by cold crashing I get almost no trub or hop matter into the keg. When the keg kicks, the bottom is nearly clean.

The one thing that may be tricky is finding a double-drilled stopper. The guy at my LHBS has a drill bit in the back that does it, so he just gave me those two stoppers for $1 each. I think I've seen threads about people doing it themselves with a piece of copper pipe or something. I guess a normal drill bit doesn't work too well. The jugs are 1-gallon fermentors I had lying around.

Anyway, hope someone finds this helpful. This is the best balance I've found between (relative) simplicity and feeling like I'm doing the best I can do avoid O2 and improve my beer. :mug:

Fantastic idea! I like it!
 
I've been meaning to share a technique I've been using recently to cold crash with virtually no oxygen exposure. It doesn't require hooking up CO2, a second regulator, or any extra equipment other than $2 worth of drilled stoppers.

I think cold crashing this beer is important. Before I started cold crashing, I would get at least a week or two of harsh bite from suspended hop particles. Sometimes it never really went away. I would also have a bunch of sludge at the bottom of the keg when it kicked, which would mess up my beer lines, etc.

I also think avoiding oxygen exposure is very important to this style, and I'm just not OK with sucking a bunch of air into the headspace while cold crashing. Before I started doing this, I could actually see a thin dark layer of oxidized beer forming at the top of the fermentor while crashing.

So, here's what I came up with for storing some CO2 from fermentation, and feeding it back into the primary while cold crashing. I had seen some other threads on this talking about mylar balloons and all kinds of stuff, but I think this is a more elegant, sanitary approach.

Here's how it works: I start off with the blowoff tube (the yellowed one) in a normal jar or whatever. Once I am past any potential blowoff risk, but still actively fermenting, I put that hose into the top of the first jug, which starts off filled to the top with star san. The CO2 pressure pushes that star san through the jumper line into the second jug, which fills up and then just allows excess CO2 to bubble out into the atmosphere. The first jug is now full of CO2. This is what's pictured below.

When I start to cold crash, the headspace contracts, which sucks star san from the second jug back into the first, and CO2 from the first jug back into the fermentor. That fermentor is a thin-walled plastic Fermonster, and there's little enough negative pressure that it doesn't even buckle. At the end of the cold crash, the first jug is filled back up about 1/2 to 2/3 of the way.

When I'm done cold crashing, I just take the stopper out of the fermentor and hang a CO2 line in there, trickling CO2 to maintain positive pressure as the beer siphons out. There's no rush of air when I take the stopper out because there's no negative pressure. I siphon into a keg that has been filled with star san and purged with CO2, so the beer comes into no contact with oxygen.

I do all of my dry hopping loose in primary, but by cold crashing I get almost no trub or hop matter into the keg. When the keg kicks, the bottom is nearly clean.

The one thing that may be tricky is finding a double-drilled stopper. The guy at my LHBS has a drill bit in the back that does it, so he just gave me those two stoppers for $1 each. I think I've seen threads about people doing it themselves with a piece of copper pipe or something. I guess a normal drill bit doesn't work too well. The jugs are 1-gallon fermentors I had lying around.

Anyway, hope someone finds this helpful. This is the best balance I've found between (relative) simplicity and feeling like I'm doing the best I can do avoid O2 and improve my beer. :mug:
Simple, but effective, nice write up and pictures..... sadly i dont have the room to do that.
 
I've been meaning to share a technique I've been using recently to cold crash with virtually no oxygen exposure. It doesn't require hooking up CO2, a second regulator, or any extra equipment other than $2 worth of drilled stoppers.

I think cold crashing this beer is important. Before I started cold crashing, I would get at least a week or two of harsh bite from suspended hop particles. Sometimes it never really went away. I would also have a bunch of sludge at the bottom of the keg when it kicked, which would mess up my beer lines, etc.

I also think avoiding oxygen exposure is very important to this style, and I'm just not OK with sucking a bunch of air into the headspace while cold crashing. Before I started doing this, I could actually see a thin dark layer of oxidized beer forming at the top of the fermentor while crashing.

So, here's what I came up with for storing some CO2 from fermentation, and feeding it back into the primary while cold crashing. I had seen some other threads on this talking about mylar balloons and all kinds of stuff, but I think this is a more elegant, sanitary approach.

Here's how it works: I start off with the blowoff tube (the yellowed one) in a normal jar or whatever. Once I am past any potential blowoff risk, but still actively fermenting, I put that hose into the top of the first jug, which starts off filled to the top with star san. The CO2 pressure pushes that star san through the jumper line into the second jug, which fills up and then just allows excess CO2 to bubble out into the atmosphere. The first jug is now full of CO2. This is what's pictured below.

When I start to cold crash, the headspace contracts, which sucks star san from the second jug back into the first, and CO2 from the first jug back into the fermentor. That fermentor is a thin-walled plastic Fermonster, and there's little enough negative pressure that it doesn't even buckle. At the end of the cold crash, the first jug is filled back up about 1/2 to 2/3 of the way.

When I'm done cold crashing, I just take the stopper out of the fermentor and hang a CO2 line in there, trickling CO2 to maintain positive pressure as the beer siphons out. There's no rush of air when I take the stopper out because there's no negative pressure. I siphon into a keg that has been filled with star san and purged with CO2, so the beer comes into no contact with oxygen.

I do all of my dry hopping loose in primary, but by cold crashing I get almost no trub or hop matter into the keg. When the keg kicks, the bottom is nearly clean.

The one thing that may be tricky is finding a double-drilled stopper. The guy at my LHBS has a drill bit in the back that does it, so he just gave me those two stoppers for $1 each. I think I've seen threads about people doing it themselves with a piece of copper pipe or something. I guess a normal drill bit doesn't work too well. The jugs are 1-gallon fermentors I had lying around.

Anyway, hope someone finds this helpful. This is the best balance I've found between (relative) simplicity and feeling like I'm doing the best I can do avoid O2 and improve my beer. :mug:
This is really clever!, if you can't find a double drilled stopper you can use a Krausen Catcher from NorCal using a big mason jar.
 
I'm really enjoying this style of ale. I found this recipe searching youtube and I was really happy the way my beer turned out

[ame]https://www.youtube.com/watch?v=5NPck6LOD1A&t=3s[/ame]
 
I've been meaning to share a technique I've been using recently to cold crash with virtually no oxygen exposure. It doesn't require hooking up CO2, a second regulator, or any extra equipment other than $2 worth of drilled stoppers.

I think cold crashing this beer is important. Before I started cold crashing, I would get at least a week or two of harsh bite from suspended hop particles. Sometimes it never really went away. I would also have a bunch of sludge at the bottom of the keg when it kicked, which would mess up my beer lines, etc.

I also think avoiding oxygen exposure is very important to this style, and I'm just not OK with sucking a bunch of air into the headspace while cold crashing. Before I started doing this, I could actually see a thin dark layer of oxidized beer forming at the top of the fermentor while crashing.

So, here's what I came up with for storing some CO2 from fermentation, and feeding it back into the primary while cold crashing. I had seen some other threads on this talking about mylar balloons and all kinds of stuff, but I think this is a more elegant, sanitary approach.

Here's how it works: I start off with the blowoff tube (the yellowed one) in a normal jar or whatever. Once I am past any potential blowoff risk, but still actively fermenting, I put that hose into the top of the first jug, which starts off filled to the top with star san. The CO2 pressure pushes that star san through the jumper line into the second jug, which fills up and then just allows excess CO2 to bubble out into the atmosphere. The first jug is now full of CO2. This is what's pictured below.

When I start to cold crash, the headspace contracts, which sucks star san from the second jug back into the first, and CO2 from the first jug back into the fermentor. That fermentor is a thin-walled plastic Fermonster, and there's little enough negative pressure that it doesn't even buckle. At the end of the cold crash, the first jug is filled back up about 1/2 to 2/3 of the way.

When I'm done cold crashing, I just take the stopper out of the fermentor and hang a CO2 line in there, trickling CO2 to maintain positive pressure as the beer siphons out. There's no rush of air when I take the stopper out because there's no negative pressure. I siphon into a keg that has been filled with star san and purged with CO2, so the beer comes into no contact with oxygen.

I do all of my dry hopping loose in primary, but by cold crashing I get almost no trub or hop matter into the keg. When the keg kicks, the bottom is nearly clean.

The one thing that may be tricky is finding a double-drilled stopper. The guy at my LHBS has a drill bit in the back that does it, so he just gave me those two stoppers for $1 each. I think I've seen threads about people doing it themselves with a piece of copper pipe or something. I guess a normal drill bit doesn't work too well. The jugs are 1-gallon fermentors I had lying around.

Anyway, hope someone finds this helpful. This is the best balance I've found between (relative) simplicity and feeling like I'm doing the best I can do avoid O2 and improve my beer. :mug:

I'm very interested in a setup similar to this for cold crashing but I have a question. Correct me if I'm wrong but say I'm doing a two stage dry hop in the primary. I could put the first stage in towards the end of active fermentation, the same time it's suggested that the blow off tube be hooked up to the two chambers. At that time co2 from the still active fermentation will fill the first bottle and push the sanitizer solution into the second. When I'd go to add the second dry hop to the fermenter after active fermentation slows down, won't I lose all the co2 that's now in the first bottle thus negating the entire process?
 
I'm very interested in a setup similar to this for cold crashing but I have a question. Correct me if I'm wrong but say I'm doing a two stage dry hop in the primary. I could put the first stage in towards the end of active fermentation, the same time it's suggested that the blow off tube be hooked up to the two chambers. At that time co2 from the still active fermentation will fill the first bottle and push the sanitizer solution into the second. When I'd go to add the second dry hop to the fermenter after active fermentation slows down, won't I lose all the co2 that's now in the first bottle thus negating the entire process?

No, because nothing is under pressure. When you open the fermentor to add the second dry hop, the sanitizer doesn't rush back from the second bottle into the first - it just sits there. The CO2 doesn't get sucked back into the fermentor until the temp drop causes the head space to contract.

A tiny bit of air might get into the fermentor when you open it to add the second dry hop, but I just pull out the stopper, dump in the hops, and put the stopper back in. I think the gas exchange is very minimal because it's neutral pressure.
 
Should have run out there a ways and held up your glass so it looked like the rainbow was ending at your glass:mug:

It was an awesome rainbow - actually on the drive home it was a double rainbow worthy of the famous YouTube stoner's meltdown. But the beer had only been carb'd 3 days and I was more interested in drunking it than framing the shot - got my priorities confused I guess.
 
No, because nothing is under pressure. When you open the fermentor to add the second dry hop, the sanitizer doesn't rush back from the second bottle into the first - it just sits there. The CO2 doesn't get sucked back into the fermentor until the temp drop causes the head space to contract.

A tiny bit of air might get into the fermentor when you open it to add the second dry hop, but I just pull out the stopper, dump in the hops, and put the stopper back in. I think the gas exchange is very minimal because it's neutral pressure.

Ok awesome. Thanks for clearing that up! I was thinking that the sanitizer would get sucked back into the first bottle for some reason.
 
A little better lighting - this is pretty exactly Braufessor's grain bill and the hops are citra, mosaic, and Amarillo - delicious!

IMG_1941.jpg
 
I'm interested to see if anyone has an opinion on why my latest beer turned out so hazy (and delicious!):

10wpbag.jpg


I ordered Northern Brewer's Grapefruit Pulpin' kit (http://www.northernbrewer.com/grapefruit-pulpin-all-grain-kit) during a sale last year (3 kits, $20 each) and kept the grain bill the same, so no adjuncts.

I did increase the amount of hops from 6 oz to 12 oz plus hop extract for bittering, but I've used over 1 lb of hops before and had clear beer. Water profile favored SO4 v. Cl (250:50) and mash pH was 5.35.

I used WY1272 and didn't dry hop until the yeast had flocc'd (6 days post pitch), however, I did add a dried grapefruit peel/vodka tincture to the fermentor at this time. I use stainless, so I don't know if a re-fermentation kicked off or not, but I kegged 3 days later and everything looked fine. The beer did appear hazy as it ran through the tubing though.

Any thoughts as to why I have so much haze? Maybe my beers know how much I like NE IPA and refuse to go back to the west coast style :)
 
Last edited:
I'm interested to see if anyone has an opinion on why my latest beer turned out so hazy (and delicious!):

10wpbag.jpg


I ordered Northern Brewer's Grapefruit Pulpin' kit (http://www.northernbrewer.com/grapefruit-pulpin-all-grain-kit) during a sale last year (3 kits, $20 each) and kept the grain bill the same, so no adjuncts.

I did increase the amount of hops from 6 oz to 12 oz plus hop extract for bittering, but I've used over 1 lb of hops before and had clear beer. Water profile favored SO4 v. Cl (250:50) and mash pH was 4.35.

I used WY1272 and didn't dry hop until the yeast had flocc'd (6 days post pitch), however, I did add a dried grapefruit peel/vodka tincture to the fermentor at this time. I use stainless, so I don't know if a re-fermentation kicked off or not, but I kegged 3 days later and everything looked fine. The beer did appear hazy as it ran through the tubing though.

Any thoughts as to why I have so much haze? Maybe my beers know how much I like NE IPA and refuse to go back to the west coast style :)

I assume you meant 5.35 on mash pH not 4.35??

How many pours out of the keg so far? My main guess would simply be that you transferred a fair amount of yeast/debris when kegging and you are getting that in your initial glasses. With some time, settling, and pouring off - the Murky aspect will go away and move towards hazy.

Not sure if the grapefruit peel would really make it that cloudy. When a beer has more of that "milky" appearance - it generally seems to me that it is yeast/trub etc. that got transferred to the keg. My early pours will look like that on beers where I get more of that into the keg than I prefer.
 
Fixed the pH typo, you were correct.

That was probably the 10th pour (day 5 in keg), as I sample 2-4 oz each day its in the keg, to monitor carbonation, aroma, etc. I don't believe its yeast/trub, as nothing settles out if you leave the glass in the fridge (and I transferred from a SS brewtech conical). Additionally, there aren't any hop particles floating around or off flavors that I can discern, so I think its just super haze.
 
I've been meaning to share a technique I've been using recently to cold crash with virtually no oxygen exposure. It doesn't require hooking up CO2, a second regulator, or any extra equipment other than $2 worth of drilled stoppers.

I think cold crashing this beer is important. Before I started cold crashing, I would get at least a week or two of harsh bite from suspended hop particles. Sometimes it never really went away. I would also have a bunch of sludge at the bottom of the keg when it kicked, which would mess up my beer lines, etc.

I also think avoiding oxygen exposure is very important to this style, and I'm just not OK with sucking a bunch of air into the headspace while cold crashing. Before I started doing this, I could actually see a thin dark layer of oxidized beer forming at the top of the fermentor while crashing.

So, here's what I came up with for storing some CO2 from fermentation, and feeding it back into the primary while cold crashing. I had seen some other threads on this talking about mylar balloons and all kinds of stuff, but I think this is a more elegant, sanitary approach.

Here's how it works: I start off with the blowoff tube (the yellowed one) in a normal jar or whatever. Once I am past any potential blowoff risk, but still actively fermenting, I put that hose into the top of the first jug, which starts off filled to the top with star san. The CO2 pressure pushes that star san through the jumper line into the second jug, which fills up and then just allows excess CO2 to bubble out into the atmosphere. The first jug is now full of CO2. This is what's pictured below.

When I start to cold crash, the headspace contracts, which sucks star san from the second jug back into the first, and CO2 from the first jug back into the fermentor. That fermentor is a thin-walled plastic Fermonster, and there's little enough negative pressure that it doesn't even buckle. At the end of the cold crash, the first jug is filled back up about 1/2 to 2/3 of the way.

When I'm done cold crashing, I just take the stopper out of the fermentor and hang a CO2 line in there, trickling CO2 to maintain positive pressure as the beer siphons out. There's no rush of air when I take the stopper out because there's no negative pressure. I siphon into a keg that has been filled with star san and purged with CO2, so the beer comes into no contact with oxygen.

I do all of my dry hopping loose in primary, but by cold crashing I get almost no trub or hop matter into the keg. When the keg kicks, the bottom is nearly clean.

The one thing that may be tricky is finding a double-drilled stopper. The guy at my LHBS has a drill bit in the back that does it, so he just gave me those two stoppers for $1 each. I think I've seen threads about people doing it themselves with a piece of copper pipe or something. I guess a normal drill bit doesn't work too well. The jugs are 1-gallon fermentors I had lying around.

Anyway, hope someone finds this helpful. This is the best balance I've found between (relative) simplicity and feeling like I'm doing the best I can do avoid O2 and improve my beer. :mug:

Really clever.

How big are those jugs, 1 gallon? That would tell us that you get .5 - .75 gallons of 02 suckback when you cold crash? That's way more than I would have guessed.

Also, if you have a carb cap, sticking that in the bung and hooking up your gas could help you keep the system closed while racking.
 
Used the recipe in this thread. Turned out delicious. First pull off the keg. Still carbonating but it is a tasty beer. Used Marris Otter instead of Golden Promise as the LHBS was out. The beer looks more brown in the picture than what it really is.

IMG_2577.jpg
 
Fixed the pH typo, you were correct.

That was probably the 10th pour (day 5 in keg), as I sample 2-4 oz each day its in the keg, to monitor carbonation, aroma, etc. I don't believe its yeast/trub, as nothing settles out if you leave the glass in the fridge (and I transferred from a SS brewtech conical). Additionally, there aren't any hop particles floating around or off flavors that I can discern, so I think its just super haze.

Now that what I call Quality Control!
 
Hey everyone,

I have read much of this thread over the last couple days, its awesome! I am a new brewer. Thought about it seriously for a couple years and finally brewed my first batch about 3.5 weeks ago. It came out ok, not great. 10 days ago I brewed batch 2, and I am drinking it now, and man its good! I got into this strictly to brew NE IPAs. I have fallen in love with the style over the last year. Trillium is my favorite and i get there about once every 2-3 months, but its a 3 hour drive so decided to try and brew my own. Started with a Trillium Fort point clone recipe but have made some changes. The first 2 batches I have done were extract brews, next batch is going to be all grain BIAB! Stepping it up.

This second batch is VERY good. I am quite happy and it can only get better as I gain experience and go BIAB. Below is my recipe. I also fermented in a carboy and transferred to keg via Co2. This site has been awesome. I originally was going to bottle but realized O2 is the enemy of these beers so set up a 3 tap keg system. Did a closed transfer this time and all went well. Its a little more amber/darker than expected but that might be due to the extract.

Anyway loves this thread and look forward to trying to contribute going forward.

Current recipe:

Malts & Grains
3.6 lb Muntons Light DME
3.0 lb Breiss Golden Light DME.
1 lb Briess Bavarian Wheat DME
4 oz Briess Carapis Malt
4 oz British crystal 15L

Hops
0.25 oz Columbus Hops @ 60
min
0.75 oz Columbus Hops @ 10 min
1 tsp irish moss @ 10 min
1oz Columbus, 1 oz galaxy & 1 oz Citra at hop stand @ 180° for 30’

Yeast
WL1318 used a yeast starter 28 hours prior.

Note added .75 GA water post pitch due to high OG.Did not get new reading.

Dry Hop & Fermentation
Krusen broke on day 2.
3.5 oz galaxy, 3.5 oz Ciara & 1 oz Columbus added on 3rd day
Keg on day 5.
Carb with Blichman Quick Carb on day 6.

33599075731_d9571a6e36_k.jpg
 
I got into this strictly to brew NE IPAs

brewed my first batch about 3.5 weeks ago

next batch is going to be all grain BIAB! Stepping it up.

transferred to keg via Co2

I originally was going to bottle but realized O2 is the enemy of these beers so set up a 3 tap keg system. Did a closed transfer this time and all went well.

This dude knows what's up! :mug:
 
Had to brew it myself but I finally got to try one of these thanks to all the tips in this great thread. 3 weeks from brew-day. This was the first time I tried the dry hop method from the original post - worked awesome!

Malt bill=MO, munich, flaked wheat
Hops=Apollo (FWH), citra, mosaic, galaxy, amarillo
Yeast=OYL-057
OG=1.076
FG=1.020
Water (ppm)=152Ca, 134 So, 173 Cl

IMG_4415.jpg
 
Ok...... I think I have gotten to the place where I can recommend an Amber Ale version of this..... I still may tweak the hops just a bit - but this is pretty damn good as brewed.

Beer - Big Muddy Red - NE style Amber Ale

Grain Bill to 1.060 OG:
63% 2 Row
14% Weyerman Munich
7% Flaked Oats
7% Wheat
3.5% Breiss Caramel 80
3.5% CaraMunich I (57L)
1.5% Aromatic
.5% Carafa II (For color into 12-13-14 SRM range.... could use Roast Barley too, or Midnight Wheat - it is just 1-2 ounces for color)

Hops:
60 min. 1 oz. Horizon (this is a great amber ale hop.... Nugget might be solid too)
10 min. 1oz. each Cascade and Centennial
Flameout 2 oz. Falconers Flight
Whirl pool/Hop Stand at under 170 degrees 2 oz. Falconers Flight
Dry hop at day three 2 oz. Falconers Flight

Mash @ 155 for 60 minutes

Yeast = 1272

Water:
Ca = 66
Mg = 2
Na = 13
Sulfate = 78
Chloride = 62
Bicarbonate = 72
Projected pH = 5.40

*I used 80% RO on this one. 20% of my high bicarbonate tap water...... not sure that that is "necessary" - but it is what I did on this batch.

Thoughts -
* I like the grain bill...... Maybe up the flaked??? Not sure if it is needed or would make a difference though.
* I like the yeast..... Second choice would be 1056 I think
* Water seemed good
*Beer is rich, creamy, full - nice spicy/fruity hops. Balanced. Super drinkable.
* What might I play around with...... Maybe a bit more Cascade/Centennial late or in flame out/whirlpool?? Maybe an ounce of Horizon late?? Falconers Flight Hop blend is a killer hop for Ambers. I think it is the ticket for whirlpool/ Dry hops. Horizon is a great hop in Ambers.

Falconers Flight (not the 7 C's....... just the Falconers Flight): http://labelpeelers.com/beer-making/hops/falconers-flight-hops/falconers-flight-hops-pellet-1-lb/

amber.jpg
 
Ok...... I think I have gotten to the place where I can recommend an Amber Ale version of this..... I still may tweak the hops just a bit - but this is pretty damn good as brewed.

Beer - Big Muddy Red - NE style Amber Ale

Grain Bill to 1.060 OG:
63% 2 Row
14% Weyerman Munich
7% Flaked Oats
7% Wheat
3.5% Breiss Caramel 80
3.5% CaraMunich I (57L)
1.5% Aromatic
.5% Carafa II (For color into 12-13-14 SRM range.... could use Roast Barley too, or Midnight Wheat - it is just 1-2 ounces for color)

Hops:
60 min. 1 oz. Horizon (this is a great amber ale hop.... Nugget might be solid too)
10 min. 1oz. each Cascade and Centennial
Flameout 2 oz. Falconers Flight
Whirl pool/Hop Stand at under 170 degrees 2 oz. Falconers Flight
Dry hop at day three 2 oz. Falconers Flight

Mash @ 155 for 60 minutes

Yeast = 1272

Water:
Ca = 66
Mg = 2
Na = 13
Sulfate = 78
Chloride = 62
Bicarbonate = 72
Projected pH = 5.40

*I used 80% RO on this one. 20% of my high bicarbonate tap water...... not sure that that is "necessary" - but it is what I did on this batch.

Thoughts -
* I like the grain bill...... Maybe up the flaked??? Not sure if it is needed or would make a difference though.
* I like the yeast..... Second choice would be 1056 I think
* Water seemed good
*Beer is rich, creamy, full - nice spicy/fruity hops. Balanced. Super drinkable.
* What might I play around with...... Maybe a bit more Cascade/Centennial late or in flame out/whirlpool?? Maybe an ounce of Horizon late?? Falconers Flight Hop blend is a killer hop for Ambers. I think it is the ticket for whirlpool/ Dry hops. Horizon is a great hop in Ambers.

Falconers Flight (not the 7 C's....... just the Falconers Flight): http://labelpeelers.com/beer-making/hops/falconers-flight-hops/falconers-flight-hops-pellet-1-lb/

What about using red wheat, and upping the oats to about 10%...red has more protien, which will increase the haze
 
I am sure red wheat would be fine.... not sure how significant a difference it would be. It is only 3-3.5L - so, not much darker. I think I would actually maybe up the flake proportion next time a bit..... just to check it out. Maybe go up into the 15-18% range by taking away from the wheat and base malt a bit.
 

Latest posts

Back
Top