You are using an out of date browser. It may not display this or other websites correctly.
You should upgrade or use an alternative browser.
You should upgrade or use an alternative browser.
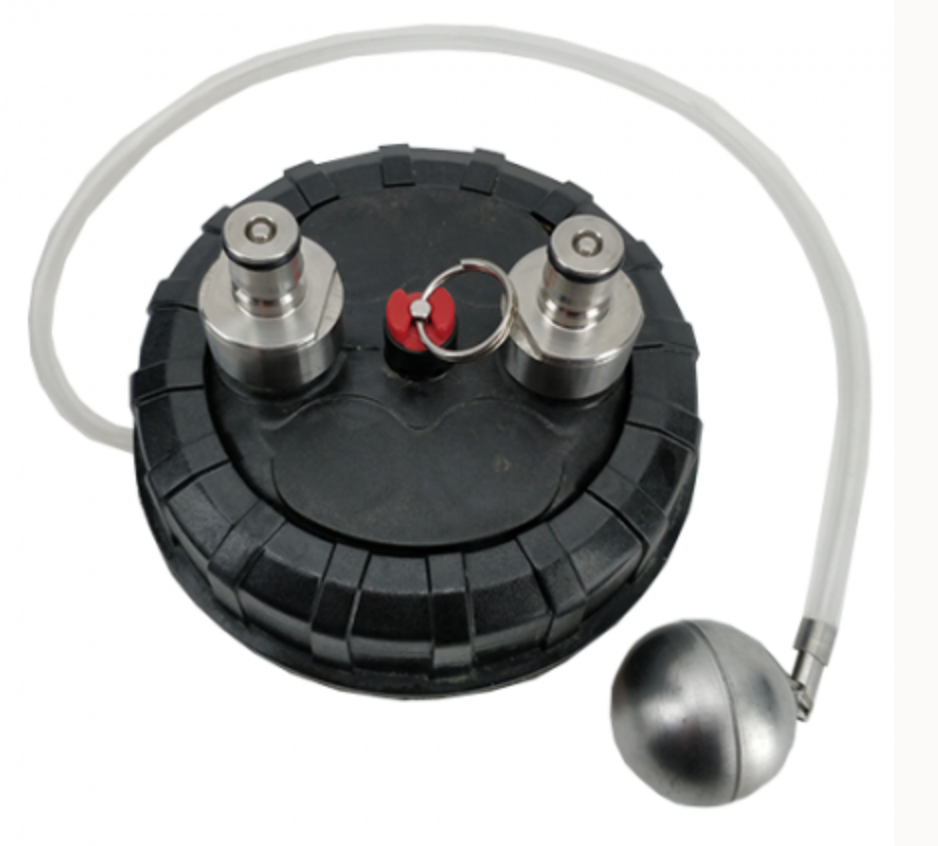
***NEW PRODUCT*** The Yeast Brink from Nor Cal Brewing Solutions
- Thread starter Jaybird
- Start date

Help Support Homebrew Talk:
This site may earn a commission from merchant affiliate
links, including eBay, Amazon, and others.
OP
OP
I can do that for you as a Custom build. Shoot me a PM with exactly what you want. I'll quote it for you.Jaybird,
Any thoughts on building this on a smaller scale? Maybe a 16oz mason jar design with a NPT fitting instead of TC? I was thinking about adapting this for use with my stainless steel bucket fermenter. My plan was to use it for dry hopping rather than yeast harvesting.
Cheers
Jay
OP
OP
and how about the bigger scale?any progress on those larger volume sight glasses?
I have 3" Sight glasses on the way. I had an issue with a shipment due to the "NEW US LAWS" and importing. But I think we have it all taken care of and should see the 3" Sight Glasses very soon!
I'll post up picts when they get here.
Cheers
Jay
awesome, thanks Jaybird. And to confirm, the 3" sight glass you refer to is a 3" TC connection and requires an adapter for use on 2" or 1.5"? can you clarify the internal fl oz measurement between each sight glass option?
OP
OP
I will be able to confirm the OZ of the 3" when they get here. The 3" Sight glass option will be available with both 2" and 1.5" Tri Clover connections. The 3" is ONLY the connection to the sight glass.awesome, thanks Jaybird. And to confirm, the 3" sight glass you refer to is a 3" TC connection and requires an adapter for use on 2" or 1.5"? can you clarify the internal fl oz measurement between each sight glass option?
Cheers
Jay
Do you have a price on this set up?View attachment 619181 1.5 " converted to 2"
Only way we can do it. If I add the 2" connection the canning jars ring will simply not go on.
Cheers
Jay

$719.00
$799.00
EdgeStar KC2000TWIN Full Size Dual Tap Kegerator & Draft Beer Dispenser - Black
Amazon.com


$53.24
1pc Hose Barb/MFL 1.5" Tri Clamp to Ball Lock Post Liquid Gas Homebrew Kegging Fermentation Parts Brewer Hardware SUS304(Liquid Hose Barb)
yunchengshiyanhuqucuichendianzishangwuyouxiangongsi

$176.97
1pc Commercial Keg Manifold 2" Tri Clamp,Ball Lock Tapping Head,Pressure Gauge/Adjustable PRV for Kegging,Fermentation Control
hanhanbaihuoxiaoshoudian


![Craft A Brew - Safale S-04 Dry Yeast - Fermentis - English Ale Dry Yeast - For English and American Ales and Hard Apple Ciders - Ingredients for Home Brewing - Beer Making Supplies - [1 Pack]](https://m.media-amazon.com/images/I/41fVGNh6JfL._SL500_.jpg)
$6.95 ($17.38 / Ounce)
$7.47 ($18.68 / Ounce)
Craft A Brew - Safale S-04 Dry Yeast - Fermentis - English Ale Dry Yeast - For English and American Ales and Hard Apple Ciders - Ingredients for Home Brewing - Beer Making Supplies - [1 Pack]
Hobby Homebrew


$7.79 ($7.79 / Count)
Craft A Brew - LalBrew Voss™ - Kveik Ale Yeast - For Craft Lagers - Ingredients for Home Brewing - Beer Making Supplies - (1 Pack)
Craft a Brew


$33.99 ($17.00 / Count)
$41.99 ($21.00 / Count)
2 Pack 1 Gallon Large Fermentation Jars with 3 Airlocks and 2 SCREW Lids(100% Airtight Heavy Duty Lid w Silicone) - Wide Mouth Glass Jars w Scale Mark - Pickle Jars for Sauerkraut, Sourdough Starter
Qianfenie Direct

$479.00
$559.00
EdgeStar KC1000SS Craft Brew Kegerator for 1/6 Barrel and Cornelius Kegs
Amazon.com

$172.35
2 Inch Tri Clamp Keg Manifold With Ball Lock Posts, Pressure Gauge, PRV (0-30 PSI) – Homebrew, Fermentation, Kegging System
wuhanshijiayangzhiyimaoyiyouxiangongsi

$11.99
DERNORD 1/2 Inch Stainless Steel Quick Disconnect Set - Beer Brewing Connector Kit (Barb Female/FPT Male)
denuodianqiyouxiangongsi


$28.98
Five Star - 6022b_ - Star San - 32 Ounce - High Foaming Sanitizer
Great Fermentations of Indiana


$20.94
$29.99
The Brew Your Own Big Book of Clone Recipes: Featuring 300 Homebrew Recipes from Your Favorite Breweries
Amazon.com

$44.99
$49.95
Craft A Brew - Mead Making Kit – Reusable Make Your Own Mead Kit – Yields 1 Gallon of Mead
Craft a Brew


$76.92 ($2,179.04 / Ounce)
Brewing accessories 1.5" Tri Clamp to Ball Lock Post Liquid Gas Homebrew Kegging Fermentation Parts Brewer Hardware SUS304 Brewing accessories(Gas Hose Barb)
chuhanhandianzishangwu


$10.99 ($31.16 / Ounce)
Hornindal Kveik Yeast for Homebrewing - Mead, Cider, Wine, Beer - 10g Packet - Saccharomyces Cerevisiae - Sold by Shadowhive.com
Shadowhive


$22.00 ($623.23 / Ounce)
AMZLMPKNTW Ball Lock Sample Faucet 30cm Reinforced Silicone Hose Secondary Fermentation Homebrew Kegging joyful
无为中南商贸有限公司


$58.16
HUIZHUGS Brewing Equipment Keg Ball Lock Faucet 30cm Reinforced Silicone Hose Secondary Fermentation Homebrew Kegging Brewing Equipment
xiangshuizhenzhanglingfengshop

$19.99
$22.99
How To Brew: Everything You Need to Know to Brew Great Beer Every Time
Simon & Schuster Digital Sales LLC

$53.24
1pc Hose Barb/MFL 1.5" Tri Clamp to Ball Lock Post Liquid Gas Homebrew Kegging Fermentation Parts Brewer Hardware SUS304(Gas MFL)
Guangshui Weilu You Trading Co., Ltd


OP
OP
Do you have a price on this set up?
The Reducer is $17.99 and is online as an option with all the Brink listings, or should be anyway.
But here is the link to the reducer.
https://www.norcalbrewingsolutions.com/store/Tri-Clover-2-Inch-to-1.5-Inch-Reducer.html
Here is the Brink kit with jar included. We do offer without the jars also. Just search BRINK on the search.
https://www.norcalbrewingsolutions....5-Inch-64-Oz-Canning-Jar-Yeast-Brink-Kit.html
Cheers
Jay
ttuato
Well-Known Member
I do not own the yeast brink nor do I own a conical - HOWEVER I do own a Jaybird modded Speidel fermentor and the yeast harvester this yeast brink is based off of. I asked a question earlier in the thread about using these to mimic the yeast brink advertised here (dry hopping specifically)- it worked! Here is a couple of pics of the setup.
I did some test batches first - 9-10oz is MAX amount hop pellets in the HALF GALLON jar. Any more and it is just sludge that will not move.
Adding beer to dryhop. Before doing this, I purged the jar with nitro and CO2, let it set for a few minutes - then purged again then tightened the TC clamp. This jar had 7.5oz hops and took about 40secs to push it all back into fermentor. When the flow slowed it was because the sludge started compacted the barb, I would just shake it a little and it would flow back in.
View attachment 607408
Now I can LODO dry hop my hazy IPAs then cold crash in my psuedo unitank and only transfer “clear” beer into kegs. Thanks @Jaybird !!!
I recently switched to the FLEX+ and the same process I outlined before works flawlessly with this fermenter.
ttuato
Well-Known Member
Do you ferment in the Speidel under pressure?
I "spund" with a few points left before FG. I used to use a spund valve attached with adjustable pressure but the 20lb spring in the norcal ball lock / PRV lid does the trick good enough. It has never exceeded 17lbs on my gauge.
I do not own the yeast brink nor do I own a conical - HOWEVER I do own a Jaybird modded Speidel fermentor and the yeast harvester this yeast brink is based off of. I asked a question earlier in the thread about using these to mimic the yeast brink advertised here (dry hopping specifically)- it worked! Here is a couple of pics of the setup.
I did some test batches first - 9-10oz is MAX amount hop pellets in the HALF GALLON jar. Any more and it is just sludge that will not move.
Adding beer to dryhop. Before doing this, I purged the jar with nitro and CO2, let it set for a few minutes - then purged again then tightened the TC clamp. This jar had 7.5oz hops and took about 40secs to push it all back into fermentor. When the flow slowed it was because the sludge started compacted the barb, I would just shake it a little and it would flow back in.
View attachment 607408
Now I can LODO dry hop my hazy IPAs then cold crash in my psuedo unitank and only transfer “clear” beer into kegs. Thanks @Jaybird !!!
Could I somehow do this dry hop process through the top of the BrewZilla All Rounder fermentor with the pressure kit? What components would I need to buy to do it?
Attachments
ttuato
Well-Known Member
No @alibremo sorry. That is just a regular ball lock. You gotta have a big bore to push the sludge through. Preferably a 1.5" TC or at the very least a 0.5" ball ball valve (ball valves are not good idea on cold side but can work if good with sanitation.Could I somehow do this dry hop process through the top of the BrewZilla All Rounder fermentor with the pressure kit? What components would I need to buy to do it?
CodeSection
Well-Known Member
- Joined
- Feb 4, 2018
- Messages
- 1,655
- Reaction score
- 819
@Jaybird, your 3" Sight Glass Yeast Brink worked perfectly yesterday when I used it to inject spice into my Pocahontas Pumpkin Ale! As can be seen in the pictures below, the 45 degree elbow and the 2" to 1.5" TC adapter worked great when I attached everything to my Spike CF10 racking arm.
This yeast brink is perfect for my needs. I plan on using it to inject spices and hops into the fermenter as it is a great way to avoid opening the fermenter up and exposing the wort/beer to O2.
For my current batch that finished fermenting, I mixed McCormick's Pumpkin Spice with sterilized RO water. Then I filled the sight glass full of beer before injecting it back into the fermenter. After that, I repeatedly filled and injected back into the fermenter four more times to insure there was an adequate mix.
The pictures below show how it looked before I filled it with beer the first time.
@CodeSection, that's given me an idea. I'm working on a double dry hopped IPA and this morning, I ended up dumping most of the first dry hop through the dump valve so I could then collect (liquid) beer in my yeast brink for the second dry hop. I think next time I'll take the jar (with the 2nd. dry hop pellets) and connect it to the racking port to avoid dumping the first dry hops that have settled at the dump valve, wait for the pellets to break down, and send it back in so the first dry hop can remain in the conical. My one concern is if the hop mush will be able to flow in through the angled racking arm without clogging up.
CodeSection
Well-Known Member
- Joined
- Feb 4, 2018
- Messages
- 1,655
- Reaction score
- 819
@CodeSection, that's given me an idea. I'm working on a double dry hopped IPA and this morning, I ended up dumping most of the first dry hop through the dump valve so I could then collect (liquid) beer in my yeast brink for the second dry hop. I think next time I'll take the jar (with the 2nd. dry hop pellets) and connect it to the racking port to avoid dumping the first dry hops that have settled at the dump valve, wait for the pellets to break down, and send it back in so the first dry hop can remain in the conical. My one concern is if the hop mush will be able to flow in through the angled racking arm without clogging up.
For hops injection, I was planning on using the dump valve after dumping the yeast/trub. Like you, without reading of experiences from others, I would be concerned injecting hops mush through the racking arm. I guess you could do a little at a time. But that could take forever if your adding a few ounces to a 10 gallon batch.
Please let us know if you try it and if it works.
Yes, that's how I injected the first dry hop. Injecting the second dry hop using the dump valve was the issue. If you don't dump the first dry hop in advance, the thick slurry will end up in the yeast brink and present difficulties in dissolving the new hops in the brink. Next time I'm going to inject the second dry hop through the racking arm. I'm hoping that, given adequate time for the beer to breakdown the pellets combined with a few pounds of co2 pressure, the hops will be driven up through the racking arm and the first dry hop can remain undisturbed at the bottom of the conical. On a side note, I do like the tip described in post #26 on purging the o2 from the yeast brink. Keeping o2 from the finished beer really makes you think at times.For hops injection, I was planning on using the dump valve after dumping the yeast/trub. Like you, without reading of experiences from others, I would be concerned injecting hops mush through the racking arm. I guess you could do a little at a time. But that could take forever if your adding a few ounces to a 10 gallon batch.
Please let us know if you try it and if it works.
CodeSection
Well-Known Member
- Joined
- Feb 4, 2018
- Messages
- 1,655
- Reaction score
- 819
...On a side note, I do like the tip described in post #26 on purging the o2 from the yeast brink. Keeping o2 from the finished beer really makes you think at times.
I purge the O2 differently than what was posted in #26. I follow Jay’s method of attaching a gas ball lock to the yeast brink’s gas post and have the end of the tubing in Starsan. Then when I open up the racking or dump valve and fill up the sight glass to the top, O2 is purged out of the sight glass.
Last edited:
OP
OP
@Jaybird, your 3" Sight Glass Yeast Brink worked perfectly yesterday when I used it to inject spice into my Pocahontas Pumpkin Ale! As can be seen in the pictures below, the 45 degree elbow and the 2" to 1.5" TC adapter worked great when I attached everything to my Spike CF10 racking arm.
This yeast brink is perfect for my needs. I plan on using it to inject spices and hops into the fermenter as it is a great way to avoid opening the fermenter up and exposing the wort/beer to O2.
For my current batch that finished fermenting, I mixed McCormick's Pumpkin Spice with sterilized RO water. Then I filled the sight glass full of beer before injecting it back into the fermenter. After that, I repeatedly filled and injected back into the fermenter four more times to insure there was an adequate mix.
The pictures below show how it looked before I filled it with beer the first time.
View attachment 654859
View attachment 654860
Man... Do I love to see a project like this come together! AWESOME!
Cheers
Jay
- Joined
- Oct 6, 2017
- Messages
- 1,701
- Reaction score
- 984
Question on this as I'm about to use mine for the first time, on a dry hopped beer. I'm assuming people are keeping the dump valve closed until you are ready to dump yeast, dumping, cleaning and sanitizing, then injecting the dry hop?
I've always used a sight glass so I've had an idea what the yeast were doing but can't fit the sight glass above the valve with this setup so I'll be going "blind".
I've always used a sight glass so I've had an idea what the yeast were doing but can't fit the sight glass above the valve with this setup so I'll be going "blind".
CodeSection
Well-Known Member
- Joined
- Feb 4, 2018
- Messages
- 1,655
- Reaction score
- 819
Question on this as I'm about to use mine for the first time, on a dry hopped beer. I'm assuming people are keeping the dump valve closed until you are ready to dump yeast, dumping, cleaning and sanitizing, then injecting the dry hop?
I've always used a sight glass so I've had an idea what the yeast were doing but can't fit the sight glass above the valve with this setup so I'll be going "blind".
You don't need a sight glass when dumping trub/yeast. Yes, the 2" dump valve remains closed until you are ready to dump everything.
My process includes using a 2" TC with a 18" silicone hose, attach it to the 2" dump valve and crack the valve one click and let the trub/yeast slowly pour out into a Pyrex 64 oz measuring cup (I measure everything so as I can refine the recipe). You might need to open the valve two clicks and then once flowing, reduce to one click.
After you have finished dumping, close the valve and sanitize the 2" valve with Starsan making sure you spray the top portion to remove all the remaining trub/yeast stuck to the sides. Attach your clean and sanitized and hop filled yeast brink to the 2" valve with a blow off line attached to the gas post and going to a glass filled with Starsan solution. Start filling the yeast brink with beer to the top.
Let the solution sit for an hour plus until the hops turn to mush. Once they are mush, put CO2 on the yeast brink, THEN open the 2" valve and inject into the concical. Close the valve FIRST and THEN disconnect the CO2 once all the hops that can are injected. You will have some hop mush left over, so disconnect the yeast brink from the CO2 and put back the blowoff tube. Repeat refilling with more beer, disconnect blow off tube, add CO2 line and inject again. Repeat until all the hops mush is gone....
Good luck!
- Joined
- Oct 6, 2017
- Messages
- 1,701
- Reaction score
- 984
Thanks! I'm planning to harvest this yeast as well so I'll be dumping into the brink but otherwise sounds like that's a solid process for me to go by.
CodeSection
Well-Known Member
- Joined
- Feb 4, 2018
- Messages
- 1,655
- Reaction score
- 819
Thanks! I'm planning to harvest this yeast as well so I'll be dumping into the brink but otherwise sounds like that's a solid process for me to go by.
Regardless if you have the canning jar yeast brink or the sight glass yeast brink, I think you will find it a lot easier to harvest directly into a regular canning jar, unless you are planning on injecting right away into another fermenter with freshly brewed wort.
- Joined
- Oct 6, 2017
- Messages
- 1,701
- Reaction score
- 984
I have the canning jar version
CodeSection
Well-Known Member
- Joined
- Feb 4, 2018
- Messages
- 1,655
- Reaction score
- 819
I have the canning jar version
The Yeast Brink is really designed for injecting. The Yeast Harvester is designed and better suited for harvesting. The tube in the yeast brink is the difference and is the issue.
I had a good conversation with Jay before buying his 3" Sight Glass Yeast Brink and he confirmed the above. The reason why I had asked Jay about this was I read a few postings (one from @Jtvann ~ I believe he posted he sold his yeast brink because of not being able to harvest the yeast effectively with it) about the difficulty of using the yeast brink for harvesting yeast.
Good luck and post how it went.
This is correct. When using the yeast brink to harvest, yeast would settle to the bottom of the down tube, but would not displace the liquid any more. Any wort outside the tube would not work it's way up as yeast fell. The harvester on the other hand, without the down tube, worked perfectly at harvesting yeast.
- Joined
- Oct 6, 2017
- Messages
- 1,701
- Reaction score
- 984
Well that's kind of a bummer. I'm wondering...I have the quart jar version. No reason I couldn't screw it on to a 1/2 gallon jar. I'm thinking maybe I could dump yeast into a 1/2 gallon jar since the bottom of the tube would be well off the bottom of the jar. Looks like at least a pint capacity. Then I can clean and sanitize the brink and switch back to the quart jar for dry hopping.
- Joined
- Oct 6, 2017
- Messages
- 1,701
- Reaction score
- 984
OK, got down to close to FG last night and didn't have a ton of time to mess with things so I went ahead and dumped yeast/trub into an open jar through a TC to hose fitting just to offer some restriction. It was just WLP001 so its not like its hard to get or anything. That didn't seem like a terrible way to dump so I may try harvesting yeast that way before buying anything else. It definitely would not work though if the yeast cake gets compacted before doing it.
I added the dry hop to the brink and did a few cycles of soak/push. This morning I see that from the leftover liquid that can't be pushed out of the brink its separated into half creamy yeast half beer. Since this is what was still actively working in the beer, not what was sitting on the bottom during the first dump, I wonder if this is enough to grow into a full starter?
I added the dry hop to the brink and did a few cycles of soak/push. This morning I see that from the leftover liquid that can't be pushed out of the brink its separated into half creamy yeast half beer. Since this is what was still actively working in the beer, not what was sitting on the bottom during the first dump, I wonder if this is enough to grow into a full starter?
CodeSection
Well-Known Member
- Joined
- Feb 4, 2018
- Messages
- 1,655
- Reaction score
- 819
OK, got down to close to FG last night and didn't have a ton of time to mess with things so I went ahead and dumped yeast/trub into an open jar through a TC to hose fitting just to offer some restriction. It was just WLP001 so its not like its hard to get or anything. That didn't seem like a terrible way to dump so I may try harvesting yeast that way before buying anything else. It definitely would not work though if the yeast cake gets compacted before doing it.
I added the dry hop to the brink and did a few cycles of soak/push. This morning I see that from the leftover liquid that can't be pushed out of the brink its separated into half creamy yeast half beer. Since this is what was still actively working in the beer, not what was sitting on the bottom during the first dump, I wonder if this is enough to grow into a full starter?
Good job! The hose gives much better control.
Yes, it is enough to grow into a full starter. I have read several times where starters were made from the small yeast that settles in bottles. I would imagine the smaller the harvest, the longer it will take.
Do you have a jar that small to pour the remaining yeast into so as there is no headspace left in the jar after pouring?
- Joined
- Oct 6, 2017
- Messages
- 1,701
- Reaction score
- 984
No, I'd probably grow up a 1.5L starter immediately and split that in pint jars for storage. Then I'd grow each of those in a new starter for a batch of beer. I've had good luck doing that with fresh yeast.
OP
OP
Hey guys! So glad to see you all using and playing around with the brinks. I have had a HUGE request for a 4" sight glass version. You will not believe the capabilities of what we can add to that 4" cap! Crazy! We will be getting this up on the sight in a few days. the 4" sight is like 45+ ounces! Amazing! I will be doing a 2" and 3" to 4" SG adapter so for those of you that have the 2" and 3" version and want to go to the 4" We will be able to get you there.
Cheers
Jay
Cheers
Jay
CodeSection
Well-Known Member
- Joined
- Feb 4, 2018
- Messages
- 1,655
- Reaction score
- 819
Hey guys! So glad to see you all using and playing around with the brinks. I have had a HUGE request for a 4" sight glass version. You will not believe the capabilities of what we can add to that 4" cap! Crazy! We will be getting this up on the sight in a few days. the 4" sight is like 45+ ounces! Amazing! I will be doing a 2" and 3" to 4" SG adapter so for those of you that have the 2" and 3" version and want to go to the 4" We will be able to get you there.
Cheers
Jay
@Jaybird, as you know, I have been very happy with your Yeast Brink 2" TC x 3" sight glass along with the TC 2" to 1.5" reducer and TC 45 degree elbow. I use them on both the dump valve and racking valve depending if I'm injecting hops, spices or gelatin. Everything works great!
Could you list the potential hop volume that one could put in each sight glass (1.5", 2", 3" and now 4")? I'm sure others would want to know as well.
Thanks.
- Joined
- Feb 16, 2012
- Messages
- 4,644
- Reaction score
- 7,067
- Location
- At home, in the brewery in Maryland.
Hey guys! So glad to see you all using and playing around with the brinks. I have had a HUGE request for a 4" sight glass version. You will not believe the capabilities of what we can add to that 4" cap! Crazy! We will be getting this up on the sight in a few days. the 4" sight is like 45+ ounces! Amazing! I will be doing a 2" and 3" to 4" SG adapter so for those of you that have the 2" and 3" version and want to go to the 4" We will be able to get you there.
Cheers
Jay
Damn, Jay.
Why didn't you tell me a couple's months ago when I got my 3" sight? Just kidding, I really love the brink, even if I do have to do multiple 'injections' for large dry hoppings.
45+ oz. Wow. What a versatile tool. Guys and gals, you NEED one of these!
Brooo Brother
I too have one of your Yeast Brinks that I use for dry hopping with my Spike conical... Love it. I have the quart size brink and when I do a large dry hop, I attach a short piece of 1-1/2" ID tubing to the downtube to reach the bottom of a 1/2 gallon jar. I do have one question though. How would you suggest I purge the air space between the top of the brinks exit tube, the 1-1/2" to 2" converter and the bottom of my 2" butterfly dump valve on the conical? Till now, I've been injecting co2 with the 2" TC clamp loose enough to allow for the o2 to escape before tightening and proceeding with the dry hop but I'm concerned that the space I describe above is holding o2 even after the purge as the o2 is lighter than the co2. If I open the dump valve and fill up the brink until beer flows out of the gas post, would the physics be such that the entire space from the butterfly valve down would flood completely, leaving no air/co2 space remaining or would that space remain "unflooded"?Hey guys! So glad to see you all using and playing around with the brinks. I have had a HUGE request for a 4" sight glass version. You will not believe the capabilities of what we can add to that 4" cap! Crazy! We will be getting this up on the sight in a few days. the 4" sight is like 45+ ounces! Amazing! I will be doing a 2" and 3" to 4" SG adapter so for those of you that have the 2" and 3" version and want to go to the 4" We will be able to get you there.
Cheers
Jay
OP
OP
You got it.@Jaybird, as you know, I have been very happy with your Yeast Brink 2" TC x 3" sight glass along with the TC 2" to 1.5" reducer and TC 45 degree elbow. I use them on both the dump valve and racking valve depending if I'm injecting hops, spices or gelatin. Everything works great!
Could you list the potential hop volume that one could put in each sight glass (1.5", 2", 3" and now 4")? I'm sure others would want to know as well.
Thanks.
2" about 1-2 oz of pellet
3" about 4-6 oz of pellet
4" about 12-15 (maybe more) of pellet
The 4" sight glass is 48 OZ of volume. Its AWESOME!
Cheers
Jay
- Joined
- Feb 16, 2012
- Messages
- 4,644
- Reaction score
- 7,067
- Location
- At home, in the brewery in Maryland.
I too have one of your Yeast Brinks that I use for dry hopping with my Spike conical... Love it. I have the quart size brink and when I do a large dry hop, I attach a short piece of 1-1/2" ID tubing to the downtube to reach the bottom of a 1/2 gallon jar. I do have one question though. How would you suggest I purge the air space between the top of the brinks exit tube, the 1-1/2" to 2" converter and the bottom of my 2" butterfly dump valve on the conical? Till now, I've been injecting co2 with the 2" TC clamp loose enough to allow for the o2 to escape before tightening and proceeding with the dry hop but I'm concerned that the space I describe above is holding o2 even after the purge as the o2 is lighter than the co2. If I open the dump valve and fill up the brink until beer flows out of the gas post, would the physics be such that the entire space from the butterfly valve down would flood completely, leaving no air/co2 space remaining or would that space remain "unflooded"?
If you flood the entire volume of the brink with beer from your fermenter, it should be evacuated of air (gas discharge post connected, of course). There would be some beer-air contact while the liquid is displacing the air, but it would only be for the few seconds while the brink gets flooded.
You could also put your hops in the brink, connect the TC to your dump port, then purge with CO2 under pressure just before you flood the brink. That might be even more thorough. I usually fill the hops into the brink, do a few quick sprays of an aqueous NaMeta solution into the downcomer, attach the brink and then flood it. My hope is that the sulfite mist is sufficient to absorb any O2 in the brink before I flood it.
There's not much O2 in the brink in any of the above scenarios, but it doesn't take much O2 to impact your beer in a negative way. One idea I've been thinking about is pitching some active speise (maybe 5-10 ml) into the brink with the hops, then attach and flood it. Let the active yeast scavenge O2 for 15 minutes or so before injecting it into the fermenter.
I think this type of yeast oxygen scavenging might have some promise, but I'm sure I haven't thought through all the factors. There may be some biobiotransformation issues with some certain hops and/or yeast strains.
LoDO gurus....your thoughts?
Brooo Brother
OP
OP
we
https://www.norcalbrewingsolutions.com/store/Tri-Clover-2-Inch-Corny-Ball-Lock-Gas-Out.html
it gets installed in the bottom in place of the blank cap. We build the 1.5" 2" 3" and 4" TC
Cheers
Jay
we do sell a lot of these for guys that do want to purge the system before adding beer to the hops.If you flood the entire volume of the brink with beer from your fermenter, it should be evacuated of air (gas discharge post connected, of course). There would be some beer-air contact while the liquid is displacing the air, but it would only be for the few seconds while the brink gets flooded.
You could also put your hops in the brink, connect the TC to your dump port, then purge with CO2 under pressure just before you flood the brink. That might be even more thorough. I usually fill the hops into the brink, do a few quick sprays of an aqueous NaMeta solution into the downcomer, attach the brink and then flood it. My hope is that the sulfite mist is sufficient to absorb any O2 in the brink before I flood it.
There's not much O2 in the brink in any of the above scenarios, but it doesn't take much O2 to impact your beer in a negative way. One idea I've been thinking about is pitching some active speise (maybe 5-10 ml) into the brink with the hops, then attach and flood it. Let the active yeast scavenge O2 for 15 minutes or so before injecting it into the fermenter.
I think this type of yeast oxygen scavenging might have some promise, but I'm sure I haven't thought through all the factors. There may be some biobiotransformation issues with some certain hops and/or yeast strains.
LoDO gurus....your thoughts?
Brooo Brother
https://www.norcalbrewingsolutions.com/store/Tri-Clover-2-Inch-Corny-Ball-Lock-Gas-Out.html
it gets installed in the bottom in place of the blank cap. We build the 1.5" 2" 3" and 4" TC
Cheers
Jay
- Joined
- Feb 16, 2012
- Messages
- 4,644
- Reaction score
- 7,067
- Location
- At home, in the brewery in Maryland.
we
we do sell a lot of these for guys that do want to purge the system before adding beer to the hops.
https://www.norcalbrewingsolutions.com/store/Tri-Clover-2-Inch-Corny-Ball-Lock-Gas-Out.html
it gets installed in the bottom in place of the blank cap. We build the 1.5" 2" 3" and 4" TC
Cheers
Jay
Perfect. I've seen the TC/ball lock fitting many times but for some reason never thought about installing it on the bottom of the sight glass brink and use it to flush the hops. Duh... oxygenation problem pretty much eliminated. Thanks, Jay!
Brooo Brother
OP
OP
Absolutely! You bet Broo Brother!Perfect. I've seen the TC/ball lock fitting many times but for some reason never thought about installing it on the bottom of the sight glass brink and use it to flush the hops. Duh... oxygenation problem pretty much eliminated. Thanks, Jay!
Brooo Brother
Cheers
Jay
OP
OP
Probably the 3 or the 4 Just depends on what you plan to do with it exactly. If your going to dry hop and you do IPA's go big!I have a 1/2 BBL Unitank; what size would be recommended between the 2", 3" and 4" ?
Cheers
Jay
Similar threads
- Replies
- 1
- Views
- 1K
- Replies
- 7
- Views
- 2K
- Replies
- 10
- Views
- 2K
- Replies
- 1
- Views
- 1K
