
WilderBill
Member
- Joined
- Jan 11, 2014
- Messages
- 13
- Reaction score
- 8
Greetings folks, I have not posted on any brewing forums for years and years but I’ve got a new project that I figure some people may be interested in.
Background:
I bought two MoreBeer 12 gal fermenters back in 2008. I then made an AC unit glycol chiller for them based on “Backyard Brewer’s” posts on the Morebeer forum. My original build pics can be found here.
The setup has worked great ever since but I’ve always wanted to have some automated control over temperature ramps, diacetyl rests, etc. I looked at OhmBrew & FermTroller but they never seemed to entirely fit the bill for one reason or another. (After I see everything posted here maybe I should have given BrewPi a closer look before jumping in) But up to this point I never ended up doing anything. I just ran downstairs multiple times a day to adjust the Ranco controllers when needed.
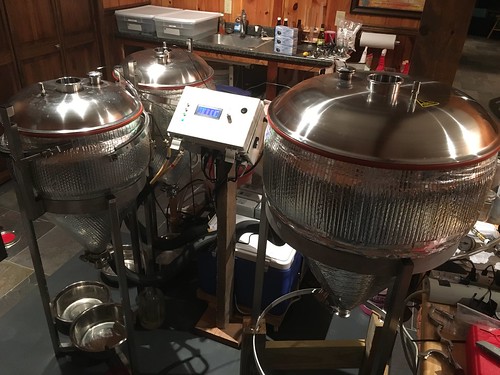
So last year I upgraded my brew system for 20 gal batch capacity and then on Cyber Monday MB sucked me in with a deal on their 27 gal conical fermentor . With this addition I finally felt the need to get off my duff and program / build the dream fermentation temp controller that I always wanted.

Here are the features/specifications:
-Controls the cooling of a window air conditioner converted to glycol chiller
-Controls heating and cooling to 1* on three different fermenters
-Heat provided by Fermwraps around the cone of each fermentor
-Cooling provided by chilled glycol being pumped through copper tubing cinched around the exterior top of the fermentors
-Fermentor manual mode allows you to set a temperature and the controller will maintain it.
-Fermentor ramp mode will increase temp from the current temp to a set temperature by a set number of degrees per day. (to be used towards the end of fermentation to help finish out the beer)
-Fermentor hold and ramp mode will hold at a set temperature for set number of hours, then ramp to a set temperature by a set number of degrees per day. (to be used at the beginning of a fermentation to let the yeast start slow and then ramp to the desired fermentation temp)
-Diacetyl rest mode will allow a fermentor to free rise to a set temperature, stay there for a set number of hours, then start chilling to a set temperature by a set number of degrees per day.
-Crash mode chills to a set temperature by a set number of degrees per day. (Used at the end of the fermentation to drop yeast and fine beers in the fermentor)
-Glycol chiller temp can be set manually or be set to automatically adjust to a set number of degrees below the lowest fermentation temperature. (logic has a floor that it won’t go below)
-Glycol outputs have anti short-cycle and delayed start settings built in.
-Logic exists to prevent setting ramp temps below current temp or d-rest temp above ambient temp.
-Error system will alarm for the above reasons, zones not being within their set temp for a set number of hours, or if set temperatures are somehow out of range.
-SD card for data logging
-Ethernet or WIFI networking is planned at a later date after I get the above all working correctly.
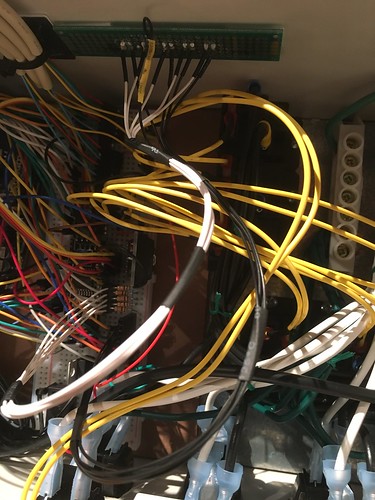
I just got everything installed today and it looks decent, the biggest issue I’m having is I apparently have some interference going on with my temp sensors when the 110V power is turned on. What used to be a steady signal will often jump .25 to .5 or even 1 degree. When it does that it will go from heat to off, to heat, to cool, to off, to heat, etc…
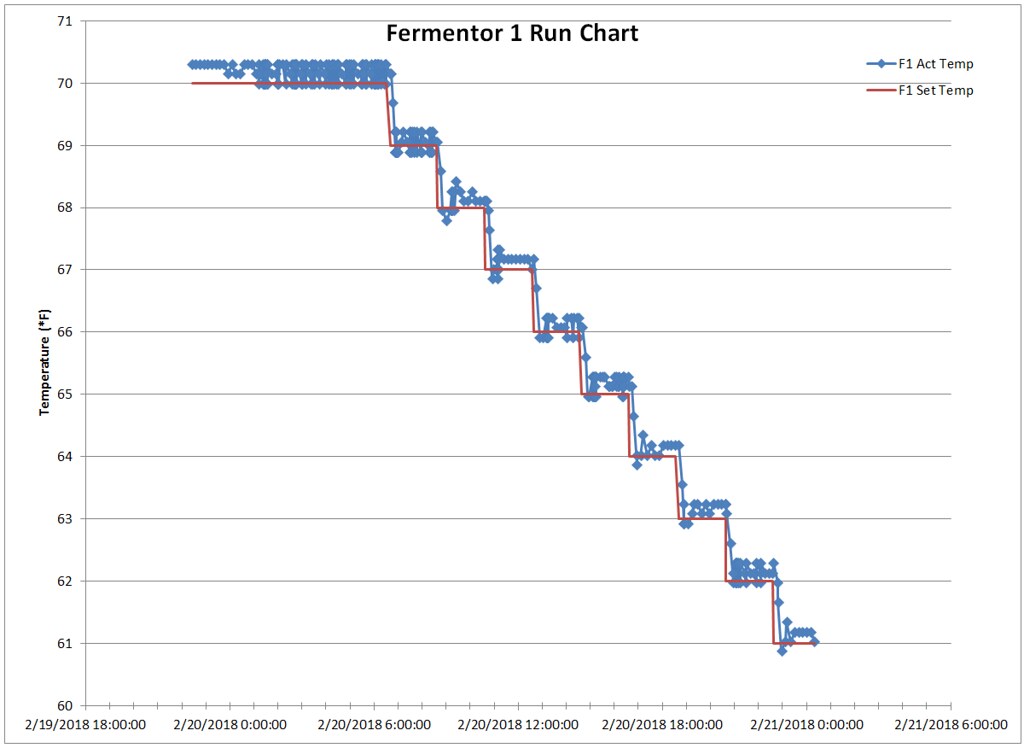
It is programmed with a deadband so that if set to 68* the heat will not kick on until 67.9 but it will kick off at 68.2, Cooling will turn on at 69.0 and will turn off at 68.7. Between 68.2 and 68.7 there will never be any heating or cooling. I didn’t get all fancy with PID control because I didn’t think it really needed it. I hadn’t needed it in the last 10 years anyway.
When the temperature is read I’m averaging 5 samples taken 10ms apart. I could do some more averaging but that is just masking the problem.
Here's the innards with the group of white and black wires in the foreground providing the signal and ground for the thermistors.
Arduino code here (v0.9):
YouTube intro video here:
Wiring diagram link:
Let me know what you think or if you have any ideas for me.
Bill
Background:
I bought two MoreBeer 12 gal fermenters back in 2008. I then made an AC unit glycol chiller for them based on “Backyard Brewer’s” posts on the Morebeer forum. My original build pics can be found here.
The setup has worked great ever since but I’ve always wanted to have some automated control over temperature ramps, diacetyl rests, etc. I looked at OhmBrew & FermTroller but they never seemed to entirely fit the bill for one reason or another. (After I see everything posted here maybe I should have given BrewPi a closer look before jumping in) But up to this point I never ended up doing anything. I just ran downstairs multiple times a day to adjust the Ranco controllers when needed.
So last year I upgraded my brew system for 20 gal batch capacity and then on Cyber Monday MB sucked me in with a deal on their 27 gal conical fermentor . With this addition I finally felt the need to get off my duff and program / build the dream fermentation temp controller that I always wanted.
Here are the features/specifications:
-Controls the cooling of a window air conditioner converted to glycol chiller
-Controls heating and cooling to 1* on three different fermenters
-Heat provided by Fermwraps around the cone of each fermentor
-Cooling provided by chilled glycol being pumped through copper tubing cinched around the exterior top of the fermentors
-Fermentor manual mode allows you to set a temperature and the controller will maintain it.
-Fermentor ramp mode will increase temp from the current temp to a set temperature by a set number of degrees per day. (to be used towards the end of fermentation to help finish out the beer)
-Fermentor hold and ramp mode will hold at a set temperature for set number of hours, then ramp to a set temperature by a set number of degrees per day. (to be used at the beginning of a fermentation to let the yeast start slow and then ramp to the desired fermentation temp)
-Diacetyl rest mode will allow a fermentor to free rise to a set temperature, stay there for a set number of hours, then start chilling to a set temperature by a set number of degrees per day.
-Crash mode chills to a set temperature by a set number of degrees per day. (Used at the end of the fermentation to drop yeast and fine beers in the fermentor)
-Glycol chiller temp can be set manually or be set to automatically adjust to a set number of degrees below the lowest fermentation temperature. (logic has a floor that it won’t go below)
-Glycol outputs have anti short-cycle and delayed start settings built in.
-Logic exists to prevent setting ramp temps below current temp or d-rest temp above ambient temp.
-Error system will alarm for the above reasons, zones not being within their set temp for a set number of hours, or if set temperatures are somehow out of range.
-SD card for data logging
-Ethernet or WIFI networking is planned at a later date after I get the above all working correctly.
I just got everything installed today and it looks decent, the biggest issue I’m having is I apparently have some interference going on with my temp sensors when the 110V power is turned on. What used to be a steady signal will often jump .25 to .5 or even 1 degree. When it does that it will go from heat to off, to heat, to cool, to off, to heat, etc…
It is programmed with a deadband so that if set to 68* the heat will not kick on until 67.9 but it will kick off at 68.2, Cooling will turn on at 69.0 and will turn off at 68.7. Between 68.2 and 68.7 there will never be any heating or cooling. I didn’t get all fancy with PID control because I didn’t think it really needed it. I hadn’t needed it in the last 10 years anyway.
When the temperature is read I’m averaging 5 samples taken 10ms apart. I could do some more averaging but that is just masking the problem.
Here's the innards with the group of white and black wires in the foreground providing the signal and ground for the thermistors.
Arduino code here (v0.9):
YouTube intro video here:
Wiring diagram link:
Let me know what you think or if you have any ideas for me.
Bill


![Craft A Brew - Safale S-04 Dry Yeast - Fermentis - English Ale Dry Yeast - For English and American Ales and Hard Apple Ciders - Ingredients for Home Brewing - Beer Making Supplies - [1 Pack]](https://m.media-amazon.com/images/I/41fVGNh6JfL._SL500_.jpg)


