Native ESP8266 BrewPi Firmware - WiFi BrewPi, no Arduino needed!

Homebrew Talk - Beer, Wine, Mead, & Cider Brewing Discussion Forum

Help Support Homebrew Talk - Beer, Wine, Mead, & Cider Brewing Discussion Forum:

This site may earn a commission from merchant affiliate links, including eBay, Amazon, and others.
The RaspberryPi OS with lxde desktop comes with an "SD Card Copier" application that allows live-cloning of the booted SD card.
It will obviously save everything on the card...

Cheers!
 
Looks like SD Card Copier not available on Lite Raspbian install as I did here.
Any chance the problem is in the WiFi settings? Do you need to enable ssh and add wpa_supplicant again? Or would that be in the disk image?
 
Everything should be in the disk image. At this point I'd suggest plugging a keyboard and monitor into the Pi and seeing what occurs when it boots up on the copied card. It could be a bad card or something.
 
Yes - Windows only, but there has to be a Linux or Mac equivalent.
I've used either SD card and have no differences or trouble on either one. Doesn't matter which one is installed to run Fermentrack.
It's not really a backup, but a clone of the SD card at the time when I do the "backup" - an exact copy.
 
Everything should be in the disk image. At this point I'd suggest plugging a keyboard and monitor into the Pi and seeing what occurs when it boots up on the copied card. It could be a bad card or something.
Thanks I’ll try. I’m brewing this weekend so going to use it without a back up.
Yes - Windows only, but there has to be a Linux or Mac equivalent.
I've used either SD card and have no differences or trouble on either one. Doesn't matter which one is installed to run Fermentrack.
It's not really a backup, but a clone of the SD card at the time when I do the "backup" - an exact copy.

Thanks. In hearing everyone’s replies it seems like I may have a bad SD card because otherwise seems like I am doing the other steps correctly.
 
When I try the cloned SD card the rPi is not found in my list of devices on my home network and the usual IP address isn’t responding.

Is there something about fermentrack that prevents the back up? Do the WiFi settings have to be reconfigured after a backup?
Done correctly, it should work. You’ll probably want to get a keyboard and monitor on there to see what’s going on.
 
Although it's not directly related to the BrewPi-ESP8266 firmware, I strongly recommend anyone that has interest in keg/pour monitoring take a look at @LBussy 's Keg Cop. Keg Cop allows for wireless monitoring of kegs, either on a standalone basis, via Raspberry Pints, or - soon- via an upcoming taplist management system that I've been working on for the past year called KegScreen.

Keg Cop (and KegScreen, once released!) is free, open source, and uses a lot of similar hardware to what you're already used to in this port of BrewPi. It's easy to build, easy to use, and solves a number of problems with existing flow monitoring solutions.
 
@Thorrak please redirect me if on wrong thread but can't find a brewpiless thread.
I have struggled with a decent signal from my ispindel out of my ferment fridge, bargain stainless steel one but a good enough cage to stop regular wifi to my access point / router upstairs. Works great if i park a second router outside the fridge but trailing cables a pain.
I saw this ( briefly discussed on the ispindel thread about month ago )
https://pizzvopyfgp6oerh6v5bvte344-...1/03/repetidor-ispindel-con-display-oled.htmlTranslation from spanish not super good but enough, I wanted to use this to have a fermentation controller ( not got the relays for that yet ) and also as a WIFI relay/booster and another gadget with the display.
I assembled it last pm and installed the software my first efforts unsuccessful until I swapped out the esp8266 for another and then it was recognised and all loaded okay.
I have managed to get a test ispindel to connect to it and see temp and gravity change.
But what I also want to do is use it as an access point for the other ispindels which use brewspy.
I can see the brewpiless network and can log onto it with a device such as phone but can't get any WWW access from there.
I have set a fixed ip for the repeater on my network but am at a loss at the network aspects.
Hey there - BrewPiLess is a different project - the thread is over here: BrewPi@ESP8266, no need of RPI and Arduino.
 
I've just moved from Brewpiless (due to constantly losing wifi and a lack of support and development) and have moved to fermentrack.
Aside from losing a few things I really liked on BPL like beer profiles via gravity (amazing for lagers and the fact I work away) and auto spunding, I'm finding fermentrack to be a much nicer, prettier, and more importantly, stable, environment.
One thing I don't seem to be able to find though, is where I can change the chamber's maximum temperature.
Currently, it seems that 30C is as high as it can go and as I use this for beer and spirits, the ability to ferment at 35+ is nice.
Does anyone know where I can change this?
 
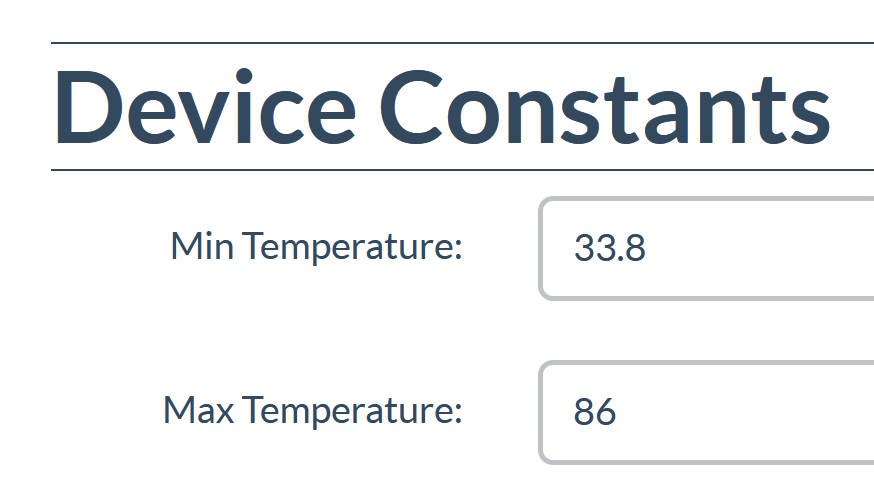
The original BrewPi (that Fermentrack et all were derived from) has both Min and Max "Temperature Settings" found under Maintenance Panel - Advanced Settings - Control Constants. I expect the Fementrack gui has something similar...

Cheers!
 
I've just moved from Brewpiless (due to constantly losing wifi and a lack of support and development) and have moved to fermentrack.
Aside from losing a few things I really liked on BPL like beer profiles via gravity (amazing for lagers and the fact I work away) and auto spunding, I'm finding fermentrack to be a much nicer, prettier, and more importantly, stable, environment.
One thing I don't seem to be able to find though, is where I can change the chamber's maximum temperature.
Currently, it seems that 30C is as high as it can go and as I use this for beer and spirits, the ability to ferment at 35+ is nice.
Does anyone know where I can change this?

Gravity-based beer profiles are coming (though I won't promise when)!

Unfortunately, I don't recall off the top of my head whether the min/max temp settings are part of the "control settings" options (which is user-configurable but isn't currently exposed in Fermentrack) or part of the hard-coded temps in the firmware. If it's the former, then I can try to expose that in Fermentrack & allow for control. If it's the latter, then you'll need a recompiled firmware with different temp limits.

Unfortunately, I'm on vacation with a laptop that doesn't have my BrewPi firmware development environment loaded on it and can't check easily to let you know - tag me again this coming Sunday when I'm back and I'll take a look and find out.

Wow, now that's some developer support!
 
Unfortunately, I don't recall off the top of my head whether the min/max temp settings are part of the "control settings" options (which is user-configurable but isn't currently exposed in Fermentrack) or part of the hard-coded temps in the firmware. If it's the former, then I can try to expose that in Fermentrack & allow for control. If it's the latter, then you'll need a recompiled firmware with different temp limits.

Considering the prevalence of Kveik and other high temp yeasts, perhaps raising that cap across the board might be a good idea?
 
I want you guys to pay attention to the BrewPi guy supporting Fermentrack. :)

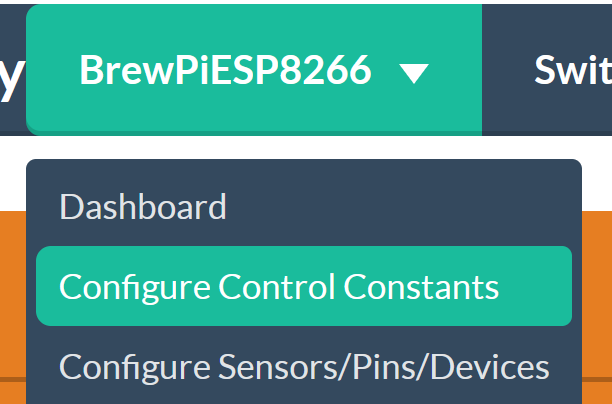
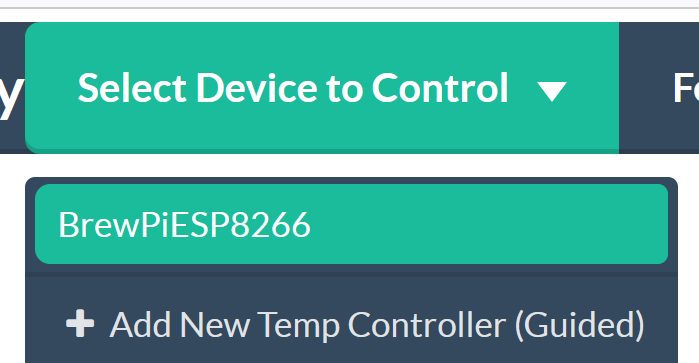
Select the device to control:

1623845133568.png


Then select Configure Control Constants:

1623845167235.png


Then you can define min and max temps:

1623845203619.png
 
Hi gents, Im looking at making a few more of these controllers and was wondering if anyone has a link to some decent PCBs. I brought a few a few years back but they had the space for the IC convertors which arent needed. @Thorrak Do you sell your PCbs?
 
Hi gents, Im looking at making a few more of these controllers and was wondering if anyone has a link to some decent PCBs. I brought a few a few years back but they had the space for the IC convertors which arent needed. @Thorrak Do you sell your PCbs?
Yes, but I’m not at home to ship them out at the moment, unfortunately.

I have all of my PCB designs (with links to fabricators) on GitHub here: thorrak/thorrak_hardware

If there is anything missing that you’re looking for, let me know and I’ll see if I can upload it.
 
Yes, but I’m not at home to ship them out at the moment, unfortunately.

I have all of my PCB designs (with links to fabricators) on GitHub here: thorrak/thorrak_hardware

If there is anything missing that you’re looking for, let me know and I’ll see if I can upload it.
Cheers for that. I was looking at this board here as I dont need the level shifter.

https://github.com/brewpi-remix/brewpi-pcb-rmx/tree/master/ESP8266 Boards/WeMos D1 Mini Breakout
But what is all of this for as I never used any of those components on my last build?


Cheers for that. I was looking at this board here as I dont need the level shifter.

https://github.com/brewpi-remix/brewpi-pcb-rmx/tree/master/ESP8266 Boards/WeMos D1 Mini Breakout
But what is all of this for as I never used any of those components on my last build?


The mosfet and 10ks are the level shifter.
The capacitors are decoupling caps - they’re optional, but highly recommended.
The 2.2k resistor is the pull-up for the temp sensor - I guarantee you had one of these (or a 4.7k) as they’re required for the temp sensors to work.
 
The mosfet and 10ks are the level shifter.
The capacitors are decoupling caps - they’re optional, but highly recommended.
The 2.2k resistor is the pull-up for the temp sensor - I guarantee you had one of these (or a 4.7k) as they’re required for the temp sensors to work.
Ahh ok so dont need the mosfet and 10ks then as I dont use the level shifter.
Ill use the caps...
And yes I did use the pull up resistor on my other builds.

Thanks for that..

So is that price $15 for 1 board through Oshpark?
 
I think it's for 3. Oshpark is more expensive but by far the best and most consistent service. You can use just about any other service you like, but I find I get less hate mail with links to Oshpark. :)
 
Hi Brewers, In using this relay in a build and having problems with it (Similar to last time way back in post 2640 which Ive re read but still not sure) Ive got them set to Inverted in the software,
Ive got the jumpers both on Low-Com (Although not shown in this photo) But every time I turn the power on I get one of the relays on or both on even though it says waiting to heat or waiting to cool.

From memory (As Im now at work) with both jumpers set to high-com both relays come on. With both jumpers off no relays are on and with both jumpers set low-com one relay comes on (Even though its Waiting to heat or waiting to cool). Im already confused... Any suggestions???

EDIT:- So after reading what I can about these relays am I right in saying that if I switch the jumpers to high-com it means a voltage activates the relay. And if I switch the jumpers to low-com it means no voltage activates the relays?? If so then wouldnt changing the settings in the software to inverted then do the opposite again??? So high-com switches on high voltage but set to inverted will switch it on low even though the jumpers are set to high??

If thats correct whats the point of the inverted or non inverted setting?

relay.jpg
 
Last edited:
Set the relays for Low Active.
Then configure the GPIO pins that drive the relays for "inverted".
LEDs D3 and D4 will light when their respective relays are activated when the end to end setup is properly configured.

Most relay modules are Low Active, period, which is why the gui offers the option of inverting the relay controls...

Cheers!
Ok thanks for that. I will give it a shot.
 
So nothing would work other than setting the pins to com-high but in the software setting them both to non-inverted. If I set the pins to com-low and used "inverted" both relays switched on straight away. Strange indeed

relay2.jpg
 
@troyp42
Thanks I'm waiting for the parts for my build. Good to know.
Which build guide are you following?
I’ve made 2 temp controllers before with fermentrack installed in a ras-berry Pi so I’m basically just building this one the same. I got all my info for it from this thread . Other than that I’ve never really seen a build guide.
 
@LBussy @Thorrak

I'm not sure if you remember or not, but a while back I was having trouble with intermittent sensors.

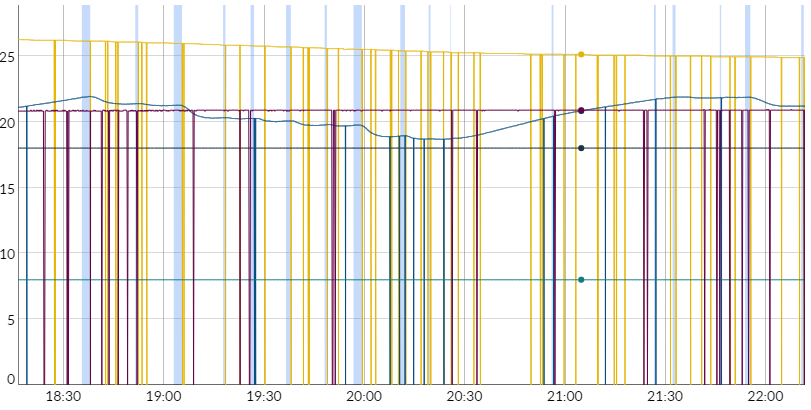
Well, today I finally had some more time to look at it and I cracked the issue: a faulty power supply for my D1 Mini!

Before changing the power supply:
1626449719415.png


And after (you can see when I changed the power supply and plugged the room sensor back in at 07:50):
1626449787526.png


So, there you have it: check your power supply!
 
Hi folks, I've just started to re-look at my esp8266 brewpi project that I built back in 2017/18
old arduino box.jpg

I added the buzzer function back using an arduino active buzzer module and successfully built the master branch 0.08 and 0.09 versions, this was on another machine using platformio. I have moved over to another pc running ubuntu and so have done a fresh install of platformio and downloaded a fresh copy the master branch before I started to implement the buzzer again.
Trying to compile gave lots of warnings about SPIFFS depreciating and several errors, one error was solved by making the WiFiManager as a local library and changing platformio.ini to reflect the change the other error was 'i' was not declared in this scope in the function 'bool isValidmDNSName(String)' in brewpi-esp8266.cpp I'm not a good coder so after googling a bit I ended up rewriting to be
Code:
bool isValidmDNSName( const char * mdns_name )
 {
        char c;
        while ( (c = *mdns_name++) )
          if ( c != '.' && !isalnum(c) )
            return false;
         return true;
}
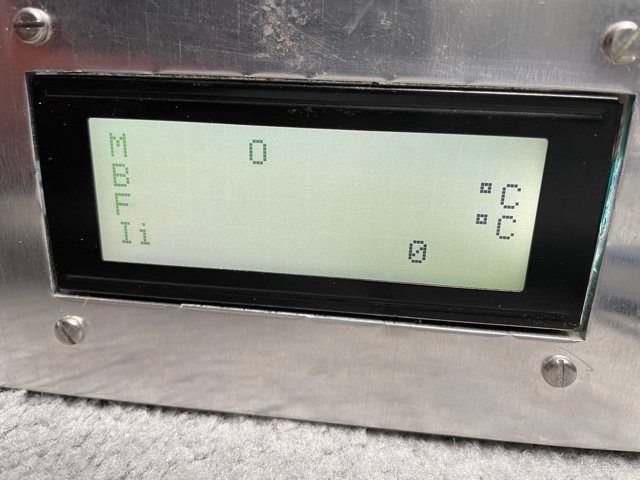
this has allowed it to successfully compile but i'm getting corruption on the LCD screen, the last update in the master branch says was to fix lcd corrution
screen_corrupt.jpg


Should I be using one of the other Dev branches instead ?
 
Assuming you are using the master branch:

What you've done there is not exactly correct, but I don't believe it's causing your issue. A better change would be:
C++:
bool isValidmDNSName(String mdns_name) {
    for (int i = 0; i < mdns_name.length(); ++i) {
        if (!isalnum(mdns_name[i]))
            return false;
    }
    return true;
}

You can safely (for now) ignore all the SPIFFS warnings. There are a couple of other character conversion warnings that can be ignored for now as well.

In the platformio.ini file, change:
INI:
lib_deps =
  https://github.com/tzapu/WiFiManager.git#development
to:
INI:
lib_deps =
  https://github.com/tzapu/WiFiManager.git

That's all you should need - I just compiled and tested here.
 
thanks @LBussy , I changed the brewpi-esp8266.cpp isValidmDNSName to your Code which works :) but changing platformio.ini to your suggestion I get an error FileNotFoundError: [Errno 2] No such file or directory: 'git':
so for the time being I've set the common section of platformio.ini to
INI:
[common]
platform = espressif8266
board = nodemcuv2
framework = arduino
lib_deps =
    tzapu/WiFiManager@^0.16.0
    ;https://github.com/tzapu/WiFiManager.git

which lets me compile and upload ok , unfortunately the screen is still corrupt :-(
If I use Fermentrack to grab the latest and flash it works fine !

for completeness here's my change to Buzzer.ccp

C++:
/*
 * Buzzer.cpp
 *
 * Copyright 2012-2013 BrewPi.
 *
 * This file is part of BrewPi.
 *
 * BrewPi is free software: you can redistribute it and/or modify
 * it under the terms of the GNU General Public License as published by
 * the Free Software Foundation, either version 3 of the License, or
 * (at your option) any later version.
 *
 * BrewPi is distributed in the hope that it will be useful,
 * but WITHOUT ANY WARRANTY; without even the implied warranty of
 * MERCHANTABILITY or FITNESS FOR A PARTICULAR PURPOSE.  See the
 * GNU General Public License for more details.
 *
 * You should have received a copy of the GNU General Public License
 * along with BrewPi.  If not, see <http://www.gnu.org/licenses/>.
 */


#include "Brewpi.h"
#include "Ticks.h"
#include "Pins.h"
#include "Buzzer.h"

// TODO - Implement

#if BREWPI_BUZZER
#if BREWPI_BOARD == BREWPI_BOARD_ESP8266
#define _delay_ms(ms) delayMicroseconds((ms) * 1000)
#endif
#if BREWPI_BOARD != BREWPI_BOARD_ESP8266
#include <util/delay.h>
#endif

#include "FastDigitalPin.h"

#if (alarmPin != 0)
    #error "Check PWM settings when you want to use a different pin for the alarm"
#endif

#define BEEP_ON() digitalWrite(alarmPin, LOW);
#define BEEP_OFF() digitalWrite(alarmPin, HIGH);

void Buzzer::init(void){
    // set up square wave PWM for buzzer
    fastPinMode(alarmPin,OUTPUT);


}

void Buzzer::setActive(bool active)
{
    if (active!=this->isActive()) {
        ValueActuator::setActive(active);
        if (active) {
            BEEP_ON();
        }
        else {
            BEEP_OFF();
        }
    }
}

void Buzzer::beep(uint8_t numBeeps, uint16_t duration){
    for(uint8_t beepCount = 0; beepCount<numBeeps; beepCount++){
        BEEP_ON();
        wait.millis(duration);
        BEEP_OFF();
        if(beepCount < numBeeps - 1){
            wait.millis(duration); // not the last beep
        }
    }
}

Buzzer buzzer;

#endif
and
in config.h I've made the following changes
C++:
#ifndef BREWPI_BUZZER
#define  BREWPI_BUZZER 1
#endif
//

#define heatingPin NODEMCU_PIN_D0
#define coolingPin NODEMCU_PIN_D5

#define oneWirePin NODEMCU_PIN_D6  // If oneWirePin is specified, beerSensorPin and fridgeSensorPin are ignored
#define doorPin    NODEMCU_PIN_D7
#define alarmPin   NODEMCU_PIN_D3
 
Back
Top