My Ugly Junk- Corona Mill Station...

Homebrew Talk - Beer, Wine, Mead, & Cider Brewing Discussion Forum

Help Support Homebrew Talk - Beer, Wine, Mead, & Cider Brewing Discussion Forum:

This site may earn a commission from merchant affiliate links, including eBay, Amazon, and others.
Seeing everyone else's Corona mills has inspired me to post mine. Granted my set up is not sophisticated, but here it goes. Just another bucket in a bucket set-up.

grain%20mill%201_zpsbncqzmmd.jpg
[/URL][/IMG]

grain%20mill%202_zpsaalh4l3a.jpg
[/URL][/IMG]
 
Nice....I think I like the eye bolt used to drive the mill concept. How does it seem to work? I have managed to break a couple of straight bolts I used to drive the mill from carelessly propping the drill to drive the mill unattended. :(
 
So I did the crushing directly into the bag, not a bad way to go at all. I'm going to keep doing it actually. I was having a lot of gravity problems when I first started BIAB, (around 50%), but found out I had a bad thermometer, crushed a little bit finer, and hit my target at 72%.

Just make sure you stir well to avoid doughballs.
 
Nice....I think I like the eye bolt used to drive the mill concept. How does it seem to work? I have managed to break a couple of straight bolts I used to drive the mill from carelessly propping the drill to drive the mill unattended. :(

It seems to work pretty well actually. I put a hook shaped bolt in my drill and the hook end goes into the eyelet.
 
Last edited:
Nice....I think I like the eye bolt used to drive the mill concept. How does it seem to work? I have managed to break a couple of straight bolts I used to drive the mill from carelessly propping the drill to drive the mill unattended. :(

I use an eye bolt in the mill, and an eye screw in the drill. The eye screw I nipped a portion off with the dremel to make it a "hook", but it has a much smaller gap than a hook typically has. All together, it works great, and provides the play needed due to the mill being drilled slightly off center.
 
There's vibration, but it's largely because my mill is drilled off center. if your mill's hole is centered on the auger, you'll have less vibration.
 
The "hook" I'm driving my eye bolt with, is from a car jack. I should get an actual bolt and a 3/8 drive for my drill but it's just one of those "had this laying around the house" things. You can actually use the wing nut from the handle that comes with it for an eye too, that's what I originally done, but that eye bolt I found is a higher grade. It vibrates like........some other things I know of, BUT my problem is as the other poster, off center.

Next time I have some free time and I"m in town, going to pick up that metric bolt and just use my air impact to drive it!
 
Ok guys, I finally got my ugly junk together and have it setup, I promise pics are to come. In the mean time would you take a look at my crush and let me know what you think? do I need to go tighter? I recirculate during my mash so I don't want to go too tight, but then again I don't want my ugly junk too loose either.

IMG_2807.jpg


IMG_2808.jpg


IMG_2809.jpg
 
I crush more than that, but I either batch sparge with a braid, or BIAB. Not all fancy pants recirculating like you :) j/k

Are there many whole grains when you examine very closely? That is where the answer lies....

No means your good, yes means crush more. It is difficult to evaluate from a pic IMO.
 
Thanks Wilserbrewer, I may tighten it down a bit more and have some rice hulls on hand in case the mash gets too thick. As promised a photo of my mill.

Ugly Junk.jpg
 
I'm getting ready for the maiden voyage of my corona mill. I don't have the grain yet so I can't do a test crush. I currently have it set so that I get a little rubbing of the plates but not continuously through the rotation. I am currently doing BIAB, so I can tolerate a finer crush.

Also, the two plates stick up above the top of the bucket. It has a little cowel. Is this problematic?

I have to post the pictures in three posts because that's how my phone gets down.

image.jpg
 
Looks good Beernik,
Your plate spacing looks reasonable, but the proof is in the crush. Grind a handful at a time and tweak as required. The mill sticking above the top of bucket will be fine, maybe a little stray dust but no big deal.

The grain may force the plates further apart while actually milling, so what looks and feels tight now may change during use, pretty much trial and error with a few handfuls of grain, if under crushed just add it back in the with the grain and crush again.

Your adjustment hardware doesn't look like the typical Chinese ugly junk, where did you find that mill?

Your hopper looks tall, or maybe it's just the photo...just be careful and don't dump it :)
 
Thanks.

It's a Victoria mill my wife bought for me off Amazon.

The extended hopper is a 4' long piece of ductwork. It fits tightly inside the 5" deep hopper that came with the mill. It seems to be stable enough as it is, but I haven't filled it yet. Hopefully the 5 gallon bucket is a wide enough base to keep the whole thing from tipping when full. I may duct tape it onto the hopper. To make more stable in there too. Or, probably more sanitary, bolt them together like I did to keep the duct from unraveling.

What I don't like about it is is the spinning plate is a little wonky. That's why it's only adjusted with a washer on one side and not the other. That was the closest I could get it to being square to the static plate.
 
Last edited by a moderator:
I just brewed my first batch with my new corona mill setup. I got 71% efficiency, which is great compared to what I got before at my LHBS on their motorized mill where I even double milled, and only got around ~63%.
But I did get a stuck sparge! I batch sparge and thought that this was more of a fly sparging problem. I was able to stir up the MT, vorlauf really slowly, and start runoff again, and it did not get stuck again after that.
My crush looked perfect, not flour, but no intact kernels either. I did notice that the corona seems to shred the husks more than a normal mill... I guess I'll be picking up some rice hulls...
 
I may duct tape it onto the hopper. To make more stable in there too. Or, probably more sanitary.....

What I don't like about it is is the spinning plate is a little wonky.


Don't worry about your mill being sanitary, grain is far from sanitary. It came out of a farm field and likely has some bird poop and insect feces in it. :). That's why we boil the beer.

Don't worry about the plate alignment so much either, the grain will force the plates to run more true as it is being augured through the mill. The plates sort of float and will find a happy alignment if you let them, and they are tightened down as they should be....don't overthink it, grind some grain cheers!
 
I second wilserbrewer's sentiments entirely. I have a Victoria mill as well (Mexico made, I believe) that I've been using for 3 years and couldn't be happier. As wilserbrewer said, grind a a bit at a time and check it until you're happy with the crush. Grain going between the plates will fix any wobble/inconsistency in my experience, though mills can differ of course. Don't worry about a bit of flour as long as most of what you're getting is crushed grain instead of flour.
 
Thanks @wilserbrewer and @lowtones84.

By sanitary, I meant visually cleaner. I was thinking about flour stuck to pealing tape.

I think I've finally settled on a recipe to try the mill on this coming weekend. I'll probably pick everything up Thursday night and do some test runs.
 
Bought my grains today.

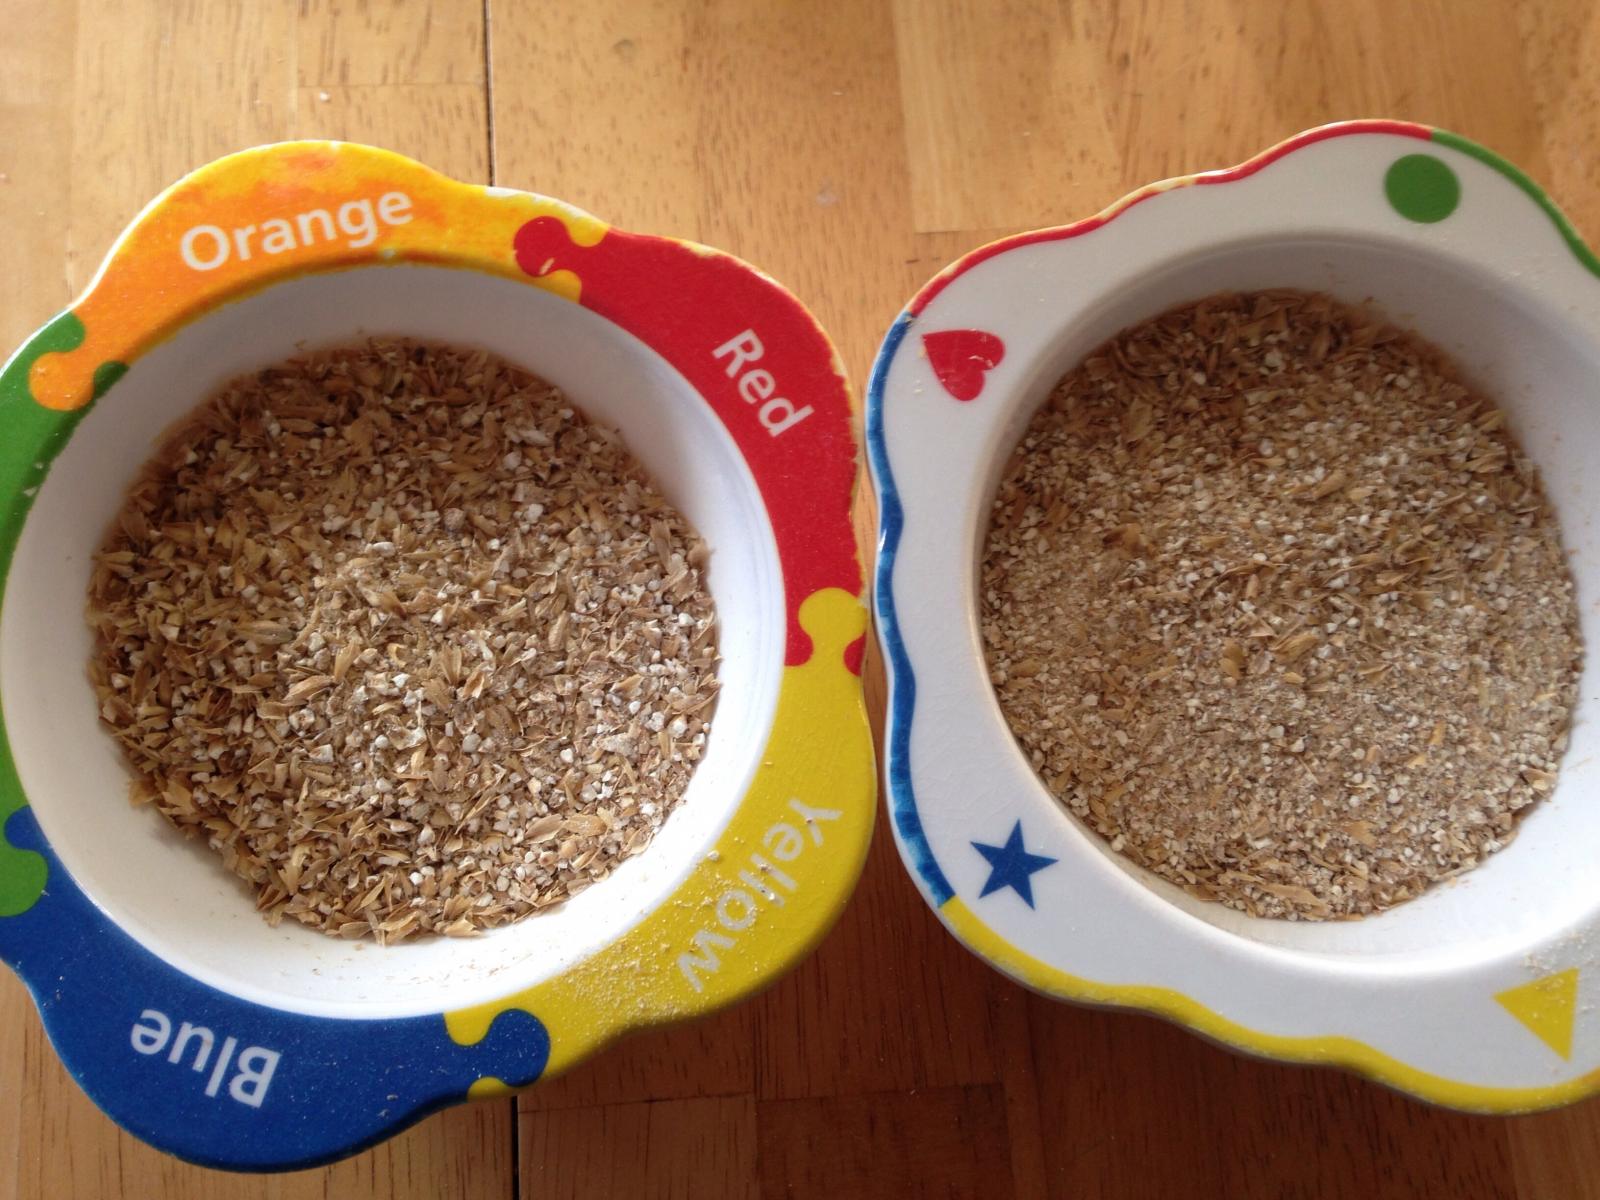
My first try with the mill and I was getting a lot of millet or couscous sized particles, no husks.

This is a pic of my second attempt. It's definitely less husk than when I had it milled at the LHBS. Should I loosen it up more for BIAB?

image.jpg
 
Bought my grains today.

My first try with the mill and I was getting a lot of millet or couscous sized particles, no husks.

This is a pic of my second attempt. It's definitely less husk than when I had it milled at the LHBS. Should I loosen it up more for BIAB?


I mill mine to 0 whole grains, regardless of shredded husk or flour content. You aren't going to get the perfect little malt nuggets like a roller mill.
 
That looks like a pretty good crush to me. You could probably even do a touch tighter, but I bet you'll do fine with that.
 
Had some extra time this morning.

Left bowl is what I posted last night.

Right bowl is tightening the plate screw a half turn.

image.jpg
 
Awesome!

I was nailing 66% efficiency with the LBHS mill. It's been a long source of frustration. I'm also thinking of moving to a pour over sparge with this beer.

The beer I'm doing this weekend, I gave myself some wiggle room. It's 5.1% & 26 IBUs at 66% efficiency. It's 6.2% & 24 IBUs at 80% efficiency.

Follow up question: would the left bowl work for a HERMS with a false bottom or would I need to loosen it more than that? I'm asking because that's my long term goal.
 
Well my pre-boil Gravity was only 2 points higher than expected with 66% efficiency. However, I think I collected about an extra gallon with my pour over sparge and squeezing the crap out of it.

So I've extended my boil by 15 minutes. I guess the proof will be in what gravity and volume come out of the boil.

EDIT:

I was right. I ended up with 9.5 gallons of beer at 1.053 instead of 8 gallons at 1.055 like I was planning.

So I think my actual efficiency was somewhere around 80%.

Because BrewPal won't let me edit the grain adsorption default, I've had to change my settings to an efficiency to 72% and a boil off rate of 9% in order for it to match my volumes and OGs for this brew.

Weird. But it works.
 
I think most choose to batxh sparge for simplicity and overall pretty good effectiveness. I would suggest getting your feet wet batch sparging, then try fly if you want...
Jmo
 
imho, fly sparging is easier than batch sparging. After the first vorlaugh(sp) just slow down the flow and match it with the hlt's incoming water. Check in on it after 20 min. , adjusting as needed. The kitchen colander rocks for dispersing water
 
I brewed my second batch with this mill yesterday. Both of these batches I have had a very minor stuck sparge. Nothing I couldn't fix by stirring up the mash, vorlaufing, and running again, but still a nuisance...
My efficiency has gone up about 2-3% compared to running grain through the LHBS twice
 
I brewed my second batch with this mill yesterday. Both of these batches I have had a very minor stuck sparge. Nothing I couldn't fix by stirring up the mash, vorlaufing, and running again, but still a nuisance...
My efficiency has gone up about 2-3% compared to running grain through the LHBS twice

I was having some stuck sparges for a few batches. Then I backed off the crush just a bit and my most recent batch was much better without losing any efficiency. Another thing that has helped is not opening the valve on the mash tun too quickly. I just ease it open and let it run for a few minutes before opening it further to speed up the flow.
 
This long thread inspired me. I recently moved to a town where there isn't a homebrew supply store or within a reasonable driving distance. Since I am going to have to buy all of my supplies online, I decided that I need to start buying in bulk, and also crush my own grain (which I used to do at my local homebrew store).

I'm cheap, so I didn't want to drop $200 on a rolling mill. Once I saw this thread, I realized I could spend a lot less on a Corona mill, and spend the savings on other equipment. Here's my setup:

2015-09-12 17.45.11.jpg

2015-09-12 17.47.23.jpg

The stand is a Black & Decker Workmate 225 that I bought from Menards for ~$60. The funnel/pipe that lead to the bucket below is a [brand new] sewer pipe 6" to 4" reducer and a 4" pipe. I used some clear PVC primer and cement to bond those pieces together. The Workmate boards are holding the pipe in place. The Corona mill fits just over top of the funnel. I expanded the hopper by using a 6" to 5" ductwork reducer that I taped on top of the original hopper. It holds approximately 5 lbs of malt. Eventually I will get the mill set up to be driven by my drill, but for my first time using it yesterday I did it the old fashioned way. It took less than 10 minutes. I did add one washer on each side to widen the gap on the mill. I was happy with the crush. It was very consistent.

The batched that I brewed yesterday using this new mill was a wheat that I brewed with the BIAB method. I got 75% brewery efficiency, which I'm happy with.

All together my milling setup cost approximately $100. In addition, I got a new workbench out of it that I can use for projects other than homebrewing.
 
Thanks for all the great ideas, I just slapped mine together using an old brewing bucket and some 2x6, and a gallon apple juice container for the hopper.
:mug:

mill (2).jpg

mill (1).jpg

mill (3).jpg

mill (4).jpg
 
Thanks for all the great ideas, I just slapped mine together using an old brewing bucket and some 2x6, and a gallon apple juice container for the hopper.
:mug:

mill (2).jpg

I used the exact same juice jug to extend the size of my hopper. I used Gorilla glue to glue it to the metal and its holding great even though the glue advises against use for polypropylene.
 
Decided to pull the trigger and join the "elite" haha. Corona mill ordered. After all, it costs the same amt as getting my car washed once!
 
Back
Top