• Please visit and share your knowledge at our sister communities:
  • If you have not, please join our official Homebrewing Facebook Group!

    Homebrewing Facebook Group

My Stirplate... Cheap and Easy Build...

Homebrew Talk

Help Support Homebrew Talk:

This site may earn a commission from merchant affiliate links, including eBay, Amazon, and others.
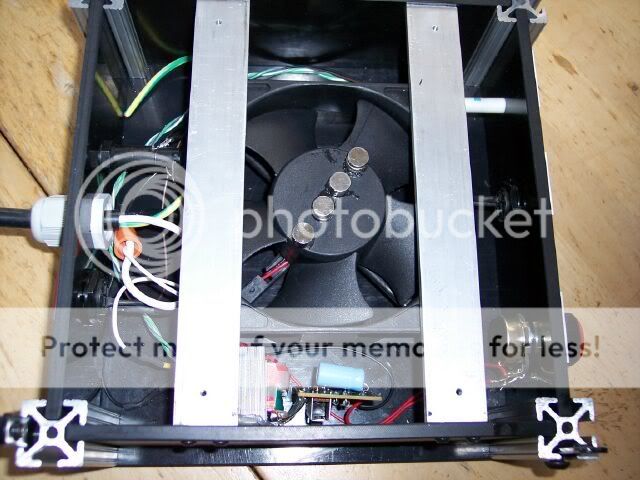
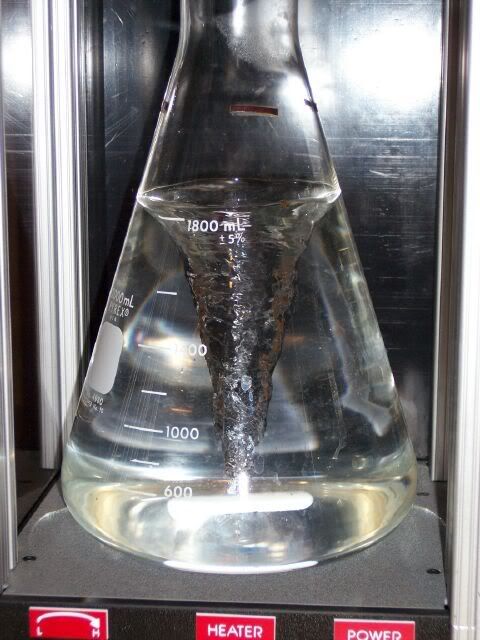
Thats for the kind words! As of now, I have replaced my hard drive magnets with ones from K&J Magnetics. They are MUCH stronger and much smaller. I have tested this setup with a 12VDC wall wort and as of last weekend did a .75 gallon starter on it using a 1 gallon glass jug from whole foods apple juice. Worked great!

which magnets di you end up using from K&J Magnetics?
 
I've read the whole thread, and plan on building one. I need to get a flask still. Should I get the 1000 or 2000 ml??? Does the stir plate increase the yeast enough to use the 1000 ml?

Thanks.

-Aaron
 
I've read the whole thread, and plan on building one. I need to get a flask still. Should I get the 1000 or 2000 ml??? Does the stir plate increase the yeast enough to use the 1000 ml?

Thanks.

-Aaron

For most normal ales a 1L(1000ml) starter is sufficient. If you plan on doing bigger ales or lagers you might want to look for a larger vessel for starters up to 5L.

That said, you don't have to use a Erlenmeyer flask. Any container with a relatively flat bottom should work. Another member posted pics of a stirplate with a glass apple juice bottle and I've been looking at the 4L wine jugs for bigger starters if I need to.
 
I just built my own stir plate--haven't used it yet, but plan to do so next week. To answer the question above regarding flask sizes, etc.: I'm planning to use a cheap vase that has a flat bottom as the vessel for my starter. It's glass, easily washable/sanitizeable (is that a word?), and best of all, very inexpensive (I probably got it at Wal-Mart a few years back for under $3). I'm planning to put some sanitized aluminum foil over the mouth of the vase to try to keep the nasties out, but loose enought to allow at least a little bit of gas exchange; either that or some saran wrap and a rubber band...
 
Remember for a 1L starter, you need a vessel larger than 1L. I use a 2L flask for my starters, and a 1L flask for culturing.
 
I mocked up my stirplate and something just ain't right. I'm using a 12V power supply with a surplus .2 amp fan. I epoxied a big washer to the hub and am using 2 rare earth magnets, a 2" stirbar, and a 2L flask. So my problem is that it's very difficult to get the stirbar to "catch" and it usually gets thrown. When I can get it to catch the vortex only goes about halfway down the liquid level and certainly isn't the maelstrom of bubbles everyone else seems to have. What's the likely culprit? Magnets? Positioning? Spacing? I have a suspicion that my fan is spinning too fast and isn't torquey enough but would like to hear everyone's thoughts...
 
Another question for you....My power supply doesn't have color coded lines, just 2 braids of copper. Which is which? I seem to remember something about the printing on the outside, but I don't remember. Thanks
 
I mocked up my stirplate and something just ain't right. I'm using a 12V power supply with a surplus .2 amp fan. I epoxied a big washer to the hub and am using 2 rare earth magnets, a 2" stirbar, and a 2L flask. So my problem is that it's very difficult to get the stirbar to "catch" and it usually gets thrown. When I can get it to catch the vortex only goes about halfway down the liquid level and certainly isn't the maelstrom of bubbles everyone else seems to have. What's the likely culprit? Magnets? Positioning? Spacing? I have a suspicion that my fan is spinning too fast and isn't torquey enough but would like to hear everyone's thoughts...

If your bar is getting thrown, then its either too fast a fan speed or not enough of a magnetic attraction. I would try getting the bar centered perfectly in your flask while its on the plate, and then mark the outside circumference of the flask's bottom on some masking tape. This will help you center your flask.

The next issue of magnetic attraction is more a matter of trial and error. Extra magnets are quite helpful. I can tell you from first hand experience, I have had much more issues using a 2" bar than a 1" bar. My flask needs to be perfect to get the 2" working. The 1" centers easily and will catch and spin almost 100% of the time. Try a single magnet in the center, or two magnets stacked in the center... then try moving magnets out opposite each other. Its just a matter of tweaking it til it works with your equipment.
 
Another question for you....My power supply doesn't have color coded lines, just 2 braids of copper. Which is which? I seem to remember something about the printing on the outside, but I don't remember. Thanks

There has to be some sort of insulation, or the power supply would short out with just bare copper. I'd bet that the insulated wires are inside the copper braids.
 
I guess I didn't explain that very well. The cord looks like you cut an extension cord off at the end. There is no black or red line. Just 2 copper strands inside the insulation.
 
I mocked up my stirplate and something just ain't right. I'm using a 12V power supply with a surplus .2 amp fan. I epoxied a big washer to the hub and am using 2 rare earth magnets, a 2" stirbar, and a 2L flask. So my problem is that it's very difficult to get the stirbar to "catch" and it usually gets thrown. When I can get it to catch the vortex only goes about halfway down the liquid level and certainly isn't the maelstrom of bubbles everyone else seems to have. What's the likely culprit? Magnets? Positioning? Spacing? I have a suspicion that my fan is spinning too fast and isn't torquey enough but would like to hear everyone's thoughts...

I chose to go against the popular dogma and use a 110 V AC muffin fan with an ordinary light dimmer for speed control. I had much the same experience as you describe trying to get a 12 V DC fan to work.

I use a 2 liter flask with a 2 inch (50mm) stir bar and typically fill the flask well above the 2000 ml mark to about 2300 ml. Foam control is a must when boiling wort with the flask filled to that level, but I do it all the time without problems.

I used two off the shelf very strong rare earth magnets to achieve the magnetic coupling strength needed. I got tired of trying to balance the salvaged hard drive magnets and the hassle of removing them from the drives. The store bought magnets are inexpensive and well worth the cost.

3213621211_f19ac62649.jpg


3214468874_7f5b31f7bf.jpg


3214468632_fcfa557578.jpg


3214470406_32d1bdd118.jpg


3213623577_07e810ee26.jpg
 
I guess I didn't explain that very well. The cord looks like you cut an extension cord off at the end. There is no black or red line. Just 2 copper strands inside the insulation.

Take a close look at the outer insulation. There may be one with ribbs and that would be the positive side. The other possibility is that one of the wires is a gold (copper) color and the other silver. The gold one is the positive wire in most cases.

You could also just hook it up and see if it works. If it doesn't work then switch the wires.
 
Another question for you....My power supply doesn't have color coded lines, just 2 braids of copper. Which is which? I seem to remember something about the printing on the outside, but I don't remember. Thanks
Here is what you can do, I am assuming it is a 12VDC fan.
Connect the two wires of your 12VDC fan to your power supply.
The fan can only do two things, spin or no motion.
DC fans come only in two versions, with or without polarity protection.
If the fan doesn't spin reverse the wires, the fan has to move.
The non polarity protected fan will rotate as soon you connect the 12 VDC.
Since you are not using the fan to move air, the direction of fan rotation is not important.
If the direction of rotation is important, look at the fan marking for rotation direction.

Cheers,
ClaudiusB
 
I built my stir plate this weekend and it was a success. However, I did get frustrated with the wiring because previously posted wiring instructions did not work for me, so I drew a wiring diagram for others who may find it useful. The colors of the wires all match up correctly. You only need to provide a spare wire that is depicted in green, or cut the yellow ground wire from your fan and use that.

wiring3.jpg


I hope someone finds this diagram useful and it wasn't a bunch of wasted time.
 
Well done.

Just some info:
The yellow wire is not a fan ground, it's the RPM signal out.


Cheers,
ClaudiusB
 
Just out of curiosity, how did you get the magnets out of the HDD? I took one apart earlier this week, and it appears that the magnets are epoxied to a metal plate. I am assuming that the magnets you are talking about are the ones that support the arm in the drive?

Edit: Figured it out on my sacrificial drive....there was a layer of adhesive, but it was not epoxy like it appeared. Was able to crack it with a longer screw in the mounting hole that was below the magnet.

I use a single edge safety razor blade with a little brass hammer, run the razor edge parallel between the metal stamping and the magnets joint. The adhesive material breaks away as the blade drives down between the two.
I've found a few thin magnets of app .060" thick with the most being .142" thick. I have six pull out tower units that hold ten hard drives per pull out hence 100 computer magnets .142" thick and a few thin ones. They are plated but at the adhesive side some of the plating comes off the magnet which is rather thin. Blood blisters are common unless you wear gloves these magnets are strong. I now have a stack of chrome discs with their aluminum spacers. It takes 3 minutes each HD to murder and remove the magnets.

DO NOT PLACE ONE OF THESE MAGNETS ON ANY COMPUTER TUBE TYPE MONITOR. My son did this with a small magnet when he was 5 or 6 years old this made a permanent dark ghost mark on the screen of a old spare monitor I had in storage.
 
Well done.

Just some info:
The yellow wire is not a fan ground, it's the RPM signal out.
Cheers,
ClaudiusB

My 12 voly .72 amp 4" fans have a black and red for the motor with two white wires to thermistor or some type of temp probe in the air stream of the computer fan. Polarity protected. I believe these fan motors have a internal thermal protection as the fan will stop pulling after 3 seconds of applied power while locked rotor.
These 720 mA 12 volt fans must be rather close in torque as your 400 mA 24 volt fan motor you have Cladius. I salvaged six of them on my rat pack adventure.
A pot used as a rheostat for stir plate speed control on these higher amp fans are great for getting hot and letting the smoke out of the pots, after this happens they seem to quit working. At 13.62 volts and 720 mA I get 9.8 watts withreadings of 1262 mA on the start up amperage surge of 17 watts. A loud cry from those 3 watt pots.
A LM317 voltage regulator should handle these fans plus the best adjustable speed control.
CJ..........
 
My solution to all the different problems I have encountered, flasks shapes, sizes, etc.

The four magnets have a pull force of 5 lb each.
MagnetsBothSets.jpg


2" stirbar in action.

StirBarLargeInAction.jpg


Cheers,
ClaudiusB

ClaudiusB;
what is the thickness of those round magnets you glued to your fan motor? The above reply you stated they are 1/2" diameter. This is a start.

I'll have over 100 hard drive .140" thick magnets when i'm done murdering these hard drives but still would rather have a row of round magnets to drive the 1" and 2" stir bars. I will use the 2" stir bar for most of my starters as i'll be pitching yeast for stouts with a volume of 17 plus gallons of wort into the fermenter. This sounds like a large flask will be needed on my next parts order besides 1/2" round magnets. I like the vortex result with a 2,000 ml flask in your posted picture. That is some stirring action. How much slower or less of a vortex will it produce with the thicker starter yeast viscosity?

This is why the the use of the 12 volt 720 mA computer fan motors I have vs the lower mA fans I have run across, these higher mA motors have a lot more torque that should work well for this stir plate project. Fans, power cubes, resistors and caps are already in my boxes of of materials from past projects this should make for a cheap no brainer project to build. A LM317 with some of my spare parts collection should be my next build item. Then work on another replacement grain mill, sold my old one after making new replacement bushings.
 
Posted by BrewBeemer
A LM317 voltage regulator should handle these fans plus the best adjustable speed control.
Good choice.

what is the thickness of those round magnets you glued to your fan motor?
3/8" DIA x 5/16"

The above reply you stated they are 1/2" diameter.
Are you sure?
Put the beer down:mug:.
The stir plate as pictured uses 3/8" magnets.

Cheers,
ClaudiusB
 
hey guys i built this just the way it says to. i can get the led on the switch to come on but i can't get the fan to come on. my fan has 2 black wires. and my power supply is an old plug or a small drill charger. anybody know why it won't come on?
 
hey guys i built this just the way it says to. i can get the led on the switch to come on but i can't get the fan to come on. my fan has 2 black wires. and my power supply is an old plug or a small drill charger. anybody know why it won't come on?

Reverse the wires.
 
I mocked up my stirplate and something just ain't right. I'm using a 12V power supply with a surplus .2 amp fan. I epoxied a big washer to the hub and am using 2 rare earth magnets, a 2" stirbar, and a 2L flask. So my problem is that it's very difficult to get the stirbar to "catch" and it usually gets thrown. When I can get it to catch the vortex only goes about halfway down the liquid level and certainly isn't the maelstrom of bubbles everyone else seems to have. What's the likely culprit? Magnets? Positioning? Spacing? I have a suspicion that my fan is spinning too fast and isn't torquey enough but would like to hear everyone's thoughts...

I just finished building mine, and I have a similar issue. If I just toss the bar in, let it attract to the center of the flask and turn the fan on, it typically gets thrown. I can usually tell when the bar is about to be thrown, so what I'll do is let it get almost to that point and then toggle the fan off and back on for just a brief second. I can then ramp up to full speed without the bar being thrown. When I turn the fan off, my bar actually gets thrown as the fan is slowing down. Maybe I don't have it balanced quite right but it settles out at higher speeds (kind of like tire vibration in your car)?

I don't have the huge swirling vortex of doom in my flask either, but if I position the flask so that the bar is spinning about 1" from the center of the flask i get drastically better results, with constant bubbling.

All that being said, I'm happy with it. The only thing I paid for was the flask and the stir bar...so my build came to about $14 total.
 
Posted by BrewBeemer

Good choice.


3/8" DIA x 5/16"


Are you sure?
Put the beer down:mug:.
The stir plate as pictured uses 3/8" magnets.

Cheers,
ClaudiusB

Thanks ClaudiusB, while I go away walking the road of shame on my wrong reply question stating 1/2" diameter. Me Bad. Thanks for correcting me. I believe the .72 amp 12 volt fans I have should have around near the same torque as your 24 volt 400mA fan your using, I coume up with 8.64 watt vs your 9.6 watts. That has me at 90% in wattage so plenty strong in torque. Zero progress at this time with anything due to conditions I have no control. Appointments are set for the back repairs to be will done ASAP.
A little off topic, I have a long outfield older Walker Turner 6" jointer in like new condition for $65. The motor was 3 phase but I had many spare single phase 1 hp replacements. I had to mention this as your into wood working. Also on Craigslist from a mega buck picture frame studio within 6 miles from me was a free floor model Square Frame Mitre picture frame saw complete with all options, arms w/stops to 48". Complete plus runs like a new machine. Lists at $2,544. They ordered 3 new ones for a tax write off then gave away this older one even with a first time freshly touched up special carbide blade. I have gone thru a lot of wood with it making frames for the fun of using it for friends. I can make odd paterns, limitless items with it just the supply of wood becomes short.
Nore to add later by Email. Carl...........
 
Back
Top