• Please visit and share your knowledge at our sister communities:
  • If you have not, please join our official Homebrewing Facebook Group!

    Homebrewing Facebook Group

My Stirplate... Cheap and Easy Build...

Homebrew Talk

Help Support Homebrew Talk:

This site may earn a commission from merchant affiliate links, including eBay, Amazon, and others.
I'm building one of these and something I discovered is that many of those old transformers (cell phone plugs or whatever your using) are not the voltage they claim they output. I've found them above and below ratings. The first one I tried claimed 10V but my multimeter said 15.4. I'm afraid I'll burn a fan with that.

They all rate higher when they don't have a load on them. The 12 volt one I'm using reads about 19.5; the 9 volt 15 and change, etc etc. They're designed to pump at the rated voltage under load.
 
Is it possible to glue the HD magnets together if the break? haha.

I gave up trying on that endeavor. I also found that the HD magnets, while free, were more of a pain to deal with - trying to get them to not interfere with the fan rotation, getting them centerd/ballanced properly, etc.

I found some magnets in either the 'crafts' or 'hobbies' section of Hobby Lobby. They have several sizes that are rated a 10 (on a 1-10 scale) for strength...and they are 3.99 per pack. The large ones you get one or two magnets per pack, and the small ones you get more. I bought the medium size magnets, around 1/4" diameter, and they came six to a pack. I used four magnets for my stirplate, and they just stuck on their own to the 3 metal washer I glued to the fan.

I can try to get pics for anyone, if it is needed. But I think you'll just have to futz with your fan, magnets, and washer combinations until you getting it working. After all, that's part of the fun opf DIY, isn't it?

Hope that helps and Maerry Christmas,
 
Look on ebay for rare earth magnets. There is a kajillion to choose from and they are all relatively cheap, you can get like 20 of them for 5 or 6 bucks.

Also, I found some computer cooling fan speed controllers on there for the same price. You just plug the fan into the controller and the controller into the power source. The same as here but less cutting and splicing I assume. I found some cooling fans also for just a few dollars. I think you could spend about 20 bucks or so and have a pretty professional looking result.
 
not sure I understand the need for the vortex to run to the bottom of the flask. All you need to do is keep the wort moving in the flask, right? I have (3) 2L erlemyer flasks to make starters in (all I use is light DME and water) -I've been just making the starters, and agitating the hell out of the mini-wort, and pitching yeast in it, putting the airlock on and letting it sit (every day, once a day, I'd shake the flask a good couple of throws or so, and after 3 days, would draw off most of the water from the yeast cake in the flask, then shake it vigorously to get it in suspension (with what little fluid I had left in the flask) and pitch it into my newly made wort in the fermenter, and I've had good success with it. But saw this thread on DIY stir plates and figured I could get even better results with my yeast starter.
I'll definately have to try making these for my flasks.
 
not sure I understand the need for the vortex to run to the bottom of the flask. All you need to do is keep the wort moving in the flask, right?

The main purpose of a stir plate is not so much to stir the wort, as getting the mix supersaturated with O2. In this sense, having the vortex run to the bottom is ideal, as when it hits the bottom it sends an explosion of bubbles through the wort.

I have (3) 2L erlemyer flasks to make starters in (all I use is light DME and water) -I've been just making the starters, and agitating the hell out of the mini-wort, and pitching yeast in it, putting the airlock on and letting it sit (every day, once a day, I'd shake the flask a good couple of throws or so, and after 3 days, would draw off most of the water from the yeast cake in the flask, then shake it vigorously to get it in suspension (with what little fluid I had left in the flask) and pitch it into my newly made wort in the fermenter, and I've had good success with it. But saw this thread on DIY stir plates and figured I could get even better results with my yeast starter.
I'll definately have to try making these for my flasks.

Although what you're doing will probably result in the bare minimum cell counts required, your best bet is to mock up a stir plate and use a 1 liter starter. You'll get at least double the cell counts as with your shaken 2-liters. This is because yeast uses O2 in its reproductive phase. Thus, your cell counts are more or less limited by how much oxygen you have in there at any given time.

Just stir plate it for about two days, then pitch the whole 1-liter solution. A lot of the higher attenuating, more vigorous yeast remain in solution, and (IMHO) when you decant you lose these guys.
 
I gave up trying on that endeavor. I also found that the HD magnets, while free, were more of a pain to deal with - trying to get them to not interfere with the fan rotation, getting them centerd/ballanced properly, etc.

I found some magnets in either the 'crafts' or 'hobbies' section of Hobby Lobby. They have several sizes that are rated a 10 (on a 1-10 scale) for strength...and they are 3.99 per pack. The large ones you get one or two magnets per pack, and the small ones you get more. I bought the medium size magnets, around 1/4" diameter, and they came six to a pack. I used four magnets for my stirplate, and they just stuck on their own to the 3 metal washer I glued to the fan.

I can try to get pics for anyone, if it is needed. But I think you'll just have to futz with your fan, magnets, and washer combinations until you getting it working. After all, that's part of the fun opf DIY, isn't it?

Hope that helps and Maerry Christmas,

I can see why. I had the two magnets on the garage floor when i seperated them from the hd mounting tabs, and they decided to go see each other. Broke them both.

I managed to glue them together, using both magnets. Got them mounted on the fan pretty centered. Need to get an enclosure and mount it all up. Wife ordered me the yeast starter kit from NB, just waiting for that stuff to arrive so I can try it out!
 
Pelikan. - Thanks for the info.
So just to get it straight, you recommend a couple of days on the stir plate, with a vortex that (preferably) hits the bottom (stir-bar, anyway) and this is WITH the yeast in the wort (so I'm making these little buggers dizzy, but happy -kind of like when I hit the tap a little too much after a long week of work -a little lightheaded, but plenty happy).
Ok, well, looks like I have a nice DIY project to add to the list (next weekend, anyway). Fortunately I have a few dead 'drives that have been doing 'paper-holder' duty, and if I dig around in the closet I know I have a couple of old computer power supplies (for fans, though one of 'em may still be functional and therefore able to provide voltage for all three stirrers.... ).
Guess I'll hit NB later and order up stir bars of various sizes to figure out which works best with my rigs, and order the proper bar.
I love a project that isn't beyond my capabilities, and this one will be entirely beneficial (and probably drive the dogs a little nuts, which is usually pretty fun too -doesn't hurt to have a slightly warped sense of humor, and mine is about as warped as it gets).
Keep the yeast happy, and that makes for better beer -which is ALWAYS a laudable goal.
 
Pelikan. - Thanks for the info.
So just to get it straight, you recommend a couple of days on the stir plate, with a vortex that (preferably) hits the bottom (stir-bar, anyway) and this is WITH the yeast in the wort (so I'm making these little buggers dizzy, but happy -kind of like when I hit the tap a little too much after a long week of work -a little lightheaded, but plenty happy).

Exactly :rockin:

40 hours is the ideal plate time, but anywhere between 36 and 48 should be fine in practice.

Ok, well, looks like I have a nice DIY project to add to the list (next weekend, anyway). Fortunately I have a few dead 'drives that have been doing 'paper-holder' duty, and if I dig around in the closet I know I have a couple of old computer power supplies (for fans, though one of 'em may still be functional and therefore able to provide voltage for all three stirrers.... ).

I don't know that I've ever seen a plate powered by comp power supply, but it will most definitely work (and will be especially convenient if you're powering more than one, as you intimate). Just make sure you're able to install that 25ohm Radio Shack rheostat between the power supply and the individual plates, so that you can adjust the power as needed.

I used a 12 volt "wall wort" transformer for mine. A lot of guys recommended a 6 volt...I bought one and it had nowhere near the juice I needed. So I went around the house and started wiring up the ones I could find. As far as I'm concerned, 9 volts is the minimum for a serious stir plate, 12 volts = ideal. As long as you have the magnetic power to hold the bar in place, you can run as much juice through the fan as you want. For a fan, I'm using one from an Intel CPU cooler. Everyone's talking about insulating the fan magnetically with a washer, etc etc...I just glued the magnets right onto the plastic of the fan hub, and the thing rips. I think it's really a matter of finding the right fan for the job.

Guess I'll hit NB later and order up stir bars of various sizes to figure out which works best with my rigs, and order the proper bar.

Bear in mind that the length of your magnets needs to be equal to or longer when compared to the length of your bars...otherwise, it won't work. Just measure your magnets, and that will tell you what you can use in terms of bar length. If you're going with a 1-liter starter (which is really as big as it needs to be), the 1" bars are just fine. The photo I posted of the 1-liter starter with the vortex to the bottom uses a 1" bar. But that very same plate will throw a 1.5" or 2" bar, because they're too long for the magnets.

I love a project that isn't beyond my capabilities, and this one will be entirely beneficial (and probably drive the dogs a little nuts, which is usually pretty fun too -doesn't hurt to have a slightly warped sense of humor, and mine is about as warped as it gets).
Keep the yeast happy, and that makes for better beer -which is ALWAYS a laudable goal.

For sure. I was a little discouraged early on, because I couldn't get the plate to work the way I wanted it to (not powerful enough). But it seems everyone was recommending magnets/power supplies that didn't provide enough juice. Once I went with two magnets and a full voltage (12v) transformer, the thing did exactly what I wanted it to.

Also, one important tid bit: with a stir plate, you need to have gas exchange. In other words, you can't put a stopper on these. Just a loose fitting cap of tin foil...get a square of foil 6"x6" and crimp it over the top...then pull the corners out a bit so it's snug but not super tight. This will prevent nasties from floating down into your starter, but will also permit copious gas exchange (which is what you want and need with a plate).

And another nugget for your consideration: The distance between the magnets and the flask has a very real and significant impact on the overall performance of the plate...so you may have to fool with the fan's position a bit before it's right. But the more magnetic/electric power you have running through it, the more leeway you have in terms of mounting.
 
great post, and thank you kindly... i have a question about this fan i salvaged form an ancient tower. its got 3 wires coming out of it: red, black and white... if red is the juice and black is the ground, whats the white one for and what should i do with it assuming i can make it work with this setup?
 
The main purpose of a stir plate is not so much to stir the wort, as getting the mix supersaturated with O2. In this sense, having the vortex run to the bottom is ideal, as when it hits the bottom it sends an explosion of bubbles through the wort.

From what I have been reading it's actually the opposite, that at the beginning of fermentation you should already have enough oxygen in the starter, but the yeast quickly falls out of suspension. If you have it continually stirred then the yeast will be kept in suspension and will be better able to multiply.
 
From what I have been reading it's actually the opposite, that at the beginning of fermentation you should already have enough oxygen in the starter, but the yeast quickly falls out of suspension. If you have it continually stirred then the yeast will be kept in suspension and will be better able to multiply.

Check out this article. In essence, yeast need O2 to reproduce and strengthen their cell walls. The more O2 during the first 40ish hours of the culture, the more yeast you'll have -- and they'll also be healthier.

Indeed, you don't really want the yeast fermenting the starter so much as reproducing. Inevitably, the starter will be fermented to one extent or other, but the focus is reproduction and cell counts.

based upon his article I still stand by my original statement. If oxygen was the main limiting factor then injecting through an aeration system 3-6 times a day would do just as much if not more than a stir plate.

He has some really good information in that article, but he is not properly isolating variables to say that the aeration of stir plated wort is why its better and most of the time he is saying aeration/agitation.
 
The rheostat will allow you to fine tune your fan speed. Hopefully that helps your setup

First, this is a really good tutorial. Thank you for taking the time to make that happen.

Second, is the rheostat the only thing you are using for speed control? No other electronics? I am a typical engineer who tends to overthink and complicate everything! :) I don't know why I did not think of a simple rheostat on a dc fan...

Great work!

-Tripod
 
based upon his article I still stand by my original statement. If oxygen was the main limiting factor then injecting through an aeration system 3-6 times a day would do just as much if not more than a stir plate.

He has some really good information in that article, but he is not properly isolating variables to say that the aeration of stir plated wort is why its better and most of the time he is saying aeration/agitation.

The O2 thing is fairly common knowledge. Yeast use up O2 so fast that the injections would not work as well. The plate keeps dissolved oxygen levels constant throughout the reproductive phase, thus creating the ideal environment for max cell counts.

Either way, this is just details. We both agree that the plate is the way to go; the why isn't terribly important.
 
First, this is a really good tutorial. Thank you for taking the time to make that happen.

Second, is the rheostat the only thing you are using for speed control? No other electronics? I am a typical engineer who tends to overthink and complicate everything! :) I don't know why I did not think of a simple rheostat on a dc fan...

Great work!

-Tripod

My Computer Fan StirPlate runs off of a 6V wall adapter, and spins plenty good enough, all the way to vortex action. It worked well for my practice at harvesting some yeast from a Bell's Beer, but I'm going to put it too good use on my next batch, where I will actually USE that yeast from Bells in my own version of Two-Hearted. I don't brew enough to have a comparison between using and not using, but it was simple enough to build from junk parts, so what the heck!
 
First, this is a really good tutorial. Thank you for taking the time to make that happen.

Second, is the rheostat the only thing you are using for speed control? No other electronics? I am a typical engineer who tends to overthink and complicate everything! :) I don't know why I did not think of a simple rheostat on a dc fan...

Great work!

-Tripod

Thank you!

All I have been using are rheostats. If I find that the fan is spinning TOO fast, I'll throw a resistor inline before the rheostat to fine tune the stir plate.
 
Just wanted to say thanks for the writeup. I put one of these together today with a bunch of parts from the nerd bin and things look pretty good so far. Gonna make my first starter on it in a couple of days. :mug:
 
Thanks, Tony, for an excellent instructional. I followed it to the letter up until the magnet part of it. All of my parts were purchased at either Radio Shack or Home Depot. The IT guys at work were able to get me a Dell fan but they broke a number of hard drive magnets before I told them I'd just get some magnets from the hardware store. I've included a picture of them below. I also used #10 bolts by 2 1/2 inches, just like Tony. I think #8 may be a bit flimsy at 2 1/2 inches and in fact, HD did not sell them longer than 2 inches. For my washer, I used a standard 2 inch washer which is fairly thick. It is not stainless. I think it ran 30 odd cents in the bins at Home Depot. It was the only 2 inch washer I could find there. I also used 1 minute epoxy to attach the washer to the fan and the magnets to the washer. In order to create a long enough magnet, I stuck two of the 3/8 by 3/8 by 1 7/8 magnets together end to end. They hold intially on their own to the steel washer but once the speed on the fan ramps up they fly to the side and stick to the bolt heads. After experimenting a bit with the flask and stir bar I figured it would work as is and took a leap of faith and expoxed them down to the washer. Earlier experiments using a single magnet did not work, probably due to length less than my 2" stir bar. Also, the 7/8" wide magnets HD sells are too powerful to spin.

For spacers, I used a combination of 1 inch spacers and 5 washers, as shown in the pics. Total space is 1 1/4", or 1/4" shorter than Tony's, who is using a thinner hard drive magnet.

My power supply is a full 12 volts which recharged one of my first cell phones. My guess is the newer ones don't require 12 volts and I definitely recommend it.

Works like a charm. At about 70-80% power, it can pull the vortex to the bottom in 1400ml of water.

Magnets.JPG


Stirrer_Insides.JPG
 
Glad to hear it worked out for you. Magnets are always going to be a matter of availability and power, which is why I use a steel washer to fine tune the plate before gluing permanently. Thanks for the kudos!
 
The above build in action in 1400 ml of water at about 75% power.

Stirrer_In_Action.JPG

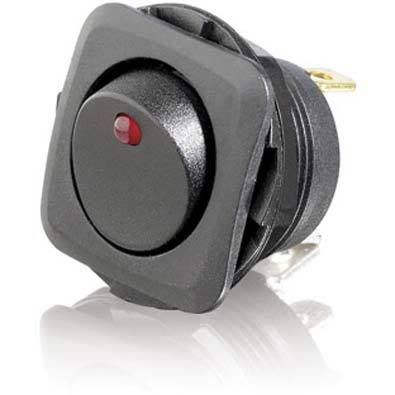
Does that illuminated rocker switch actually illuminate? I have one for my second stir plate (gave the first to my FIL), but I can't get the LED to turn on. It turns the fan on just fine, but the light doesn't work.

Do you, or anyone else, have a diagram on how to properly wire a spst LED rocker switch? Mine has three connections; 1,2, 3+-

Thanks,
 
It should have 3 pins. They are labeled "Source" "Load" and "Earth"

The positive side of your power supply connects to the "Source" pin on the switch. The "Load" Pin goes to the Positive wire on your Fan. The "Earth" Pin should be attached to the ground of the fan and the ground of the power supply. That should illuminate your switch.
 
Does that illuminated rocker switch actually illuminate? I have one for my second stir plate (gave the first to my FIL), but I can't get the LED to turn on. It turns the fan on just fine, but the light doesn't work.

Do you, or anyone else, have a diagram on how to properly wire a spst LED rocker switch? Mine has three connections; 1,2, 3+-

Thanks,

Yes, but I used the exact parts and instructions Tony prescribed so it was a no brainer.
 
pRS1C-4788629_rshalt1_dt.jpg


The switch I have is a different one, its not labeled as you stated Anthony. It has two silver collored pins, 1 and 2; and a gold colored pin 3+- (or something, I don't have it in front of me); you can kind of see this in the picture.

I'll have to check when I get home, but it might be rated for more than 12vdc, which might mean the light will not work on the lower voltage for this project. (side note - I did learn that running a 12v fan on a 14.5v adapter will melt a fan in about 10 minutes :eek: )

I tried a few ways of connecting it, but I was just guessing from other projects/experience. I got a spark on the ground wire from one arrangement and stopped messing around before I ruined something else.

I'll look and see if your labels make sense with my switch, and then try to rewire it. The switch works, but I would like the light to work as well, just the nerd side I guess.

Thanks,
 
That's where I got mine, didn't ever think to look if it was a 12v.....that's why I am thinking its 120v.

Is that gonna make the LED un-usable?
 
I've tried building this with limited success so far...

I'm using the 8x6x3 project box from radio shack, a 12v pc fan that is around 3.25", screws in the project box that are 2" (leaving an inch before the top of the encolsure). I've tried using both a 12v and a 5v adapter. With the 12v, my 1.5" stirbar gets immediately thrown off center in my 200mL flask filled with 650mL of harvested yeast (test run). The 5v power source appears to not turn the magnet. I'm using two hard drive magnets, mounted on a large metal washer. I'm thinking of giving up and just buying some magnets from McMaster (anyone got a part #? - there is a bunch of rare earth magnets).

Anyone got a helpful trick or tip for me? Thanks in advance!!

Edit: Didn't mention that I'm using this basic design with the rheostat.
 
If your immediately throwing your stir bar your magnets probably just need to be repositioned.
 
Back
Top