
- Joined
- Feb 17, 2010
- Messages
- 14,612
- Reaction score
- 3,600
Having a stock of spare parts in the garage I decided to slap this together to control the temp of my second fridge for fermenting. The cost of buying all the parts would run close to the same as buying a Ranco (~$50), but funds were tight and I already had all of these parts. I decided to take a few pics and maybe give others an idea to run with.
Here's the parts and tools needed.
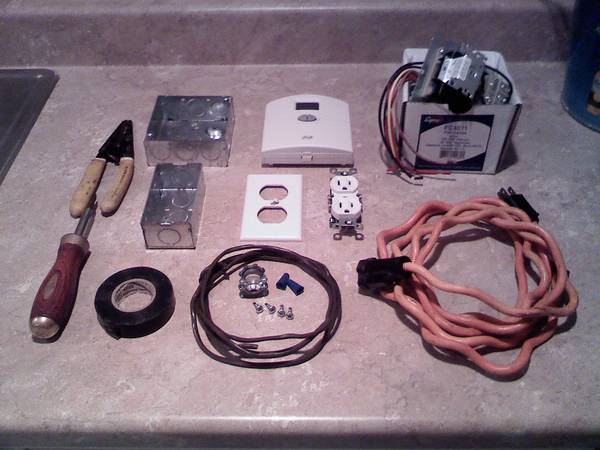
The control used is a fan control center typically used on older furnaces. It contains a 120v/24v transformer and 24v/120v relay. They cost about $20 new, but if you have a friend in the HVAC business you could have them pull one from the next install they do.
The thermostat is just a spare digital one that I had in my spare parts box. This particular one only goes down to 45*F, but for a fermentation temp controller this will be fine.
Other than that, I used an old extension cord, some scrap 18awg wire, a single and double junction box, recepticle & cover, 1/2" wire clamp, 2 wire nuts, 4 self tapping screws, electrical tape, screwdriver, and wire stippers.
Here's a shot of the internal wiring. The wiring is pretty basic. It looks like a lot more than it really is because there are so many unused connections. This is because this particular control center has a DPDT relay, when only a SPST is needed. These can be removed all together very simply for a cleaner look.

And here is the final product. All together it took about 30 minutes to assemble once I had all the parts together. The two spare screws are to mount the thermostat inside the fridge.
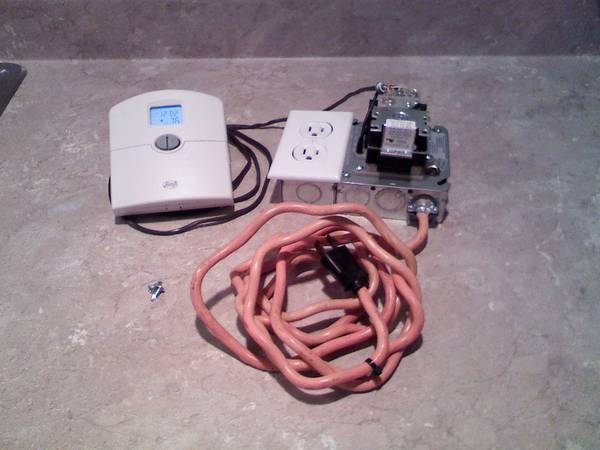
From here I just plug it into the wall, plug the fridge into it, put the thermostat inside the fridge and set the temp.

Here's the parts and tools needed.
The control used is a fan control center typically used on older furnaces. It contains a 120v/24v transformer and 24v/120v relay. They cost about $20 new, but if you have a friend in the HVAC business you could have them pull one from the next install they do.
The thermostat is just a spare digital one that I had in my spare parts box. This particular one only goes down to 45*F, but for a fermentation temp controller this will be fine.
Other than that, I used an old extension cord, some scrap 18awg wire, a single and double junction box, recepticle & cover, 1/2" wire clamp, 2 wire nuts, 4 self tapping screws, electrical tape, screwdriver, and wire stippers.
Here's a shot of the internal wiring. The wiring is pretty basic. It looks like a lot more than it really is because there are so many unused connections. This is because this particular control center has a DPDT relay, when only a SPST is needed. These can be removed all together very simply for a cleaner look.
And here is the final product. All together it took about 30 minutes to assemble once I had all the parts together. The two spare screws are to mount the thermostat inside the fridge.
From here I just plug it into the wall, plug the fridge into it, put the thermostat inside the fridge and set the temp.
