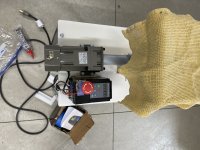
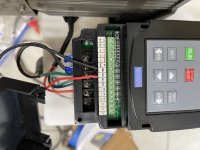
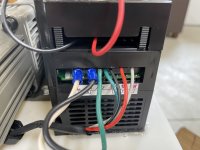
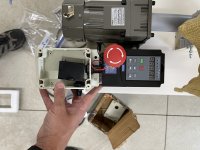
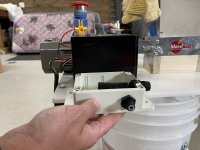
Here are some pictures of the wiring…pretty simple. The programming is the important part as it won’t work when you first turn it on without setting the frequency, low/high frequency, start switch option, etc.
You are using an out of date browser. It may not display this or other websites correctly.
You should upgrade or use an alternative browser.
You should upgrade or use an alternative browser.
Motorized MaltMuncher Pro
- Thread starter Fidelity101
- Start date

Help Support Homebrew Talk:
This site may earn a commission from merchant affiliate
links, including eBay, Amazon, and others.
@Fidelity101 thanks mate! I owe you one or more. Normally when we visit Niagara Falls, Ontario we fly into Buffalo. Next time we do, depending on covid, we'll have to have a few brews (my treat).
If anyone else is interested in purchasing the VFD, get from here (no, I have nothing to do with this supplier, nor am I an affiliate).
https://www.vevor.com/collections/e...-drive-inverter-cnc-vfd-vsd-single-to-3-phase
Signup for newsletter by giving email. Within 2 days will receive a discount code to use.
https://www.vevor.com/collections/e...-drive-inverter-cnc-vfd-vsd-single-to-3-phase
Signup for newsletter by giving email. Within 2 days will receive a discount code to use.
Is the discount code worth the $20 cost increase? I’m not a fan of eBay, but the price seems like a good jump over the one I listed.If anyone else is interested in purchasing the VFD, get from here (no, I have nothing to do with this supplier, nor am I an affiliate).
https://www.vevor.com/collections/e...-drive-inverter-cnc-vfd-vsd-single-to-3-phase
Signup for newsletter by giving email. Within 2 days will receive a discount code to use.
I received $5.00 off. I'd rather deal with a supplier other than eBay. Been burned in the past. Not happening again.Is the discount code worth the $20 cost increase? I’m not a fan of eBay, but the price seems like a good jump over the one I listed.
Also, the one on eBay is 2nd hand with no returns.
Link as provided in post Motorized MaltMuncher Pro
I received $5.00 off. I'd rather deal with a supplier other than eBay. Been burned in the past. Not happening again.
Also, the one on eBay is 2nd hand with no returns. I'm getting brand new.
Link as provided in post Motorized MaltMuncher Pro

$20.94
$29.99
The Brew Your Own Big Book of Clone Recipes: Featuring 300 Homebrew Recipes from Your Favorite Breweries
Amazon.com

$53.24
1pc Hose Barb/MFL 1.5" Tri Clamp to Ball Lock Post Liquid Gas Homebrew Kegging Fermentation Parts Brewer Hardware SUS304(Liquid Hose Barb)
Guangshui Weilu You Trading Co., Ltd

$22.00 ($623.23 / Ounce)
AMZLMPKNTW Ball Lock Sample Faucet 30cm Reinforced Silicone Hose Secondary Fermentation Homebrew Kegging joyful
无为中南商贸有限公司

$176.97
1pc Commercial Keg Manifold 2" Tri Clamp,Ball Lock Tapping Head,Pressure Gauge/Adjustable PRV for Kegging,Fermentation Control
hanhanbaihuoxiaoshoudian

$58.16
HUIZHUGS Brewing Equipment Keg Ball Lock Faucet 30cm Reinforced Silicone Hose Secondary Fermentation Homebrew Kegging Brewing Equipment
xiangshuizhenzhanglingfengshop

$7.79 ($7.79 / Count)
Craft A Brew - LalBrew Voss™ - Kveik Ale Yeast - For Craft Lagers - Ingredients for Home Brewing - Beer Making Supplies - (1 Pack)
Craft a Brew

$33.99 ($17.00 / Count)
$41.99 ($21.00 / Count)
2 Pack 1 Gallon Large Fermentation Jars with 3 Airlocks and 2 SCREW Lids(100% Airtight Heavy Duty Lid w Silicone) - Wide Mouth Glass Jars w Scale Mark - Pickle Jars for Sauerkraut, Sourdough Starter
Qianfenie Direct

$53.24
1pc Hose Barb/MFL 1.5" Tri Clamp to Ball Lock Post Liquid Gas Homebrew Kegging Fermentation Parts Brewer Hardware SUS304(Liquid MFL)
yunchengshiyanhuqucuichendianzishangwuyouxiangongsi

$10.99 ($31.16 / Ounce)
Hornindal Kveik Yeast for Homebrewing - Mead, Cider, Wine, Beer - 10g Packet - Saccharomyces Cerevisiae - Sold by Shadowhive.com
Shadowhive

$28.98
Five Star - 6022b_ - Star San - 32 Ounce - High Foaming Sanitizer
Great Fermentations of Indiana
Wow, good catch! I didn’t even notice the second hand or customer return information. I guess I was lucky to get a functional unit but I agree I would normally have skipped over it.
THANK YOU!!! to @Fidelity101.
I read your comments about the Motorized MaltMuncher Pro having a 3 phase motor. I never thought to take my switch box apart to see that for myself.
I followed your suggestion and ordered the Vevor VFD from a different Ebay vendor. It arrived last Friday. I was able to wire it up quite easily.
I went ahead and completed the set up and set all the parameters as suggested.
The mill now works fabulously!
I mounted the VFD to the base with 2) M4 30 stainless screws with washers and nuts. They hold the VFD firmly in place.
The passive roller on my mill was not centered out of the box. Wit a little fiddling I was able to center it. The mill now has no problem grinding at a 0.028" gap setting. I ran 15 lbs of Barke Pilsner malt through it this morning with no trouble.
Thanks again for all the suggestions. I do like this system very, very much more now.
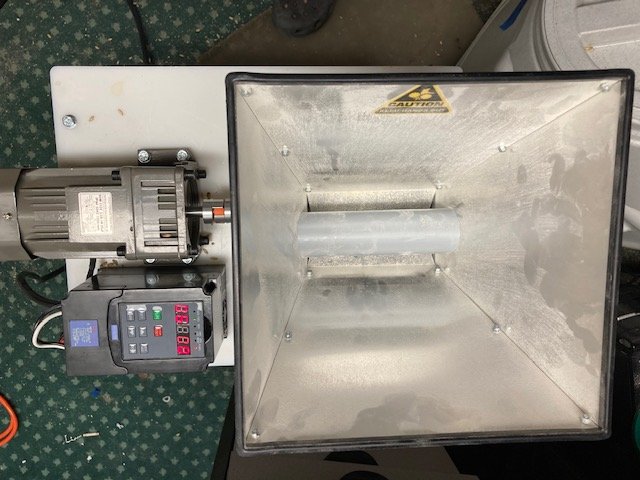


Last edited:
I am glad I could help. You should consider adding the on off switch for safety. Also, remove that pvc pipe because it’s not longer required to slow down the intake. 
I'm wondering if that PVC pipe is for safety reasons?I am glad I could help. You should consider adding the on off switch for safety. Also, remove that pvc pipe because it’s not longer required to slow down the intake.
Received the VFD.
From the AC what wire connects to the VFD marked "L"? Black or white wire?
From the AC what wire connects to the VFD marked "N"? Black or white wire?
What motor wire connects to the VFD marked "U" Black, red or yellow?
What motor wire connects to the VFD marked "V" Black, red or yellow?
What motor wire connects to the VFD marked "M" Black, red or yellow?
Guess I'm unfamiliar with Japanese electricity markings.
Thanks.
I'm wondering if that PVC pipe is for safety reasons?
Morebeer hasn’t confirmed this so I can’t say their exact reasoning BUT I can say that the PVC pipe helps to limit grain going into a system with a poor power design and that PVC pipe is acting as a limiter. Does it help people avoid putting their fingers into the grinder, maybe. But no other system has a PVC pipe installed and there aren’t too many people stupid enough to stick fingers in a grinder with the power on. Now that the system has a LOT more power, you shouldn’t have to worry about a stuck grind but it’s also a smart idea to have the emergency off button you can smash rather than trying to find and touch the tiny little power button on the module itself. Wiring is extremely easy with one wire on each side of the switch going into the FWD and GND ports on the top/side of the controller.
L is the black wire (hot)Received the VFD.
From the AC what wire connects to the VFD marked "L"? Black or white wire?
From the AC what wire connects to the VFD marked "N"? Black or white wire?
What motor wire connects to the VFD marked "U" Black, red or yellow?
What motor wire connects to the VFD marked "V" Black, red or yellow?
What motor wire connects to the VFD marked "M" Black, red or yellow?
Guess I'm unfamiliar with Japanese electricity markings.
Thanks.
N is the white wire (neutral)
For the motor wiring, you want Black red and white. U is black, V is red and M is white. Look at the pictures I posted earlier which show the actual connections. The ground wire for the power input AND the motor ground should both be connected to ground on the module.
Again, I would HIGHLY recommend looking at my pictures posted earlier and installing the on/off switch that Morebeer provided as a safety switch. Using one side of the switch (because if you look at it, it has disconnects on both sides) and use any two wires to connect to the switch with one lead going into FWD and one going into GND. Then, in the setup screen, I believe it’s option 4 or 5, you want to control the operating using the external switch rather than the push button on the controller itself. Apologies in advance as I still need to make a video stepping people through the options. If anyone else has already configured the system, feel free to post the video and save me a step.
Last edited:
It is there so small fingers do not find their way into the rollers. The mill is low enough that that could be a worry. If the bolt is removed, there will be two holes exposed the grain could fall out of.
Fidelity101, you may want to check the polarity on your AC inlet cable. At least with mine, the black wire is line and the white is neutral.
Fidelity101, you may want to check the polarity on your AC inlet cable. At least with mine, the black wire is line and the white is neutral.
L is the black wire (hot)
N is the white wire (neutral)
For the motor wiring, you want Black red and white. U is black, V is red and M is white. Look at the pictures I posted earlier which show the actual connections. The ground wire for the power input AND the motor ground should both be connected to ground on the module.
Again, I would HIGHLY recommend looking at my pictures posted earlier and installing the on/off switch that Morebeer provided as a safety switch. Using one side of the switch (because if you look at it, it has disconnects on both sides) and use any two wires to connect to the switch with one lead going into FWD and one going into GND. Then, in the setup screen, I believe it’s option 4 or 5, you want to control the operating using the external switch rather than the push button on the controller itself. Apologies in advance as I still need to make a video stepping people through the options. If anyone else has already configured the system, feel free to post the video and save me a step.
I was thinking L = Load and N = Neutral, but the manual wasn't clear.
I will use a standard AC SPST switch as the main on/off switch. I will not use the turn and push switch that originally came with the motor.
Hmm... my motor has a black wire, a red wire and a yellow wire. I guess your white is my yellow wire.
Thanks for the info.
Last edited:
@Fidelity101 What about the Pn (Configuration Parameters) values on pages 12 to 16 of the manual?
Thanks.
Thanks.
Last edited:
That’s what I stated above but I see what you mean based on my pictures provided earlier. Now I have to go back and check to see if I was really foolish enough to install those wires in the wrong order!It is there so small fingers do not find their way into the rollers. The mill is low enough that that could be a worry. If the bolt is removed, there will be two holes exposed the grain could fall out of.
Fidelity101, you may want to check the polarity on your AC inlet cable. At least with mine, the black wire is line and the white is neutral.
I was hooking up my controller based on your pictures. I then checked the polarity on the power cable that came with the mill and then reversed the L and N to meet code.
I do have a main power switch on the power strip the mill is plugged into for a master kill. if ever needed.
I may switch out the hopper for the one from my old cereal killer so I do not have the holes in the sides.
Thanks once again for your work on this project. It makes the money spent on this product well worth it.
Cheers,
Wayne
The hopper on the Cereal killer is the exact same so it’s an easy swap…or just put some painters tape on the inside to cover the holes. I’m glad the system works for you and thank you for catching the wire crossing based on the photos!
Just checking the wiring if OK. I am a bit concerned by the small gauge wire going to the motor. Does this look OK?
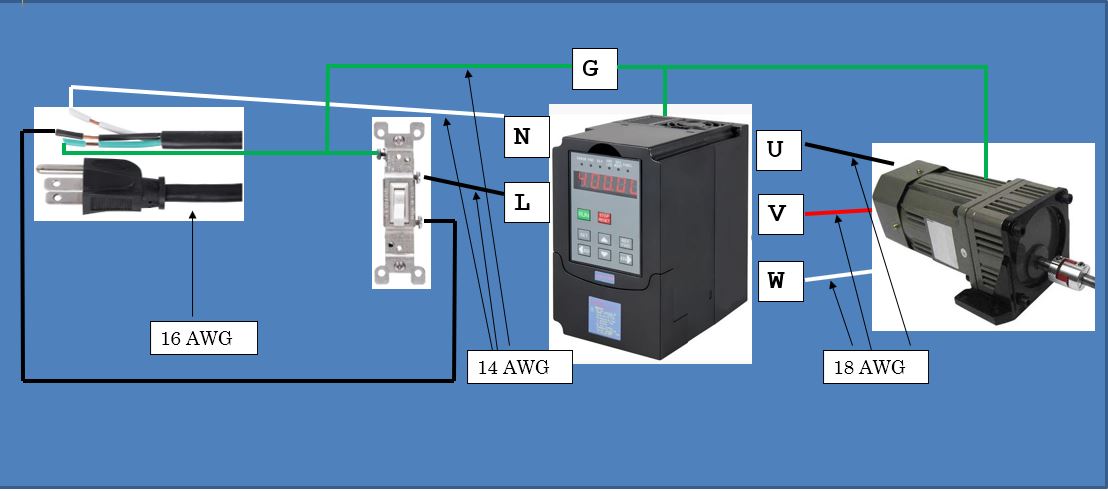

Last edited:
That looks great! Thank you for the diagram.
The motor is only pulling about 1A so 20 AWG wire is more than adequate for the task.
Using the switch is a great addition and probably helpful to many. Having been in many emergency situations myself, I’ve come to realize that precision isn’t possible and blunt force is the only option that’s really possible so I opted to keep the big circular button as the emergency off. It did require one extra cable run and programming the controller but that’s just something I know I’d need if my shirt, finger, etc ever got caught in the grinder.
In thinking about it more, I think switching out the switch you have with the red circular button is a better idea. Instead of mounting it to the controller like I did, you can/should install it inline to have an emergency cutoff that shuts down power and neutral to the whole system. That’s definitely a better approach than what I did and something I’m going to change on mine as well.
Just remember, when your adrenaline is pumping and you’re in intense pain, you will not have the fine motor skills you’re use to in normal life. You won’t be able to flip a little switch or hit a button in a timely manner but you CAN smash a big red button.
Last edited:
@Fidelity101 any input on the Pn settings?
Sorry, no. I’ll have to look tonight. Do you have the manual? I went through each option and made sure it was set to 60hz on power up. 40hz minimum and 65hz max.
@Tobor_8thMan
I used these settings:
Pn 02: 60
Pn 08: 1S
Pn 09: 1S
Pn 10: 60
Pn 11: 1.5
Pn 12: 50
I left all the other settings at the default.
I hope this helps.
I used these settings:
Pn 02: 60
Pn 08: 1S
Pn 09: 1S
Pn 10: 60
Pn 11: 1.5
Pn 12: 50
I left all the other settings at the default.
I hope this helps.
Updated diagram using emergency stop switch.
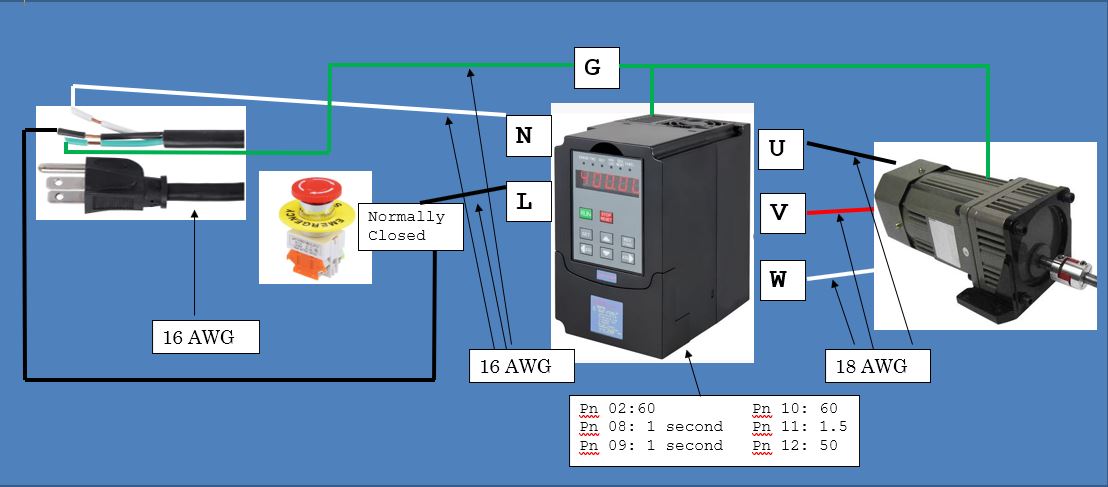
In the Emergency Push Button shown NC connections are 1 and 2. However, always verify with a VOM.

In the Emergency Push Button shown NC connections are 1 and 2. However, always verify with a VOM.
Last edited:
testingapril
Well-Known Member
Just picked up a monster mm3 with one of these motors. Looks like Vevor is out of stock of that particular VFD. Plenty of comparable 220v VFDs available. If I have 220v supply available would one of those work? I can't figure out if these 110v input vfd's are outputting 120/208v 3 phase (I would assume). I also can't figure out if the 220v input vfd is outputting 120/208v 3 phase (I would also assume this). Anyone with more experience here can fill me in? Or maybe there are settings in the vfd to change the output voltage?
The motor is 110v 3 phase. You will need a 110 V single phase to 3 phase VFD. 110 V 3 phase VFD is what I bought. As it is new, the cost is a bit more expensive that the used unit @Fidelity101 purchased. That VFD works great with the Keg Land motor and mill.
Last edited:
testingapril
Well-Known Member
The motor is 110v 3 phase. You will need a 110 V single phase to 3 phase VFD. 110 V 3 phase VFD is what I bought. As it is new, the cost is a bit more expensive that the used unit Fidelity101 purchased. That VFD works great with the Keg Land motor and mill.
110V 3 phase isn't really a thing as far as I can tell. 3 phase has 2 voltage readings, line voltage (volts between two lines) which is typically 208v in the US and phase voltage (volts between a single phase and neutral/ground) which is typically 120v in the US. If you've got a multi-meter and could measure the voltage across either of those, that would answer the question I believe.
The motor is Chinese. It is labelled 110V. The output from the VFD is 110 neutral to one phase and 110 from neutral to the other phase. 110 between the two phases. Look at the diagram on the motor. They are using a capacitor between one phase and neutral. That limits what the motor sees, which is why the motor had so little torque.
@Fidelity101 explained it earlier in this thread: "Shame I have to spend another $50 to fix the motor because morebeer decided to go with a cheaper 3 phase low power motor instead of a single phase higher amp motor...but at $400 I can understand the need for trade offs."
"The original design used a static box (capacitor) that literally fired one time to get the motor started and then turned off. So the motor operated without the third power leg which caused 0 torque during that phase of the motor...which is why it always gets stuck. So going from 0% power during that portion of the rotation to 100% power is incredibly noticable!"
Last edited:
- Joined
- Mar 2, 2022
- Messages
- 15
- Reaction score
- 19
Thanks to all of you for your time and efforts so all of us can enjoy!
Ran it for the first time today, worked like a charm
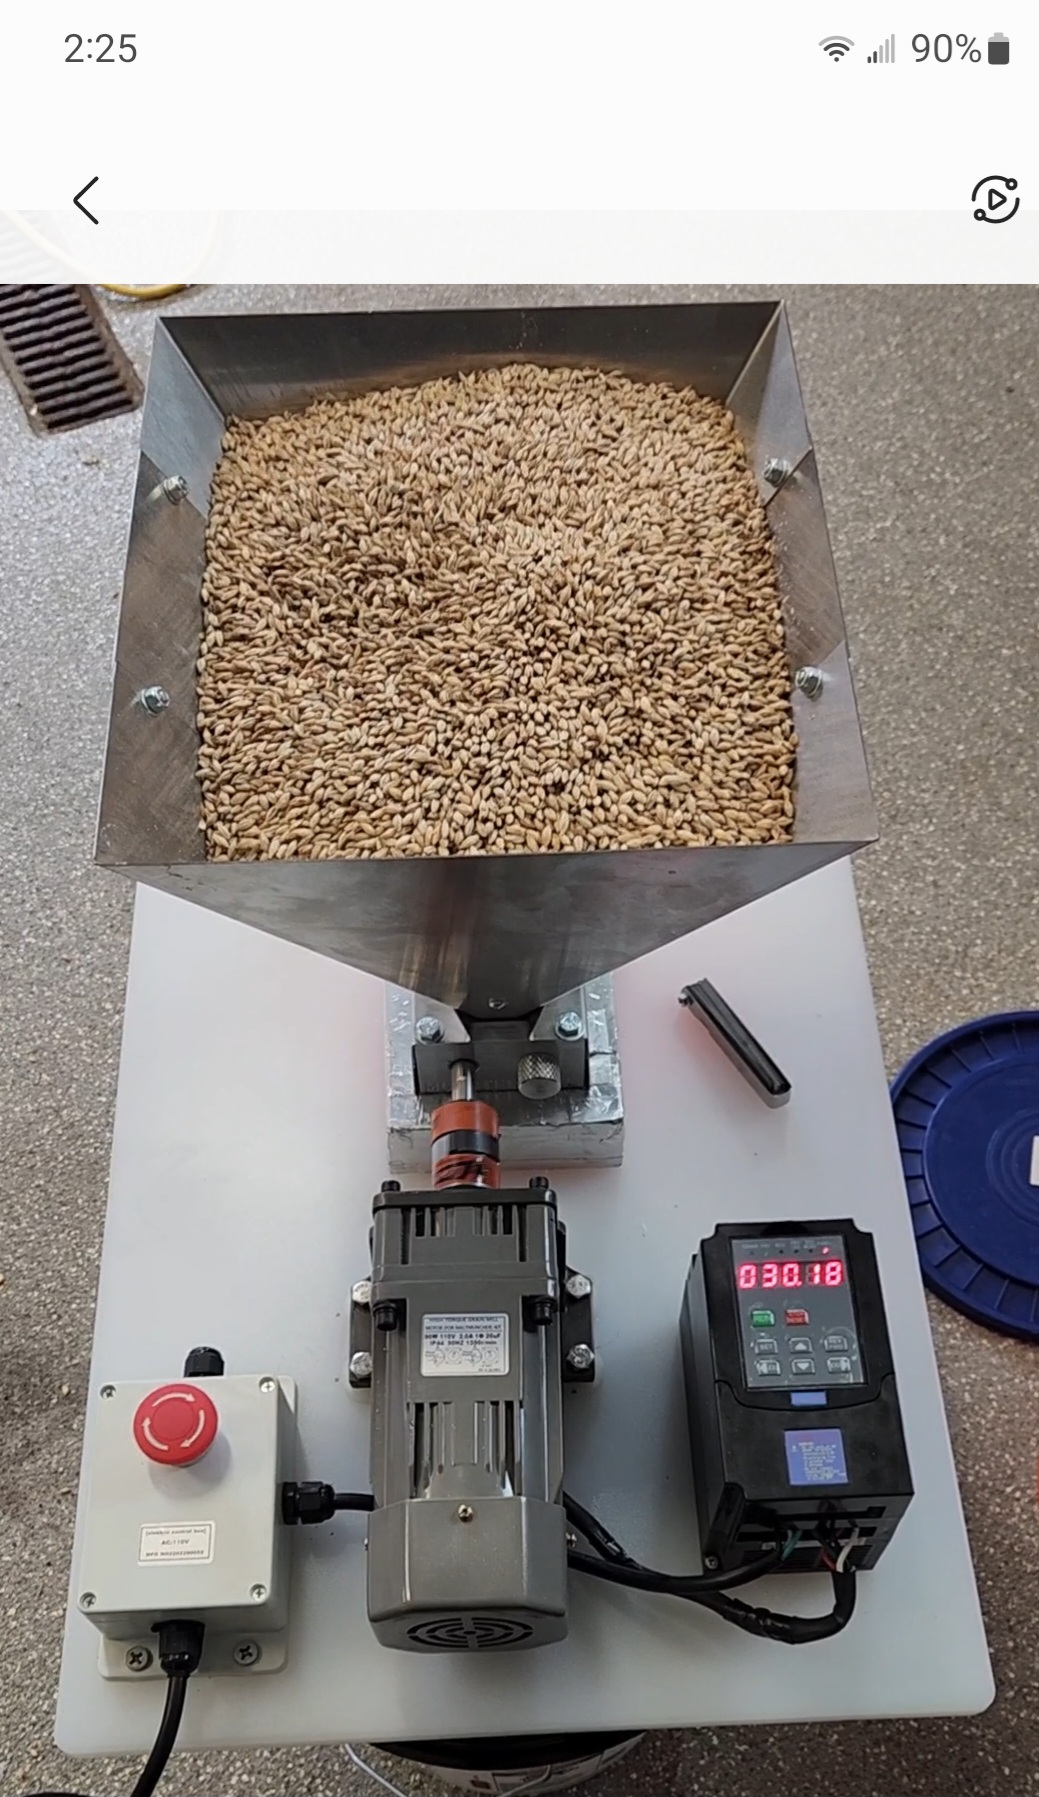
Ran it for the first time today, worked like a charm

Similar threads
- Replies
- 0
- Views
- 377
- Replies
- 21
- Views
- 3K




![Craft A Brew - Safale BE-256 Yeast - Fermentis - Belgian Ale Dry Yeast - For Belgian & Strong Ales - Ingredients for Home Brewing - Beer Making Supplies - [3 Pack]](https://m.media-amazon.com/images/I/51bcKEwQmWL._SL500_.jpg)


