iSpindle - DIY Electronic Hydrometer

Homebrew Talk - Beer, Wine, Mead, & Cider Brewing Discussion Forum

Help Support Homebrew Talk - Beer, Wine, Mead, & Cider Brewing Discussion Forum:

This site may earn a commission from merchant affiliate links, including eBay, Amazon, and others.
You just need to do a little bit more research, its in german but chrome translates it for you

https://github.com/universam1/iSpindel/blob/master/docs/iSpindelbreadboard.md

Thanks, i've gone through this, it's a little bit as clear as mud, i have translated though.

I think i follow it up until point 6. untwist the wires....

I might try and map it onto a breadboard and share it if someone fancies taking a look to make sure its right?

But that last bit attach the battery, do you literally just solder the wires directly to the battery?
 
I just subbed to this thread. It looks like it needs some work but it is a really exciting project.
 
Thanks, i've gone through this, it's a little bit as clear as mud, i have translated though.

I think i follow it up until point 6. untwist the wires....

I might try and map it onto a breadboard and share it if someone fancies taking a look to make sure its right?

But that last bit attach the battery, do you literally just solder the wires directly to the battery?

As soon as i get all my parts ill start finishing this, but yea instructions are not organized in the easiest way.

and yes, solder straight to battery i would think so it doesnt move at all
 
I'm trying to make sense of and redraw the diagrams in photoshop. Taking a leaf out of the ESP brewpi lot as well I've taken a first bash at creating a board that (given the small size) would only be a few £s each. But it's my first attempt at both using fritzing as a basis and designing boards but there doesn't seem to be a lot going on with this so it should be easy.
 
I'm trying to make sense of and redraw the diagrams in photoshop. Taking a leaf out of the ESP brewpi lot as well I've taken a first bash at creating a board that (given the small size) would only be a few £s each. But it's my first attempt at both using fritzing as a basis and designing boards but there doesn't seem to be a lot going on with this so it should be easy.
I was thinking about doing the same thing. Just for the experience- I don't think I would have the boards made.
 
I created a PCB for this project last week and learned German just for fun so I could write it all in German to match the original site. https://github.com/universam1/iSpindel/blob/master/docs/iSpindelPCB.md

I'm kidding, of course. It looks like they have a pcb that is designed to take the place of the 3D printed sled and house the boards, too. Might be a cool project.


Actually kind of makes sense to create something to fill the pelting, I guess in theory you could create something with a curve of the in radius and it would fit perfectly. If not a little expensive.

I suspect it'll be cheaper for me to spend the €60 and buy it via the iSpindle GitHub link. Given the cost of 3D printing over here. But a PCB would look so much neater and less likely to fail due to my dodgy soldering.

That and having to cut down the PCB to 40x30 to make sure it seats properly in the sled...

Actually thinking about it after a few beers a PCB tonthe sleds dimensions could potentially be cheaper than a printing the sled and weighted to the correct weight with airdry clay or something?
 
I'm trying to make sense of and redraw the diagrams in photoshop. Taking a leaf out of the ESP brewpi lot as well I've taken a first bash at creating a board that (given the small size) would only be a few £s each. But it's my first attempt at both using fritzing as a basis and designing boards but there doesn't seem to be a lot going on with this so it should be easy.

Friends don't let friends use Fritzing. It has its place, but doing PCB layout is not it.

I recommend KiCad, but a lot of hobbyists use Eagle (free version). It's a learning experience, but at least you'll be doing it properly.
 
Thanks Ame, i'll give those a try, i quite liked the drag and drop of Fritzing.

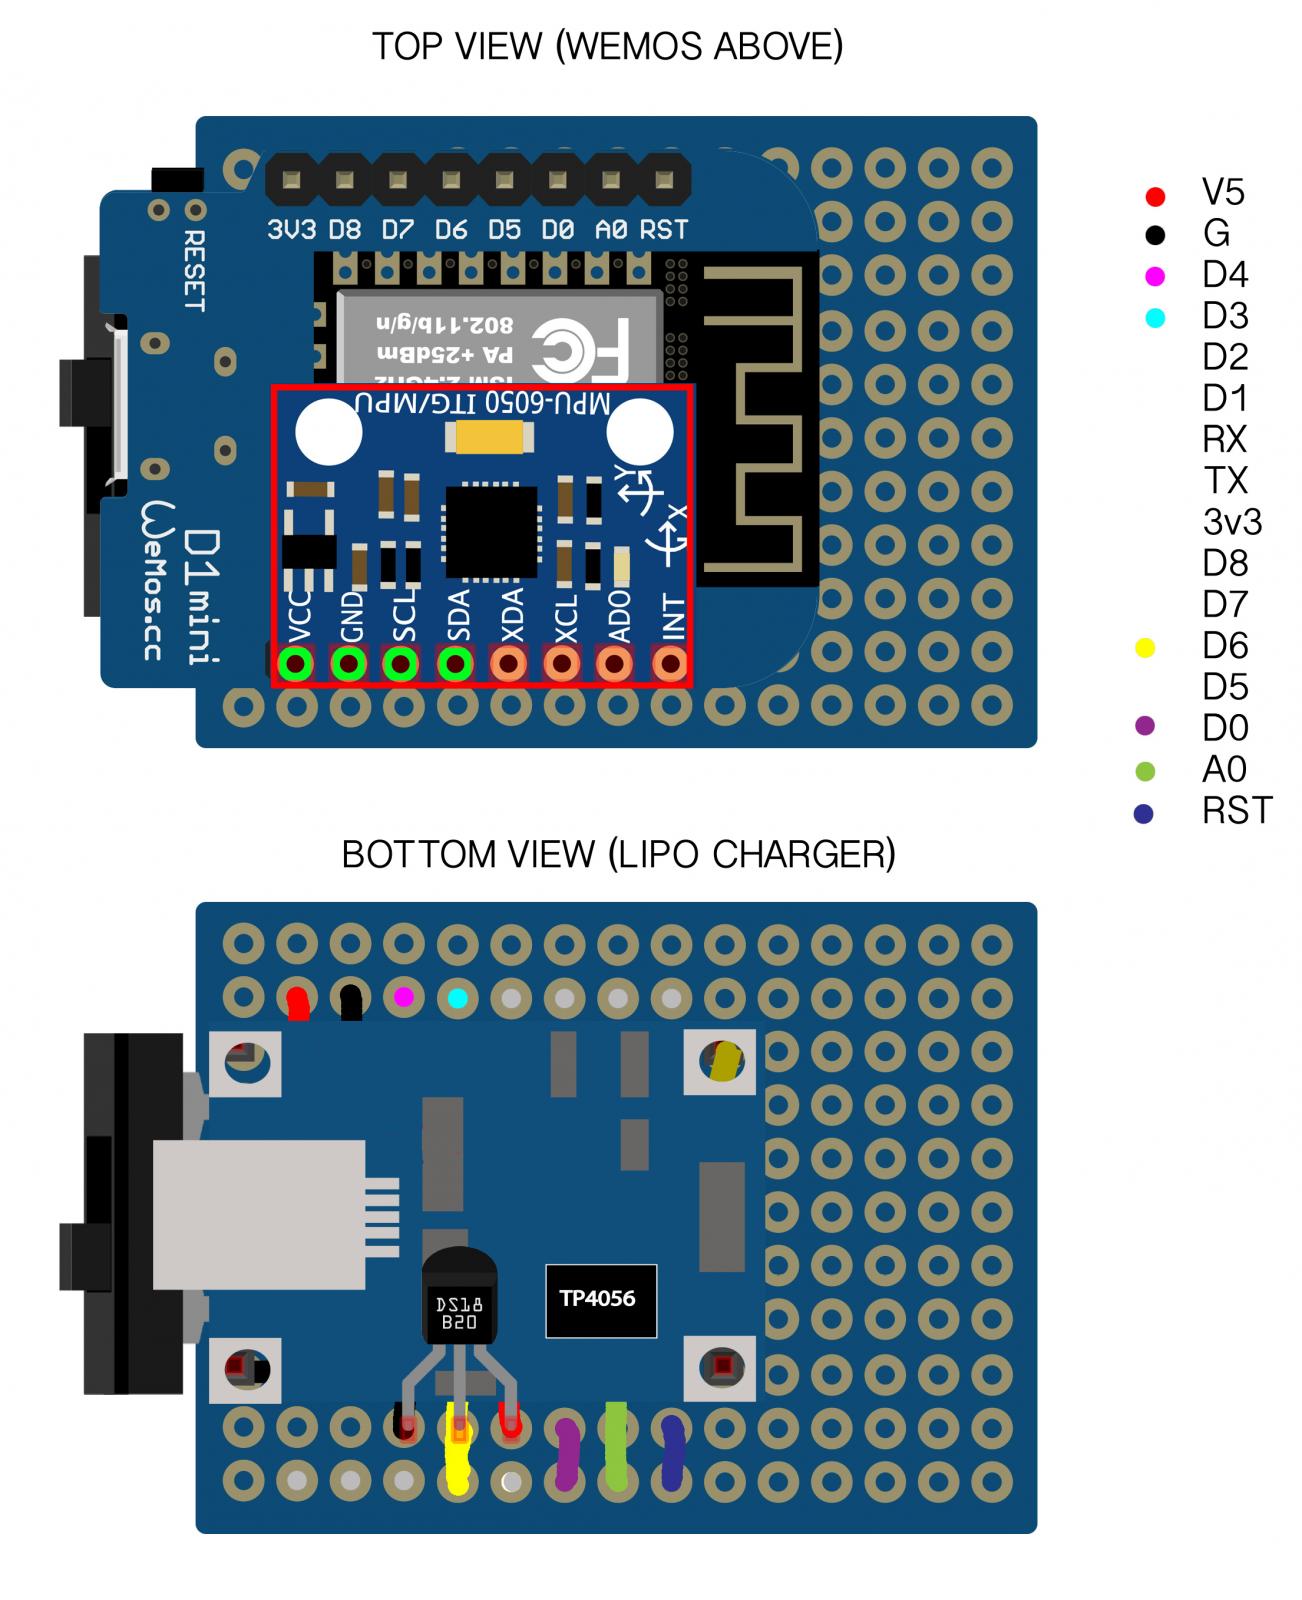
with some help from ElChangoGuero i've pulled together some drawings that are a little tidier than the ones on the git hub, and easier for me to follow anyway, so hopefully they'll be of use to others too.

1st Pic - Wemos and MPU 6050 attachment
2nd Pic - Top View - Resistor placement, and top wiring paths, also switch goes here too.
3rd Pic - Bottom View - Bottom wiring path, DS18b20 placement as well as feet for Lipo charge
4th Pic - a rough approximation of how it should all look assembled.

If anything i wrong give me a shout and i'll amend it

Wemos & MPU 6050-1.jpg


Bottom View.jpg


Wemos & MPU 6050-4.jpg


Top View.jpg
 
Friends don't let friends use Fritzing. It has its place, but doing PCB layout is not it.

I recommend KiCad, but a lot of hobbyists use Eagle (free version). It's a learning experience, but at least you'll be doing it properly.

Thanks Ame, i'll give those a try, i quite liked the drag and drop of Fritzing.

As a hobbyist, I recommend KiCAD. It's free and has no board or layer limits. There is a bit of a learning curve though. If you need any help, just ask. I'm no expert, but can make my way through it.
 
If you want it for importing Eagle files, I don't believe it will open either .brd or .sch files. If you're familiar with eagle, be prepared for a little frustration. It doesn't use the same workflow as eagle. But it does make sense once you figure it out.
 
I just downloaded KiCad. Can Kicad read .brn files?

Do you mean Eagle files?

There's this:
https://github.com/lachlanA/eagle-to-kicad

Never tried it, but if you have a reasonably straightforward board it might be easier to redo from scratch. That way you get a learning experience and you can compare the end result with what you had from Eagle.

The point of recommending KiCad is that it is completely free and unrestricted. Eagle has a free version with generous limits, but if you hit those limits you have to pay to get around them.
 
If you want it for importing Eagle files, I don't believe it will open either .brd or .sch files. If you're familiar with eagle, be prepared for a little frustration. It doesn't use the same workflow as eagle. But it does make sense once you figure it out.

I desperately wish I started with KiCad rather than Eagle. I've tried KiCad twice now, and both times have ended up banging my head against a wall because of the way I was trained by Eagle.
 
I desperately wish I started with KiCad rather than Eagle. I've tried KiCad twice now, and both times have ended up banging my head against a wall because of the way I was trained by Eagle.

Eagle trains you to bang your head against the wall? Maybe that's why KiCad is becoming more popular. :)
 
I desperately wish I started with KiCad rather than Eagle. I've tried KiCad twice now, and both times have ended up banging my head against a wall because of the way I was trained by Eagle.

Eagle trains you to bang your head against the wall? Maybe that's why KiCad is becoming more popular. :)

Not to derail this thread further... but I started with Eagle and realized the board limit wasn't as big as it seemed so I switched to KiCAD. I'm a hobbyist and it isn't reasonable for me to get a license. It's not that KiCAD is frustrating on it's own, but if you start with Eagle, KiCAD's workflow can be frustrating until you get it down. It's quirky, but it does the job and is well worth the price.

Edit: Strangely enough Eagle is now owned by Autodesk. I spend more than half of my work life on AutoCad, 3D Studio, and Revit.
 
well that sucks was just about to go and buy the iSpindle via the 3d Mechtronics site and they're all out...
 
I couldn't really tell unfortunately - What exactly does the bundle contain that isn't in the AliExpress list (if anything)? The sled?

yeah mainly the sled and the Pelting, and the ability to get it delivered this half of the year. I've ordered the not complete set, in the knowledge that I might need to file down the sled to get it to fit in the pelting I've had to order from eBay.

Actually saved myself a couple £s
 
I was able to get the sled printed by a friend at his local library.$2 bucks. He was lucky to get them printed because there is a back log and waiting list.
 
I was able to get the sled printed by a friend at his local library.$2 bucks. He was lucky to get them printed because there is a back log and waiting list.
I just pulled in the .STL file and it's about $0.45 worth of filament (cheap stuff, expensive filament would double that) and would take ~2.5 hours to print.
 
I wonder if that means they will adopt the rather liberal licensing used by most other AutoDesk applications?

I just looked it up, and you can subscribe to the standard version (4 Layers and 24.8 square inches) for $15 a month. Which is reasonable, but not free. :)

Another option if you like the drag and drop of Fritzing is circuits.io. It is another Autodesk service, but it's free. And you can order boards directly from them. But I don't know anything about price or quality since I've never used them.
 
Which file did you print?

There are 4 files in the "drawer" directory, and there is no words about it.

drawer-combo-short.stl
https://raw.githubusercontent.com/universam1/iSpindel/master/drawer/drawer-combo-short.stl

Actually printed out 3 at my local library; spare for me and one for another guy out here who is building the project also. Cost $6 including setup. iSpindel parts are on the slow boat from China.

Going to relay it to my network with an ESP8266 + ds18b20 temp sensors + a bubble counter.

Wonder if there is a better way to connect the wires to power than to solder them to the battery. I'd like to be able to swap out the batteries easier.

Soldering the battery makes me nervous..

I think it should be possible to use a battery holder like the PCB version with proper sled:
https://github.com/universam1/iSpindel/blob/master/docs/iSpindelPCB.md
 
Finally figured out how I can contribute to this thread!

...I have a 3-D printer, but not the time (or skills) to figure out how to make the electronics.

I'd print some sleds for free if someone is interested in providing the labor to put the iSpindle together for me.
 
I should probably be asking this over on the iSpindle GitHub, but figured it less likely to get lost in translation here.

The iSpindle instructions mentioned about removing a couple of bits from the boards.

4. Remove the GY-521 LED - (is this purely because the LED is a power drain, can I literally just remove it or do I need to complete the connection?)

8. Remove the Wemos diode. (now that thing is tiny, I can only think that the moment I get my soldering iron anywhere near that it's going to destroy the board) but as an important note over on GitHub they put the following.

I think I am going to remove this hint at all. Initially I was using the Wemos USB port also to power the Lipo charge module. I find though that this soldering over strains majority and is not really needed with the charger module having its own port.
Nevertheless, don't forget to remove that very diode, otherwise you are powering the battery directly by 5V from Wemos and might lead to a nice fire in your house...

SO does anyone have any tips on removing these, am I better using a craft knife and trying to it out, or heat it with a soldering iron and loosen it off?

I must admit the thought of messing something up and burning the house down isn't looking appealing.
 
Remove the LED means literally what it says. No need to do anything afterwards, but make sure there is not a splash of solder joining the two pads where the LED used to be. Same with the diode.

As for the 'how', well, let's just say experience is what you get just after you need it.

You could probably cover both ends of the LED or diode with a solder blob, then knock it away with the tip of the iron while the solder is still molten. Or grab it with a pair of metal tweezers. Clean up afterwards with some desoldering braid if you have it.
 
drawer-combo-short.stl
https://raw.githubusercontent.com/universam1/iSpindel/master/drawer/drawer-combo-short.stl

Actually printed out 3 at my local library; spare for me and one for another guy out here who is building the project also. Cost $6 including setup. iSpindel parts are on the slow boat from China.

Going to relay it to my network with an ESP8266 + ds18b20 temp sensors + a bubble counter.

Wonder if there is a better way to connect the wires to power than to solder them to the battery. I'd like to be able to swap out the batteries easier.
Ive been collecting the bits to make this and havent 3d printed it as yet because the source of the preforms is different and I wanted to measure them up first.
In your printed sleds, does the sled hold the battery on an angle to give it some initial tilt? looks like it from the diagrams.
 
The soda bottle from eBay seems be different from that people from the Germany bought. I have one made by a German friend, and the sled won't fit the bottles I bought from eBay.

Not having the ability to design a sled, (nor do I have a 3-D printer), I choose to make one that like the PCB version with a battery holder. All we need to do is to make sure that everything in the bootle is fixed in its position. A few nylon bolts might do the job instead of the 3-D printed sled.

The battery tilts on the sled, but some weights might be necessary. It might be 15g to 30g according to what I red.

Update:
Tried mine. It needs at least 20g to make it tilt around 30 degree. Wheel balancing blocks ordered. .

yup, same thing happened to me, didnt know about the weight i am working with a friend to make a new 3d model for this bottles and now have to add a 20g weight lol, will keep you guys posted if everything works out(fingers crossed)
 

Latest posts

Back
Top