HOWTO - Make a BrewPi Fermentation Controller For Cheap

Homebrew Talk - Beer, Wine, Mead, & Cider Brewing Discussion Forum

Help Support Homebrew Talk - Beer, Wine, Mead, & Cider Brewing Discussion Forum:

This site may earn a commission from merchant affiliate links, including eBay, Amazon, and others.
Status
Not open for further replies.
Hey guys


I have been messing all day with this all day using the Arduino mega 2560


I know uno is a easy way to do this, but i have the mega and can be a little bit stubborn.


I wired it up like this image
BrewPi-Schematic.png


Then i found a mega2560 hex buried in this thead and flashed it with this command:

Code:
sudo avrdude -p m2560 -c wiring -P /dev/ttyACM0 -b 115200 -F -D -U flash:w:/home/pi/brewpi_mega2560.hex


I could setup brewpi and actually read the temperature from the sensors, but there is no way for me to actually add them since the only function I have is "none"

I8cwYFb.jpg


Anyone have any idea what I can try? I tried playing with some conf files (and then some) but am completely stuck.


:mug:


Do you have any idea what the version of that hex file is?
 
Have you tried hitting the button under the advanced settings at the very bottom of the page that resets the defaults to the factory core? Sometimes that works for me if I'm having trouble during configuration.
 
Have you tried hitting the button under the advanced settings at the very bottom of the page that resets the defaults to the factory core? Sometimes that works for me if I'm having trouble during configuration.

Yeah that did not work :(

Still can only choose none from the dropdown

Code:
Feb 07 2017 00:27:41   Resetting controller to factory defaults
 Feb 07 2017 00:27:43   Controller debug message: INFO MESSAGE 15: EEPROM initialized
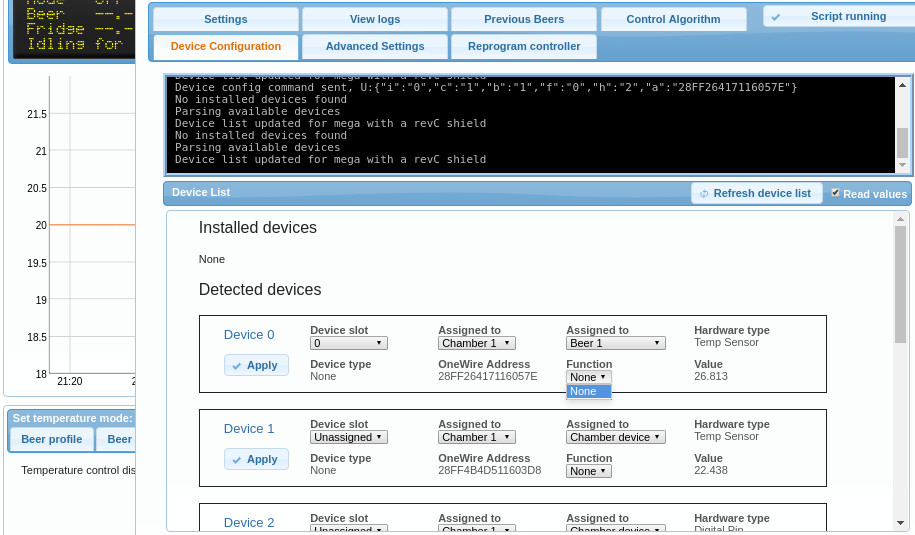
 Feb 07 2017 00:28:26   Installed devices received: []
 Feb 07 2017 00:28:28   Available devices received: [{"a": "28FF26417116057E", "c": 1, "b": 0, "d": 0, "f": 0, "i": -1, "h": 2, "j": 0.0, "p": 58, "t": 0, "v": 26.5}, {"a": "28FF4B4D511603D8", "c": 1, "b": 0, "d": 0, "f": 0, "i": -1, "h": 2, "j": 0.0, "p": 58, "t": 0, "v": 22.125}, {"c": 1, "b": 0, "d": 0, "f": 0, "i": -1, "h": 1, "p": 2, "t": 0, "x": 1}, {"c": 1, "b": 0, "d": 0, "f": 0, "i": -1, "h": 1, "p": 5, "t": 0, "x": 1}, {"c": 1, "b": 0, "d": 0, "f": 0, "i": -1, "h": 1, "p": 6, "t": 0, "x": 1}, {"c": 1, "b": 0, "d": 0, "f": 0, "i": -1, "h": 1, "p": 59, "t": 0, "x": 1}, {"c": 1, "b": 0, "d": 0, "f": 0, "i": -1, "h": 1, "p": 4, "t": 0, "x": 1}]
 Feb 07 2017 00:28:47   Device updated to: {"i":0,"t":0,"c":0,"b":0,"f":0,"h":0,"d":0,"p":0}
 Feb 07 2017 00:28:52   Installed devices received: []
 Feb 07 2017 00:28:54   Available devices received: [{"a": "28FF26417116057E", "c": 1, "b": 0, "d": 0, "f": 0, "i": -1, "h": 2, "j": 0.0, "p": 58, "t": 0, "v": 26.5}, {"a": "28FF4B4D511603D8", "c": 1, "b": 0, "d": 0, "f": 0, "i": -1, "h": 2, "j": 0.0, "p": 58, "t": 0, "v": 22.125}, {"c": 1, "b": 0, "d": 0, "f": 0, "i": -1, "h": 1, "p": 2, "t": 0, "x": 1}, {"c": 1, "b": 0, "d": 0, "f": 0, "i": -1, "h": 1, "p": 5, "t": 0, "x": 1}, {"c": 1, "b": 0, "d": 0, "f": 0, "i": -1, "h": 1, "p": 6, "t": 0, "x": 1}, {"c": 1, "b": 0, "d": 0, "f": 0, "i": -1, "h": 1, "p": 59, "t": 0, "x": 1}, {"c": 1, "b": 0, "d": 0, "f": 0, "i": -1, "h": 1, "p": 4, "t": 0, "x": 1}]
 
Hey guys

I have been messing all day with this all day using the Arduino mega 2560

......

Anyone have any idea what I can try? I tried playing with some conf files (and then some) but am completely stuck.

:mug:

Yeah - the Arduino Mega2560 won't work. Code wasn't compiled for it and likely won't be. You need an UNO with the ATMega258, I believe it is.
 
This it the output I get from the updater:
Code:
Found BrewPi v.2.4, running commit 00000000, running on an Arduino Mega with a revC shield on port /dev/ttyACM0

Full output can be seen here: http://pastebin.com/raw/f5SAvwb1

IIRC, RevC shields assume that you're using OneWire relays. It sounds like this firmware was compiled against the RevC shield (and therefore won't support wired relays like in your diagram).

Alternatively, it's an issue with brewpi-script not reporting the hardware correctly for that board.
 
Yeah - the Arduino Mega2560 won't work. Code wasn't compiled for it and likely won't be. You need an UNO with the ATMega258, I believe it is.

Guess I´ll have to find a uno then. Thanks for all help guys :)
 
Hey guys, just got my BrewPi up and running this weekend. Thanks for all of the great information on this thread it was a fairly simple process. I just placed my first fermentor in my chamber last night. It had been fermenting in my finished basement. It has already been fermenting for a week in an ambient temperature of 67 degrees. I was a bit shocked when the temperature sensor in a thermowell told me the beer was at 61.5 degrees when I first hooked it all up. I knew there would be a difference between ambient and actual temp but it definitely made me realize that this brewPi will help me step up my game.

Any ways I want to create a temp profile similar to what the guys from brulosophy have been doing. Remember I am already 7 days into my fermentation so I plan on ramping up the temperature right away.

This is his method.
1. Chill wort to target fermentation temp (66°-68°F/19˚-20˚C)), place in temp controlled environment, attach insulated temp probe to side of fermentor, and pitch yeast starter.
2. After 2-5 days (OG dependent) of active fermentation, remove*probe from side of fermentor so it measures ambient then bump regulator to 75°F/24˚C* (the Black Box*makes this easy).
3. After 2-5 more days, once FG is stable and the sample is free of off-flavors, cold crash the beer to 30-32°F/0˚C.

This is the schedule I made, remember I am already 1 week into fermentation. He states he just sets the fermentation chamber to 75. We are measuring the beer so I figured maybe it would be roughly 2 days to get to the same point.

Do you think this looks somewhat right?

Fermentation Schedule.jpg
 
Last edited:
IIRC, RevC shields assume that you're using OneWire relays. It sounds like this firmware was compiled against the RevC shield (and therefore won't support wired relays like in your diagram)[...].

That is incorrect, the Elco Rev C shield only supported standard relays.

Cheers!
 
Hey guys, just got my BrewPi up and running this weekend. Thanks for all of the great information on this thread it was a fairly simple process. I just placed my first fermentor in my chamber last night. It had been fermenting in my finished basement. It has already been fermenting for a week in an ambient temperature of 67 degrees. I was a bit shocked when the temperature sensor in a thermowell told me the beer was at 61.5 degrees when I first hooked it all up. I knew there would be a difference between ambient and actual temp but it definitely made me realize that this brewPi will help me step up my game.

Any ways I want to create a temp profile similar to what the guys from brulosophy have been doing. Remember I am already 7 days into my fermentation so I plan on ramping up the temperature right away.

This is his method.
1. Chill wort to target fermentation temp (66°-68°F/19˚-20˚C)), place in temp controlled environment, attach insulated temp probe to side of fermentor, and pitch yeast starter.
2. After 2-5 days (OG dependent) of active fermentation, remove*probe from side of fermentor so it measures ambient then bump regulator to 75°F/24˚C* (the Black Box*makes this easy).
3. After 2-5 more days, once FG is stable and the sample is free of off-flavors, cold crash the beer to 30-32°F/0˚C.

This is the schedule I made, remember I am already 1 week into fermentation. He states he just sets the fermentation chamber to 75. We are measuring the beer so I figured maybe it would be roughly 2 days to get to the same point.

Do you think this looks somewhat right?

That would work, one thing of note is you can use decimals in your days. To get "sudden" movement i use that.

For example your

0 - 69
2 - 75

would ramp the temp from 69 to 75 over 2 days. If you set

0 - 69
1.9 - 69
2 - 75

You would see your graph profile change to being a steep curve.
It wont take 2 days to get your beer from 69-75, its up to you if you want ti too or to force it to go as fast as possible. For warming you probably have the right idea going slow, so your ambient doesnt get too hot.

For cold crashing though this method of using decimals is best, it gets you from ferm temps to cold crashed as fast as your freezer/fridge will let you.
 
This it the output I get from the updater:

Code:
Found BrewPi v.2.4, running commit 00000000, running on an Arduino Mega with a revC shield on port /dev/ttyACM0


Full output can be seen here: http://pastebin.com/raw/f5SAvwb1


The most recent version is 2.10 that may be why it doesn't work. perhaps someone had gotten one working at one time but it's most likely deprecated. get a cheap uno clone and you'll be back on track.
 
The most recent version is 2.10 that may be why it doesn't work. perhaps someone had gotten one working at one time but it's most likely deprecated. get a cheap uno clone and you'll be back on track.

Got a real uno - plug and play :mug:
 
So as suggested by people in the Craftbeerpi thread, rather than replacing Brewpi with CPB, I am here to ask help with debugging my setup. I have built a Brewpi rig exactly as explained in this thread and it works fine with only the fridge actuator installed. However I installed a heater recently and now I get mad oscillation; looks like the system is not able to accurately set the overshoot of the heater.

My rig:
IMG_1848.jpg


1: Chamber temp probe
2: Beer temp probe, insulated.
3: Heater, which is a 60W tube heater (used in chicken coops etc) in a box with a fan on the right side. Arrows indicate flow.

Any suggestions? I am a bit of a noob PID controller wise.
 
Describe the probe insulation as it isn't evident from the picture.
Also as the heater fan is clearly to the left in the picture, where is the probe actually located?

Cheers!
 
That right a space probably doesn't really need a heater as long as it's fermenting.
 
The beer probe is pressed against the fermenter using a sponge (2), the chamber probe is taped to the wall on the right (you can just see its tip next to the '1'). The heater fan is on the right side of the box, pushing air out of the black vent on the top left of the box.

You're right wbarber, it doesn't really need a heater for fermenting around 68º, but like today when the ambient room temp is about 64º, and I want to go from 68º to 70º for attenuation I can't really do that without a heater. For lagers it's also nice to be able to do controlled ramps.
 
I'd need to see the graphs both zoomed out and or zoomed in if the graph is really long(7+days) and squished together to get any idea's.

The only thing that comes to mind is your chamber probe is at the top of your chamber. Heat rises, so it will artifically see slightly higher temps than there really are. Try bringing it to the bottom
 
The beer probe is pressed against the fermenter using a sponge (2), the chamber probe is taped to the wall on the right (you can just see its tip next to the '1'). The heater fan is on the right side of the box, pushing air out of the black vent on the top left of the box.

You really can't have enough insulation for the beer probe if your going to attach it to the side of the vessel.
I'd give a bigger piece of insulation a try. I would also try to get the probe away from the wall a bit. Hanging in free air, rather than taped to the side. The walls of the chamber are going to change temp a lot slower than the air within the chamber. The air is really what you want to be measuring with the chamber probe. It's tight in there, but that may help.

Edited to add: I would try hanging the probe from the temperature control knob so that it doesn't touch any thing. This way it is mid-chamber and not touching anything but open air.
 
I'd suggest either a smaller heater or a larger chamber/smaller fermenter. I feel like all your effectively doing is heating up one bottom corner of your pot. it would work much better to remove the heater from the box and just have the fan in a place where it can just move air. not just hot air, all the air, all the time. Hot air will rise naturally. and since your beer probe and your fridge probe are both located on the exterior of the vessel, you most likely see both rise pretty close to one another. it's not necessary to put the beer probe in a thermowell, but you might just find that it helps.
 
Still, a grab of the BrewPi temperature graph with all channels enabled and showing enough-but-not-too-much could be helpful...

Cheers!
 
Thanks for your replies!

I can assure you the heater does a nice job heating the entire chamber, not just the bottom of the fermenter. Also the beer probe does not seem to be affected that much by the chamber temp (it's metal on metal underneath the sponge). The only downside of this setup (compared to say a lightbulb), and probably contributing to my problem, is that the tube does not cool down rapidly when turned off (it gets to about 90ºF). The fan shuts off when the heater is turned off.

As I said, when only cooling it works fine, it cools until it reaches the set temp and then keeps it constant with small corrections, even in summer when it's hot. The temps are accurate (I checked this), the only problem is that the system can't determine when to shut off the heater so I guess this is something that can be remedied by tweaking the settings.

My graph:
Screen_Shot_2017_02_09_at_09_09_40.png
 
The idea of lowering the fridge sensor, is so it is closer to the heat source and will therefore heat up sooner than it currently is, doing so, it will turn off sooner and will prevent the over shoot (to some degree). Also being lower in the fridge the air temp will drop faster triggering the heater, thus preventing the undershoot.

End of the day it looks like your swinging 0.6°C which is around 1°f this is the only product that will get you closer than what you have now but your going to have to do some trial and error with those sensors. And Know you will hit a wall where you wont get improvement until your beer sensor is in a thermowel, your fermenter is plastic and an insulator to some extent between the beer and sensor.

ED punctuation and clarity
 
I think this was mentioned, but I had some similar issues to this and the solution was insulating the beer probe, getting the fridge probe in free air, and positioning a fan. The fan may have to be fiddled with but you want to make sure you have a good circulation and no dead spots. I had a sensor in a corner and that was a dead spot so the temp swings were pretty pronounced.
 
...Also the beer probe does not seem to be affected that much by the chamber temp (it's metal on metal underneath the sponge).

I would argue that the Beer temp fluctuates up and down quite a bit in line with the temperature of the chamber. I still think you need additional insulation from the chamber temp.

In my setup, I use a thermowell in the beer. If my chamber temp increases 5°f, the beer temp increases by less than 0.1°f

...The fan shuts off when the heater is turned off.

In order to maintain more consistent temps throughout and to eliminate the tube heater from creating a hotspot, I would run the fan continously.

the only problem is that the system can't determine when to shut off the heater so I guess this is something that can be remedied by tweaking the setting.

I think that your setup needs to be tweaked, rather than the PID settings.

Also, I still think that you should move the chamber temp probe so that it hangs in open air. Having it taped to the side wall is going to create a lag in the PID peak detection, and mess with the predictive values.

If you want to get a handle on the temp control, I would at least try some of the recommendations from everyone before dismissing them and assuming that it's the settings that need tweaked.
 
Hey everyone, got my BrewPi set up, fermenter is bubbling away happily. I had a look at the graph and noticed some very strange readings - anyone know what the cause is/ if it's a cause for concern?

Cheers

Screen Shot 2017-02-10 at 00.34.20.png
 
Hey everyone, got my BrewPi set up, fermenter is bubbling away happily. I had a look at the graph and noticed some very strange readings - anyone know what the cause is/ if it's a cause for concern?

Cheers
Looks like the time changed on the Pi while it was running.
 
I am getting my parts together for a project box and I want to be able to disconnect the sensors for a clean look. When I use RJ12 panel mounts to get out of the box for the one wire sensors, I just have to ensure that each plug (RJ11) is wired the same on each side so the panel mount "connects" the break in the wire correct?

Thanks and I am sure the question is noob in nature but want to ensure I am not missing something obvious. It always seems when a novice sees something as obvious it is actually wrong.

Jeff
 
I am getting my parts together for a project box and I want to be able to disconnect the sensors for a clean look. When I use RJ12 panel mounts to get out of the box for the one wire sensors, I just have to ensure that each plug (RJ11) is wired the same on each side so the panel mount "connects" the break in the wire correct?

I think I understand your question and I think you've got it wrong. I think what you're saying is that you'd wire the two RJ11 jacks so that they are a mirror image of each other, so when you place them together, face to face, the pins all line up with the same corresponding wire. That would be wrong. The connector crosses the wires internally.

Just wire up the RJ11 jacks both the same way and plug them in to either side of your panel connector.
 
  • Like
Reactions: JDL
Thanks for your replies!

I can assure you the heater does a nice job heating the entire chamber, not just the bottom of the fermenter. Also the beer probe does not seem to be affected that much by the chamber temp (it's metal on metal underneath the sponge). The only downside of this setup (compared to say a lightbulb), and probably contributing to my problem, is that the tube does not cool down rapidly when turned off (it gets to about 90ºF). The fan shuts off when the heater is turned off.

As I said, when only cooling it works fine, it cools until it reaches the set temp and then keeps it constant with small corrections, even in summer when it's hot. The temps are accurate (I checked this), the only problem is that the system can't determine when to shut off the heater so I guess this is something that can be remedied by tweaking the settings.

My graph:
Screen_Shot_2017_02_09_at_09_09_40.png

I can say with very high confidence that your problem is the time lag between the Fridge Setting and Fridge Temp. That lag leads to an instability in the system. As others have already said, the fridge/chamber temp needs to be decoupled from the chamber wall. Also notice how the lag on the leading/heating edge is larger than for the trailing/cooling edge. Once that chamber probe responds more quickly, then your system response will be much improved.
 
I think I understand your question and I think you've got it wrong. I think what you're saying is that you'd wire the two RJ11 jacks so that they are a mirror image of each other, so when you place them together, face to face, the pins all line up with the same corresponding wire. That would be wrong. The connector crosses the wires internally.

Just wire up the RJ11 jacks both the same way and plug them in to either side of your panel connector.

Yet it seems so obvious now that you say it...this is why I determined to ask the question and use the forums great wealth of knowledge.

Thanks again,
Jeff
 
We should have an audiobook of the last 4 years of this forum thread commissioned… that way we could just forward that to all the newcomers so they don't have to read every last page…
 
Status
Not open for further replies.
Back
Top