How to do a closed transfer for dummies?

Homebrew Talk - Beer, Wine, Mead, & Cider Brewing Discussion Forum

Help Support Homebrew Talk - Beer, Wine, Mead, & Cider Brewing Discussion Forum:

This site may earn a commission from merchant affiliate links, including eBay, Amazon, and others.

chewyheel

Well-Known Member
Joined
Jul 30, 2011
Messages
140
Reaction score
29
Location
Midway
I'd like to start incorporating some cold side techniques reduce oxidation, however, my engineering skills are approximately that of a 2 year old, so crafting/improvising brewing toys is not my strong suit. I know there are topics covering this but I get bogged down in the jargon and hardware required I get frustrated and throw my hands up in despair. I'm looking for a way to transfer from my Speidel fermenter to my keg with the least amount of fuss.

My current technique is siphon straight from the valve on the Speidel with a silicon tube gently into the the keg from the opening at the top. I'm pretty sure this is the biggest area of oxygen ingress I have when kegging so I should start there. Also, is a spunding valve necessary? What's the best way to purge a keg before filling it?

Any help is greatly appreciated.
 
Does your speidel have a spigot on the bottom? If so it's pretty simple.

1) Prepare a piece of vinyl tubing that fits tightly on the spigot with a liquid (black) ball lock quick disconnect on one end - this connects from your spigot to your purged corny keg's liquid post.

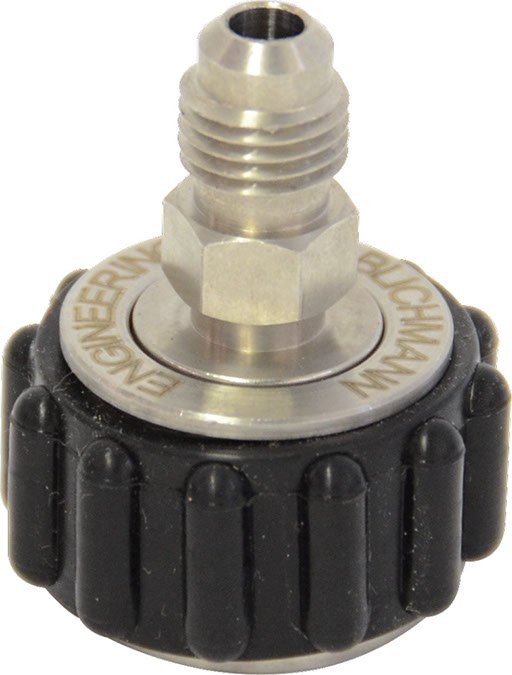
2) Replace your blow off tube/airlock with a ss carbonation cap with with hose barb (easy to find online or maybe LHBS)

3) Feed Co2 into the top of the fermenter by connecting your co2 tank to the carbonation cap at a very low psi (another technique is to feed the displaced CO2 from your purged keg but you asked for easy)

4) Once everything is hooked up, just pull the pressure relief valve on your keg and the flow should start.

For info on purging your keg, search for liquid purging with sanitizer.

I don't use a spunding and they are really only applicable if you have a fermenter that is pressure rated (mines not)


Yep, my spigot is at the bottom.

A carbonation cap like this one?
https://decorhousestore.com/product...MIvMKsr5Ti4gIVZf_jBx2Bqw4dEAkYAyABEgLhgfD_BwE
 
Another option for purging your keg is doing a fermentation purge. Just do a search and you'll find lots of info but using the CO2 produced during fermentation from your airlock/blow off to purge your keg of air (you of course also have to set up a 'blow off' out of the keg as well). Very easy to do and my skills at building things are quite basic as well.
 
I've only done it a few times myself, but here is what I do.

Purge keg with CO2:
-Fill to the top with sanitizer (I use Star San).
-Put lid on the keg.
-Attach beer-out disconnect with an appropriate sized tube, and put the tube in a bucket or another keg (the sanitizer will be flowing out of here).
-Attach gas-in disconnect to let CO2 fill the keg.
-After a few minutes when it starts making weird noises, you'll know that it's finished.
-Release the pressure relief valve.

Closed Transfer:
-Attach gas-in disconnect to the keg on one end, and to a 3-piece airlock on the other end. I find that a 1/2" ID tube will fit over the inside of the airlock.
-Replace the airlock in the fermenter with the airlock from above. This allows you to put CO2 from the keg directly into the fermenter. Some prefer the carbonation cap method, but I find this more convenient.
-Attach 5/16" tube to the fermenter spigot, with a liquid-out disconnect on the other end.
-Open the spigot and put your finger in the liquid-out disconnect to fill the tube with beer (so that there's no air in the tube before you hook it up to the keg. I usually pour a few ounces into a cup, and take my gravity reading from the sample).
-Connect the disconnect to the beer-out post.
-Watch the condensation line move up the keg as it gets filled.
-Get ready to close the spigot if beer comes out of the gas-out disconnect.

I had a few rough patches because I had too much trub on the bottom of my fermenter. It would cover the entire spigot and sometimes I wouldn't get any beer to flow. But my last few batches, I strained the wort as I poured it into the fermenter and that made an enormous difference.
 
I use a Speidel & do closed transfer every brew-just did one this afternoon. First off, get one of these: https://www.norcalbrewingsolutions....l-Lock-Gas-In-with-Pressure-Relief-Valve.html
-worth every penny. I changed out the spring in mine w a slightly shortened ball lock connect spring-Nor Cal sells beefier springs as well. That bulkhead goes on right after the yeast goes in, with a gas to liquid jumper hose feeding the target kegs liquid out and a gas to open end into a blow off bottle.
If you're going to cold crash, remove jumper, blow off & keg (otherwise you'll suck the blow off star san into your keg) I also "top off" the fermenter periodically w c02.
On transfer day, sanitize the spigot & fashion a section of tubing (3/8" silicon works best) w a threaded liquid ball lock connect at one end. (At this point, I add some reserved gyle to the keg to prime and ostensibly scrub any errant 02, but you could just fill the tubing w your fermented beer-press on the disconnect pin to fill) Attach the disconnect to the liquid out, put some very low pressure c02 on the bulkhead, open the kegs PRV & let it do its thing. Sounds more complicated than it actually is. Let me know if you need clarification-post fermentaion oxygen mitigation is worth the effort!
 
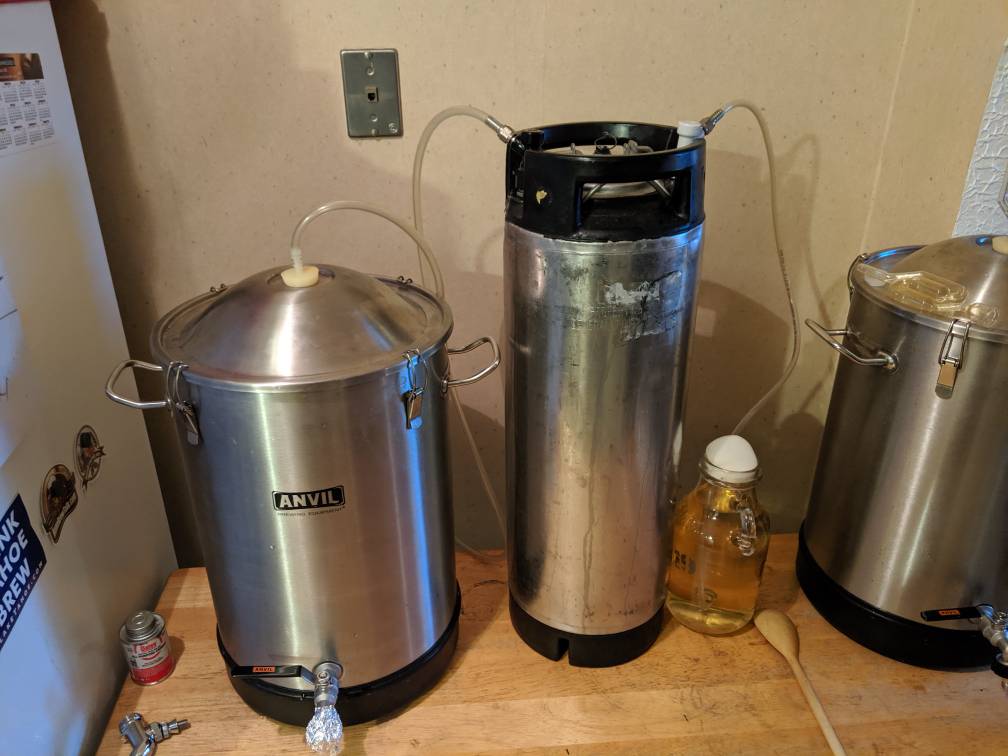
Maybe a little off topic but it's somewhat the same idea. No Speidel here.

This uses fermentation to purge the keg.

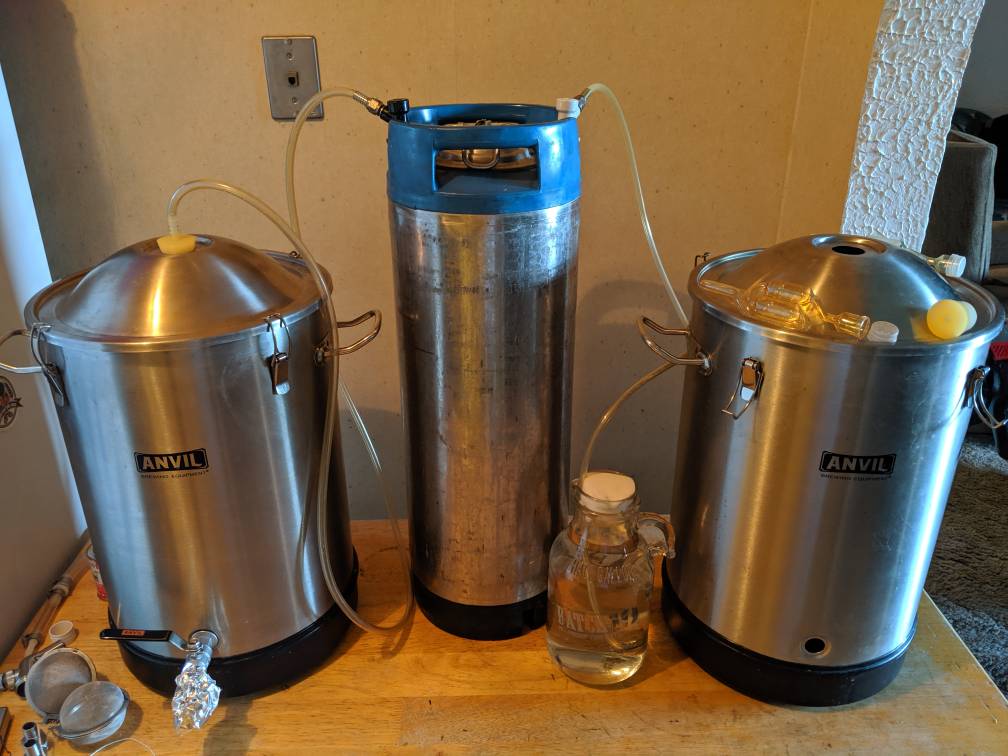
The left most fermentor is blasting out CO2 from fermentation. Ignore the right most fermentor.

1) I have a bung at the top of the fermentor with a hose barb connected to the Black Quick Disconnect LIQUID OUT of my corny.

2) Blowing CO2 out the Grey Quick Disconnect GAS IN connection. The opposite end of the Grey GAS IN connection is sitting in a growler blowing out gas as if it was an air lock.

So transfer time, drop the keg to the floor, and I swamp the 1/4 flare hose swivel keg swivel connections. Black for Grey, Grey for Black.

1) The fermentor ball valve drains to the Black Quick Disconnect LIQUID OUT. Filling the keg with beer.

2) The Grey Quick Disconnect is connected to fermentor top bung. Replacing venting gas from the keg back to the fermentor.

I spund with this cheap $10 regulator on day 3. Then let it carbonate using late fermentation CO2. I have this vent at 20psi. One to three weeks later, I chill, wait a few days for CO2 absorption and then drink. Waiting depends if I have an open slot for the keg.


IMG_20190611_175530.jpeg
IMG_20190526_200355.jpeg
10055.jpeg
IMG_20190414_212300.jpeg
 
This post describes my simple system for capturing fermentation gas to purge a keg, prevent oxygen intrusion during cold crashing, and do a closed transfer without bottled C02.

Credit for figuring out that fermentation produces enough gas to purge a keg goes to @doug293cz .
 
Easy and cheap:
-go to dollar store
-buy balloon
-tape 1-2 inches of tubing into balloon opening
-place tubing into air lock port 24 hours into fermentation (so head space O2 has been flushed)
-transfer out of spigot while leaving balloon full of CO2 attached to top port into a CO2 purged keg
 
Easy and cheap:
-go to dollar store
-buy balloon
-tape 1-2 inches of tubing into balloon opening
-place tubing into air lock port 24 hours into fermentation (so head space O2 has been flushed)
-transfer out of spigot while leaving balloon full of CO2 attached to top port into a CO2 purged keg

That will work for cold crashing.

But there's not enough volume in the balloon (unless you are talking a ridiculously large balloon) to replace the volume of liquid in the fermenter during a transfer.

For that you also need to connect the keg to the fermenter, so the liquid in the fermenter is replaced by the CO2 in the empty keg during the transfer.
Per your last comment,....That's what I said earlier... See image.

Right most fermentor has aging cider. So ignore that.

Ferment/Purge:

A) Fermentor gas out to Keg liquid out on the empty keg. CO2 fills from the bottom up.

B) Keg gas in to airlock growler.

Closed Transfer:

C) Swap of the keg lines

D) The growler blow of goes to spigot on the fermentor.

E) Open ball valve.

The filing keg returns it's CO2 back to fermentor.

Worth noting.... since you can't see squat other that the beer in the transfer line. I use a scale. At about 50lbs the keg is about full.

This week's transfer was 51lbs.
IMG_20190611_175530.jpeg
 
That will work for cold crashing.

But there's not enough volume in the balloon (unless you are talking a ridiculously large balloon) to replace the volume of liquid in the fermenter during a transfer.

For that you also need to connect the keg to the fermenter, so the liquid in the fermenter is replaced by the CO2 in the empty keg during the transfer.

With the balloon Im using now, I get to about 2 gallons left to transfer when my balloon is out of CO2 and I think all that head space created is enough to keep the heavier CO2 gas in contact with the beer as the O2 starts to creep in.

But if someone wanted to be on the safe side, I find that I have to purge out my balloon after about 12 hours and it fills itself again. So I guess you could have 2 balloons handy and tie one off and save it to swap on during the transfer
 
with an appropriate sized tube,

I recently tried doing a closed transfer and it was a mess bc the only size tubing that would fit on a bottling bucket spigot did not fit well with the barb on the liquid keg side. Is there a barb that can be found that will fit both the spigot and keg side?
 
1. Fill the keg with no foam sanitizer by using a bottling bucket with a spigot. Run the hose from the spigot to the out post using a black disconnect. Open the spigot and open the PRV (or tilt the keg slightly with the gas out post high and attach a spare gas QD) until sanitizer comes out. The keg is now full of sanitizer.

2. Use the same hose you filled the keg with but close the spigot, detach it from the bottling bucket spigot, and place the lose end in the bottling bucket. Attach 2-3 psi from a CO2 tank to the gas in post (see photo). Once CO2 begins to bubble in the now full bucket of sanitizer disconnect the black QD. Disconnect the gas in QD from the keg.

72E89898-D8B4-4012-B5EE-3AD70F5EFA30.jpeg


3. Turn the keg upside down by turning it towards the gas in post with the gas in post at the lowest point (slightly tilted). Using a spare gas in grey QD, install the QD to allow residual sanitizer to escape. (Shortened gas in dip tube helps with getting all the residual out) Do not allow all the CO2 escape.

4. Using the same hose you used to fill and drain the keg, attach the black QD onto the liquid out post and while gas is escaping quickly attach it to the spigot of your fermenter. Tighten hose clamp. You just purged the line with CO2.

5. Attach a hose to the spare grey QD and install it on the gas in post of your purged keg. As CO2 is escaping attach it to the top of your fermenter. You just purged the line with CO2 and created a pretty darn close oxygen free closed loop.

CC1E71F9-7730-4348-B90B-810626C989D5.jpeg


6. Open drain on the fermenter, have a beer and wait until beer comes out the gas in line. You now have a full keg of beer that displaced the CO2 in the keg by pushing it into the fermenter. I like to lay my keg on its side with the gas in post high for this.

7. Once full, with keg upright and level, apply a small amount of pressure to the keg and a tap. Drain a bit of beer until you no longer hear CO2 bubbling in beer. You just created CO2 filled headspace.

Hope this helps.

(I tried several ways to make the closed loop photo straight but gave up.)
 
Last edited:
I use a Speidel & do closed transfer every brew-just did one this afternoon. First off, get one of these: https://www.norcalbrewingsolutions....l-Lock-Gas-In-with-Pressure-Relief-Valve.html
-worth every penny. I changed out the spring in mine w a slightly shortened ball lock connect spring-Nor Cal sells beefier springs as well. That bulkhead goes on right after the yeast goes in, with a gas to liquid jumper hose feeding the target kegs liquid out and a gas to open end into a blow off bottle.
If you're going to cold crash, remove jumper, blow off & keg (otherwise you'll suck the blow off star san into your keg) I also "top off" the fermenter periodically w c02.
On transfer day, sanitize the spigot & fashion a section of tubing (3/8" silicon works best) w a threaded liquid ball lock connect at one end. (At this point, I add some reserved gyle to the keg to prime and ostensibly scrub any errant 02, but you could just fill the tubing w your fermented beer-press on the disconnect pin to fill) Attach the disconnect to the liquid out, put some very low pressure c02 on the bulkhead, open the kegs PRV & let it do its thing. Sounds more complicated than it actually is. Let me know if you need clarification-post fermentaion oxygen mitigation is worth the effort!

Just wanted to +1 this for the Speidel fermenters and the ball lock PRV - Agree they are worth every penny! I'd also highly recommend the metal spigots for this process as well. I had issues with the plastic spigot leaking under pressure through the pinhole in front.
https://www.morebeer.com/products/chrome-spigot-speidel-plastic-fermenters.html

From a timing perspective, just make sure that the pressure in the keg is equalized (or less than) the current pressure in the fermenter before you open the spigot! Otherwise you'll force CO2 back INTO the fermenter and stir up a bunch of yeast/trub at the bottom.
 
I recently tried doing a closed transfer and it was a mess bc the only size tubing that would fit on a bottling bucket spigot did not fit well with the barb on the liquid keg side. Is there a barb that can be found that will fit both the spigot and keg side?

I had the same issue, the spigot from the Speidel is a bigger diameter than the barb that attaches to the keg, anyone have a work around for this?
 
I had the same issue, the spigot from the Speidel is a bigger diameter than the barb that attaches to the keg, anyone have a work around for this?

I use a piece of food grade 5/16" I.D. silicone tubing rather than the hard PVC tubing. It's flexible enough to stretch over the spigot, but also tight enough to go over the threads on the back of the ball lock connector (I just remove the hose barb altogether). You could put a clamp on it to be on the safe side, my transfers are only going at 2-3 PSI so it hasn't been an issue
 
I use a piece of food grade 5/16" I.D. silicone tubing rather than the hard PVC tubing. It's flexible enough to stretch over the spigot, but also tight enough to go over the threads on the back of the ball lock connector (I just remove the hose barb altogether). You could put a clamp on it to be on the safe side, my transfers are only going at 2-3 PSI so it hasn't been an issue

Awesome thanks for the tip, I’ll try that next time
 

Latest posts

Back
Top