• Please visit and share your knowledge at our sister communities:
  • If you have not, please join our official Homebrewing Facebook Group!

    Homebrewing Facebook Group

Hoppo's Rustic Fermentation Chambers (Ale & Lager)

Homebrew Talk

Help Support Homebrew Talk:

This site may earn a commission from merchant affiliate links, including eBay, Amazon, and others.
Thanks guys....I'll take all of your suggestions into consideration. What I'm still trying to figure out is if I even need a heating source in the Ale chamber. I have been fermenting ales in my upstairs laundry room since I started brewing, which is climate controlled, so I have never fermented in a sealed, insulated, small space like a chamber. Is there any feedback as to my question:

My Ale chamber is going to be under 6 cu. ft. once fully insulated and it will be air tight. The side of my basement that these chambers will be located in will be consistently in the upper 50's to low 60's, season dependent. With this small of a cubic volume in this type of ambient temperature......do I need a heat source? Also, is there a possibility that my Ale chamber could get too warm with heat generated during fermentation and I'll have to end up using the lager chamber? Just trying to figure a few things out. Thanks for your help! :mug:

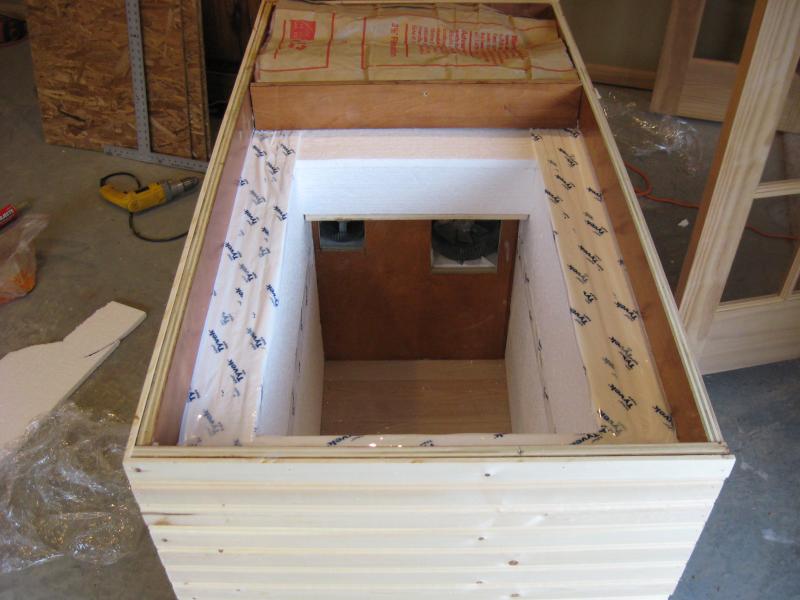
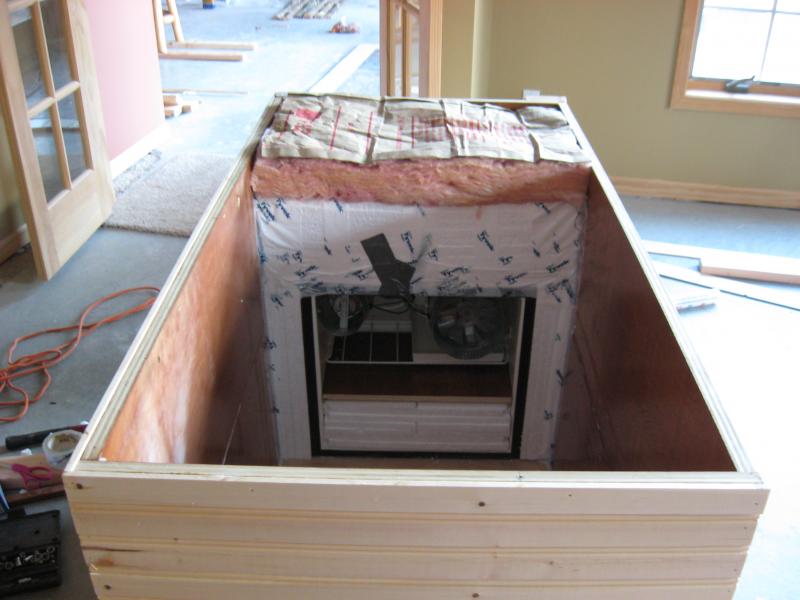
Oh.....here's a couple of pics of the lager chamber with most of the insulation in. The insulation for the bottom is actually under the sub-floor and is also 4.5" thick.
IMG_2450.jpg


IMG_2452.jpg


IMG_2453.jpg


IMG_2454.jpg
 
based on their configuration, even if the ale chamber gets too hot, you should be able add a small connection between the lagering chamber and the ale chamber with a fan on a temp controller.
 
I love the cabin type theme you are going with for the bar and everything! This builds make me miss having a basement. :(
 
based on their configuration, even if the ale chamber gets too hot, you should be able add a small connection between the lagering chamber and the ale chamber with a fan on a temp controller.

You know what....that is a fantastic idea!!! I never even though about that. It's certainly doable. I guess I'll just see how she goes.

Thanks aubicat....I'll check it out for a heat source.

TBaGZ.....I appreciate the compliment. It has been a fun project and I am so glad that my wife was cool with me doing the whole cabin theme in the basement. We live back in a woods with lots of wildlife, so it's fitting. The rest of the house it polar opposite to the cabin decor though.
 
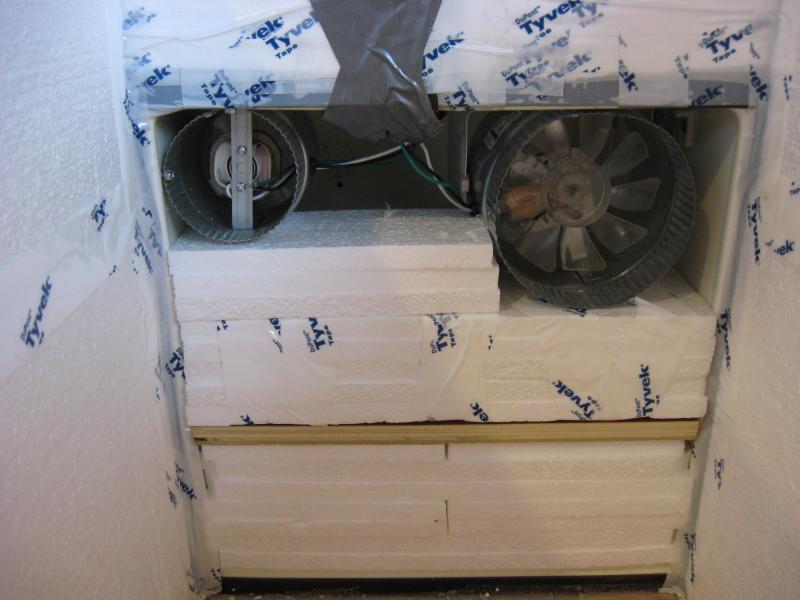
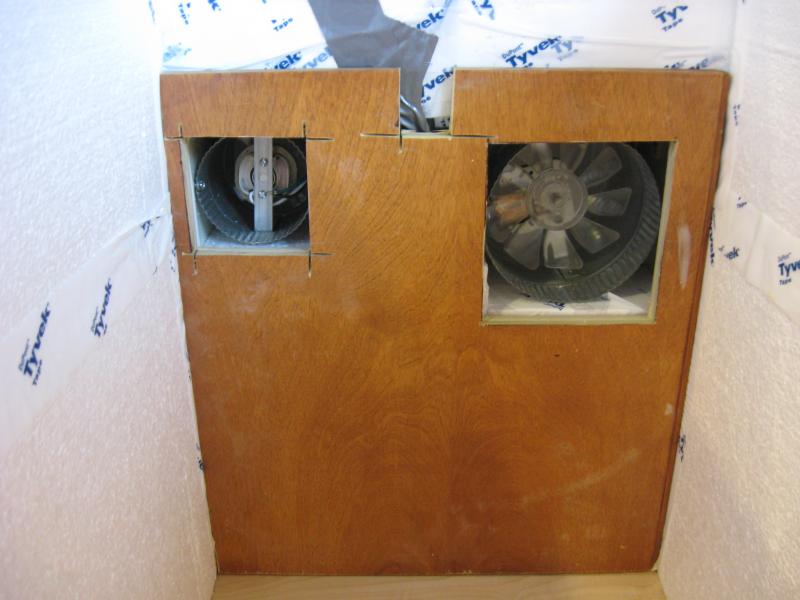
I did some more work on the lager chamber today. I filled the mini-fridge cavity with more insulation to further decrease the cu. volume of space and made a seperation panel between the fridge and the chamber. Fans are wired and I added more insulation around the upper perimeter. I purchased some weather stripping today to install around the entire top of the insulation rim, so that there will be an air-tight seal. I originally as going to build the temp. controller right into the side of the chamber box, like I did in the cabinet of my keezer, but decided to go a different route. I'm going to make a little wooded "control panel" that mounts on the wall around a handy box. I will mount the two temp. controllers on the face of the box and the controller will control power to the outlets behind the chambers. I'll just buy some extra long temp. probes, so there is pleny of slack to pull the cambers away from the wall if needed. Should work fine. Here's a couple of pics. of the progress.

IMG_2456.jpg


IMG_2458.jpg


IMG_2461.jpg


IMG_2463.jpg
 
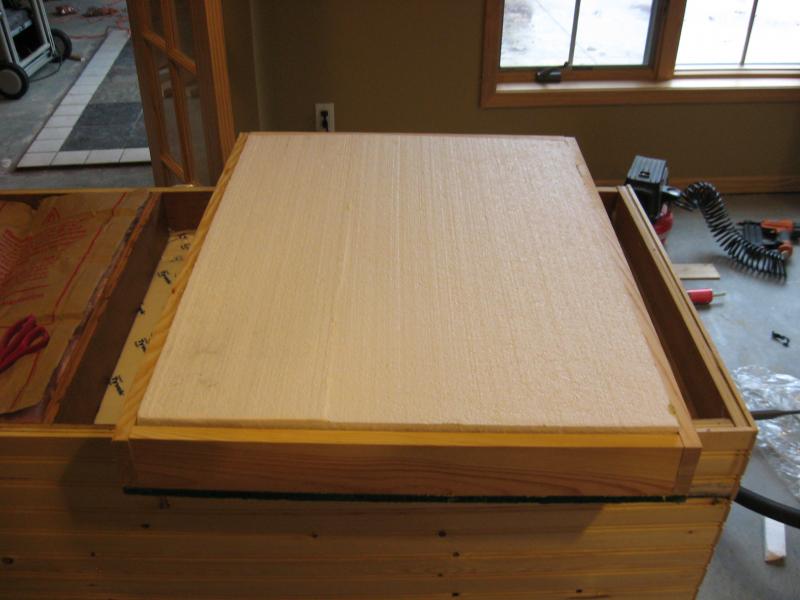
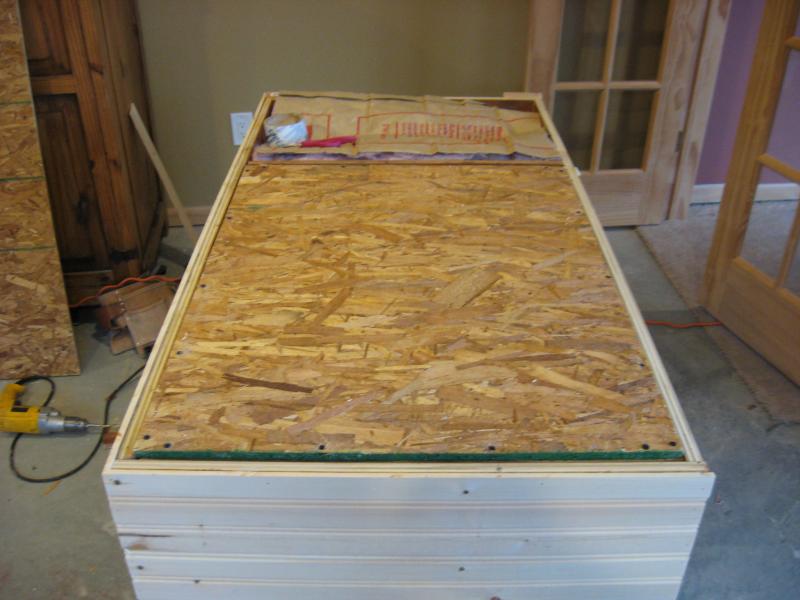
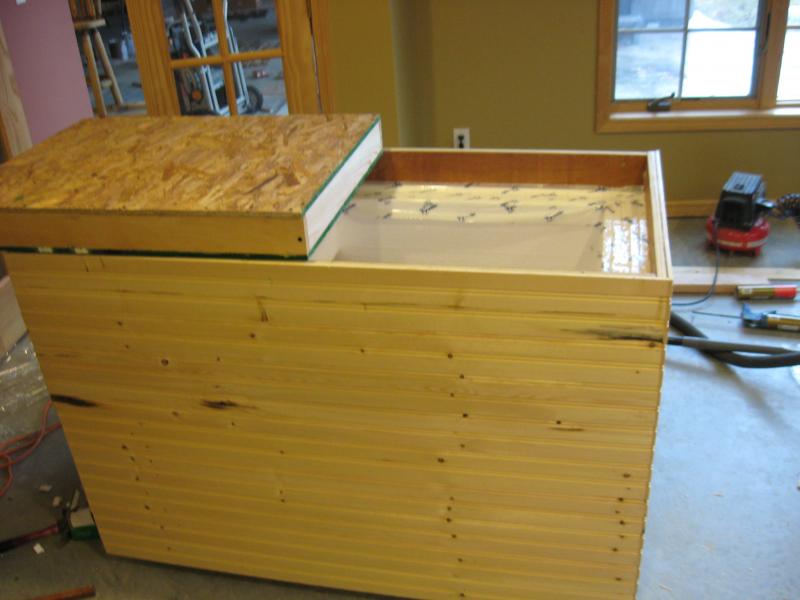
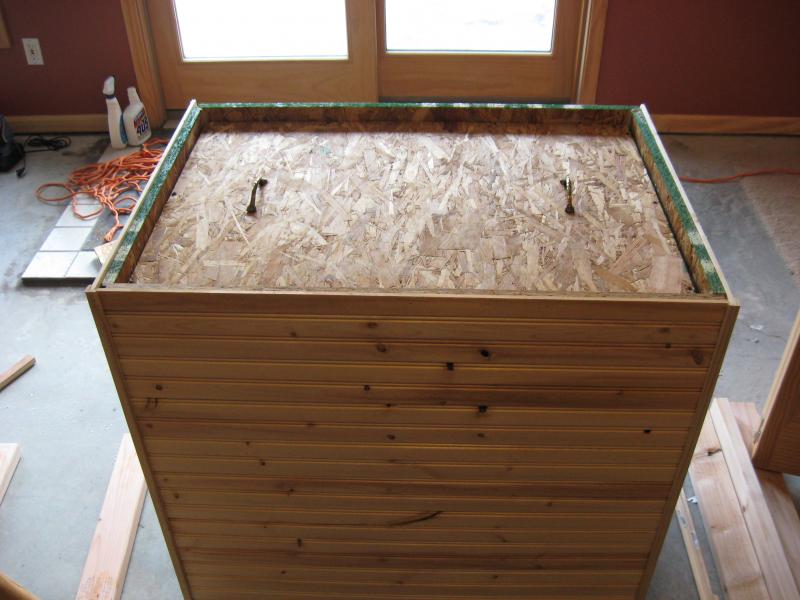
.....and finally, the rest of the progress that I made this afternoon. I build the lid, which slides down into the cavity and sits on the upper lip of the vertical wall insulation. With the weather stripping, it will be air tight. To build the insulated lid, I sandwiched 5 layers of polystyrene insulation between two sheets of 1/2" OSB, build a fram around and screwed it all together. The top of the compartment lid sits about 1/8" above the level of the cabinet top when the seal is in place and can be compressed down flush to the same level. Once I build the actual hinged lid, apply the trim boards, cement board, and travertine tile....along with the log across the front, it will be plenty of weight to compress the chamber lid down on the seal to make it air tight. Here are a few more pics.

IMG_2464.jpg


IMG_2466.jpg


IMG_2465.jpg


IMG_2467.jpg
 
This makes me think I should up the insulation on my chamber...I'm probably at about R5 which works fine for ale temps in my basement, haven't tried a lager in my current chamber yet. Do you ferment in carboys? If so, I hope you have brewhaulers for lowering the carboys into your chamber. Where will your temperature sensor be?
 
I use Ale Pales with blow off tubes for primary fermentation. I remove the rubber grommet where the air lock goes in the top of the bucket, drill the hole out larger and install spiggots in the lids, hook up some tubing, and drop it into a bucket of iodophor/water solution. Rarely use secondarys with my ales, but when I do I use carboys. Yes, I do have brewhaulers on them. I suppose as I get into more lagers, I'll be using them more frequently. I was going to go out and buy some 6 1/2 gallon carboys for primaries early on, so I could monitor/observe the fermentation, but realized after my first several batches that I was perfectly content with the ale pales and was no longer hovering over my fermenters like a momma bird waiting for her eggs to hatch. I became very patient, very quickly, so I trust that the yeasties are doing their thing and don't obsess over needing to see the process. I did make the chambers deep enough to accommodate either vessel however.

My original design was to build a door in the side of both chambers to slide the fermenters in, but I'm pretty tall and very strong, so heaving 5 gallons of wort up and over the side isn't a big deal. Maybe some day when I'm old and arthritic, I'll regret the design decision, but for now it won't be an issue. It's no different than loading 5 gallon ball locks into my keezer or than those who use chest freezers for their chambers. If I choose to, I will be able to pump the wort out of the BK directly into the fermenters already in the chambers if needed. That would cut out half of the work I suppose.

I plan on getting extra long temperature probes (prolly 10 footers) and drilling a small hole through the back walls, through the insulation side wall, and into the chambers. The temp. controllers will be located on the back wall above the chambers controlling the electrical outlets behind them. For my keezer, I tape the probe to the outside of the keg, cover it with insulation and it works great. I'm not sure how that method will work with Ale Pales, as they won't conduct temp. as well as stainless steel. I may just purchase waterproof probes and drop them into a small container of water to avoid short cycling of the fridge or heat sources due to temperature stratification. I'm open to suggestions on this topic as well, as this is my first stab at using fermentation chambers. Thanks guys! :mug:
 
I tape the probe to a carboy and insulate it. I think you'll want to figure out how to measure the temp in your bucket (thermowell maybe). I don't think that active fermentation will raise the temp of your entire chamber enough to get accurate control if your probe is in a separate vessel of water - just my opinion though.
 
Great point. I may just go the same route as you and switch over to carboys. I have a couple of 5 gallon carboys for secondary, but will need to get my hands on some 6 1/2 gallon ones for primaries. I have had great luck with taping/insulating the probe to my kegs in the keezer, so I wouldn't mind just sticking with that approach. If I were to tape the probe to the outside of an Ale Pale and cover with insulation, would it give me an accurate representation of internal temperature? I just assumed that the plastic may not conduct the temp. to the probe like glass or stainless steel. Am I way off base on this? If that would work, I would prefer to keep using Ale Pales, as I have 5 of them and would rather spend the money on keg conversion components as opposed to carboys. Anyone that would like to chime in....I'm open to suggestions. Thanks!
 
Great point. I may just go the same route as you and switch over to carboys. I have a couple of 5 gallon carboys for secondary, but will need to get my hands on some 6 1/2 gallon ones for primaries. I have had great luck with taping/insulating the probe to my kegs in the keezer, so I wouldn't mind just sticking with that approach. If I were to tape the probe to the outside of an Ale Pale and cover with insulation, would it give me an accurate representation of internal temperature? I just assumed that the plastic may not conduct the temp. to the probe like glass or stainless steel. Am I way off base on this? If that would work, I would prefer to keep using Ale Pales, as I have 5 of them and would rather spend the money on keg conversion components as opposed to carboys. Anyone that would like to chime in....I'm open to suggestions. Thanks!

I haven't tried this, but I bet you could do some experimentation with the ale pails. Measure the temp with an accurate thermometer, while seeing what your temp controller reads. If you checked at several temperature intervals I bet you could dial it in - then just adjust your temp controller (the ebay one many of us use has a calibration feature).
 
Thanks guys. I got some of the insulation done on the ale chamber yesterday, but ran out of insulation and adhesive to laminate the panels together. I will try to finish it up tomorrow, but then I have to focus all of my attention on cleaning the basement. My wife and I went and picked out carpeting and are scheduling the measurement with HD this week. Hopefully we will have the carpeting installed sometime next week and can put that project to rest. I really need to get all of the furniture out of the unfinished side, so I can free up space to finish my projects over there and contain the mess to one room.
 
Finished all of the insulation in the ale chamber yesterday, wired the heat source, and wired in the inductor fan for circulation. I ended up trying the light bulb in a can approach, so we'll see how it does. I think that it won't have a problem raising the temp in the chamber. I will post some pics of the progress this weekend. It's similar to the lager chamber and includes an insulated chamber lid. Now I just need to trim out the corners and build the decorative lids with cedar logs, knotty pine trim boards, and tumbled travertine. I won't be able to make any progress this weekend on the chamber tops, because I have to clean the entire basement. We are getting our formal measurement for carpeting on Tues. and hopefully will have the carpeting installed early the next week. :mug:
 
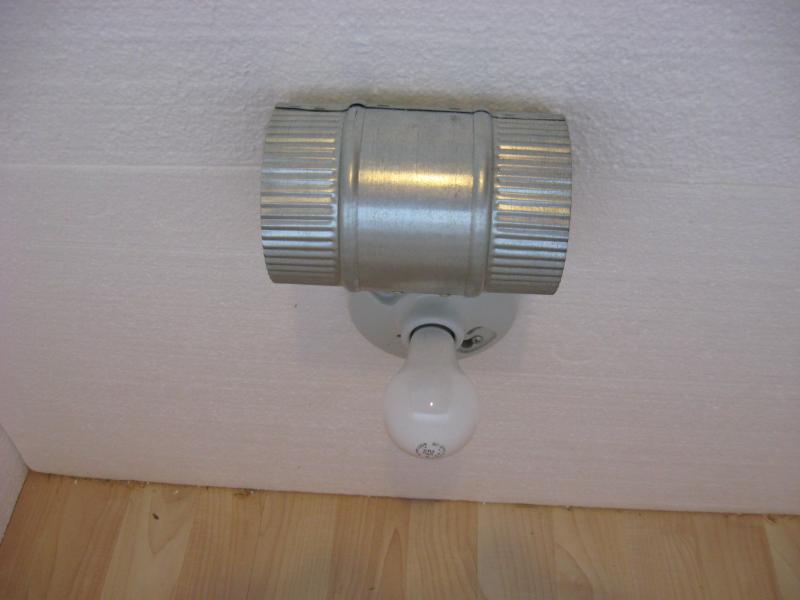
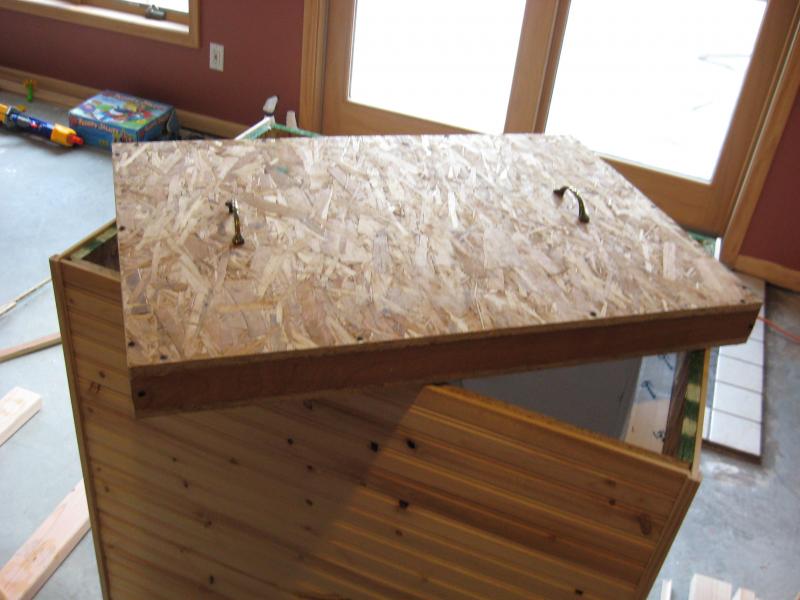
Here are some pics of the Ale Chamber with insulation installed and insulated chamber lid build. As you can see, I went a little lighter with this chamber compared to the other. With heat generated during fermentation and my heater source with circulating fan, it should be easy to maintain temps with less insulation. Like the lager chamber, I caulked every corner and seam and laminated the insultion panels together with construction adhesive. I taped the seams with tyvek tape as well. For my heat source, I am using the "light in a can technique. I have a single bulk light socket and 4" Inductor fan wired together. The light bulb is below the fan and a large vegetable juice can will slip over the heat source. As the heat raditates up to the fan, it will push it around the chamber. I'm hoping that it doesn't get too warm inside. It will be in the storage side of my basement that stays in the upper 50's in the winter to the low 60's in the summer. If I start to have issues with overheating in the chamber, I will try to connect the two chambers with insulated ducting from the lager chamber over to the ale chamber. I just have to experiment to see what needs to happen. :confused:

IMG_2469.jpg


IMG_2470.jpg


IMG_2471.jpg


IMG_2472.jpg
 
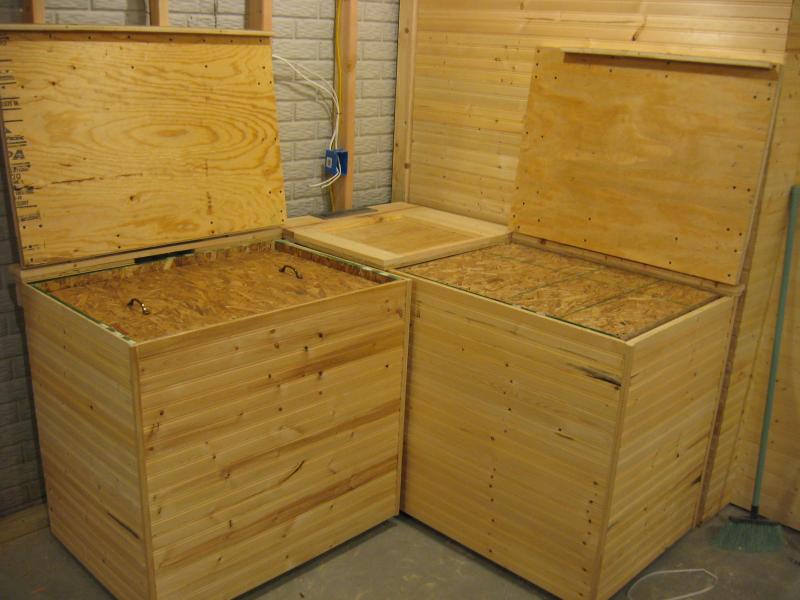
Here's a pic of the two chambers in their final resting position once the brewing room is done. Next I need to build the decorative outer lids with cedar logs, travertine tile, etc. Just incase you were wondering in the prior pics, there is 5 layers of insulation below the subfloor of both chambers, so I did not forget to insulated the bottoms of the chambers, they are insulated from the bottom surface of the chambers. ;) The rest of my day will be spent cleaning the entire basement and getting it ready for carpet installation.

IMG_2474.jpg


IMG_2475.jpg
 
any updates on these builds? :) love your work - stumbled across one of your builds yesterday and have been trying to read through them all :)
 
Sorry....no real updates on this build. I plan on getting the ball rolling asap on my chambers. I found a source in Ontario for temperature controllers that can auto switch between heating and cooling applications, so I'll order them this week and get moving on the projects again. I own a couple of physical therapy practices and we are short handed at one, so I'm working long hours....not to mention my son's baseball games, my daughters softball games and gymnastics practices, etc., etc. My daughter finished softball last week and my son had his last regular season baseball game on Saturday, so now just playoffs and then done!!! Over the next couple of weeks I plan on getting my chambers going again, as well as my dedicated brewing room. I also need to get the wine racking built in my cold storage wine/beer room, because we have a 6 gallon batch of cabernet that needs bottling in another 2 weeks. Too much to do....too little time. I'll post some updates when I get a chance. :)
 
I finally ordered two temperature controllers through Thermomart and they came in the mail on Monday. One is a simple single channel temperature controller to control the mini-fridge compressor and inductor fans in my lager chamer. The second is a Single Input/Dual Output controller that auto-switches between a heat source and a cooling source to keep precise temps. This will be used in my ale chamber. Unfortunately, I was unable to find these controller in Fahrenheit and had to settle with Celcius. For less than 1/2 of the cost of the Dwyer Love controller that I used with my keezer, I can live with it. I went to HD yesterday and purchased a 6"x6"x4" plastic electrical junction box, all of the conduit/fittings, and the receptacles for my Fermentation Temperature Control Center. I was able to assemble some of the components last night such as the conduit and fittings, receptacle boxes, romex to the receptacles, etc. I still need to cut the r/o's for the temperature controllers in the face (lid) of the junction box and wire in the power sources and the outputs, otherwise everything else is complete. I'll post a few pics of my progress when I get home from work.
 
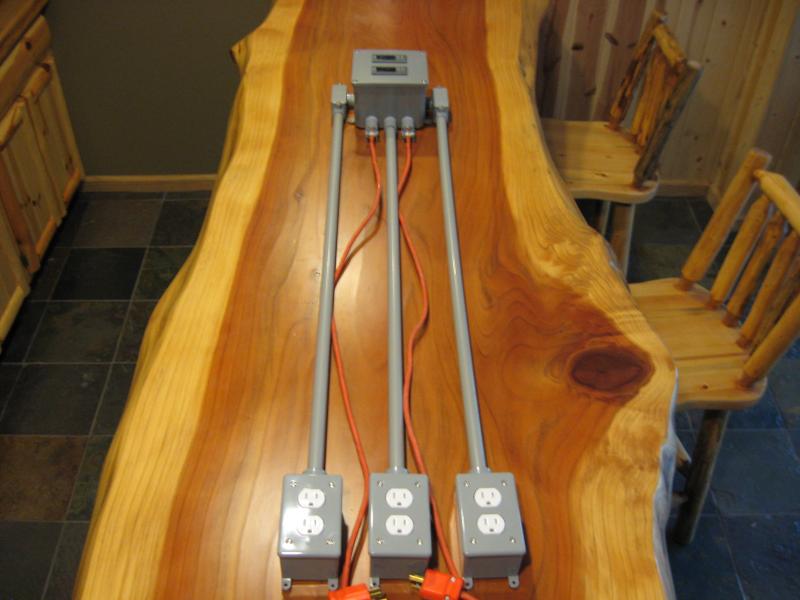
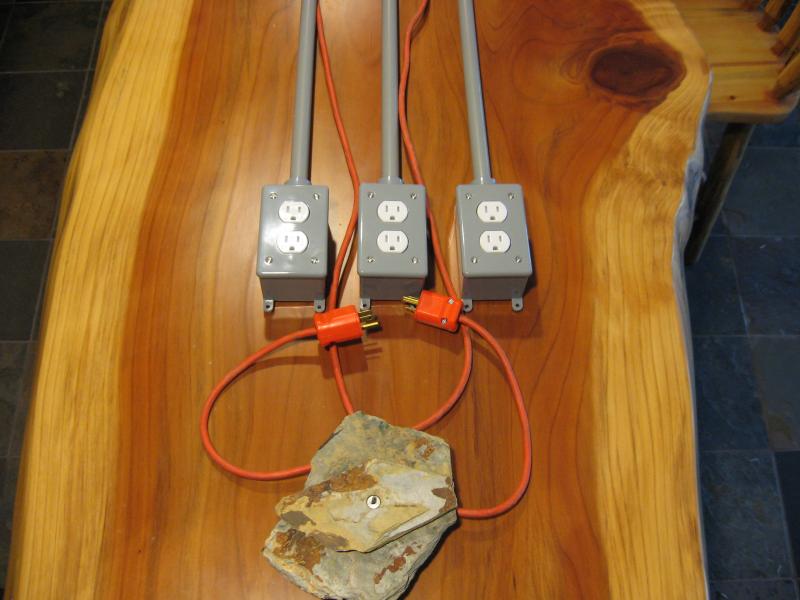
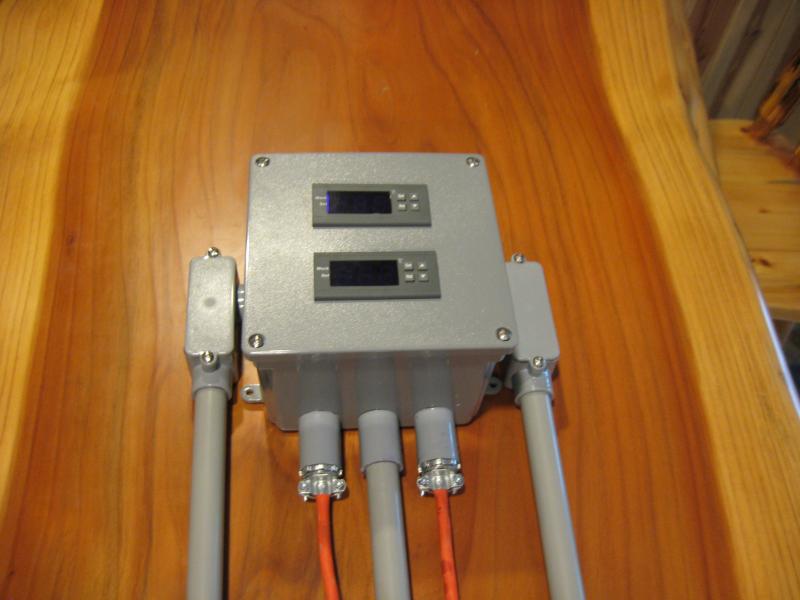
Here are some pics of my final product for the temperature control center for my chambers. I decided to pipe everything to keep it looking neat. In fact, the power source cords (orange cords in the pic) will likely be piped in conduit as well. I dropped the receptacles just under 3 feet below the control box and they will be behind the chambers to plug into. The top controller is a simple single channel controller that will control the compressor for cooling my lager chamber and an inductor fan that will be used to remove the hot air produced by the cooling coils of the mini-fridge used from behind the chamber. It controls power to the right receptacle. The lower controller is a single input, dual output that auto switches between a heat and a cold source to maintain temps in my ale chamber. The receptacle on the left controls power to my heat source and a circulating fan. The receptacle in the middle provides power for my cold source, which I haven't quite figured out yet. I used water and tamper resistant electrical receptacles. :mug:

IMG_2556.jpg


IMG_2561.jpg


IMG_2562.jpg


IMG_2563.jpg
 
I need some feedback. My "ale" chamber will be used for primary fermentation of both ales and wine. My heat source is very simple and effective (light in a can + inductor fan). I'm still debating about the cooling source. My initial plan was to just install a computer fan to draw cool ambient air into the chamber from the bottom and have another fan exhausting warmer air out of the upper portion of the chamber. My brewing room does not have radiant floor heating like the rest of my basement does, so when I keep the heat registers dampered down in that room, the ambient temperature is consistent in the low to mid 60's. By exhausting warm temperatures created during fermentation out of the top of the chamber and drawing cool ambient air in through the bottom, would that be enough to keep the temperatures down in the chamber during primary fermentation? I have also considered using a thermoelectric cooling unit and heat sink system that I found on ebay for $35 for the whole setup.....2 fans and power source included. Here is the link for that: http://www.ebay.com/itm/refrigerati...793?pt=LH_DefaultDomain_0&hash=item2a1da08239

What do you guys think.....am I fine with the simple computer fan intake/exhaust approach or should I install an actual cooling source? Any input would be fantastic! :mug:
 
I did the final wiring for the temp. controllers, but it wasn't easy. The wiring diagrams SUCKED that came with the controllers. After a quick HBT search, I found JuanMoore's post containing a wiring diagram for my simple single input/single output controller and I was able to easily apply it to the single input/dual output controller. I did some testing after adjusting the parameters and the controllers are working as advertised! I decided to test my lager chamber with the new control system. I was able to drop the temp. inside of the chamber from 21.8 C to 10.0 C in 25 minutes (down to 50 degrees F), so I'm pleased with the performance of the old mini-fridge compressor and inductor fan set up. The chamber should be fine for primary fermentation for all lagers, but lagering down to mid 30 degree temps. likely won't happen in this chamber. I am keeping my eye out for another chest freezer for secondary lagering.

I'm still trying to figure out what to do with my ale chamber for cooling if needed. Please read my prior post and give suggestions....I would greatly appreciate the feedback. Once I figure out my method for cooling for that chamber, then I will finish the cosmetic work including decorative lids trimmed out in knotty pine, cedar logs, and tumbled travertine tile. :)
 
Damn dude you got the dream man cave goin on or what!! That is really nice what you've done so far. Jealous as hell, lol. Wish I could help you out with your ale cooling but don't know alot about refridgeration......I'm intrigued by the thermoelectric config you're considering....that would probably work really well for me here in FL in my garage. Good luck with it and hope someone comes on here and gives you good advice.
I wonder if I could build a frame/cabinet around a thermoelectric cooler big enough for a couple of ale buckets to ferment in sort of like you did with your mini fridge for your lager chamber....
 
Thanks for the compliment....much appreciated. My basement "man cave" is the result of 3+ years of blood, sweat, and lots of beers. :D It was a love/hate relationship, because I love home construction projects and building sh*t, but at times was so damn burned out with it that I considered hiring the rest done. In retrospect, I am glad I did everything on my own from start to finish now that it's done. I took a break from all of my projects for the past few months, but now am back at it. I'm going to build the decorative lids for the chambers to match my keezer build (check it out in my sig. line if you haven't). Then I really have to get the plumbing and electrical ran in my brewing room, so I can drywall and get tile going. I think I'm going to get the room done first and then tackle the rest of my electric HERMS system and control panel.

I don't see any reason why what you are proposing wouldn't work with a thermoelectric cooling system. It may require more than one peltier cooling unit depending on the volume of the chamber that you build. Just make sure that you insulate the hell out of the box and it's sealed tight. On the other hand, you could always just hunt down a little 5 or 7 cu. ft. chest freezer on craigslist for a few bucks and control the temps with a simple $20 ebay temp. controller. I plan on finding another chest freezer for longer term secondary lagering down into the mid 30 degree range. Of course, I'll likely build a cabinet around it and dress it out to match my rustic cabin motif. Let me know if I can help in any way to guide you in the right direction. :mug:
 
I was bored and had a couple of old computer towers laying around, so I canibalized them for their fans. I decided that the peltier cooling approach isn't exactly suited for this project and I have now idea of their cooling capacity without adding multiple units. With the ambient temperature of my basement staying in the low to mid 60's, I'm just going the computer fan cooling route. I used a hole saw to create a "cold air intake" in the floor of the chamber and then created another exhaust portal out of the upper, rear portion of the chamber. The fans were wired together using an old cell phone AC to DC cord. The air flow through the chamber is better than expected. I'm hoping that drawing in ambient air from the bottom and exhausting warmer air out of the top will suffice for cooling purposes. I finished up with my light in a can set up with an inductor fan for my heat source as well. I did a few trial tests with my new single input, dual output control module and the autoswitching between heat and cooling worked just fine. I guess I'm going to have to brew a batch of Ale or wine to try this thing out. More pics. to come.
 
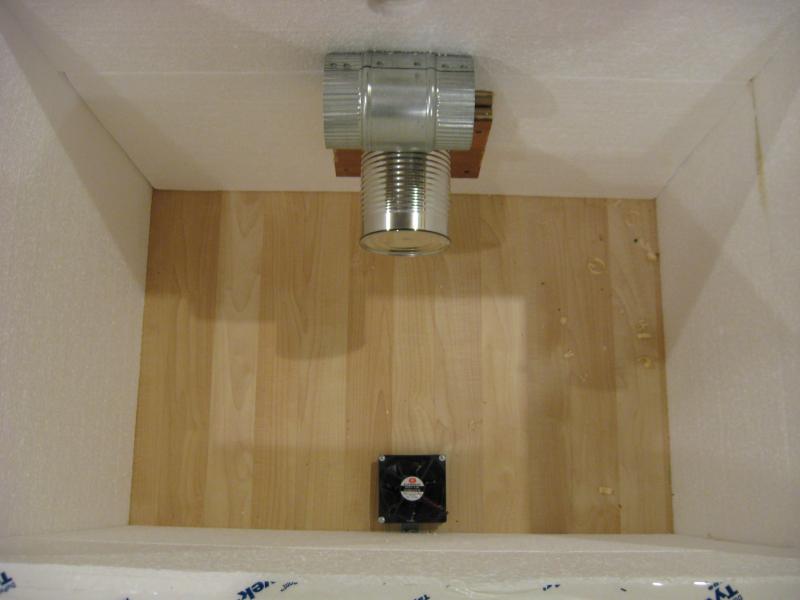
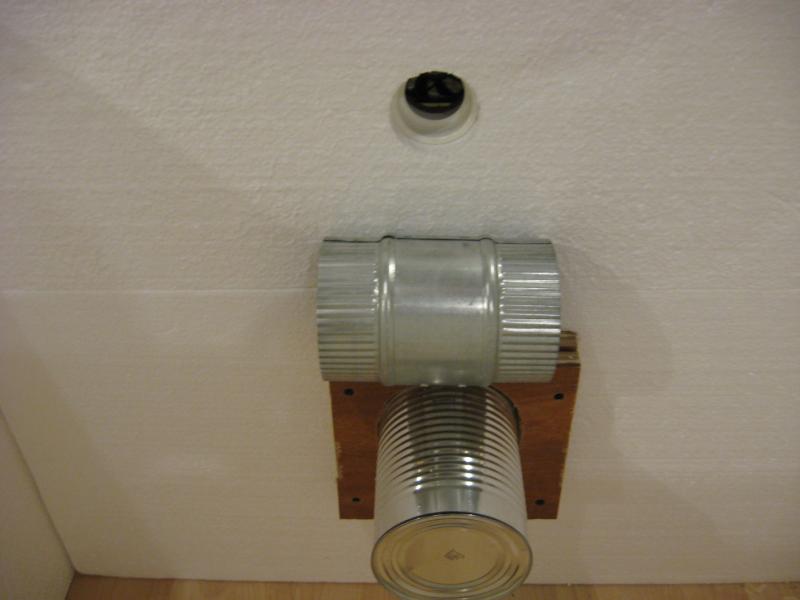
Here are the pics of the computer fans installed, which will hopefully be effective as my cooling source. Since this particular chamber is dedicated to ales and wine, I'm just trying to counteract and dissipate heat generation during fermentation, so I don't think I need a refrigeration source for this one. One of the fans is installed in the floor of the chamber drawing cool air into the chamber from down low. The other is in the rear wall, positioned in the upper portion of the chamber to exhaust warm air in the upper portion of the chamber out. You can also see my heating source in the pics....basically the old fashioned low wattage light bulb in the can trick, with an inductor fan above it to circulate the warm air around the chamber to maintain temps. when my basement gets too cold in the winter for ales/wine.

IMG_2569.jpg


IMG_2571.jpg


IMG_2572.jpg


IMG_2573.jpg
 
I have been working a ton of hours, so I managed to work only a 1/2 day today....and my last patient cancelled, so I got out extra early. I was able to keg a batch of Amarillo Wheat IPA, bottle 6 gallons/30 bottles of Cabernet, and start working on the decorative lids for my chambers. It's unbelievable what I can get accomplished when my kids are away for the week, my wife is at work, and I can get out of work early. I need to retire, so I can devote more time to brewing and brewing projects. :D Here are a couple of pics of the plywood cut to size. Now I need to knife a couple of 1/2 logs, trim the tops out, and apply the cement board.

IMG_2574.jpg


IMG_2575.jpg
 
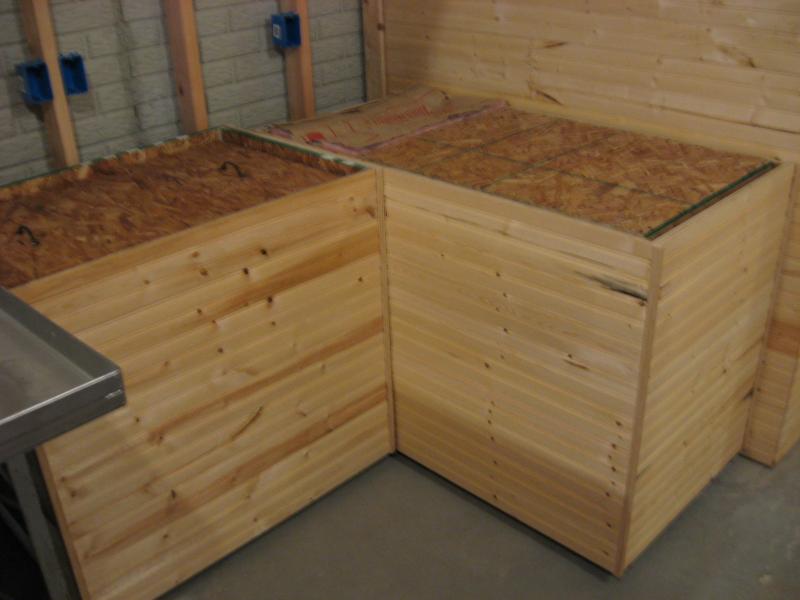
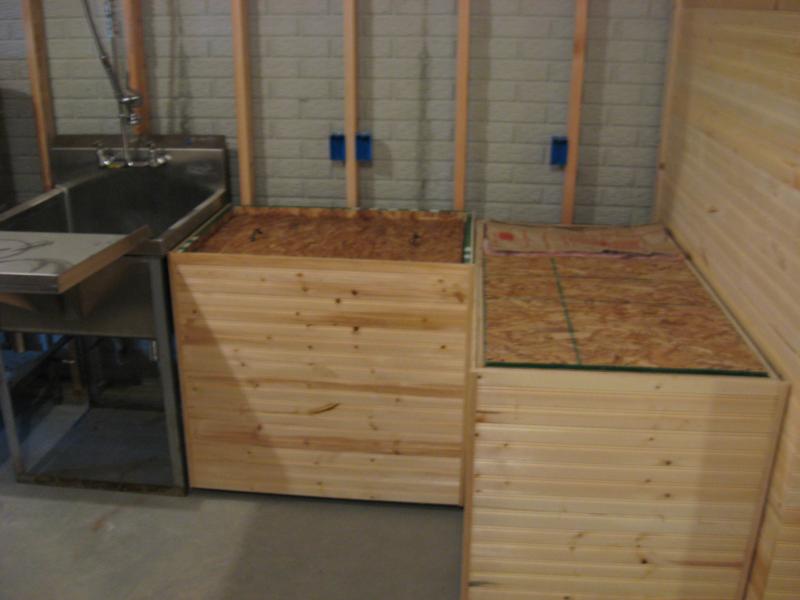
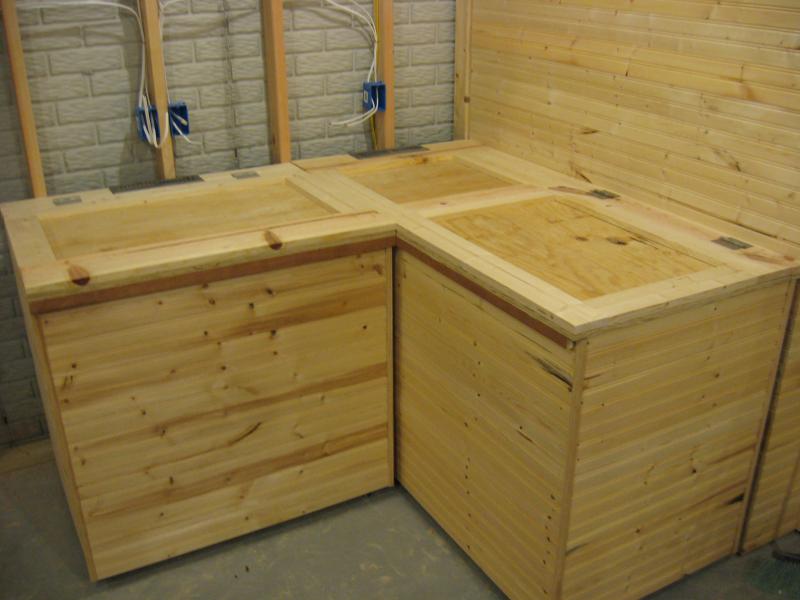
Finally found some time to start trimming out the decorative lids for my fermentation chambers today. The goal is to make them look similar to my rustic keezer. Here are a few pics of the tops of both chambers trimmed out and how they fit together in the corner of my brewery. Next I will knife a few logs and try to get this thing to fit together with the log trims in place.

IMG_2586.jpg


IMG_2589.jpg


IMG_2590.jpg


IMG_2592.jpg
 
Back
Top