You are using an out of date browser. It may not display this or other websites correctly.
You should upgrade or use an alternative browser.
You should upgrade or use an alternative browser.
Grainfather!!
- Thread starter BrewMeister49
- Start date

Help Support Homebrew Talk:
This site may earn a commission from merchant affiliate
links, including eBay, Amazon, and others.
-Parts are not easily replaceable should they go out. And they will.
Not true. Parts are easily replaceable (except the heating element)....and available from your LHBS. I have sold 2 dozen of these and replaced one part. And several purchasers are using theirs weekly.....
M0KCE
Well-Known Member
So then why is the US version only 120V ?
Good question, not sure, would be nice to have the choice when ordering though.
How do you get that ? I measured 10.5" ID x 17" ish deep. 6.37 gallons or so.
In the manual here,. I suggest you look through it because many of the questions you've asked/been asking are answered within. Ed

I hope your GF works a long time, but he brings up a good point too. The pump could probably be replaced by a chugger, with an improvement in performance. But what about the "boiler" ? I'd like to see what lurks below ? How does one access this thing ?
FWIW, if I owned a GF, I'd be doing some mods, like starting with a calibrated sight glass and an upgraded heating element. If you don't want to go 240VAC, you could use 2 120VAC elements and plug them into different circuits.
I'd also move the temp sensor to the mash bed, where the temperature matters.
Thank you, me too!
I doubt I'd replace the pump w/a chugger (even though I have a new one, never opened, need to sell!) as it's likely too powerful. If the heating element in the boiler crapped out, you MAY be hosed. But I would open her up from below. May not be pretty but besides being hidden anyway, I'd have a go at it, and replace the heating element(s), though could require some work. I believe the likelihood of a heating element failure is low. Not a complex part we're talking about. What else do you think lurks below? A catalytic converter? A fuse box? Seriously it's heating elements and wire, what else? Probably no insulation even. Reset switch is mounted into base too.
If you want a 240v machine, buy one? You can use different circuits but folks may be limited to one circuit in their brewing area too, like a kitchen or outside. I don't see the advantage of a sight glass beyond bling. I can see my levels fine enough and don't need something that can easily break with all the moving I do with my GF. As for temp sensor in mash, sure, but explain how you'd do that. Easy way is a thermometer with one of those wires run down thru top plate. Besides that mash temp could be different in various locations, and thus inaccurate for the entire mash, what in beer quality are you gaining? Strike with +10F or so and good to go (based on my mash bed temp measurements I've performed, and not long after the temp probe and controller catch up!).
I love the look of Kal's electric brewery setup, but beyond it being way overboard for my hobby (and expensive) I'd eventually be overwhelmed by all the components. Love the simple lifestyle! This hobby can grow way out of hand if you let it. If you like that great, but I prefer to limit its growth and the GF does just that.
In the manual here,. I suggest you look through it because many of the questions you've asked/been asking are answered within. Ed
I don't see the volume of the mash tun in the manual.

$176.97
1pc Commercial Keg Manifold 2" Tri Clamp,Ball Lock Tapping Head,Pressure Gauge/Adjustable PRV for Kegging,Fermentation Control
hanhanbaihuoxiaoshoudian

$33.99 ($17.00 / Count)
$41.99 ($21.00 / Count)
2 Pack 1 Gallon Large Fermentation Jars with 3 Airlocks and 2 SCREW Lids(100% Airtight Heavy Duty Lid w Silicone) - Wide Mouth Glass Jars w Scale Mark - Pickle Jars for Sauerkraut, Sourdough Starter
Qianfenie Direct

$20.94
$29.99
The Brew Your Own Big Book of Clone Recipes: Featuring 300 Homebrew Recipes from Your Favorite Breweries
Amazon.com

$53.24
1pc Hose Barb/MFL 1.5" Tri Clamp to Ball Lock Post Liquid Gas Homebrew Kegging Fermentation Parts Brewer Hardware SUS304(Liquid Hose Barb)
Guangshui Weilu You Trading Co., Ltd

$7.79 ($7.79 / Count)
Craft A Brew - LalBrew Voss™ - Kveik Ale Yeast - For Craft Lagers - Ingredients for Home Brewing - Beer Making Supplies - (1 Pack)
Craft a Brew


$76.92 ($2,179.04 / Ounce)
Brewing accessories 1.5" Tri Clamp to Ball Lock Post Liquid Gas Homebrew Kegging Fermentation Parts Brewer Hardware SUS304 Brewing accessories(Gas Hose Barb)
chuhanhandianzishangwu


$58.16
HUIZHUGS Brewing Equipment Keg Ball Lock Faucet 30cm Reinforced Silicone Hose Secondary Fermentation Homebrew Kegging Brewing Equipment
xiangshuizhenzhanglingfengshop


$53.24
1pc Hose Barb/MFL 1.5" Tri Clamp to Ball Lock Post Liquid Gas Homebrew Kegging Fermentation Parts Brewer Hardware SUS304(Liquid Hose Barb)
yunchengshiyanhuqucuichendianzishangwuyouxiangongsi


$44.99
$49.95
Craft A Brew - Mead Making Kit – Reusable Make Your Own Mead Kit – Yields 1 Gallon of Mead
Craft a Brew
![Craft A Brew - Safale BE-256 Yeast - Fermentis - Belgian Ale Dry Yeast - For Belgian & Strong Ales - Ingredients for Home Brewing - Beer Making Supplies - [3 Pack]](https://m.media-amazon.com/images/I/51bcKEwQmWL._SL500_.jpg)


$10.99 ($31.16 / Ounce)
Hornindal Kveik Yeast for Homebrewing - Mead, Cider, Wine, Beer - 10g Packet - Saccharomyces Cerevisiae - Sold by Shadowhive.com
Shadowhive


$28.98
Five Star - 6022b_ - Star San - 32 Ounce - High Foaming Sanitizer
Great Fermentations of Indiana

$719.00
$799.00
EdgeStar KC2000TWIN Full Size Dual Tap Kegerator & Draft Beer Dispenser - Black
Amazon.com


$479.00
$559.00
EdgeStar KC1000SS Craft Brew Kegerator for 1/6 Barrel and Cornelius Kegs
Amazon.com


$22.00 ($623.23 / Ounce)
AMZLMPKNTW Ball Lock Sample Faucet 30cm Reinforced Silicone Hose Secondary Fermentation Homebrew Kegging joyful
无为中南商贸有限公司


$159.50 ($26.58 / Count)
3M High Flow Series System BREW120-MS, 5616001, For Brewed Coffee and Hot Tea, Valve-in-Head Design
Amazon.com


TAs for temp sensor in mash, sure, but explain how you'd do that. Easy way is a thermometer with one of those wires run down thru top plate
The current temp sensor just pushes into the thermowell. Pull it out. Cut the wires and extend them so it can run up the discharge pipe Install a second thermowell in the top plate such that the opening for the temp sensor is above the liquid level and the tip is 3-4" into the grain mash. Push the temp sensor into the thermowell. Seal it with epoxy if you want.
If you want to get fancy, pull the controller box apart and put a switch in it. Install a second temp sensor in the existing thermowell. Wire it so you can switch between the bed temp sensor and the boil kettle temp sensor. It would be very interesting to observe the difference.
FWIW, I think the current temp sensor location isn't very good. I'm sure the wort it is measuring is picking up heat from the "boiler". What you are really measuring is semi heated wort before it loses some heat going up the discharge tube and back into the grain bed. The grain bed is going to lag whatever temp that wort returns to the bed at.
If the return wort is used as the setpoint, the best the grain bed will ever to is catch up to that. If the flow rate *through the bed* is too low, the bed will never catch up to the setpoint.
What should happen is the bed temp sensor should control the process. When the bed is cold the boiler should be full on and when it is, the wort return temp should be much higher than the bed set point in order to get the bed to where it is supposed to be. See the difference ? If you want the bed to be 150F and it is at 140F, you need a wort return temp of 160 or higher to raise the bed temp. If you keep the wort return temp at 150, the bed will lag it, how much depends on a number of a factors.
Ask any HERMS brewer about this. When trying to raise the temp of the mash, the HLT and the wort return temp has to be considerably higher than the bed set temp or the bed never gets there.
I'd be making a lot of mods to the GF if I bought one.
PS: mash temp matters a lot. It changes the entire fermentability of the wort and thus the finished character of the beer.
actech
Well-Known Member
I am getting close to a year in with the grainfather. It gets used weekly. If not brewing, does a great job sous vide steaks/chops etc. Not sure how easy these others are to multitask with but the gf is very easy to sous vide. Killer beer with a killer porterhouse !!!
Thanks to all contributors to this thread. Have learned a great deal from you all. Ordered my GF yesterday after a lot of research and am excited to get it in action.
Couple questions:
If an extension cord is needed could anyone share what they think is "best"? GF cord is 3 feet long so I might be close with it
I recall that some said cleaning could be easier but there are some tabs or agent that is really helpful. Any specifics on that?
TIA
-PCL
Couple questions:
If an extension cord is needed could anyone share what they think is "best"? GF cord is 3 feet long so I might be close with it
I recall that some said cleaning could be easier but there are some tabs or agent that is really helpful. Any specifics on that?
TIA
-PCL
The current temp sensor just pushes into the thermowell. Pull it out. Cut the wires and extend them so it can run up the discharge pipe Install a second thermowell in the top plate such that the opening for the temp sensor is above the liquid level and the tip is 3-4" into the grain mash. Push the temp sensor into the thermowell. Seal it with epoxy if you want.
If you want to get fancy, pull the controller box apart and put a switch in it. Install a second temp sensor in the existing thermowell. Wire it so you can switch between the bed temp sensor and the boil kettle temp sensor. It would be very interesting to observe the difference.
FWIW, I think the current temp sensor location isn't very good. I'm sure the wort it is measuring is picking up heat from the "boiler". What you are really measuring is semi heated wort before it loses some heat going up the discharge tube and back into the grain bed. The grain bed is going to lag whatever temp that wort returns to the bed at.
If the return wort is used as the setpoint, the best the grain bed will ever to is catch up to that. If the flow rate *through the bed* is too low, the bed will never catch up to the setpoint.
What should happen is the bed temp sensor should control the process. When the bed is cold the boiler should be full on and when it is, the wort return temp should be much higher than the bed set point in order to get the bed to where it is supposed to be. See the difference ? If you want the bed to be 150F and it is at 140F, you need a wort return temp of 160 or higher to raise the bed temp. If you keep the wort return temp at 150, the bed will lag it, how much depends on a number of a factors.
Ask any HERMS brewer about this. When trying to raise the temp of the mash, the HLT and the wort return temp has to be considerably higher than the bed set temp or the bed never gets there.
I'd be making a lot of mods to the GF if I bought one.
PS: mash temp matters a lot. It changes the entire fermentability of the wort and thus the finished character of the beer.
I understand mash temps and roles, I however do not believe in a lot of above. First and foremost is the assumption that such perfect control will result in noticeably different beer. Next, your design is questionable. Why measure just 3-4" deep? Why not be variable with height of grain bed? Why measure in one spot of grain bed? Why not take multiple measurements throughout? KISS applies here, use a strike temp for the mash temp you wish to achieve, works like a charm. Even with your redesign of probe location, you would want to strike properly, otherwise you will need heat right after a thorough dough in is complete.
No need to rig up the controller for a comparison of existing probe location temp and grain bed. We've already done that. We know the issue well. This is why, like in the old cooler MLT days, I hit with a strike temp +10F or so. Even then, like now, I've never missed my mash temp by 10F! With a proper strike temp and continuing circulation, grain bed swings are minimal and do not need high power, the controller is preset for 2F swings, you can adjust to 1F. That is a point for folks who desire the new controller for PID, I could care less on this point, it's so minor that my taste buds will not detect a difference.
I think you are a great candidate for buying the Mash & Boil for $300 and make mods. I'm quite sure you could do your mods for well less than the cost of a GF. And I'd (and others here too), would get the win of hearing about your experience. I wish you all the best in your choice, and please if you go another route (Mash & Boil, Mash & Boil!!), share your experience.
Thanks to all contributors to this thread. Have learned a great deal from you all. Ordered my GF yesterday after a lot of research and am excited to get it in action.
Couple questions:
If an extension cord is needed could anyone share what they think is "best"? GF cord is 3 feet long so I might be close with it
I recall that some said cleaning could be easier but there are some tabs or agent that is really helpful. Any specifics on that?
TIA
-PCL
Congrats! I'm sure you will be pleased. Cord is 5' long, not 3 (unless that changed in the last year, but I'd doubt it). I'd get one rated for 20a, or build your own. No idea on tabs, I've put mine through about 20 brews and clean up with PBW is a breeze, and still looks great today!
Congrats! I'm sure you will be pleased. Cord is 5' long, not 3 (unless that changed in the last year, but I'd doubt it). I'd get one rated for 20a, or build your own. No idea on tabs, I've put mine through about 20 brews and clean up with PBW is a breeze, and still looks great today!
Appreciated!
I am getting close to a year in with the grainfather. It gets used weekly. If not brewing, does a great job sous vide steaks/chops etc. Not sure how easy these others are to multitask with but the gf is very easy to sous vide. Killer beer with a killer porterhouse !!!
Do you just place your sous vid cooker in the boiler? I presume not clamping it in like in a pot/Dutch oven. Been thinking about buying one (Anova, maybe w/blue tooth), but thought my heavy stock pot would be better choice (more efficient use of space?).
actech
Well-Known Member
No vacuum seal seasoned steaks. Pour couple gallons of water in the gf . Set the temp where you want it. Put the steaks in, attach recirq arm, turn on pump. Just use basket with the top plate installed on bottom so you dont have the overflow arm in the middle.
elreplica
Well-Known Member
Thanks to all contributors to this thread. Have learned a great deal from you all. Ordered my GF yesterday after a lot of research and am excited to get it in action.
Couple questions:
If an extension cord is needed could anyone share what they think is "best"? GF cord is 3 feet long so I might be close with it
I recall that some said cleaning could be easier but there are some tabs or agent that is really helpful. Any specifics on that?
TIA
-PCL
I believe the GF cord is five feet - not three. I put a Yellowjacket GFCI on the end - nor sure I needed it where I usually locate it but it's on. I would use a short as possible, heavy cord, say one meter 10 gauge grounded. If you cannot find one its not hard to wire one up. 60/40 Oxyclean/ TSP 90 will make cheap PBW...
d-bone
Well-Known Member
- Joined
- Jul 19, 2015
- Messages
- 79
- Reaction score
- 15
Just to clarify, by "bag brewing" do you mean no sparge/full volume mashing? As far as mash chemistry goes, I am not an expert by any stretch. Matter of fact, I'm not an expert in any of this stuff as it is just a hobby that occupies a portion of my garage, and time. But I would wager that the chemistry is exactly the same, thick or thin, but it's the rate at which it happens that is different.
And I do agree that mash thickness changes things. That's exactly the conclusion the Braukaiser article I linked is supporting.
I agree the brewing industry isn't stupid, but the reason they don't use the no sparge method is something we'll just end up disagreeing on. The reason the commercial brewing industry doesn't use no sparge brewing is a matter economics, not quality of wort. They need to make money, we don't, so things like efficiency, space and speed to market are a big deal to these folks.
On a commercial scale a few percentage points of efficiency can mean big bucks. High efficiency brew houses can achieve 95+% mash efficiency. This will not happen with no sparge. Have you measured your mash efficiency with your 3 vessel system? If you have I would guess that even on a really good day it never goes above 90%.
No sparge brewing also requires larger vessels. Larger vessels are more expensive. Larger vessels also need more space. More space is more money. On a homebrew scale, going from a 10 gallon to a 15 gallon kettle is inconsequential in most scenarios.
I don't think eBIAB, brewing with electricity and a bag, is really you're hang up. It's the no sparge mash you think is inferior. I will by no means get into a tinkle contest with much more acclaimed brewers than myself, I will say that with no sparge I have garnered some hardware along the way, including a Best of Show in a Pro-Am and enough medals to finish in a very respectable position in the Lone Star Circuit. I've never entered NHC, but maybe this will be motivation to do so
Agreed, to each their own. I don't squeeze and the bag isn't heavy, hot, or wet when I handle it. I pull the bag out with a ratcheting pulley, let it drain for 20 minutes or so, then move it to the garbage bag where I dump the grains. Easy peasy, and for me much simpler than trying to sparge.
")
that does not sound as easy as dumping water on a grain bed.
d-bone
Well-Known Member
- Joined
- Jul 19, 2015
- Messages
- 79
- Reaction score
- 15
Thanks to all contributors to this thread. Have learned a great deal from you all. Ordered my GF yesterday after a lot of research and am excited to get it in action.
Couple questions:
If an extension cord is needed could anyone share what they think is "best"? GF cord is 3 feet long so I might be close with it
I recall that some said cleaning could be easier but there are some tabs or agent that is really helpful. Any specifics on that?
TIA
-PCL
I got a three ft 10g chord. works great. you just want to make sure the extension is same gauge or bigger. as for cleaning, I just wipe away any any solids and recirc. pbw. 15 min with the chiller, another 20 with the arm. and rinse. I just save my water from chilling and use that. pretty easy since you only have one vessel to clean. I dont see how it could be any easier other than someone else doing it for you.
The key to mash temperature control in any recirculating system, whether RIMS (as in the Grainfather), external RIMS (as in many homebrew systems) or HERMS (as in many homebrew and commercially available systems) is a good volume of flow through the mash. If the flow through the mash is adequate, temps throughout the mash should be consistent. This is, after all, why we recirculate in the first place. If flow is too restricted by compacted grains and/or too fine a crush, temperature control will be ineffective. In a conventional system the stuck sparge will be obvious. With BIAB (either brew in a bag or brew in a basket) the wort will continue to flow - it just won't flow through the mash where it is needed. If the operator fails to notice and remedy this, both temperature control and mash efficiency will suffer.
How do you get that ? I measured 10.5" ID x 17" ish deep. 6.37 gallons or so.
I don't see the volume of the mash tun in the manual.
That's because it's not really a mash tun in the true sense of the word. It's a basket inside the boiler/kettle. As you pointed out in your previous post, the dimensions of the basket are about 10.5"x~17", which provides you enough volume to put a max of about 19-20 pounds of milled grain (or about 6.37 gals.) There will be about 0.9 gal of dead space under the basket to allow enough wort volume to feed to the pump and provide space for the temp probe, as well as about 0.5+ inch space between the sides of the interior wall of the kettle and the grain basket, so there is also wort not in direct contact with the grain. With a mash tun (as well as BIAB,) almost the entire amount of wort is in direct contact with the grains, but static (unless you stir or recirculate.) The way I see it in the GF, you have a more "dynamic" mash process where the wort is constantly flowing through the grain bed, so you can get away with a slightly lower qt/lb ratio. But, that's just my thought. I also do full volume BIAB (both bag & basket) with recirculation, and I've found my conversion efficiency tends to be slightly higher than with the GF. Hope that answers your question. Ed
No need to rig up the controller for a comparison of existing probe location temp and grain bed. We've already done that. We know the issue well. This is why, like in the old cooler MLT days, I hit with a strike temp +10F or so. Even then, like now, I've never missed my mash temp by 10F! With a proper strike temp and continuing circulation, grain bed swings are minimal and do not need high power, the controller is preset for 2F swings, you can adjust to 1F. That is a point for folks who desire the new controller for PID, I could care less on this point, it's so minor that my taste buds will not detect a difference.
How do you know your taste buds wouldn't detect a difference ?
How do you know your bed is tracking what the controller reads ? Have you plotted both temperatures for the duration of a mash ?
Do you ever do step mashes ? What is happening with the bed temps then ?
Don't over think this. The proof is in the drinking/tasting. Is is as good as it COULD be? Who knows? It's up to you whether or not the beer is to your liking or is as perfect as it needs to be. I have not had any complaints thus far.
I also have a full blown Cal's Clone Electric Brewery that I built from scratch, and still bought a Grainfather to simplify my brew day. I still use big brother some but a two hour cleanup afterwards is really too much like work. Besides, not having to stand on my patio or in my garage brewing when it is 100 degrees (or 25 )outside, I think this thing is wonderful based on the beer it has turned out for me to date. YMMV.
I also have a full blown Cal's Clone Electric Brewery that I built from scratch, and still bought a Grainfather to simplify my brew day. I still use big brother some but a two hour cleanup afterwards is really too much like work. Besides, not having to stand on my patio or in my garage brewing when it is 100 degrees (or 25 )outside, I think this thing is wonderful based on the beer it has turned out for me to date. YMMV.
I think you are a great candidate for buying the Mash & Boil for $300 and make mods.
That thing is pretty limited.
- Power limited to 120VAC, so 1800 watts, max. It probably puts out 1500 watts.
- The boil kettle is smaller than the GF, 7.5 gallon versus 8.
- The mash tun is even smaller than the GF MT, 9.5" in diameter, versus 10.5"
- No pump, no CFC, no discharge pipe, no overflow pipe, no top screen, no hop filter, very limited controller.
It is a bare bones system, not even a good starting point because it is too small capacity wise. By the time you add a pump ($120), CFC ($100), discharge pipe, overflow pipe, top screen, hop filter and upgrade the controller, what are you saving ?
MT volume = 9.5 x 17 = 5.2 gallons. You aren't going to make a beer much over 1.060 with it.
skraeling
Scientist Extraordinaire
- Joined
- Sep 26, 2013
- Messages
- 721
- Reaction score
- 285
That thing is pretty limited.
- Power limited to 120VAC, so 1800 watts, max. It probably puts out 1500 watts.
- The boil kettle is smaller than the GF, 7.5 gallon versus 8.
- The mash tun is even smaller than the GF MT, 9.5" in diameter, versus 10.5"
- No pump, no CFC, no discharge pipe, no overflow pipe, no top screen, no hop filter, very limited controller.
It is a bare bones system, not even a good starting point because it is too small capacity wise. By the time you add a pump ($120), CFC ($100), discharge pipe, overflow pipe, top screen, hop filter and upgrade the controller, what are you saving ?
MT volume = 9.5 x 17 = 5.2 gallons. You aren't going to make a beer much over 1.060 with it.
My GF should be showing up by the end of this week supposedly. Ill give you my thoughts on it when it arrives. I still have my 2.5ish tier setup for doing up to 10g batches if I ever have the need. It will be interesting to see how the brew days compare. I too looked at the M&B but for the price its ok, just didnt have enough features for my taste frankly.
Im even rebrewing as my first batch a recipie I just did (holiday ale) so ill even be able to compare 1:1 gravity readings, brew day, taste etc. Should be cool.
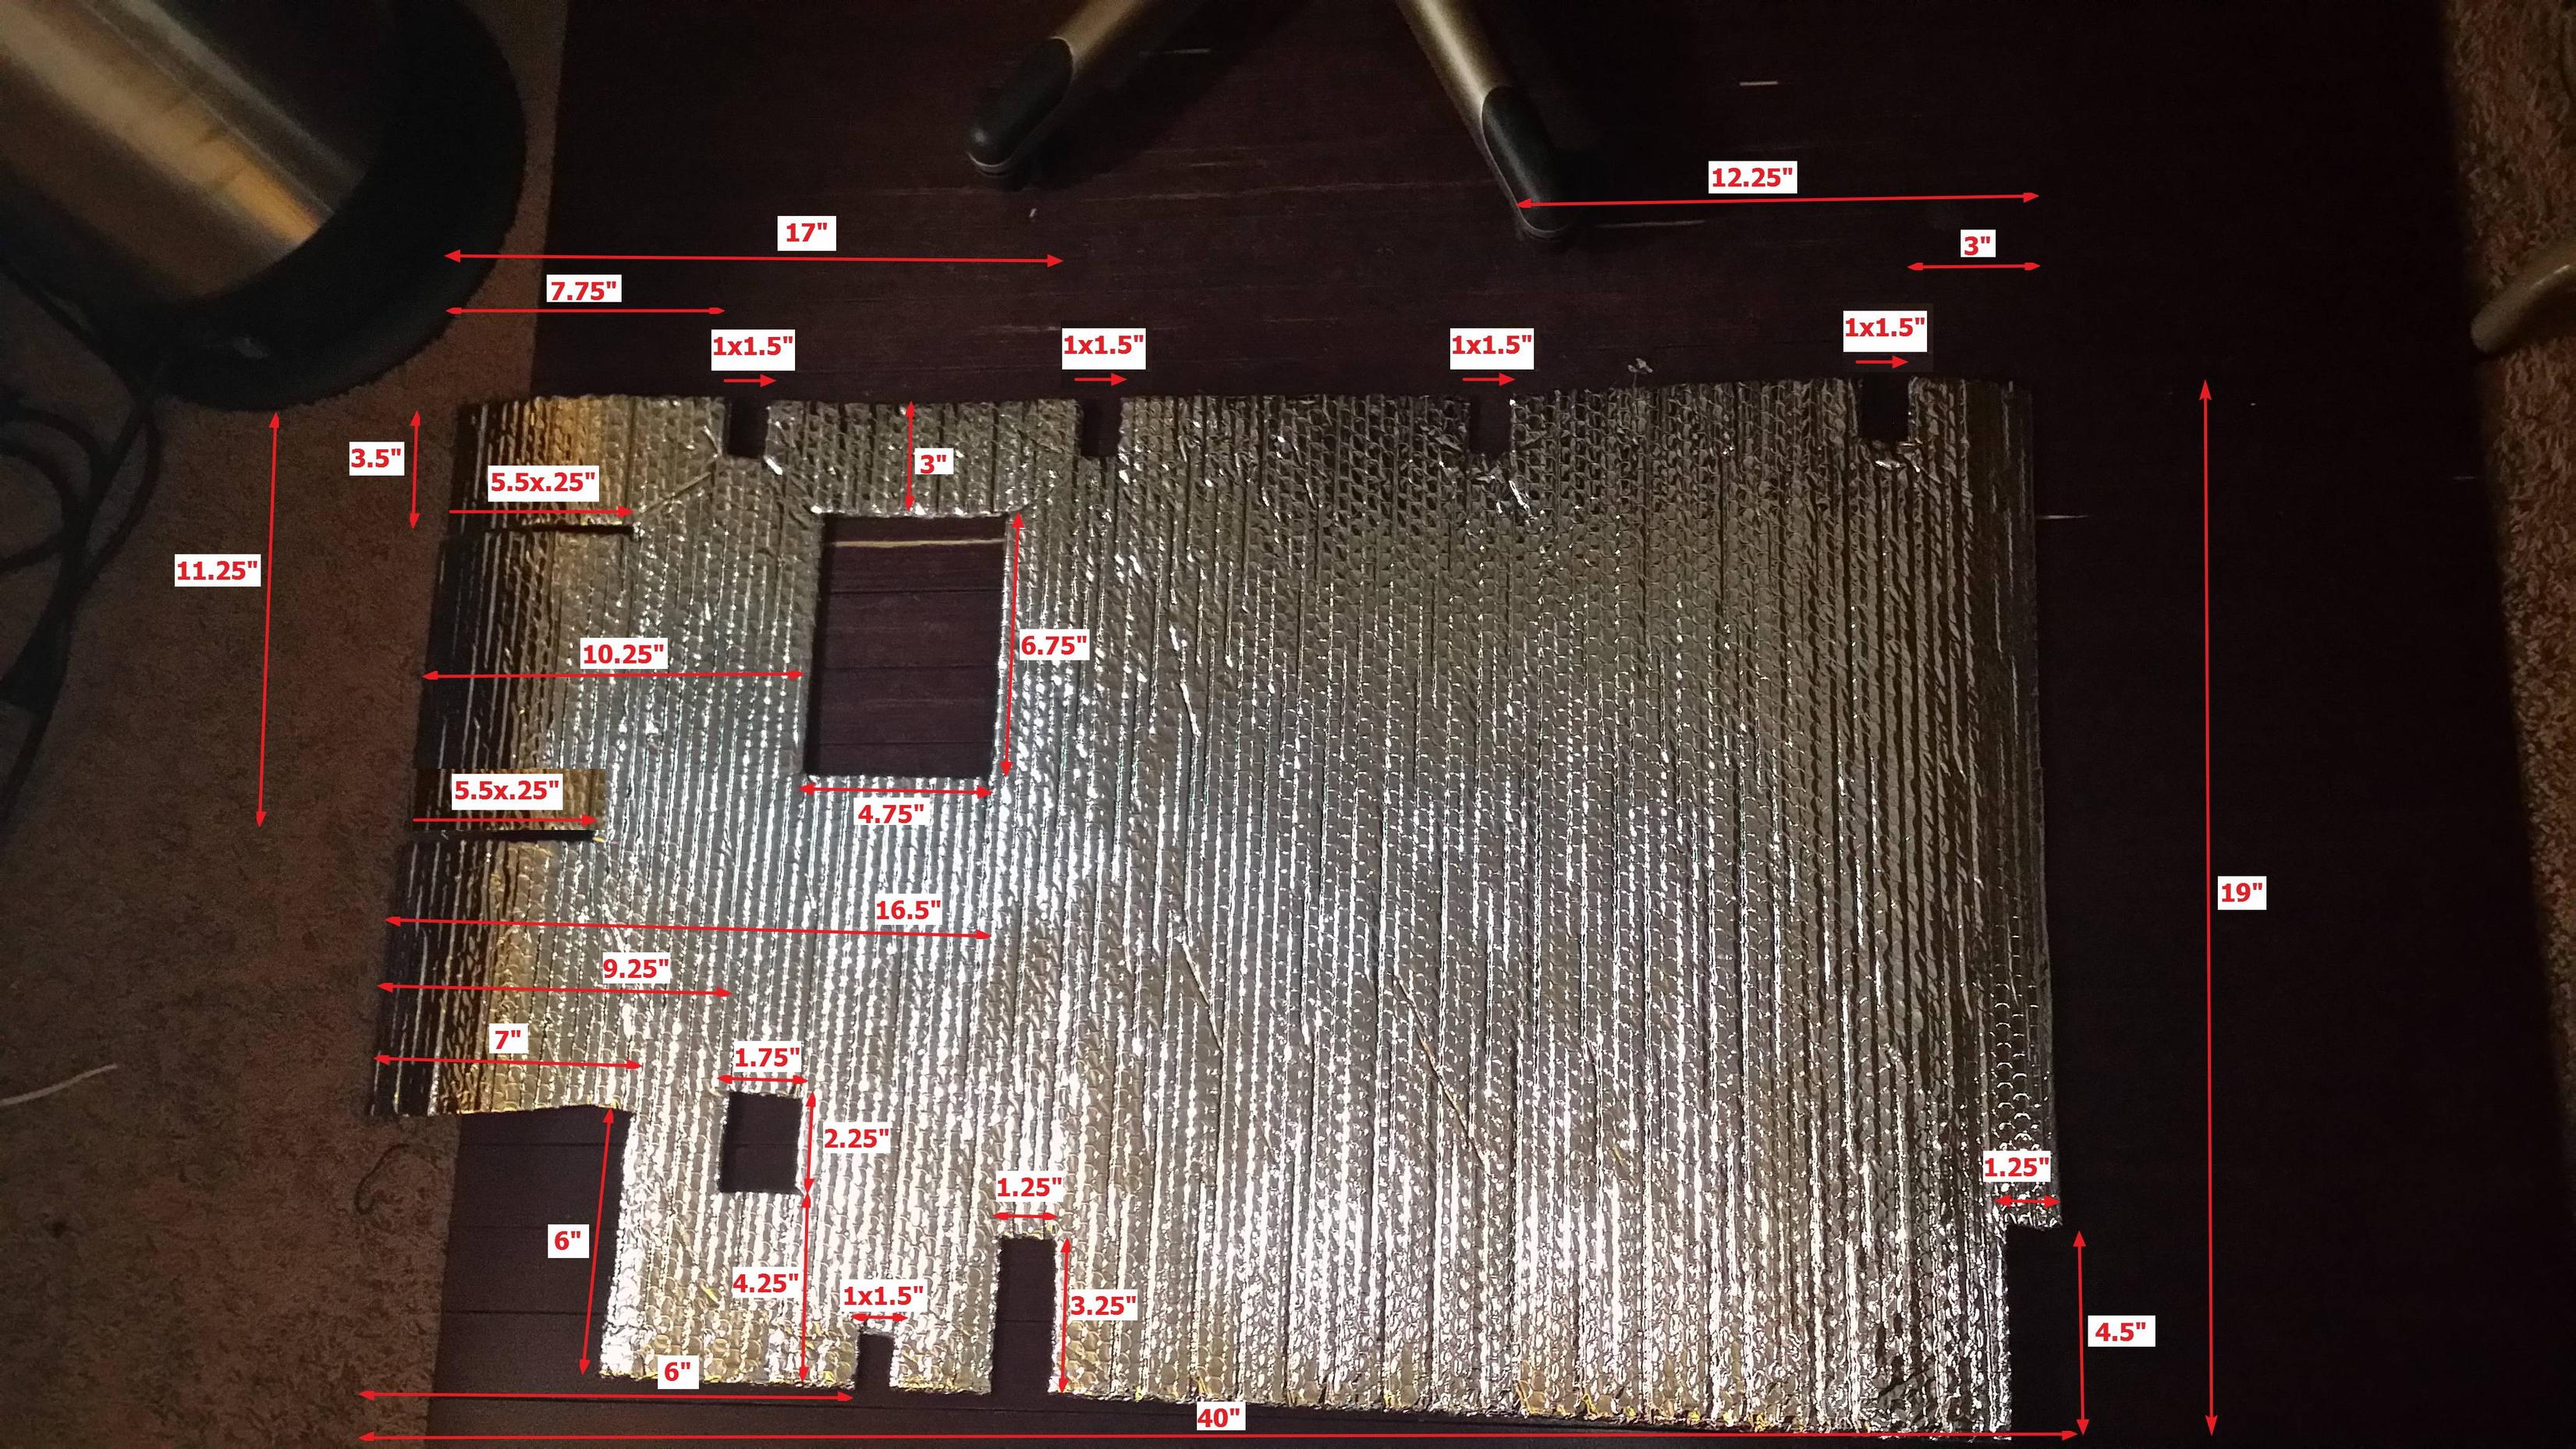
So has anyone considered insulating the exterior malt pipe? Its probably way overkill, but could be kinda fun to do I think.
Grainfather has their own version ... a Graincoat. Or you can make your own with Reflectix.
TheHopfather
Well-Known Member
Grainfather has their own version ... a Graincoat. Or you can make your own with Reflectix.
The Graincoat/Reflectix only covers the boiler though. The post you are responding to is talking about insulating the exterior wort return pipe from the pump up.
SirSpectre
Well-Known Member
Just picked up a GF this weekend. Going to brew my first batch with it tonight!
I was cleaning it with the solution and water yesterday and I started the pump to cycle through a little and stopped it. I hooked up the chiller and it worked for a little while, but then when it ran low and I added more water, it wouldn't flow again. I had to blow back through it to get it to work again. I don't want to do this when I am actually brewing. Anything I should look for?
I was cleaning it with the solution and water yesterday and I started the pump to cycle through a little and stopped it. I hooked up the chiller and it worked for a little while, but then when it ran low and I added more water, it wouldn't flow again. I had to blow back through it to get it to work again. I don't want to do this when I am actually brewing. Anything I should look for?
I have a few brews done now but can't seem to master the sparge efficiency. I feel like I'm using too much water for my mash (17.5L for a 6kg grain bill) and creating a loose grain bed allowing the water to just fall through in like 5-10mins. I'm just curious if anyone else has dealt with this? Do I use less water and risk a stuck mash or sparge?
Cheers
Cheers
What is your brewhouse efficiency running? I sometimes feel like my sparge is going too fast as well but find I am running low to mid 80's in the BHE. You might also taste your grains afterward. Mine have no perceptible sweetness left.
Similar threads
- Replies
- 15
- Views
- 1K
- Replies
- 24
- Views
- 2K

Latest posts
-
-

-
-
 The Dysfunctional-Palooza Obnoxious Masshole BS Thread
- Latest: Hoppy2bmerry
-

-
-

-