• Please visit and share your knowledge at our sister communities:
  • If you have not, please join our official Homebrewing Facebook Group!

    Homebrewing Facebook Group

Frigidaire Model FRC445GB Mini-Fridge Kegerator Conversion

Homebrew Talk

Help Support Homebrew Talk:

This site may earn a commission from merchant affiliate links, including eBay, Amazon, and others.
Hope these help some people out.

k1.jpg

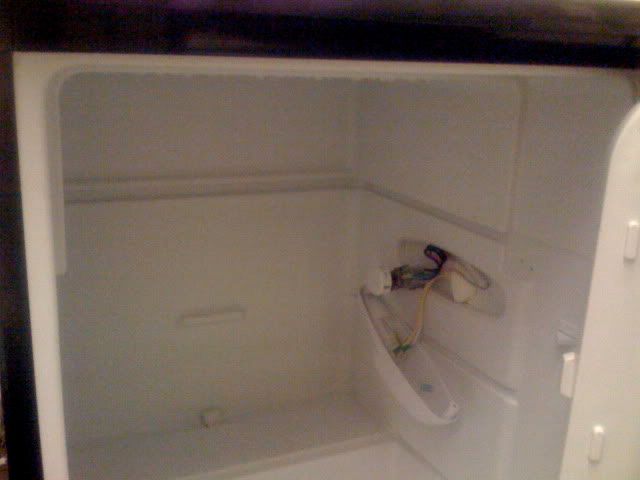
The fridge before drilling. Shelves and freezer have been removed.

k2.jpg

I used a level to find where the top of the keg lines up with the door. I didn't wan't the shanks hitting the keg.

k3.jpg

Once I leveled the top of the keg I taped a line on the fridge to mark it.

k4.jpg

I then removed the door by removing 3 screws at the bottom of the fridge.

k5.jpg

Using a carpenter's square and referencing the door lock, I found and taped the vertical center of the fridge.

k6.jpg

I then found and taped the center of my drip tray.

k7.jpg

A quick mock layout to help mark the holes for the shanks.

k8.jpg

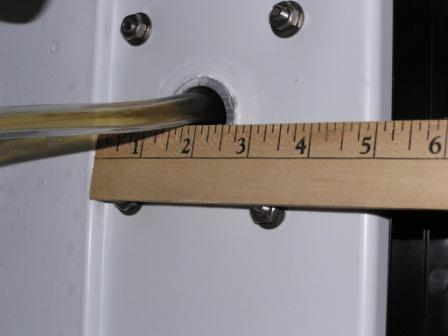
I drilled 2 pilot holes and then used a 7/8 hole saw to drill out the shank holes.

k9.jpg

Shank holes front and back.

k10.jpg

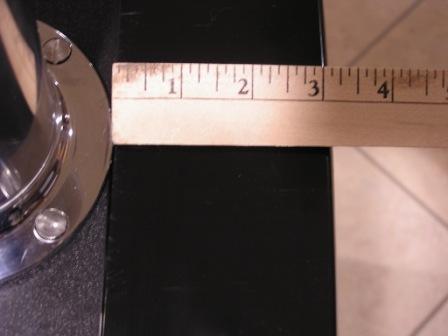
I had to create spacers for the shanks on the inside of the fridge so that the shank nut wouldn't kit the inner curve of the fridge door. I used a vinyl board that I had laying around from a previous bathroom project. It was a pain to drill out, and the first set I made were too wide, but ultimately these worked out great.

continued below
 
For everyone who wants to use this fridge but wants to run a tower, this fridge is really easy to run a tower on. the tops come off with minimal effort. just open the door so you can have something to grip, and grab the plastic top where it overhangs in the front. pull up and viola, its off. under this you will find approx. 2 inches of foam insulation. I removed where I wanted to put the tower with a filet knife, and then the coils become apparent. just be careful removing the foam, as if you manhandle it, you could conceiveably pierce the coils. no need to use cornstarch and booze, as you can cleary see where you can drill and where you cant. after you cut your hole for the lines, simply silicone the top back on. I took pictures to document so anyone who wants to see what to do can get a visual, but cant find the cord for my camera, so when I find it, ill post pics.

Cheers
 
Saw this post and thought I'd add my throw in my penny. By coincidence I installed a tower on this very fridge today. The front 4" doesn't have any coils in it. No need to remove the top if you want the tower in the front.

After hole drilled.
attachment.php


Inside of fridge after tower installation.

attachment.php


The unit seems pretty solid. I didn't see the need for a reinforcement plate on the inside. But, I'll monitor it and add if needed.

Finished product.

attachment.php


First pint poured. Not really a pint, more like 12oz.

attachment.php

Sorry! I think my class is warped.

Still room for a drip tray. Easiest install ever. only took 1 hr from start to finish.

Beer fridge (5).JPG


Beer fridge (8).JPG


Beer fridge (9).JPG


Beer fridge (10).JPG
 
Hmm...i can't see the pics you posted, bumbler...

Sodapop...looking forward to the pics where you take the top off.
 
:drunk:Sorry! :drunk:

Been corrected.

First time posting pics.:confused:

What a noob.:eek:

No top off for me. It's more deconstruction than I'm looking for.
 
sweet I have this fridge and have wanted to do a tower I think the front tower would suit me just fine and I wouldnt have to worry about pulling off the top.
 
The front 4" doesn't have any coils in it. No need to remove the top if you want the tower in the front.

Finished product.

attachment.php

Bumbler, it looks like the tower is farther than 4" from the front, or did you mean that its 4" from behind the plastic lip on the front?

I think I may be picking one of these up real soon. Did you find you had to move the temperature control?

Thanks!
 
Bumbler, it looks like the tower is farther than 4" from the front, or did you mean that its 4" from behind the plastic lip on the front?

I think I may be picking one of these up real soon. Did you find you had to move the temperature control?

Thanks!


I resolve to stay calm! I just spent 40 min doing my thing. I know, I'm slow. As soon as I hit "post" it fouled up. Must have timed out. Sorry! I'll try again tomorrow.
 
I'll try and type faster tonight.

The tower I installed is a 3" tower with a 4 1/2" base with 4 bolt holes.

The 4" I was referring to is really 4 1/2" and it's on the inside of the fridge. That's where the coils are so that's where I concentrated my effort. Pierced coil equals end of project. As soon as you open the door look up. It's the closest part to the front. It's the first section of white plastic.

Where the ceiling drops 1/2" that's where the refrigeration coils start. DO NOT DRILL INTO THAT PART UNLES YOU REMOVE THE TOP AND LOCATE THE COILS.

pic is of the ceiling of the frige.
pic1.jpg


The next pic is of the top of the fridge. I put the front of the tower where the the black top changes from motteled to glossy. The line is very apparent.

pic2.jpg


You can see in the next pic where I traced around the base and marked the holes. I think it's prudent to mention that if the base has more than 4 holes, measurements should be taken to ensure that the bolt hole located in the rear don't line up over the coils. You can see in pic 1 there isn't a lot of extra room.

pic3.jpg


The final pic is a close up of the hole. All I did was find a scrap piece of pvc. Mine happened to be 1-1/4". I found a hole saw the same diameter. Driled the hole, cut the pvc to length, inserted, and caulked it on top and bottom to maintain the vapor barrier.

pic4.jpg


As for the temp control. Yes, I did remove the light and turn it around. That little extra space allows two cornies to fit. As Elmer Fudd said, "Be very careful of the copper tube attached to the temp control." If it kinks or breaks you'll have to use an external temp control.

One final comment. Everyone has there own Ideas and preferences. Some want to have 10 kegs going at once. I would love to have more but I don't have the space. I live in a tiny house and have to have a tiny fridge. Therfore my fridge is perfect for me.

Hope this helps.
 
Hey everyone....I completed my first kegging of a West Coast style IPA (dry hopped with 1 oz of Simcoe and 2 oz of Columbus!). I recently purchased the Frididaire FRC445GB and unscrewed the temp control dial and pushed it back a bit in order to fit two kegs. Those of you who have done this, do you then re-attach the temp gauge in a new location or do you just leave it dangling? I used duct tape to keep in in place. If anyone has any pics of what they did, it would be great! thank you!
 
I also used duct tape for now. I plan on going back and JBWelding both it and my CO2 manifold in place in the near future.
 
Hello, Is there another model refrigerator that is similar to this one? I picked up the Frigidaire Model FRC445GB from Lowes a couple of weeks ago...but it was making a pretty awful sound so I decided to return it for another. I brought that one home tonight, and the thing is banged up beyond belief (both sides dented, inside pieces broken.) This one was quieter though!

So I need to take this one back, but not sure if I want to go through the trouble again with this model and wonder if someone has a suggestion for a different brand.

Thanks for the help!
Craig
 
I'll try and type faster tonight.

The tower I installed is a 3" tower with a 4 1/2" base with 4 bolt holes.

The 4" I was referring to is really 4 1/2" and it's on the inside of the fridge. That's where the coils are so that's where I concentrated my effort. Pierced coil equals end of project. As soon as you open the door look up. It's the closest part to the front. It's the first section of white plastic.

Where the ceiling drops 1/2" that's where the refrigeration coils start. DO NOT DRILL INTO THAT PART UNLES YOU REMOVE THE TOP AND LOCATE THE COILS.

pic is of the ceiling of the frige.
pic1.jpg


The next pic is of the top of the fridge. I put the front of the tower where the the black top changes from motteled to glossy. The line is very apparent.

pic2.jpg


You can see in the next pic where I traced around the base and marked the holes. I think it's prudent to mention that if the base has more than 4 holes, measurements should be taken to ensure that the bolt hole located in the rear don't line up over the coils. You can see in pic 1 there isn't a lot of extra room.

pic3.jpg


The final pic is a close up of the hole. All I did was find a scrap piece of pvc. Mine happened to be 1-1/4". I found a hole saw the same diameter. Driled the hole, cut the pvc to length, inserted, and caulked it on top and bottom to maintain the vapor barrier.

pic4.jpg


As for the temp control. Yes, I did remove the light and turn it around. That little extra space allows two cornies to fit. As Elmer Fudd said, "Be very careful of the copper tube attached to the temp control." If it kinks or breaks you'll have to use an external temp control.

One final comment. Everyone has there own Ideas and preferences. Some want to have 10 kegs going at once. I would love to have more but I don't have the space. I live in a tiny house and have to have a tiny fridge. Therfore my fridge is perfect for me.

Hope this helps.

Bumbler, quick question.

In the time that you've been enjoying this conversion...have you felt the need to add any reinforcement for the tower? You commented that the top of the fridge seemed sturdy enough to forgo reinforcing it, so I'm curious if you still feel that way after a few weeks (or months, I can't remember) of having this kegerator.

I'm like 95% sure i'm gonna pick this fridge up at Lowe's and convert it this weekend. I'm still waiting on my hole bit to arrive from Amazon.

Cheers.
 
In the time that you've been enjoying this conversion...have you felt the need to add any reinforcement for the tower?
Cheers.

It's just as sturdy as the day I put it on. I doubt I'll ever reinforce it.

Side note:

I did have a problem freezing my last batch during conditioning. I had a thermometer inside the fridge. It told me air temp not keg temp. Since then I bought a remote temp sensor and strapped it to the keg and mounted the display on the wall above the fridge. I can now monitor the keg temp every pour. The keg stays between 37 and 38.

Sweet! I will be buying this fridge this weekend and will perform the conversion on Saturday (I hope!).

So if you don't mind I have one more question...what temperature setting do you have the fridge on? Maybe if the controller is a dial you could give this as a number on the clock dial?

Cheers and thanks again for your replies!
 
So if you don't mind I have one more question...what temperature setting do you have the fridge on? Maybe if the controller is a dial you could give this as a number on the clock dial?

I'm not 100% sure. I flipped it over and removed the light to give the needed space. The exact dial position is difficult to see. That may be why I froze the brew. I'd start in mid range and work from there.

Happy Drilling!
 
Ok I bought this fridge and converted it yesterday!!! What a breeze!

Sorry about crappy pics, these are iPhone pics as our regular digi cam was out of juice.

I now know what you meant about the temp controller...I think mine is around "4" or so and the beer is a good temp for me. But you definitely need to bend that thing out of the way like I did here.
IMG_0065.jpg


I decided to line hole with duct tape...
IMG_0072.jpg


Finished project!
IMG_0076.jpg
 
I am thinking about moving my CO2 tank outside the fridge. Has anyone drilled a hole in the side of this yet? I am assuming the coils go up the back to the top.....I might just drill through where the light screw is...but would rather have on the other side of the fridge.
 
I am thinking about moving my CO2 tank outside the fridge. Has anyone drilled a hole in the side of this yet?

Now that I have more time again I'm also looking into moving my co2 tank to the outside. I've seen WatereeBrew's pics and think it's playing roulette with your Evap. coil.

am assuming the coils go up the back to the top.....I might just drill through where the light screw is...but would rather have on the other side of the fridge.

No assumptions necessary. Evap. coils in the back and top. Cond. coils on both sides. This weekend i'll be drilling a hole in the condensate channel for my co2 line.
 
Question - when you guys are moving the light... is it cutting it and rewiring it somewhere or is it simply pulling the excess wire and double sided taping it further back in the fridge? AJ in HD pulled it entirely and relocated it?

Isn't the thermostat hooked up to the same plastic unit as the light? or is it somewhere else?
 
Question - when you guys are moving the light... is it cutting it and rewiring it somewhere or is it simply pulling the excess wire and double sided taping it further back in the fridge? AJ in HD pulled it entirely and relocated it?

I removed the light bulb cover and light bulb. I didn't see the need for light. The fridge isn't that big. Then I flipped the entire apparatus 180 degrees and screwed it back in place.

the thermostat hooked up to the same plastic unit as the light? or is it somewhere else?

Correct, the T-stat is in the same plastic unit.
 
Back
Top