• Please visit and share your knowledge at our sister communities:
  • If you have not, please join our official Homebrewing Facebook Group!

    Homebrewing Facebook Group

EZboil, Power Regulator for Boiling DSPR110

Homebrew Talk

Help Support Homebrew Talk:

This site may earn a commission from merchant affiliate links, including eBay, Amazon, and others.
I thought about the temp display, but as far as I know you can't jumper a single rtd to multiple displays. The cap is cheaper than a timer, too. :)
 
I thought about the temp display, but as far as I know you can't jumper a single rtd to multiple displays.

Oh, I meant buying a second probe and installing it in an Tee on the outlet of the CFC. It means a second wire to the control box, but from what I remember of your setup the CFC is permanently mounted under the table, so you wouldn't have to mess with disconnects too often.

The panel plug is certainly the most cost effective option :D

You could also cut the hole a bit bigger and mount a 120v wall outlet on there. Then you'd have a handy place to charge your cellphone, or plug in a fan, or whatever. The hole from the switch could become a 12v cigarette lighter plug.

I know I use my iPad for logging brew day notes, you could incorporate some sort of phone/tablet cradle or arm or mount using that space.


<edit>
Last note, I think @doug293cz had discussed a 120v option in his control panel. It would let you easily cut back the maximum power of the element without relying on the controller as much.

The most basic approach would be to use a rotary selector switch:
http://www.amazon.com/dp/B009IS7SN2/?tag=skimlinks_replacement-20

It is almost the same size as a 1/16 DIN opening, so that would be a neat fit, and you could swap between 120 and 240 to your element.
 
Last edited by a moderator:
you could swap between 120 and 240 to your element

I think the settings would be quite different for the two voltages. If I were going to do that, I would have two EZBoils and switch between them. (Yes, I am that lazy.)


But I did like the idea of the PID being a passive display for CFC exit temp. I might do that one myself!
 
I think the settings would be quite different for the two voltages.

But I did like the idea of the PID being a passive display for CFC exit temp. I might do that one myself!

I find I always wish I had more temperature displays going, glad you like the idea :)


As far as the settings, it would certainly be different, but my thought was that since you are not "tuning" the DSPR110 it may actually be able to hold a steady temperature even at the lower power output.
 
As far as the settings, it would certainly be different, but my thought was that since you are not "tuning" the DSPR110 it may actually be able to hold a steady temperature even at the lower power output.

On my experiment the other day, the difference between an oSCr setting of 0 (the default) and -3 (the optimal for my 120V tube) was pretty drastic. I imagine you'd have to deal with either undershoot or overshoot depending on which voltage you optimized for. Or maybe find a middle setting that was good enough for both.
 
On my experiment the other day, the difference between an oSCr setting of 0 (the default) and -3 (the optimal for my 120V tube) was pretty drastic. I imagine you'd have to deal with either undershoot or overshoot depending on which voltage you optimized for. Or maybe find a middle setting that was good enough for both.

That makes sense, and at the end of the day it really probably doesn't matter. At 240v it should only take less than 15% duty cycle to maintain the mash temp, which should be just fine.
 
I have a panel with two PIDs, one for the RIMS tube and the other for an eHLT

I've ditched the eHLT due to leaks and moved to just brewing no sparge batches, so I've repurposed the eHLT PID to measure the chiller outlet temperature.

I previously used a CDN thermometer mounted in a tee fitting to measure the chiller outlet temps, which works but was hard to see. Having the temp display on the PID is very convenient
 
On my experiment the other day, the difference between an oSCr setting of 0 (the default) and -3 (the optimal for my 120V tube) was pretty drastic. I imagine you'd have to deal with either undershoot or overshoot depending on which voltage you optimized for. Or maybe find a middle setting that was good enough for both.
I don't think you can make the conclusion that required oSCr setting would need to be very different for 120V vs. 240V by only testing at 120V. It might be true, or it might not. Really need to test at both to see how the algorithm performs. The fact that it seems to hold rock steady once tuned is very encouraging. Also, tuning is much simpler than for a PID.

Brew on :mug:
 
...
Last note, I think @doug293cz had discussed a 120v option in his control panel. It would let you easily cut back the maximum power of the element without relying on the controller as much.

The most basic approach would be to use a rotary selector switch:
http://www.amazon.com/dp/B009IS7SN2/?tag=skimlinks_replacement-20

It is almost the same size as a 1/16 DIN opening, so that would be a neat fit, and you could swap between 120 and 240 to your element.
That switch would allow the elimination of one or two contactors (depending on how some other switching was designed) for setting up a two voltage option. On the other hand, the extra contactor(s) solution lends itself to automated control, which is something I want to consider. Decisions, decisions.

Brew on :mug:
 
Last edited by a moderator:
That switch would allow the elimination of one or two contactors (depending on how some other switching was designed) for setting up a two voltage option. On the other hand, the extra contactor(s) solution lends itself to automated control, which is something I want to consider. Decisions, decisions.

Brew on :mug:

I'm right there with you, I love the simple and basic approach when I can, but every time I see someone's automated thread I wish for an extra contactor or three.
 
So far I haven't had any sort of scorching issue while recirculating the mash, so I'm not sure how much swapping between 120v and 240v would help. At some point I probably will stick the PID back in there as a return temperature display, that's a great idea when cooling! Lets me know when the chiller output is at the pitching temp I'm looking for, so I can run it right off into the fermenter from there. I'll need another T, and another RTD... Should have the camlock fitting...

You guys are bad influences!
 
Cool, glad I found this. I was about to start a thread. I've been going back and forth for a long long time about whether to learn Arduino use a PID. I feel like the PID systems can kinda suck because the displays aren't as intuitive to use when setting up alarms, temps, auto/manual, etc. these look much easier to operate. The video Auber made, although the presenter puts you to sleep, makes the product look like running a stove. For those of us that don't really need automation this is perfect! I'm always curious to hear from Bobby M. when he tries out a new product.
 
It does cycle considerably faster. The operation mode of the DSPR vs. typical PID's is described in the DSPR manual. RTFM :D

Brew on :mug:


Ok, thanks. I wasn't quite sure what they meant in the online description when the talk about the burst cycle being one and 100 cycles.
Are you at all worried the increased cycling will reduce the life of your SSRs?
 
Ok, thanks. I wasn't quite sure what they meant in the online description when the talk about the burst cycle being one and 100 cycles.
Are you at all worried the increased cycling will reduce the life of your SSRs?

SSR's are specifically designed for fast switching. Unless they are defective (like many counterfeit Fotek's) it won't be a problem.

Brew on :mug:
 
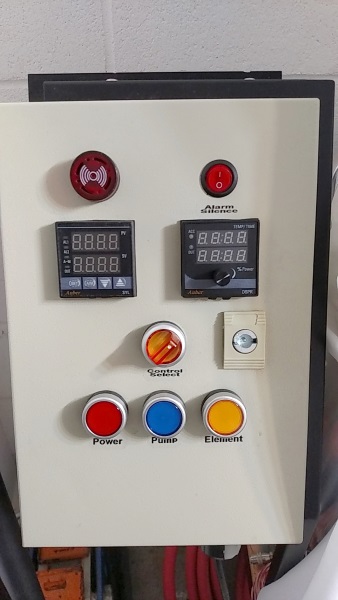
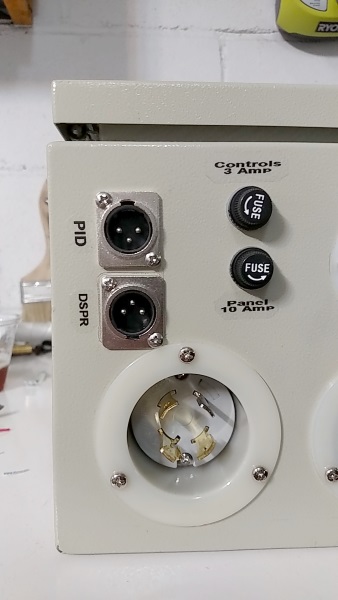
I decided to keep both the PID and the DSPR110. All I need to add was another XLR jack. It'll be handy for a few reasons... Redundancy in case one of them craps out, I can use the PID to give me the temps on the kettle return when chilling/whirlpooling so I know when the runoff is at the pitching temp I'm looking for and can switch it to the fermenter, I can use it like a big sous-vide water bath...

Also, more shiny things and blinky lights.

panel.jpg


plug.jpg
 
Angrybits, it looks like it cycles on and off way faster than other systems I've seen videos of before. Can you tell us about that?


It seems to do a very good job at varying the duty cycle to maintain the temperature, which as stated above should not have any impact on the life of the ssr or element.

I think it's more like a smart thermostat than anything else. While you don't see the fractional parts of the temperature, I'm quite sure that it's reacting to whether the temp is trending up or down because you see it vary the output even when the read out isn't changing. Very cool piece of gear.

Your video promises an actual mash test in the future, can't wait to see it!
 
Your video promises an actual mash test in the future, can't wait to see it!

You and me both, friend! I disassembled and rebuilt my stand into a 2-tier stand and cleaned some kegs this past weekend, or I might have cranked a batch out. I only have one pump right now and I realized that sparging was going to be a pain in the butt without gravity feeding it.
 
So, I just heard that there is no alarm outputs on these, but that they have an internal buzzer. How does it compare noise wise to a regular 22mm buzzer you'd have with a PID?
 
So I brewed today using the DSPR110.

Out of the box, it worked like a champ. The only configuration I did was turning off the timer function and setting the offsets so that the probe measurements matched my calibrated thermometer. Came up to mash-in temps quick and smooth, no overshooting at all. Held temps rock steady, ramped quickly and smoothly between temps (Did a hochkurz type mash, 147 for 40 mins, 158 for 20 mins, 168 for 10 mins).

Only gotcha I ran into was in my original configuration, I had the temp sensor in a Tee on the kettle valve. This was no big deal, as the only time I needed to control temps the pump was running. The DSPR110 needs a temp probe in the kettle. A little disassembly of the T, drill a new hole in the kettle, a silicone washer, a stainless washer and NPT lock nut transformed my 1/2NPT RTD sensor into a weldless setup. This got me up and running.

Even if you're *not* doing single vessel, this controller kicks so much ass at mashing that I'd recommend it for a recirculating mash tun.

I am buying it for mash only. I'm going to build a RIMs system for BIAB but boil with propane.
 
So I brewed today using the DSPR110.

Out of the box, it worked like a champ. The only configuration I did was turning off the timer function and setting the offsets so that the probe measurements matched my calibrated thermometer. Came up to mash-in temps quick and smooth, no overshooting at all. Held temps rock steady, ramped quickly and smoothly between temps (Did a hochkurz type mash, 147 for 40 mins, 158 for 20 mins, 168 for 10 mins).

Only gotcha I ran into was in my original configuration, I had the temp sensor in a Tee on the kettle valve. This was no big deal, as the only time I needed to control temps the pump was running. The DSPR110 needs a temp probe in the kettle. A little disassembly of the T, drill a new hole in the kettle, a silicone washer, a stainless washer and NPT lock nut transformed my 1/2NPT RTD sensor into a weldless setup. This got me up and running.

Even if you're *not* doing single vessel, this controller kicks so much ass at mashing that I'd recommend it for a recirculating mash tun.


Great write-up, thank you for sharing. I'm definitely going to use 3 of these when I finally get all my 3-vessel setup electrified. For now it's just RIMS tube and then propane for boil, like the person above me.

Family in town this weekend and wife eye-zap surgery next weekend. Sometimes I think God just doesn't want me to have a free moment to make a batch of beer.
 
Back
Top