• Please visit and share your knowledge at our sister communities:
  • If you have not, please join our official Homebrewing Facebook Group!

    Homebrewing Facebook Group

E-Brewing video series

Homebrew Talk

Help Support Homebrew Talk:

This site may earn a commission from merchant affiliate links, including eBay, Amazon, and others.

E-Brewing Video Series

  • Yes do it.

  • Nah don't bother


Results are only viewable after voting.
I vote for wiring up a panel next. How to crimp, dealing with 2 wires at one terminal, wire routing, etc.

Thanks for the suggestion!

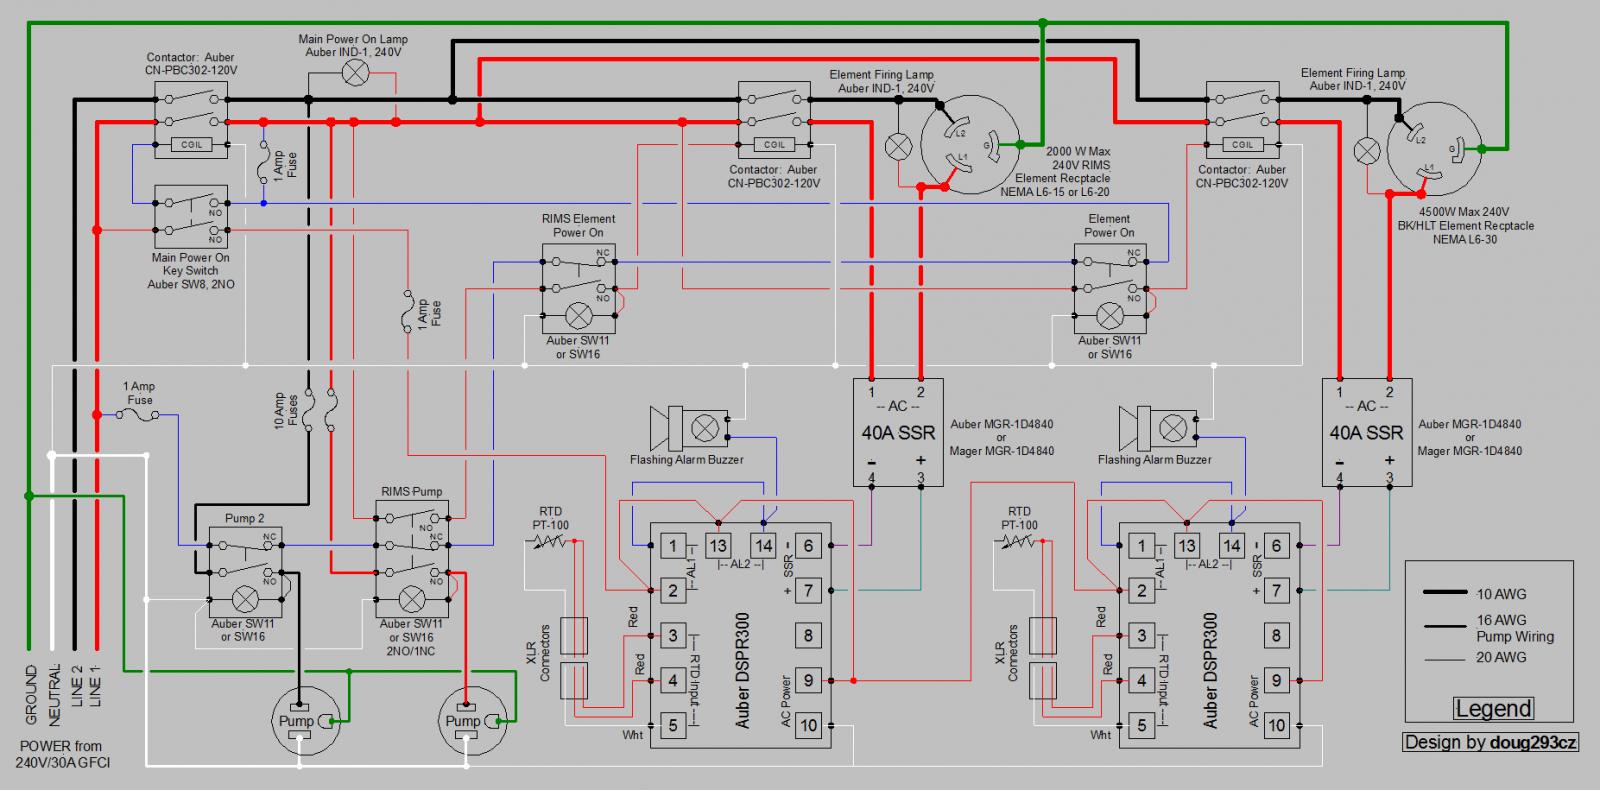
Here is the latest. It turned out a bit lengthy as well... Can't seem to get the time down! Too much to cover all at once I guess. Have a look and let me know if I missed something. Got the RIMS diagram from @doug293cz and I will be working on that next.

Here is the link. Electric Brewing Series - Part 3

Keep the suggestions coming!

Thumbnail.jpg
 
I like your vids! Well done, easy to understand and informative. Will help many seeking this type of info. Nice job! I also like your Kal clone! I built one with Sabco kegs and tri clover fittings on portable stands for the kettles and control box. I love electric!

John


John
 
I like your vids! Well done, easy to understand and informative. Will help many seeking this type of info. Nice job! I also like your Kal clone! I built one with Sabco kegs and tri clover fittings on portable stands for the kettles and control box. I love electric!

John


John

Thanks John! They might be boring for some, but i know when i was building my system it was alot of reading and figuring it out on my own. I hope to remove some of the mystery around it. Best thing i ever did IMO.

Thanks for watching !
Cheers
Brian
 
Well done. One comment... it would be helpful to explain what the different wire guages (AWG) mean and their respective current carrying capacity. Would help people understand what color terminal will be used at each connection (e.g. a yellow terminal at an element becaue it is carrying 25A).
 
Well done. One comment... it would be helpful to explain what the different wire guages (AWG) mean and their respective current carrying capacity. Would help people understand what color terminal will be used at each connection (e.g. a yellow terminal at an element becaue it is carrying 25A).

Good point! Will address it in the next video . Thanks for the feedback!

Cheers!
 
Nicely done..looking forward to seeing more! :) Am also enjoying your Friday beer reviews..
Thanks! I have a much more advanced RIMS diagram/build coming up. Stay tuned! Thanks on the beer reviews too. Have not had much feedback on those, we like doing them though.

Cheers!
Brian
 
I am looking for input on where to go next with the series. HERMS System? PID calibration and programing? I am up for any ideas. Let me know what you guys think.
 
I am looking for input on where to go next with the series. HERMS System? PID calibration and programing? I am up for any ideas. Let me know what you guys think.


I would do a HERMS system and then PID calibration, maybe entering your system into a brewing software and then brew day video?

Seems like a logical sequence to me! Great job on the series! Very informative!
 
I would do a HERMS system and then PID calibration, maybe entering your system into a brewing software and then brew day video?

Seems like a logical sequence to me! Great job on the series! Very informative!

Thanks for the feedback!
Cheers!
Brian
 
Can someone explain to me when a contactor is needed and when it's not? I noticed that one is not used in the simple BIAB diagram but one is used in the RIMS diagram. Maybe I don't fully understand the purpose of them. Sorry, I'm new to all of this.
 
Can someone explain to me when a contactor is needed and when it's not? I noticed that one is not used in the simple BIAB diagram but one is used in the RIMS diagram. Maybe I don't fully understand the purpose of them. Sorry, I'm new to all of this.

In many cases, it's just a matter of aesthetics. The Leviton 3032 (and similar) look like wall light switches. Some folks don't want that look on their panels. The nice looking lighted switches that are frequently used can only handle 10A, so are not suitable for directly switching the element power.

Other times, you need a relay (a contactor is nothing more than a high current relay.) If you want to interlock a switch, for example to prevent a RIMS element from being powered up if the pump is not running, then you must use a relay rather than a simple mechanical switch. Also, if you want to do any computer control (BCS, RPi, Arduino, PLC, etc.), then you must use contactors.

If the above doesn't answer your question, then ask in more detail.

p.s. I'm the originator of the designs discussed in the videos.

Brew on :mug:
 
Apparently you can build a all wifi panel for half the cost, since Raspberry and CraftBeerPi do everything else for you :eek:!

There's no way you can do it for half the cost just by using an RPi. You can save the cost of multiple temp controllers (PID's, EZBoils, etc.) IF the design uses more than one, but those controllers usually make up less than 25% of the cost of a control panel. You still need all the contactors, relays instead of switches to control the contactors, enclosure, SSR's, heatsinks, wire, receptacles/plugs, etc.

Brew on :mug:
 
In many cases, it's just a matter of aesthetics. The Leviton 3032 (and similar) look like wall light switches. Some folks don't want that look on their panels. The nice looking lighted switches that are frequently used can only handle 10A, so are not suitable for directly switching the element power.

Other times, you need a relay (a contactor is nothing more than a high current relay.) If you want to interlock a switch, for example to prevent a RIMS element from being powered up if the pump is not running, then you must use a relay rather than a simple mechanical switch. Also, if you want to do any computer control (BCS, RPi, Arduino, PLC, etc.), then you must use contactors.

If the above doesn't answer your question, then ask in more detail.

p.s. I'm the originator of the designs discussed in the videos.

Brew on :mug:
Makes complete sense. Thanks for the reply! I just want to make sure I understand everything I will (and won't) be using in my panel.
 
There's no way you can do it for half the cost just by using an RPi. You can save the cost of multiple temp controllers (PID's, EZBoils, etc.) IF the design uses more than one, but those controllers usually make up less than 25% of the cost of a control panel. You still need all the contactors, relays instead of switches to control the contactors, enclosure, SSR's, heatsinks, wire, receptacles/plugs, etc.

Brew on :mug:

hmm ball parking the price, i think its possible to build a pretty nice panel for around $400, going as simple as possible
 
This might not be the right place for this... BUT we hit 1000 subs on the channel today. I have to credit a lot of the recent success to the HBT community. THANK YOU everyone that encouraged me to do the e-brewing series. It really ignited my passion to put out more good content. We are going to be doing a giveaway to our subs soon. I got a little excited today here is a video.. :p
1000 subs announcement

Thanks again everyone.
Special thanks to @doug293cz For assisting with the great diagrams! :mug:
 
This might not be the right place for this... BUT we hit 1000 subs on the channel today. I have to credit a lot of the recent success to the HBT community. THANK YOU everyone that encouraged me to do the e-brewing series. It really ignited my passion to put out more good content. We are going to be doing a giveaway to our subs soon. I got a little excited today here is a video.. :p

1000 subs announcement


Thanks again everyone.

Special thanks to @doug293cz For assisting with the great diagrams! :mug:


Congratulations on the milestone! Keep putting out great content and the more brewers will watch!

Cheers!
 
I know you mentioned it in one of the videos already, but I would love to see a video of actually putting together a panel from parts to finish!

By the way, I have enjoyed the videos so far! I have not gotten into electric brewing, but I am looking into doing RIMS with a pump and a basic control panel!

Great! I don't think i would brew any other way now.

I do want to do a "complete" build. This does take money though, rest assured i am working on it behind the scenes. The more support we recieve the more likely it is to happen.

Thanks for the feedback!
Cheers!
 
Fantastic series so far, thank you so much!

Looking forward to more, researching building up a custom electric system so these are fantastic right now.
 
Fantastic series so far, thank you so much!

Looking forward to more, researching building up a custom electric system so these are fantastic right now.

Thanks for the feedback. Glad you are finding it helpful.

Cheers!

Brian
 

Latest posts

Back
Top