• Please visit and share your knowledge at our sister communities:
  • If you have not, please join our official Homebrewing Facebook Group!

    Homebrewing Facebook Group

DIY Fail...

Homebrew Talk

Help Support Homebrew Talk:

This site may earn a commission from merchant affiliate links, including eBay, Amazon, and others.

kgx2

Well-Known Member
Joined
Apr 22, 2014
Messages
49
Reaction score
2
Location
Magic Rat World
So I've tried to make my own stir plate but after getting everything together and soldering it up nothing works. I'll be the first to say I know little to none about electric wiring but can build anything with good instructions (especially with diagrams). This seemed to be a very simple project so I figured I'd give it a shot. I tried switching the power wire on the potentiometer and that didn't help either. Using a 6V 1A power supply, old pc case fan 120mm 12V .6A, potentiometer, power inlet connector (no idea real name) & and a toggle on/off switch.

I know the power supply is lower than the fan but I tired another supply and still nothing so I don't think it's the supply. There seems to be very few things I could do wrong here as it really is a pretty simple circuit right?

Any help would be great! I'm going to get another new fan and see if this one was just dead as it did come from a retired pc.

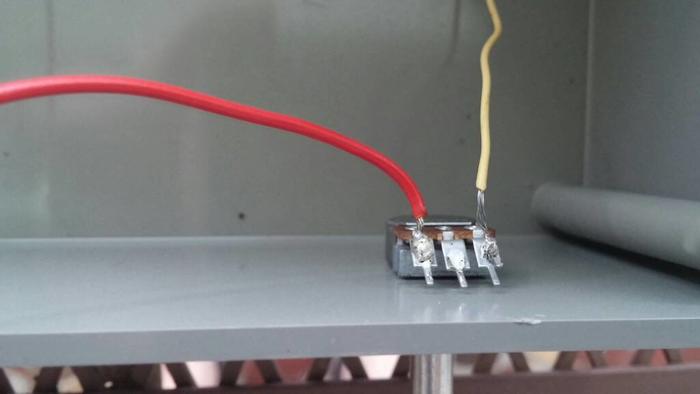
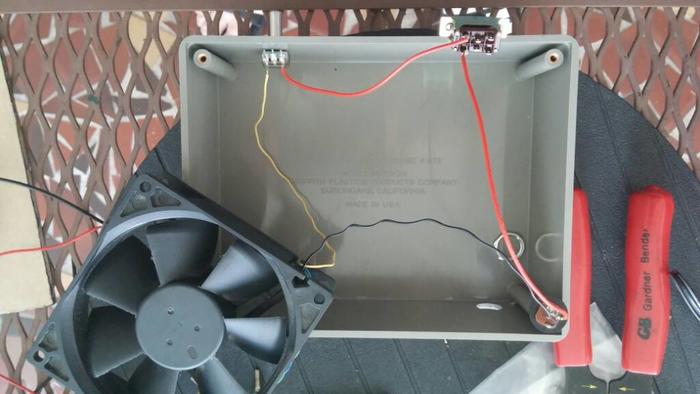
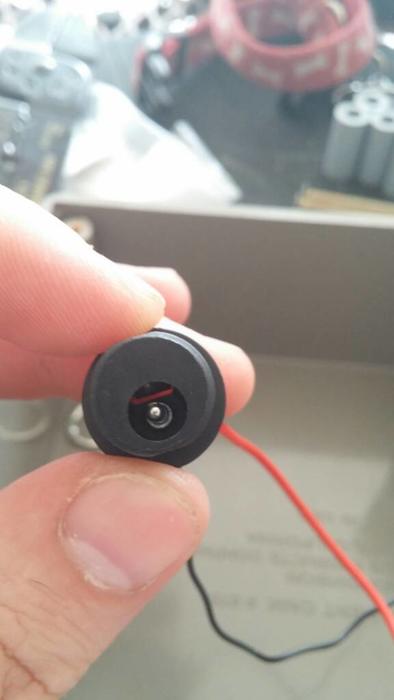
Here are some pics of the project and components.
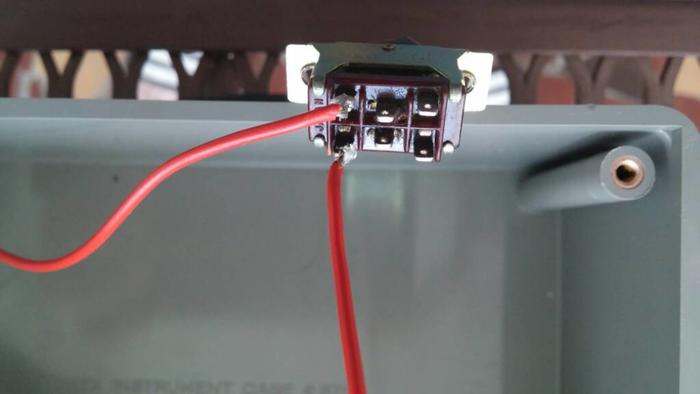
1404923638984.jpg


1404923652001.jpg


1404923664443.jpg


1404923676418.jpg
 
You try hooking the fan up to the power supply directly to see if it actually works first? What's that extra item you have in the first picture?
 
Yeah, what theck said. Connect the fan direct to the power supply and make sure it spins. Once confirmed, start working out from there.

Also, the toggle switch (first pic) looks like it might be wired incorrectly.
 
IIRC you have the potentiometer wired as always being full resistance. You want to use one end and the center pin. The two ends always go full resistance so you want one end to the variable middle. Which end you pick just determines if 100% is full clockwise or counterclockwise.
 
The switch is wired wrong - out of six places to solder, pick one center and one end on the same group of three. In other words, move one of the wires to the opposite side center terminal.

Also - depending on the power rating of that potentiometer, you might have a smoke producer there. Put a jumper from one side terminal of the pot to the center - it's doing absolutely nothing the way it's wired.
 
If that is your power ON switch in the first pic, I think you have it mis-wired. The wire from the power supply should be on one of the middle connections, and the wire to the fan should be on the normally open connection on the same side of the switch.
 
Yeah, what theck said. Connect the fan direct to the power supply and make sure it spins. Once confirmed, start working out from there.

Also, the toggle switch (first pic) looks like it might be wired incorrectly.

Agree!! FYI toggle looks like a ganged double throw double pole-looks like you are jumping gangs. Ganged is two switches in one. Three posts to a gang, outer post to inner post is a switch
Pot also looks to be wired wrong. looks to be wired across the pot. middle leg is the variable.
As said just jump both switch and pot, paper clip fine, and work backwards from there
 
The first pic is the power switch.

Fan had 4 wires. I checked a site that said the right wire would be ground on the right most side then power wire just left to it.

I changed the potentiometer red wire to that post cause the middle post wasn't doing anything so I thought I'd try the other post. Nice to know I had it right the first time.

How would I know the power rating of the potentiometer? I got it at a gadgets store in a bin labeled 25ohm I think. (No idea what an ohm is 😳)

I'll change the incoming red power wire to the middle post of the on off switch and the red wire going to the potentiometer to the bottom most but on the same side as the incoming power wire?

What's a pot? Potentiometer?
Does the incoming power look wired correctly?

Thanks all!
Yes, pot = potentiometer. I'm am unjuneer, not a speller! FYI, rat world--am sitting in the data center there as I type! For now just bypass everything till you know you are good.
 
I can answer my own post. Yes it was cause we have power!

Fan works but only 1 speed? Pot only turns it on or off with the power switch on. No speed settings/control?

Need a better fan still?
 
I can answer my own post. Yes it was cause we have power!

Fan works but only 1 speed? Pot only turns it on or off with the power switch on. No speed settings/control?

Need a better fan still?

Maybe your power supply is underpowered? Does it spin fast at one speed? Not an expert but when I swapped mine for a bigger supply 12v but more amp I think? it worked much better.
 
Pot most likely burned out, very possible on these DIY builds. What is really needed is what is called a VPM (variable pulse modulator)..OH crap! Ya, better solution, cheap too, I got one on ebay, 3 bucks- with shipping, off hand do not remember the link to it. That pot looks light duty. to explain, we have to get back into that 'ohms' thing. Ohm is resistance, so the pot is a restriction. Ohms law, 25 ohm pot, 6 volt supply equals a lot of power/watts. plus a pot is a passive load and the fan is inductive, reason for that VPM thingy. it basicly turns the fan off and on quickly. 99% of the stir plates use potentiometers and are fine, pot may run hot tho. Trick is to use a large enuff potentiometer if you go this route. My guess, check parts list that have been proven. FYI, at 6 volts with a 12 volt fan, you may not need anything other than that switch. See if it throws the bar.
 
Trying to glue the stupid magnets in place but I'm not letting it dry I guess cause it keeps throwing them... using a poker chip a buffer between the fan magnet and the rare earth magnets. One of each polarity facing up to spin the bar in place hopefully.
 
Yeah the pot needs replaced cause even with a hard drive magnet it still throws the stir bar.

Off to the shack I guess....
 
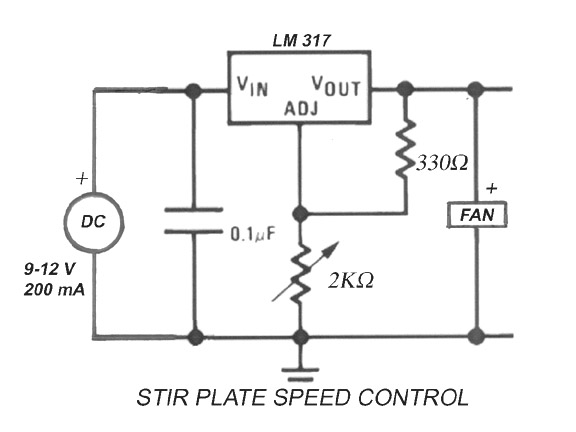
Need to use a voltage regulator to drive the fan. The pot is probably not rated for tha current draw of the fan. use the circuit below. This is the circuit used by Stir Starters and is the one I used to build mine. The regulator takes the fan load on and the pot merely is an input to the regulator to adjust the voltage to the fan. Radio Shack has the parts. The part no. there is LM317T.

Schematic.jpg
 
Thanks for the links but why would I buy a stir plate when I'm talking about making one in the DIY section?
 
I had alot of problems with the bar being thrown when I built my first stir plate. I was using just a power supply and potentiometer like your setup. This just isn't the best way of controlling speed IMHO.
After going through many unsuccessful modifications, I ended up building a voltage regulator like the one mentioned by HopinJim. With a 13VDC power supply hooked up, it gave me much better speed control and now I don't throw the bar at all.
Just something to keep in mind. Throwing the bar frustrated me for awhile.
 
HopinJim thanks for the info. I found the item on their website. As I stated my electrical knowledge isn't much though so I've no idea how to read the diagram you posted. Any chance you coud post a picture of how you wired yours?
 
Thanks for the links but why would I buy a stir plate when I'm talking about making one in the DIY section?

Because this....

HopinJim thanks for the info. I found the item on their website. As I stated my electrical knowledge isn't much though so I've no idea how to read the diagram you posted. Any chance you coud post a picture of how you wired yours?
 
MODS: I think this should get stickied. Even though it started as asking for help, it has a lot of very helpful hints about building stir plates in just a few pages.
 
I brewed today , laid yeast on water for 15mins , stir a bit for 15 mins , pitched the yeast, air lock going in 2.5 hours. Stir plate ?
 
The point of my latter posts are this: I don't try and DIY a auto transmission rebuild - I've taken everyone I've had to do to a shop. Why? Because I don't have the knowledge, skills, abilities, or tools to do the job and for me to obtain all that, it would cost more than it does to just have someone else do it. I have the knowledge, skills, abilities, and tools to build my own stir plate - but I didn't - because my time is worth money to me and it was cheaper to buy it.

Making your own stir plate is cool - but when it turns out dangerous - it's not cool.

I hope this has been helpful.
 
I brewed today , laid yeast on water for 15mins , stir a bit for 15 mins , pitched the yeast, air lock going in 2.5 hours. Stir plate ?

Sounds like you severely overpitched, since there was no real growth phase taking place. Ideally, with a proper pitch you shouldn't see visible signs of fermentation for 12-24 hours.

But, yeah, your point is valid as long as you are happy with the limited choices of available dry yeast strains and you don't mind buying fresh yeast every batch (assuming you are not harvesting and re-pitching slurry into the next batch while viability is still high). Granted, even if you do need to make a starter, a stir plate is not necessary, though it is very helpful and will yield more cells, and is therefore more economical, than a starter made without one.

I use liquid yeast exclusively because I like the greater variety of strains that are available. I also reuse my yeast many times over, often starting with as little as 20B cells that were harvested maybe 6 or 8 months prior that needs to be propagated to the proper pitching size. For that my stir plate is worth it's weight in gold and since I'm reusing yeast rather than buying fresh, I'm sure my stir plate has paid for itself, given that a typical starter's worth of DME is around $1.00 and a new vial is ~$8.00.

The bottom line is that you're right. None of us needs a stir plate to brew beer. But it does become a necessity once you make the decision to stop wasting money on new yeast and to start reusing yeast you've already paid for.
 
Back
Top