• Please visit and share your knowledge at our sister communities:
  • If you have not, please join our official Homebrewing Facebook Group!

    Homebrewing Facebook Group

BruControl: Brewery control & automation software

Homebrew Talk

Help Support Homebrew Talk:

This site may earn a commission from merchant affiliate links, including eBay, Amazon, and others.
Truth be told... I try not to write script for you guys as I think/believe/hope that you are better off in the long run if you grind through it and teach yourself. Trust my goal isn't to frustrate anyone, and I will provide whatever help you require...

I agree that you need to learn, except an example or pix is worth a 1000 words. You give very limited sample code in the manual. If I have an example of something, I can normally figure it out. If you have no experiences in any scripting or coding, it would be very difficult.

Some of the answers I get go into great detail but without examples, I am scratching my head sometimes.
 
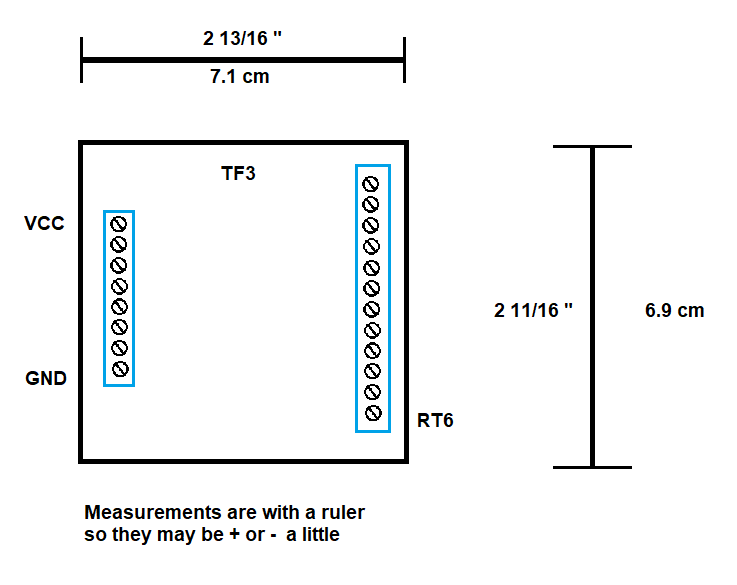
2 11/16 " H x 2 13/16 wide. I was off a cm last night. I should have said 7x7.
I re measured this am. I did only measure with a cheap ruler and do a "real" measurement

tf3x2.png
 
I agree that you need to learn, except an example or pix is worth a 1000 words. You give very limited sample code in the manual. If I have an example of something, I can normally figure it out. If you have no experiences in any scripting or coding, it would be very difficult.

Some of the answers I get go into great detail but without examples, I am scratching my head sometimes.

I'm a bit surprised to hear this as each statement or command has both the syntax and example. I suppose we could create an example repository... not sure if that should be here or on the website.
 
OK, here is a little teaser on the next update.

Added Auto Lock, such that the interface will lock itself after a definable period of non-use:
upload_2019-10-26_10-33-22.png

Also, per request, we added "Aliases"... named them 'Display Name' though to be clearer:
upload_2019-10-26_10-35-56.png

We moved the data recording to a proper SQL database - this should help reduce file system overhead. Also fixed some bugs such as overlapping alarms, crash when pasting scripts with unmatched header brackets, graph data not shown when on a different workspace, hysteresis value not resolving to ON/OFF or TRUE/FALSE, bounds for PID calc and out times, etc.

We're working on the profile element, then will get it up for your use.
 
I'm a bit surprised to hear this as each statement or command has both the syntax and example. I suppose we could create an example repository... not sure if that should be here or on the website.

I agree with oak barn. I have looked at the manual hundreds of times and still scratch my head. It’s not till I have an example that I can begin to learn what’s going on.
 
I have learned/dabbled in several different scripting and programming languages during my career. Some I have picked up with my google foo, and others I have had more formal training paid for by my employer. I think one of the challenges for new programmers/scripters is to be able to think like a computer. It can be straight forward to understand each individual command/concept in an isolated example, but building these up into more complex useful scripts can be a challenge for someone new to this. For example just looking at my boil kettle I can monitor and react to a boil over, loss of boil, or incorrect boil intensity without much effort. But to write a script to do that requires you to be able to think like a computer as to how to accomplish the same things in a linear, one command at a time fashion. Taking a high level concept and directly implementing it with low level code can be a challenge for both novice programmers writing simple code as well as experienced programmers writing complex code. Instead, It can be very helpful to take a top down approach. Starting with a flow chart for a state machine and then moving to pseudo code comments before writing any code can be very helpful to break down the high level concepts into more manageable sub-blocks that are eventually further reduced into actual code.

The example flow chart in the site below has corresponding code with comments for a few different languages.
https://www.geeksforgeeks.org/an-introduction-to-flowcharts/

So for the example above of wanting to temporarily disable the alarm during temperature ramping, I would start by creating a flow chart that represents the state machine as it is coded now. I would also add comments to your code that represent the blocks in the flow chart so you can bounce between them. Then I would modify the flow chart for the new functionality, add new comments to the code, and finally add the code itself.

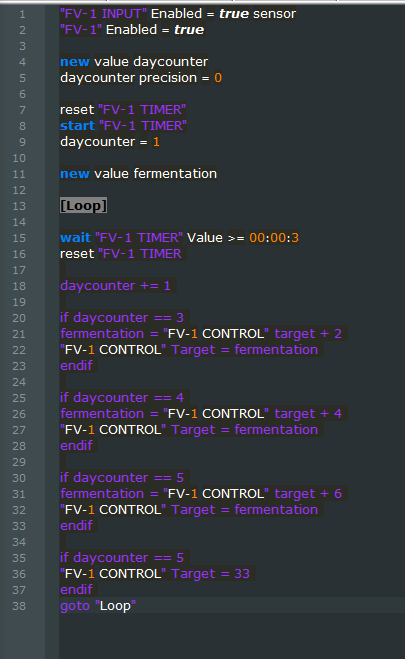
Fermet_script.PNG


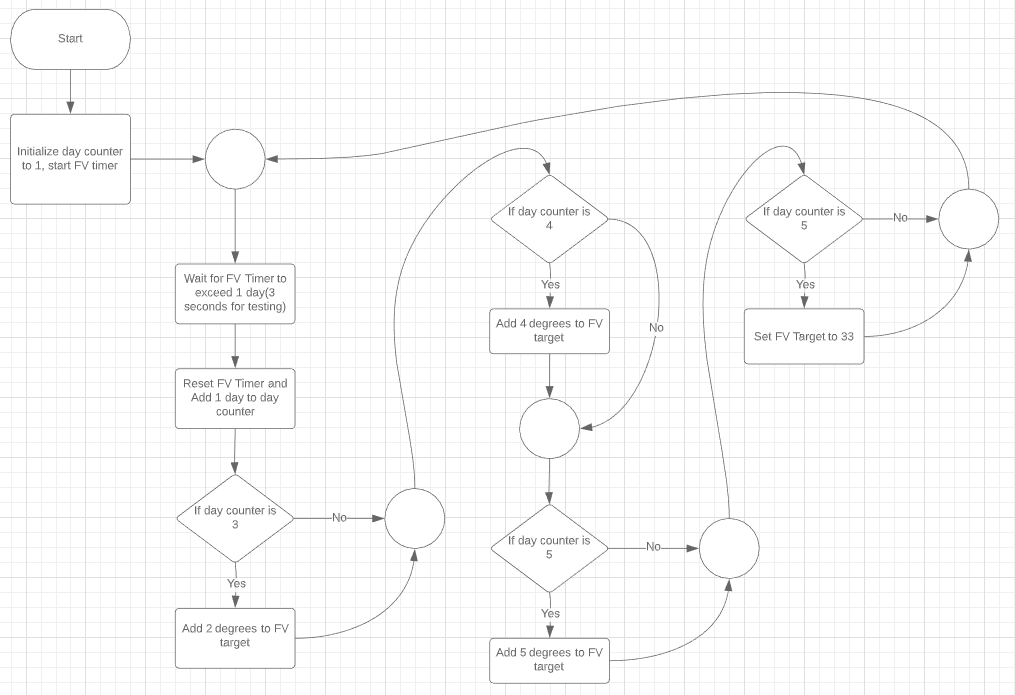
Here would be the flow chart as the code exists above. (Note multiple if statements that are evaluating if we are at day 5). In case anybody wants to know, I used Lucidchart to make this flow chart.

Ferment_state_machine.PNG


Edit: to sum this all up, using the approach I mentioned will help a new scripter to be able to break down their scripting problems into more targeted questions in the forum. Looking at a long script that someone else wrote is difficult to follow, whereas smaller more targeted questions/examples are easier to review and provide feedback on.

In addition we all tackle large problems in different ways. To be honest I didn't even look at oakbarn's script above because the description of what he is trying to do sounds way too conviluted and non KISS to me. I'm not saying that there is no merit to it or that what he is trying to accomplish is wrong, but I'm not going to spend the time to try and understand the entirety of it all and provide feedback on how it was implemented in a script. It's like asking me to be your editor for a BYO article. I can help with simple grammar, but not the vision of your article.
 
Last edited:
I'm a bit surprised to hear this as each statement or command has both the syntax and example. I suppose we could create an example repository... not sure if that should be here or on the website.
I think a repo on the website would be a nice addition... I would say that it could largely be community driven, but the code would need to be vetted and well commented (context is everything). That said, there is no substitute for trial and error learning to fully understand the framework in which everything works. The example crane gives above about the flow chart is great advice when starting out. Understanding the process is paramount and really should be the first step before trying to code or script anything.
 
I think a repo on the website would be a nice addition... I would say that it could largely be community driven, but the code would need to be vetted and well commented (context is everything). That said, there is no substitute for trial and error learning to fully understand the framework in which everything works. The example crane gives above about the flow chart is great advice when starting out. Understanding the process is paramount and really should be the first step before trying to code or script anything.
I think repos are good for people who already have a foundation. However to obtain that foundation would still require some tutorials. We all learn by building/expanding off of our previous knowledge and perspective. When it comes to programming the best teachers I've had focus on one large problem by starting with the very basics. For example, let's make a fermentation chamber with all the bells and whistles. For someone new to this here is a way to break this down into manageable building blocks.

1. Hysteresis cooling
2. Dual stage hysteresis heating and cooling.
3. Changing temperature setpoints over a pre-determined time schedule
4. Out of range setpoint alarms (start with very long delays that eliminate false triggers from ramping after setpoint changes)
5. Disable alarm during setpoint changes and use tighter and shorter duration alarm triggering while holding temperature.
6. Enabling Tilt hydrometer support.
7. Dynamically drive fermentation schedule off of Tilt specific gravity.
8. Add spunding valve control.
9. Add beersmith data exchange fermentation profile importation.

The only problem is that writing good tutorials and documentation can take as much or more time than writing the underlying code.
 
I have learned/dabbled in several different scripting and programming languages during my career. Some I have picked up with my google foo, and others I have had more formal training paid for by my employer. I think one of the challenges for new programmers/scripters is to be able to think like a computer. It can be straight forward to understand each individual command/concept in an isolated example, but building these up into more complex useful scripts can be a challenge for someone new to this. For example just looking at my boil kettle I can monitor and react to a boil over, loss of boil, or incorrect boil intensity without much effort. But to write a script to do that requires you to be able to think like a computer as to how to accomplish the same things in a linear, one command at a time fashion. Taking a high level concept and directly implementing it with low level code can be a challenge for both novice programmers writing simple code as well as experienced programmers writing complex code. Instead, It can be very helpful to take a top down approach. Starting with a flow chart for a state machine and then moving to pseudo code comments before writing any code can be very helpful to break down the high level concepts into more manageable sub-blocks that are eventually further reduced into actual code.

The example flow chart in the site below has corresponding code with comments for a few different languages.
https://www.geeksforgeeks.org/an-introduction-to-flowcharts/

So for the example above of wanting to temporarily disable the alarm during temperature ramping, I would start by creating a flow chart that represents the state machine as it is coded now. I would also add comments to your code that represent the blocks in the flow chart so you can bounce between them. Then I would modify the flow chart for the new functionality, add new comments to the code, and finally add the code itself.

View attachment 649868

Here would be the flow chart as the code exists above. (Note multiple if statements that are evaluating if we are at day 5). In case anybody wants to know, I used Lucidchart to make this flow chart.

View attachment 649867

Edit: to sum this all up, using the approach I mentioned will help a new scripter to be able to break down their scripting problems into more targeted questions in the forum. Looking at a long script that someone else wrote is difficult to follow, whereas smaller more targeted questions/examples are easier to review and provide feedback on.

In addition we all tackle large problems in different ways. To be honest I didn't even look at oakbarn's script above because the description of what he is trying to do sounds way too conviluted and non KISS to me. I'm not saying that there is no merit to it or that what he is trying to accomplish is wrong, but I'm not going to spend the time to try and understand the entirety of it all and provide feedback on how it was implemented in a script. It's like asking me to be your editor for a BYO article. I can help with simple grammar, but not the vision of your article.

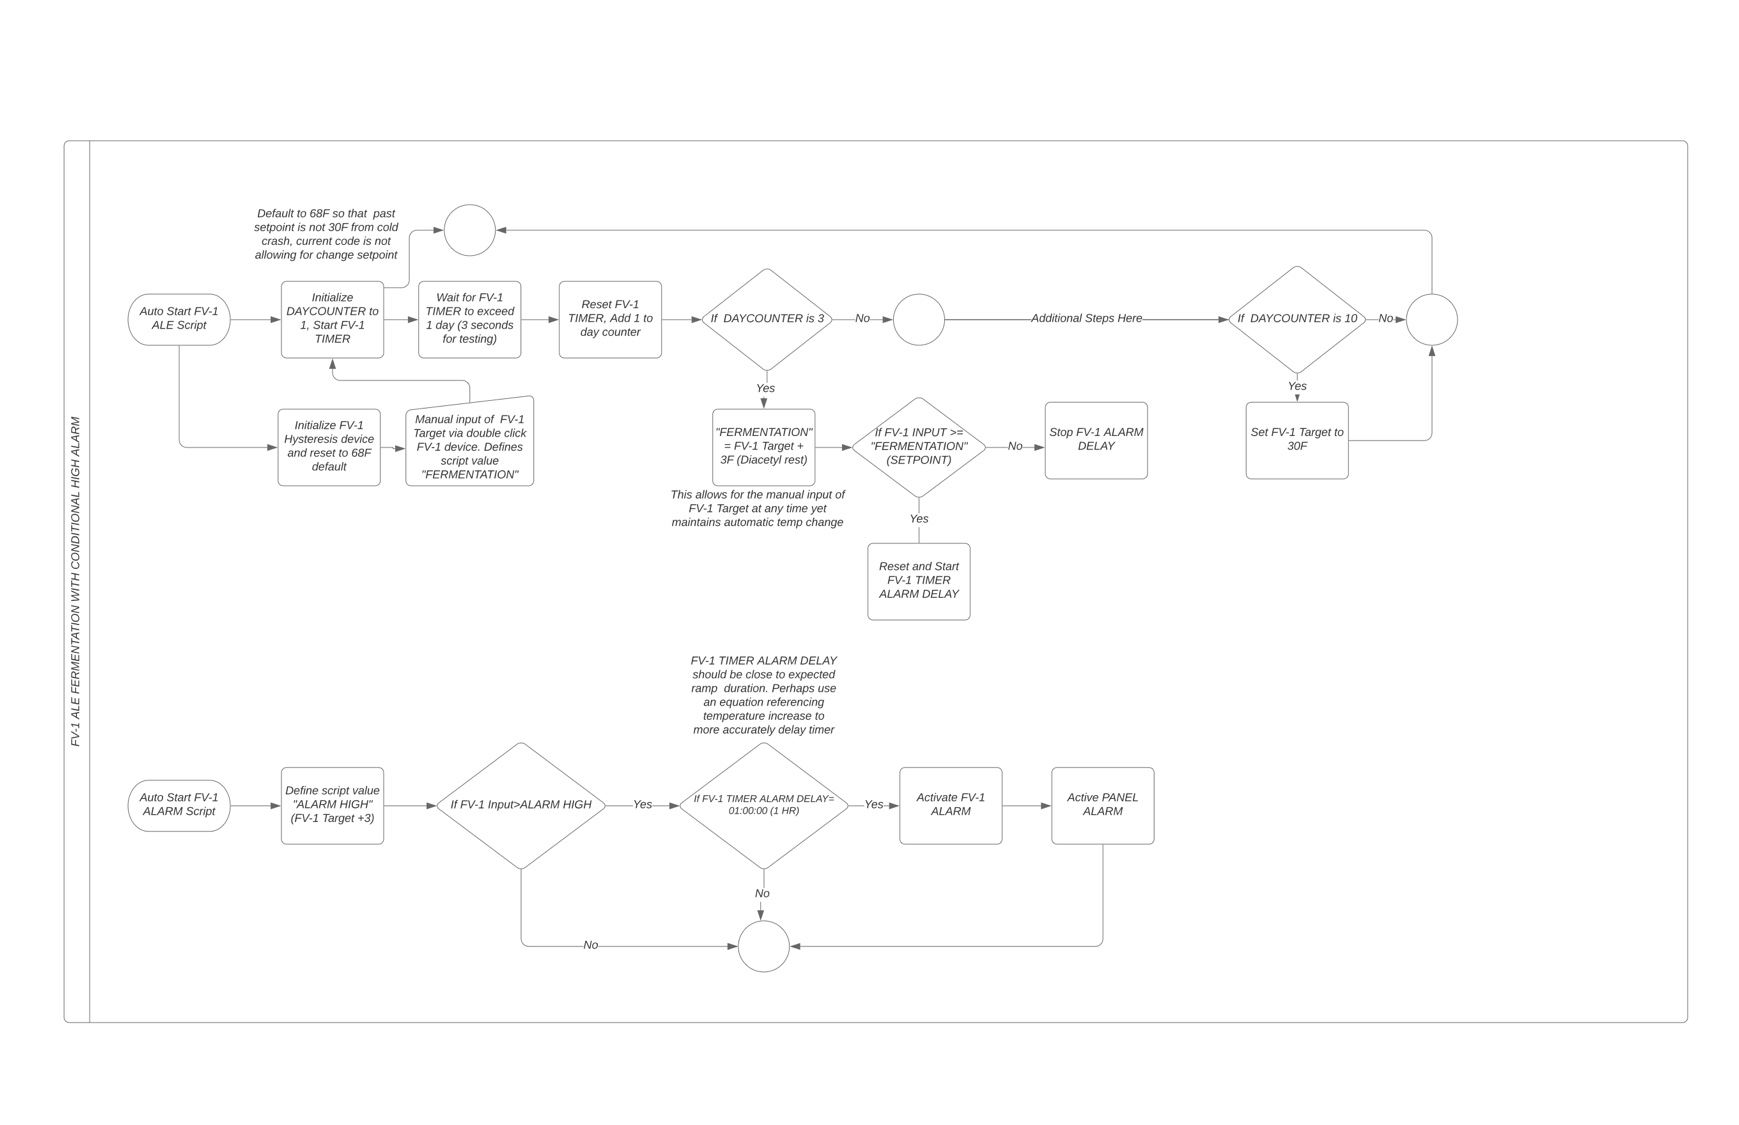
Thank you for providing the insight and references to making a flow chart to assist with coding. I took you advice and decided to make one to tackle the conditional alarm for multi set point Hysteresis.


IMG_0250.JPG
 
I think repos are good for people who already have a foundation. However to obtain that foundation would still require some tutorials. We all learn by building/expanding off of our previous knowledge and perspective. When it comes to programming the best teachers I've had focus on one large problem by starting with the very basics. For example, let's make a fermentation chamber with all the bells and whistles. For someone new to this here is a way to break this down into manageable building blocks.

1. Hysteresis cooling
2. Dual stage hysteresis heating and cooling.
3. Changing temperature setpoints over a pre-determined time schedule
4. Out of range setpoint alarms (start with very long delays that eliminate false triggers from ramping after setpoint changes)
5. Disable alarm during setpoint changes and use tighter and shorter duration alarm triggering while holding temperature.
6. Enabling Tilt hydrometer support.
7. Dynamically drive fermentation schedule off of Tilt specific gravity.
8. Add spunding valve control.
9. Add beersmith data exchange fermentation profile importation.

The only problem is that writing good tutorials and documentation can take as much or more time than writing the underlying code.

I’ve got 1-3 covered utilizing automatic and manual control switches.

Tackling 4 and 5 now tho I don’t like using a timer to disable Alarm. Regarding a high alarm, I’d like to make a value (or is this a string?) called “ramp up” so if setpoint>input ramp up is true. If ramp up is true alarm is false.

Not sure I need a timer to achieve this but i currently have one in my flow diagram

Edit: thinking about this more, I’d need to incorporate a deadband as to not interfere with typical fermentation swing. Am I on to something or is a timer in order?
 
Last edited:
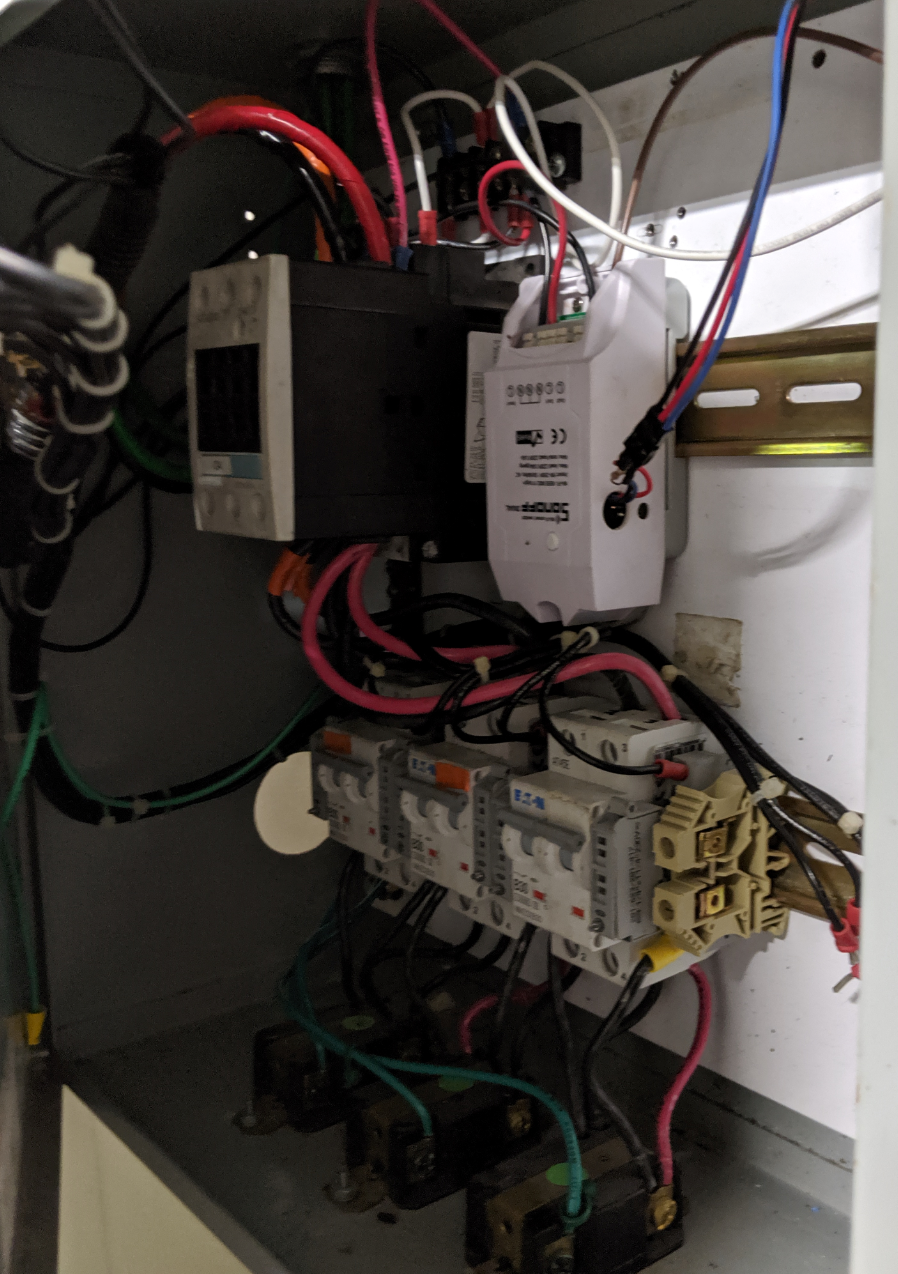
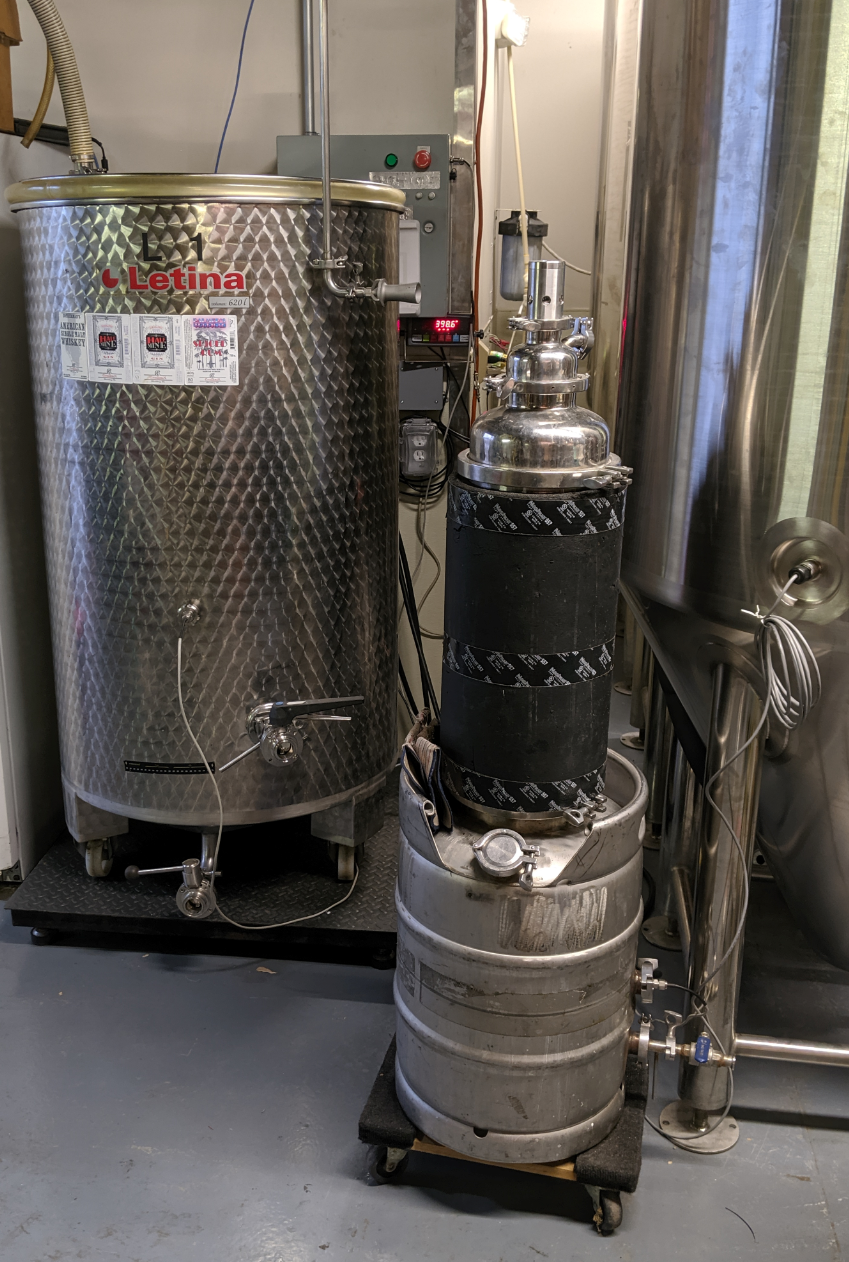
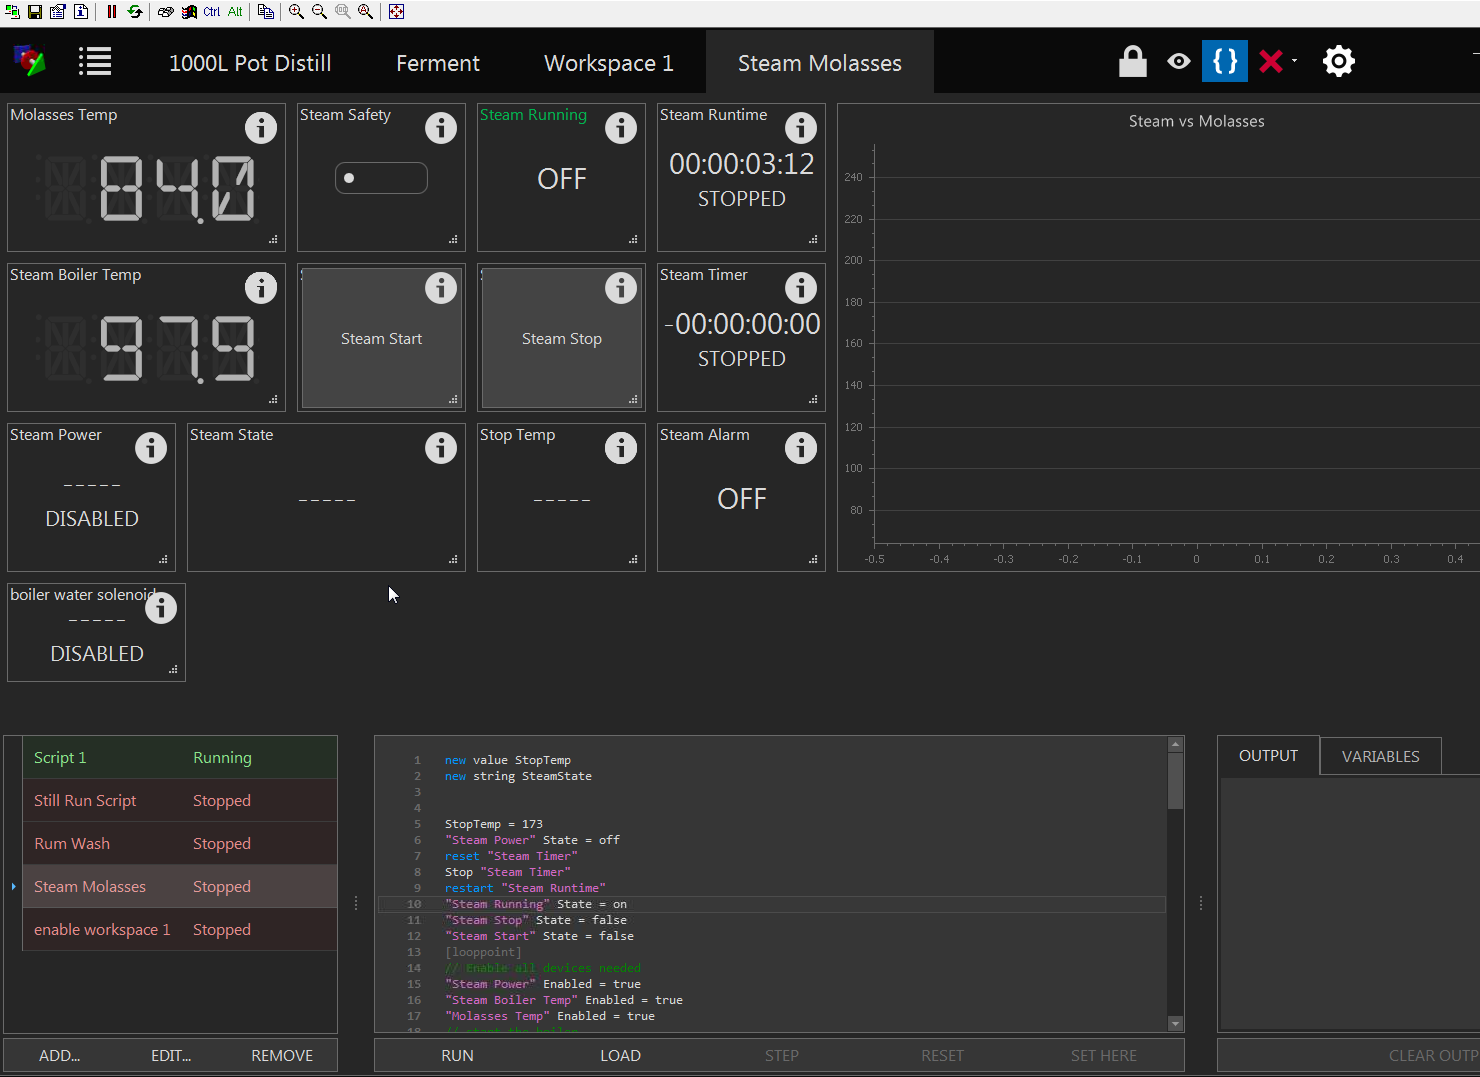
Moved my steam boiler to it's own control panel, using a previous one.. some 3/4" conduit, 4AWG wire, 50A 3-phase breaker and contactor for 3 5500W elements makes about 1.5 boiler horsepower, using one of the SonOff Duals I had laying around with the DIN rail adapter made for a super simple install. Now we can steam molasses while running the still...

upload_2019-10-27_20-2-4.png

upload_2019-10-27_20-2-30.png


upload_2019-10-27_20-1-11.png
 
OK, here is a little teaser on the next update.

Added Auto Lock, such that the interface will lock itself after a definable period of non-use:
View attachment 649819

Also, per request, we added "Aliases"... named them 'Display Name' though to be clearer:
View attachment 649820

We moved the data recording to a proper SQL database - this should help reduce file system overhead. Also fixed some bugs such as overlapping alarms, crash when pasting scripts with unmatched header brackets, graph data not shown when on a different workspace, hysteresis value not resolving to ON/OFF or TRUE/FALSE, bounds for PID calc and out times, etc.

We're working on the profile element, then will get it up for your use.
:bravo:

Additional request for the future:

Alarm Wav files: Setup like an Background property where you could have more than a single choice for the wav file.
I have created different alarms, each with its own wav file. It would be easier to have one alarm with selectable wav files just like you can now do with the background.

Have a choice for the path for both the new wav file and the background image. That way, with the new Alias, you could have unlimited backgrounds (and wav files) for your one element. I have found that I need one more background as I have used the 4 available (One of the four is no background).

I was a little overwhelmed trying to learn the scripting but have completed my hot side script and am almost ready for my first brew day with BruControl. I brewed with my BCS yesterday and was already thinking how much easier it will be with Brucontrol.

While scripting has a learning curve, it allows the end user to make as many steps as needed. The BCS is limited to 64 steps. I have well over a hundred in the Hotside Brew Script alone. I have not even started on the Cool side (except to monitor the Tilt) and there we have 3 fermentors although only one is glycol chilled.
 
Last edited:
I'm a bit surprised to hear this as each statement or command has both the syntax and example. I suppose we could create an example repository... not sure if that should be here or on the website.
They examples are there, but how to use them and effects of other is somewhat difficult without specific examples related to a brew day.


A simple 3 vessels (MLT with RIMS, Electric HLT, Electric Brew Kettle) Brew day with Mash, Sparge, Boil with 3 Hop drops) , with some transfer steps as a "generic" script that is heavily commented would have been a great help in learning. Maybe provide along with a generic configuration of the three vessels. Make it down loadable from the web. I read and re read the sample code you provide, but without the elements, it was hard to figure out just what was happening.

You could also create a tutorial on how to build that configuration from scratch, explaining each step in detail.

I think both would be a great help.
 
Man guys, I try and try to get this deviation alarm to work to no avail, this is driving me nuts!

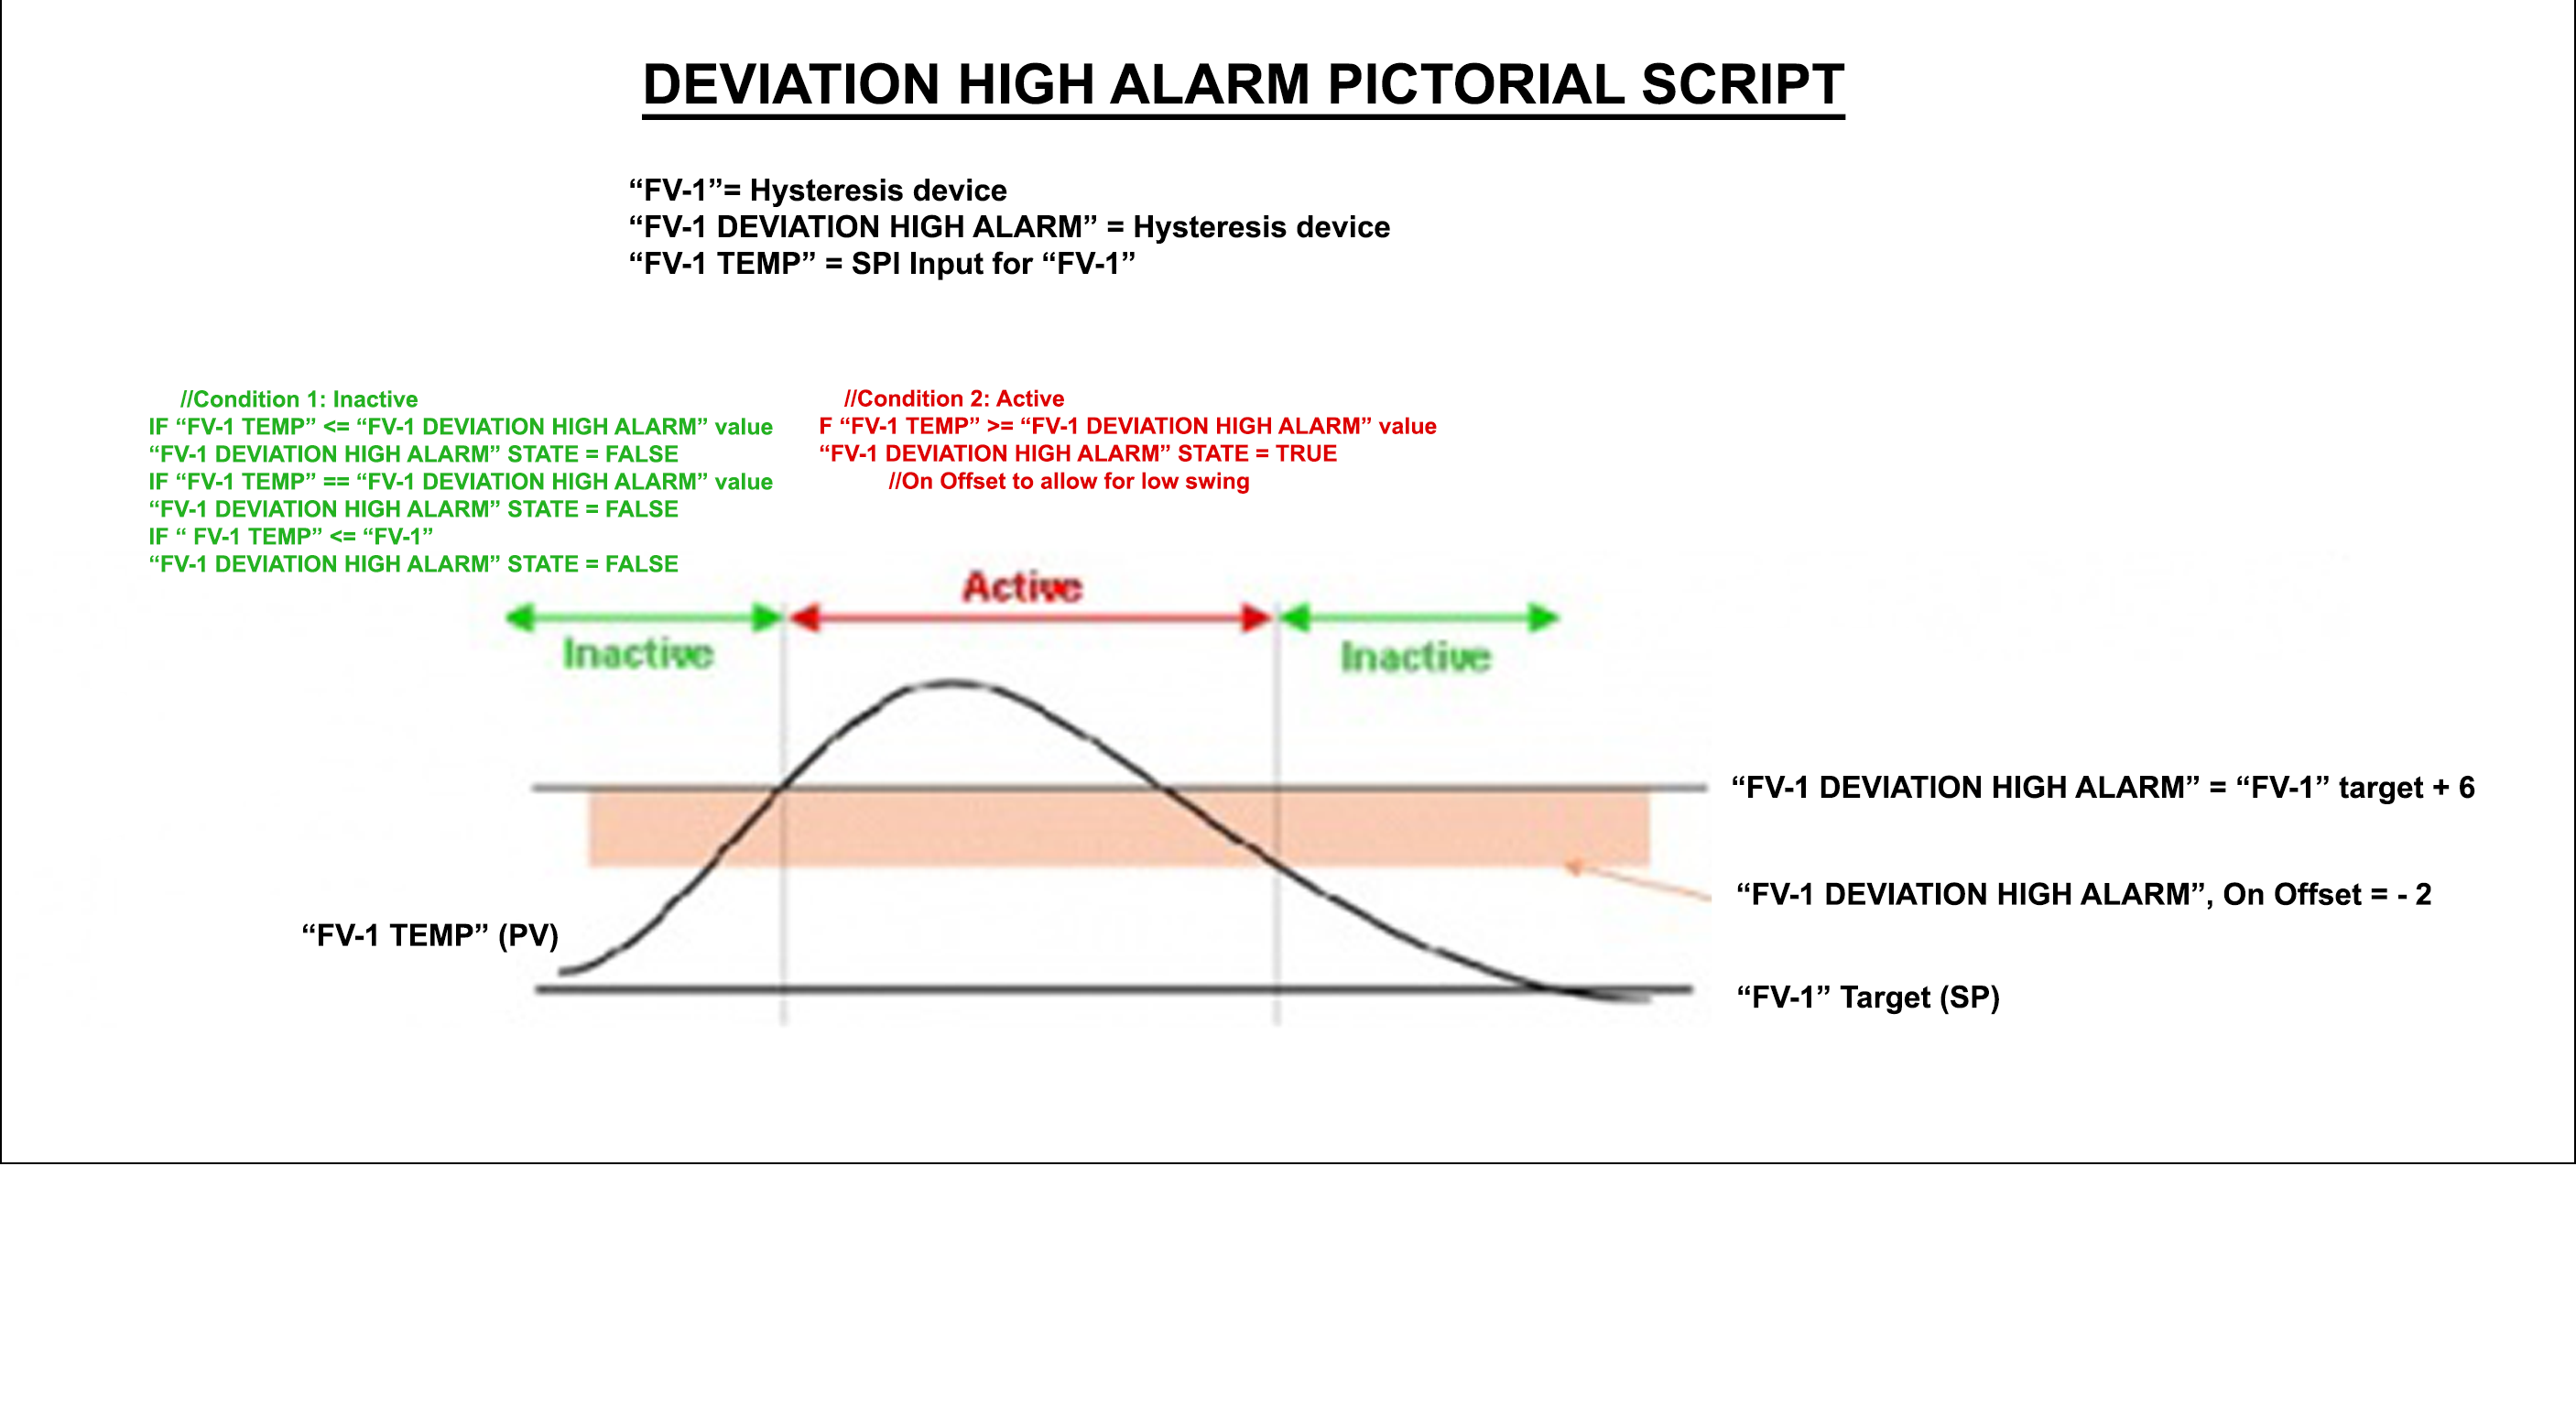
I'm figured I'd give a second attempt to use @crane suggestion for a diagram to better communicate the problem and idea. Perhaps this picture I drafted will show my thoughts and what I'm trying to achieve. Ultimately I'm trying to disable alarm during ramp up and ramp down. Of course this has its challenges of differentiating the ramp phase to the stable phase of fermentation. I feel this can be done without using time as a variable but rather conditional based. Writing the script to navigate through the conditions is where I am thoroughly confused.

Anyone willing to validate whether or not this will work and or provide some insight? The alarm I have suggested is not an Alarm element but rather a hysteresis element acting as an alarm. I feel the offset may assist in low (or high) process value swings from set point.

Am I over-complicating this? How are you guys approaching deviation Alarms with step mashing/mashout?

Deviation High Alarm.png
 

Attachments

  • Deviation High Alarm.png
    Deviation High Alarm.png
    413.9 KB
Last edited:
First, thank you for posting your process with comments, it makes it much easier to try to figure out what you are doing. That said, maybe I'm not understanding your intent, but if the process is in a range or mode (i.e. ramping) that you don't want to alarm, simply disable the alarm (or in your case the hysteresis element) via the script. You could use a script variable to tell the system when it is in a defined ramp, then if the ramp variable is true, disable the alarm and vice versa.
 
First, thank you for posting your process with comments, it makes it much easier to try to figure out what you are doing. That said, maybe I'm not understanding your intent, but if the process is in a range or mode (i.e. ramping) that you don't want to alarm, simply disable the alarm (or in your case the hysteresis element) via the script. You could use a script variable to tell the system when it is in a defined ramp, then if the ramp variable is true, disable the alarm and vice versa.

I think your understanding my intent. Ive over complicated in my picture. I did in fact try to disable the alarm during the ramp phase and this is where I’m failing.

I’m having trouble defining this ramp phase to disable along with parallel paths with fermentation day counter
 
I’ve got 1-3 covered utilizing automatic and manual control switches.

Tackling 4 and 5 now tho I don’t like using a timer to disable Alarm. Regarding a high alarm, I’d like to make a value (or is this a string?) called “ramp up” so if setpoint>input ramp up is true. If ramp up is true alarm is false.

Not sure I need a timer to achieve this but i currently have one in my flow diagram

Edit: thinking about this more, I’d need to incorporate a deadband as to not interfere with typical fermentation swing. Am I on to something or is a timer in order?

Put the Alarm function in a different concurrent looping script.
Set your FV to a global and update that value when you update when you update FV

You can use the globalFV in the looping script to know where you are in the fermentation code.

As I had in my example alarm code, I have a incremetal gBrewStatus that lets me know where in the code I am.

You could also create a hidden switch named something like hiddenSwitchRamp that you turn on when you are ramping and have your Alarm Code go around the Alarm when the hiddenSwitchRamp is true.
 
Here is how I would do it:

1. Change the hysteresis target and set a boolean to say the system is in ramp mode.
2. Evaluate the temp to determine the error and issue an alarm if the system is NOT in ramp mode.
3. When the hysteresis device turns off, disable ramp mode. Continue back at #2.

Make sense? Now try to write the script. I'll write it if you want me to to, but per above... something about fishing and eating for a lifetime.

I’ll see what I can do, much appreciated. Do you think using hysteresis for alarm is wise? This way I can use the on offset..Any merit to this?
 
You use hysteresis to control your fermentation temperature - not the alarm. The alarm is triggered via script. Make sense?

Yes this makes sense it’s what I currently have hysteresis for fermentation and alarm for alarm. Just thought the hysteresis alarm would give the extra flexibility
 
Ok, I'll make myself a liar... here is a sample script of what I proposed earlier. This is not tested but should be directionally correct.

Code:
[setup]
new bool RampMode
new value TempDelta

[Target1]
"FermHysteresisDevice" Target = 60
RampMode = true

[loop]
TempDelta = "InputDevice" Value
TempDelta -= "FermHysteresisDevice" Target
if RampMode == false
    if TempDelta >= 5
        "Alarm" Active = true
    endif
endif
if RampMode == true
    if "FermHysteresisDevice" value == 0
        RampMode = false
    endif
endif
sleep 5000
goto "loop"

First we set up two variables for use in the script. Then we set the temp of of the fermenter hysteresis device (assumes you made one of this name) to 60 degrees. We also turn "RampMode" on since we just changed the temp.

Now we run a loop. First, the temperature delta (TempDelta) is calculated to see how far above the desired temp the fermenter is at. Next, if RampMode is off and the temp is 5 + degrees above our desired, an alarm is activated. However, if RampMode is on (and it will be the first pass through), the alarm cannot activate. Next, we check if RampMode is on and if the fermenter hysteresis device has turned off (assuming desired temp has been reached), and if so RampMode gets turned off, ensuring the earlier check takes place going forward.

Hope this helps!
 
Last edited:
Ok, I'll make myself a liar... here is a sample script of what I proposed earlier. This is not tested but should be directionally correct.

Code:
[setup]
new bool RampMode
new value TempDelta

[Target1]
"FermHysteresisDevice" Target = 60
RampMode = true

[loop]
TempDelta = "InputDevice" Value
TempDelta -= "FermHysteresisDevice" Target
if RampMode == false
    if TempDelta >= 5
        "Alarm" Active = true
    endif
endif
if RampMode = true
    if "FermHysteresisDevice" value = 0
        RampMode = false
    endif
endif
sleep 5000
goto "loop"

First we set up two variables for use in the script. Then we set the temp of of the fermenter hysteresis device (assumes you made one of this name) to 60 degrees. We also turn "RampMode" on since we just changed the temp.

Now we run a loop. First, the temperature delta (TempDelta) is calculated to see how far above the desired temp the fermenter is at. Next, if RampMode is off and the temp is 5 + degrees above our desired, an alarm is activated. However, if RampMode is on (and it will be the first pass through), the alarm cannot activate. Next, we check if RampMode is on and if the fermenter hysteresis device has turned off (assuming desired temp has been reached), and if so RampMode gets turned off, ensuring the earlier check takes place going forward.

Hope this helps!

Tonight I’m eating fish, not fishing[emoji23] I’ll dissect this throughout the next few days. Today was the first day read the manual and actually understood it. Looking forward to completing this.

What does “-=“ mean on the second line of the loop?
 
Last edited:
Thanks, any reason why one of my scripts when off continually cycles many times a second? My other scripts don't do this. I suspect it has something to do with my switch script (see below) that turns on this script for auto control..

9:40.710 [Stopped]
03:49:41.210 [Stopped]
03:49:41.710 [Stopped]
03:49:42.226 [Stopped]
03:49:42.726 [Stopped]
03:49:43.241 [Stopped]
03:49:43.741 [Stopped]

[Setup]
new bool previous_state
previous_state = false

[Loop]
if "FV-1 AUTO" State == true // If the FV AUTO SWITCH is on...
"FV-1 GLOBAL" Value = "FV-1" Target // FV Target will mirror to FV GLOBAL, This is needed for GRAPH Display
if previous_state == false
Start "FV-1 ALE PROFILE" // Starts FV ALE PROFILE script
previous_state = true
endif

else // If the FV AUTO switch is off...
stop "FV-1 ALE PROFILE" // Stops FV ALE Profile script
reset "FV-1 TIMER" // Resets FV TIMER
previous_state = false
endif

sleep 500
goto "Loop"
 
feature request- search and replace. I think it would be awesome to search for text and replace with text in the script menu.
 
Thanks, any reason why one of my scripts when off continually cycles many times a second? My other scripts don't do this. I suspect it has something to do with my switch script (see below) that turns on this script for auto control..

9:40.710 [Stopped]
03:49:41.210 [Stopped]
03:49:41.710 [Stopped]
03:49:42.226 [Stopped]
03:49:42.726 [Stopped]
03:49:43.241 [Stopped]
03:49:43.741 [Stopped]
Go back and re-read post 3515 in this thread. You need to add the final nested if statement in my last example.
 
Back
Top