BruControl: Brewery control & automation software

Homebrew Talk - Beer, Wine, Mead, & Cider Brewing Discussion Forum

Help Support Homebrew Talk - Beer, Wine, Mead, & Cider Brewing Discussion Forum:

This site may earn a commission from merchant affiliate links, including eBay, Amazon, and others.
Furnace valves can only be used with low pressure burners. A furnace valve will provide everything needed for ignition, flame detection, etc. By going with high pressure burners, you can't use a furnace valve and therefore need to re-invent the wheel WRT auto ignition and flame detection. So @oakbarn is making his life harder than it needs to be, because he doesn't want to switch to low pressure burners.
Yes, the obvious solution is to go low pressure but I have other considerations that make the High Pressure a good choice for me with my existing Brewery. I would concur that anyone starting out with propane consider the low pressure route. I was just hoping someone had an elegant solution to re-invent the wheel WRT auto ignition and flame detection. I found a Brasso valve that might work. It is the old style bi metal NO two wire thermocouple switch. No sure of the cost yet and if it will work, but I will be looking at that. Turning on the Burners manually is not a big deal as I have been doing it with the BCS many years. I never thought about a rise in Temp but not sure how long that would take. What I am looking for is the Safety and not have gas flowing if the flame is not lit. I have had a CB Pop on the igniter circuit once and I also have manual cutoff switches for almost all my circuits that I have failed to turn on properly. Now when I manually light a burner, I can hear and see the flame. Not 100% Safety like a Furnace Valve, but have not had any issues with a Flame going Out once lit.

BTW, @ Brundog when I tested a Flame Sensor ( I had an Adafruit one), it was a NO Switch type that I would use on a Digital Input (DIN on the BCS) just like a Float Switch so no analog signal. I may have to find it and try it again. As I remember, it was not reliable enough to automate Burner Lighting..
 
Furnace valves can only be used with low pressure burners. A furnace valve will provide everything needed for ignition, flame detection, etc. By going with high pressure burners, you can't use a furnace valve and therefore need to re-invent the wheel WRT auto ignition and flame detection. So @oakbarn is making his life harder than it needs to be, because he doesn't want to switch to low pressure burners.

OK makes sense - thanks for clarifying.
 
Want to double check my thinking on something. I have multiple fermentation chambers all monitored with RTD probes. I have one workspace that shows all the chambers and then a separate workspace for each chamber that shows more detail, Tilt graph, Temp Graph, etc. Since an element can only be displayed on one workspace I have added the RTD probe elements on each individual chamber workspace and then added a global for each probe on the chamber "overview" workspace. I have a script that loops ever 5 seconds to update the value of each global with the value of it's respective RTD Probe. The graphs point to the RTD Probe itself rather than the global.

Is this the best way to handle displaying the same info on multiple workspaces? Anyone see anything wrong with doing it this way or a better way to accomplish the same thing?
I have done that and when the new Version is released with Alias, it will be even better. While a Global is a great way to have a Temperature (with the updating script) on different Workspaces. I have an extra Mega that I use for semi fake Digital Outs. For example, I have two Digital Outs on two different MEGAs. They both control the same Pump. One of them is the real wired to an SSR. When it is On the Pump is On. The other one simply turns On or Off the real one. I do have some script and a Global to know "Who is on First" and it works well. Of course, if you have extra Digital Outs, they could be on the same Mega, but since the Mega are so $, I elected to have one for my un wired fake outs. In fact, that Mega resides by my router and have nothing wired except the Ethernet. You could also have it as a simple Serial Interface connected to your computer to make it very low $.
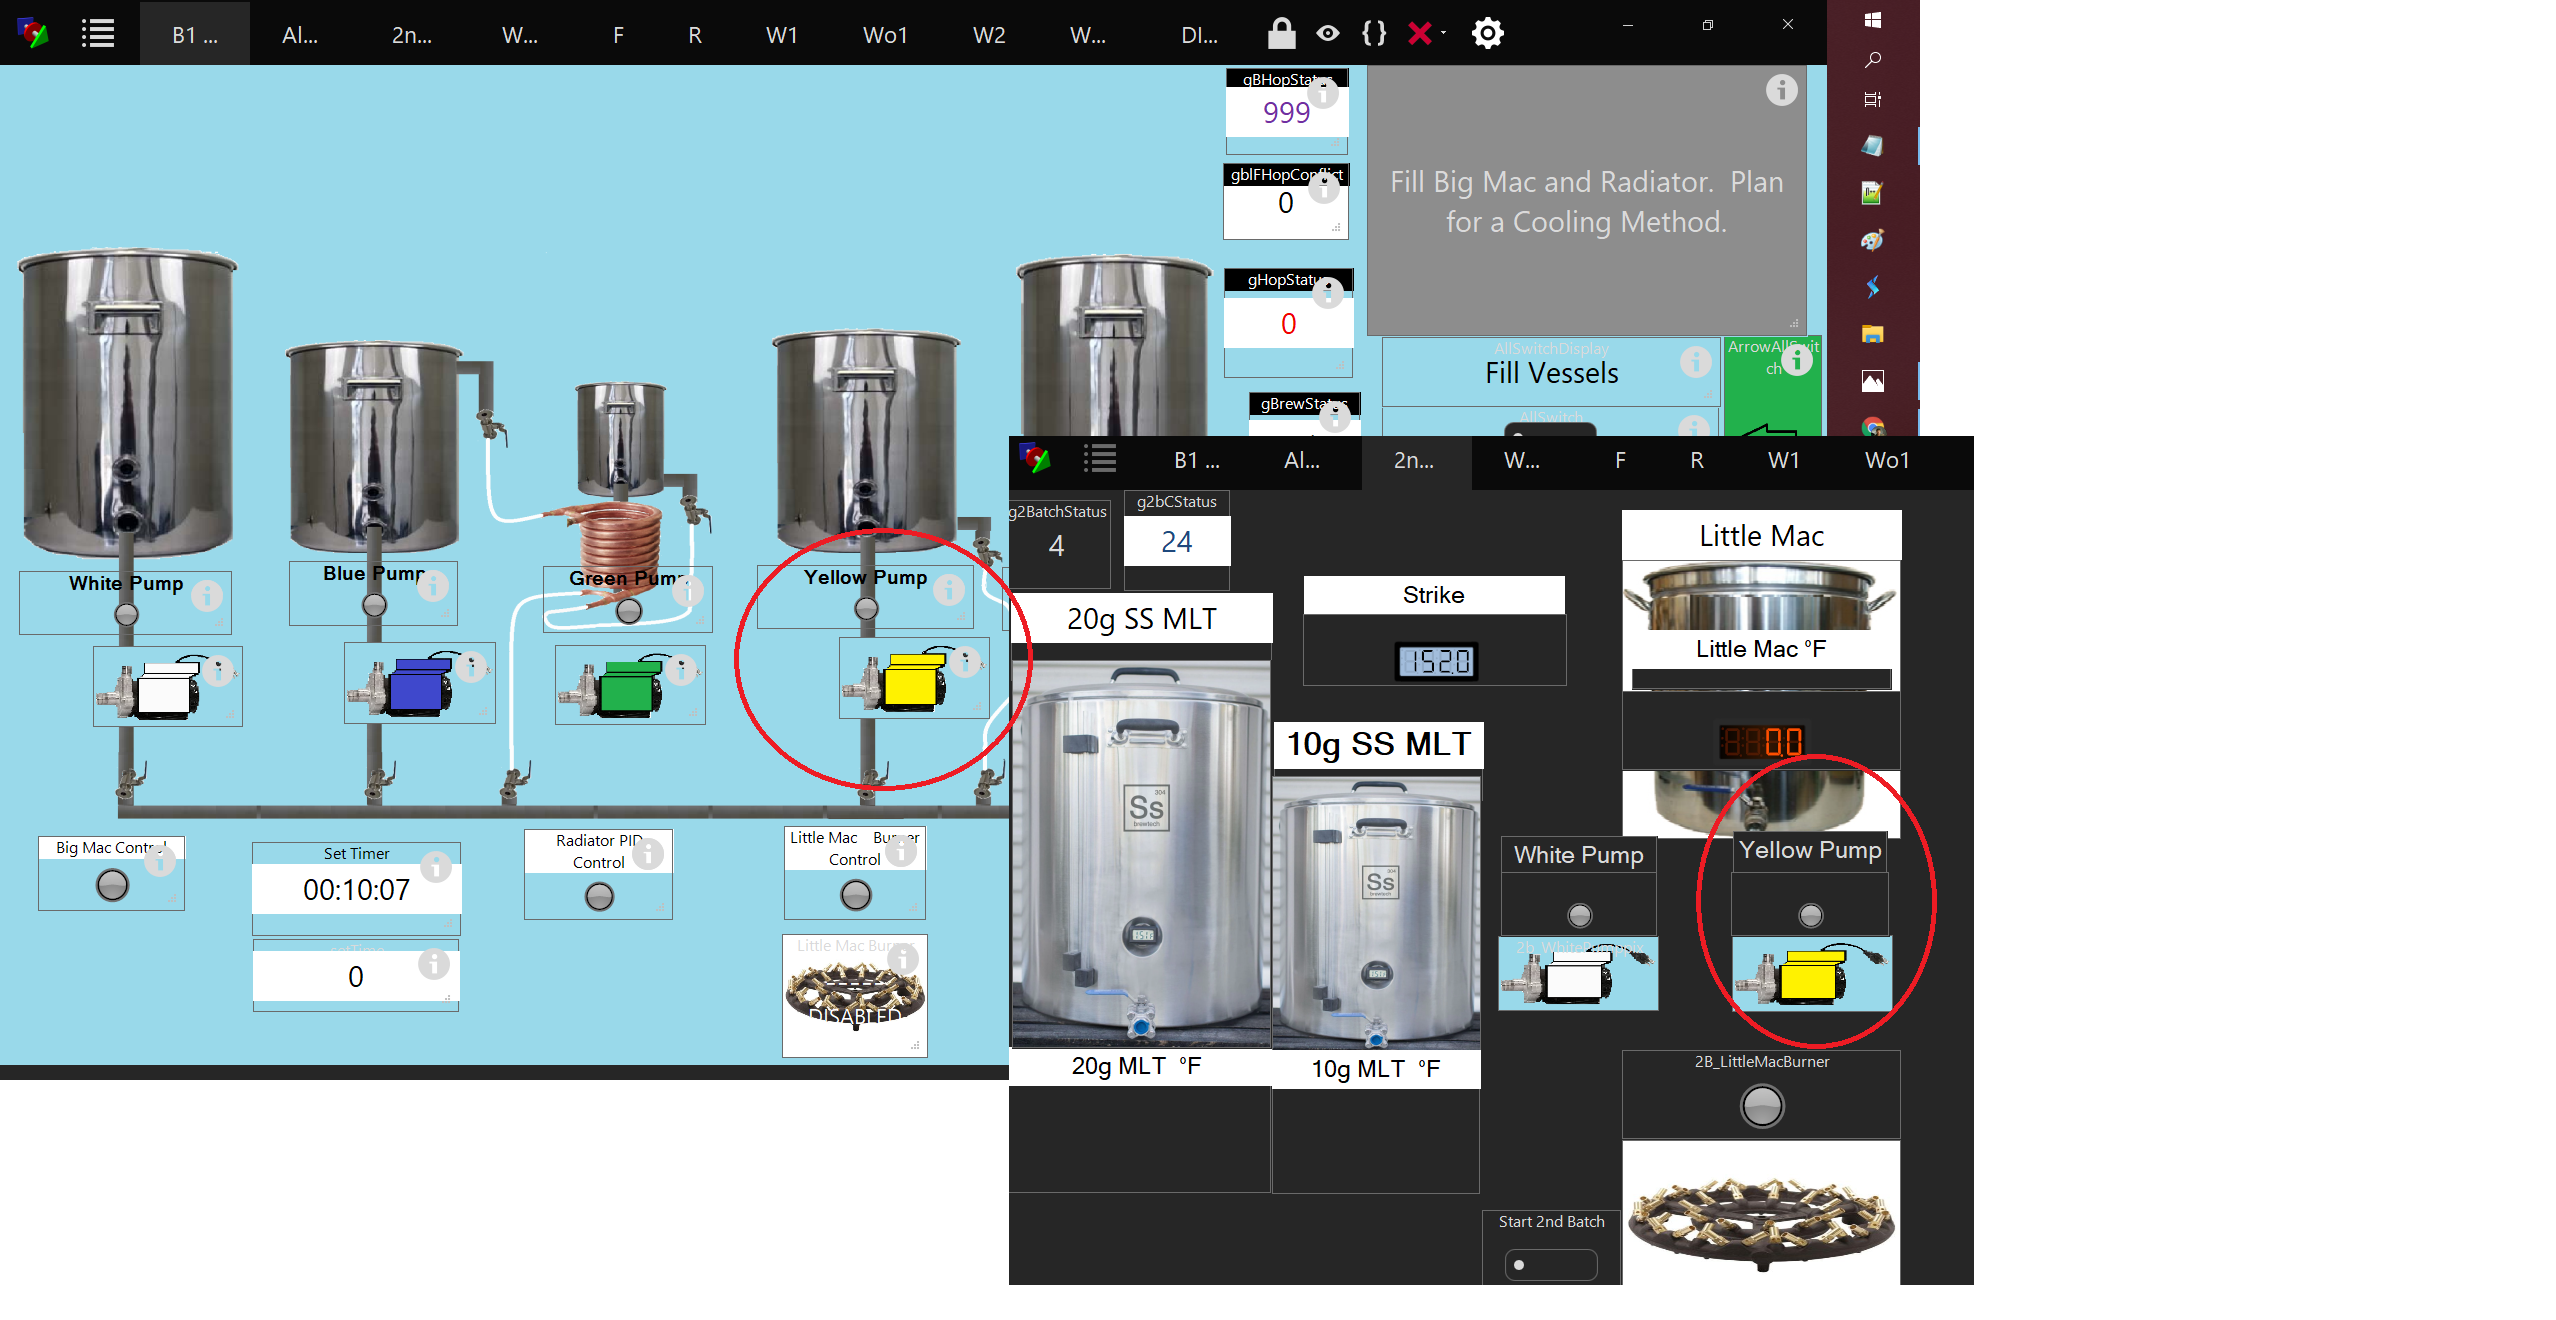
yellow Pump.png
 
Yes, the obvious solution is to go low pressure but I have other considerations that make the High Pressure a good choice for me with my existing Brewery. I would concur that anyone starting out with propane consider the low pressure route. I was just hoping someone had an elegant solution to re-invent the wheel WRT auto ignition and flame detection. I found a Brasso valve that might work. It is the old style bi metal NO two wire thermocouple switch. No sure of the cost yet and if it will work, but I will be looking at that. Turning on the Burners manually is not a big deal as I have been doing it with the BCS many years. I never thought about a rise in Temp but not sure how long that would take. What I am looking for is the Safety and not have gas flowing if the flame is not lit. I have had a CB Pop on the igniter circuit once and I also have manual cutoff switches for almost all my circuits that I have failed to turn on properly. Now when I manually light a burner, I can hear and see the flame. Not 100% Safety like a Furnace Valve, but have not had any issues with a Flame going Out once lit.

BTW, @ Brundog when I tested a Flame Sensor ( I had an Adafruit one), it was a NO Switch type that I would use on a Digital Input (DIN on the BCS) just like a Float Switch so no analog signal. I may have to find it and try it again. As I remember, it was not reliable enough to automate Burner Lighting..

Google seems to show lots of turnkey ignition systems and controllers. Not sure your budget but this doesn't seem to be a massive hurdle?
 
fwiw, while it's true that "furnace valves" - ie: furnace controllers with integrated valves - are limited to NG-scale pressures (~11 WC/~0.4psi) - there are furnace controllers that provide ignition and flame sensing and valve control outputs - not integrated valves. These have been used successfully with external solenoid valves (Red Hats were popular years ago) on high pressure propane rigs...

Cheers!
 
I have done that and when the new Version is released with Alias, it will be even better. While a Global is a great way to have a Temperature (with the updating script) on different Workspaces. I have an extra Mega that I use for semi fake Digital Outs. For example, I have two Digital Outs on two different MEGAs. They both control the same Pump. One of them is the real wired to an SSR. When it is On the Pump is On. The other one simply turns On or Off the real one. I do have some script and a Global to know "Who is on First" and it works well. Of course, if you have extra Digital Outs, they could be on the same Mega, but since the Mega are so $, I elected to have one for my un wired fake outs. In fact, that Mega resides by my router and have nothing wired except the Ethernet. You could also have it as a simple Serial Interface connected to your computer to make it very low $.
View attachment 674938
Thanks Oakbarn. Hadn't thought of that, but makes sense. Will keep this in mind going forward. Already have a couple of scenarios where this would work out.
 
I like creating a fake digital out versus a Global simply because of the look and feel. It is very easy to make the semi fake out look and act exactly like the real digital out. You can do the same with global but getting them to look exactly like a digital out takes too much when these is an easy solution.
 
fwiw, while it's true that "furnace valves" - ie: furnace controllers with integrated valves - are limited to NG-scale pressures (~11 WC/~0.4psi) - there are furnace controllers that provide ignition and flame sensing and valve control outputs - not integrated valves. These have been used successfully with external solenoid valves (Red Hats were popular years ago) on high pressure propane rigs...

Cheers!
I picked this up for $10. I will try it.

Universal Replacement Carbide non -integrated HSI Furance Control Module, Need to get a 24 vac valve.
 
I was looking for some help on string concantenation and value conversion. I would like to display some fermenter information on an LCD panel on the front of my panel. By default the RTD temperature shows up with having 13 decimal places regardless of what I have the element display on the workspace (Precision of 1). I can take that variable and reapply the precision to it and get down to a single decimal place. Once I place that precision value into a string variable it looses the precision and I get 13 decimal places back. I am trying to accomplish something similar to below wtih two temperatures which would involve retaining the precision and concatentating with string text. I can get the precision value to display on a single line by itself on the LCD but as soon as I try to concatenate additional information it looses the precision. I can also concatenate the full RTD value with a string but not with the precision which won't fit on a 20 character line.

Is there a way to preserve the precision when the value is saved in a string value
Is there a way to convert variable types?

Trying to display on LCD line “68.7 - 72.5” with both temps coming from RTD temperature probes

Have you tried using a Global Value Type with a precision of 1 as the intermediary?

Move the RTD value to the Global then concatenate the value of the global.


I do not have a RTD Probe working but this is off the top of my head.

If that does not work, try two globals where the second intermediary is a string. RTD -> Global Value 1 -> Global String Value & Your String
 
I was looking for some help on string concantenation and value conversion. I would like to display some fermenter information on an LCD panel on the front of my panel. By default the RTD temperature shows up with having 13 decimal places regardless of what I have the element display on the workspace (Precision of 1). I can take that variable and reapply the precision to it and get down to a single decimal place. Once I place that precision value into a string variable it looses the precision and I get 13 decimal places back. I am trying to accomplish something similar to below wtih two temperatures which would involve retaining the precision and concatentating with string text. I can get the precision value to display on a single line by itself on the LCD but as soon as I try to concatenate additional information it looses the precision. I can also concatenate the full RTD value with a string but not with the precision which won't fit on a 20 character line.

Is there a way to preserve the precision when the value is saved in a string value
Is there a way to convert variable types?

Trying to display on LCD line “68.7 - 72.5” with both temps coming from RTD temperature probes


I saw similar behavior last weekend when I was testing out my updated brewday script. I have a global (EndCondition) that displays the end condition for the current brewing step. Despite what I set for precision my calculated end volume didn't seem to change at all from setting the precision.

temp1 = StrikeVolume
temp1 += 0.1 // account for losses in transfer to MT underlet
temp1 += MinBKVolume
temp1 precision = 2
tempStr2 = temp1
tempStr1 = "BK: " + tempStr2
tempStr1 += " Gal"
EndCondition = tempStr1
tempStr2 = "End Condition: " + tempStr1
print tempStr2
 
Have you tried using a Global Value Type with a precision of 1 as the intermediary?

Move the RTD value to the Global then concatenate the value of the global.


I do not have a RTD Probe working but this is off the top of my head.

If that does not work, try two globals where the second intermediary is a string. RTD -> Global Value 1 -> Global String Value & Your String
Thanks. I will try the secondary global. I have tried it with 1 intermediary global and it didn't retain the precision.
 
Have you tried using a Global Value Type with a precision of 1 as the intermediary?

Move the RTD value to the Global then concatenate the value of the global.


I do not have a RTD Probe working but this is off the top of my head.

If that does not work, try two globals where the second intermediary is a string. RTD -> Global Value 1 -> Global String Value & Your String
Oakbarn, outstanding idea. Using the first global with precision and a second global as a string worked and allowed me to concatenate additional text in with the values. I had to concatenate a couple of times due to the nature of the globals but it held the precision.

By storing the value in the second global is it essentially "converting" the value to a string at that point?

Thanks again. Had thought about the first global but never the second.
 
Maybe I'm not clear on the ask, but there are two properties associated with values in elements: value property and displaytext property, the latter of which is a string, and mirrors what is shown in the element. For example, here is how I concatenate the text for my dispenser control's LCD:

Code:
fdisplayinfo = "Ferm: "
fdisplayinfo += "Fermenter Temp" DisplayText
fdisplayinfo += " - "
fdisplayinfo += "Fermenter Control" DisplayText
BrunDog, I had completely missed the DisplayText value in the manual when I was looking. but see it now. I will give that a try as well. I was strictly using Value before.
 
the SSR can short and catch fire in normal use, it is no different if you split up phases...

SSR's generate heat, so my preference is to use just contactors and create steps by dissecting the operation of a single three phase element. I have one 6-pole/3-phase triple element have 2 contactors controlling it, one contactor controls one individual loop of the element with 2 wires, and the other contactor controls power to 2 of the individual elements with 3 wires. this requires that you remove one of the jumpers on the element and run 5 wires to it. this gives you 3kw (for 9kw element) or 4KW(for a 12kw element) when the single loop contactor is on, and 6/8kw when the other is on. when both are on you get full element power.

with 4 other elements on their own 3-phase contactors, for 9kw, with a little logic in a script, you can get 3/6/9/12/15/18/21/24/27/30/33/36/39/42/45kw
Here is my attempt at wiring per your recommendation. I have a few questions...
1. I assume the 50amp contactor I have will work for the one requiring three lines. Could a lower amp contactor be used in place of the one requiring two lines? Not really sure how to calculate the amp draw for a 2phase contactor. The reason I'm asking is I am running short on panel space.

2. Which element lugs are bridged in this configuration.

3. I have some concerns about watt density in the kettle. I am currently comparing the two elements the first with unknown watt density. Does anyone have any concerns with the first?

https://www.alibaba.com/product-det...spm=a2700.galleryofferlist.0.0.435b2e32ecx8Rr
23.6" immersion length. Looking at similar elements I'm estimating this at 60w/sq inch

https://www.glaciertanks.com/elemt-r12kw-208-wye-low.html
47" immersion length, 30w/sq inch

4. I have 208 3 Phase the brewery. 220V/380V per the 9kw at Alibaba will simply mean a lower wattage? No safety issues here?

Heat Element Wiring(1).png


I may end up doing this (2) contactor configuration with only (1) of the three elements giving me 12, 24, 28, 32 or 36kw.
 
Last edited:
I suggest you draw a complete schematic.

Without looking over the element carefully, it has 3 elements in it, so that means 6 terminals. The element likely comes with jumpers connecting, say 1-4, 2-5, 3-6. So therefore you wire the three phases to those pairs. You don’t wire 5 lines to the element.

Therefore it would be one 3 phase contactor per one 3 phase element.
 
Regarding the kettle, my two main concerns are boil off and boil over...
Thinking through the logic here to apply to @clearwaterbrewer suggestion.

Lets assume (3) elements in the kettle and (1) of which split up using two contactors per his recommendation to allow for finer control.

I propose to have all (3) elements full bore until 208F. One of the three elements will be on hysteresis for the ramp phase and be disabled near boil over temps (208F). The remaining element (being split) can assist with the fine control. This can be via two digital out elements to assist with controlling the boil off rate. The digital outs can be manually controlled or scripted to target boil off. The other element I assume will need to be 100% throughout the coarse of the boil.

I cant think of any other semi-automatic way to control this without allowing the contactors to run themselves to death. Thoughts?
 
I suggest you draw a complete schematic.

Without looking over the element carefully, it has 3 elements in it, so that means 6 terminals. The element likely comes with jumpers connecting, say 1-4, 2-5, 3-6. So therefore you wire the three phases to those pairs. You don’t wire 5 lines to the element.

Therefore it would be one 3 phase contactor per one 3 phase element.
I understand the (1) 3 phase contactor per 3 phase element idea. This is what I am currently wired for. In an effort to improve before testing, Clearwaterbrewer mentioned the following for fine control.
I have one 6-pole/3-phase triple element have 2 contactors controlling it, one contactor controls one individual loop of the element with 2 wires, and the other contactor controls power to 2 of the individual elements with 3 wires. this requires that you remove one of the jumpers on the element and run 5 wires to it

I am not proposing to wire it up as my diagram suggests but rather requesting from the group how to wire it per his recommendation of utilizing two contactors to one 3phase element.

It sounds to me he is bringing one phase through one contactor and the other two through the other contactor for a total of five wires.
 
Last edited:
I don't think you are thinking about the heating element itself. Current has to flow through a loop in the element. Your drawing would imply that 1 & 6, 6 & 5, and 1 & 5 are resistively connected. This is why 3 phase elements have 3 elements (6 terminals) and 3 jumpers to create the loops. I'm not sure you can do it the way you are proposing.
 
I don't think you are thinking about the heating element itself. Current has to flow through a loop in the element. Your drawing would imply that 1 & 6, 6 & 5, and 1 & 5 are resistively connected. This is why 3 phase elements have 3 elements (6 terminals) and 3 jumpers to create the loops. I'm not sure you can do it the way you are proposing.
I understand what your saying in a standard 3phase all or nothing wattage approach. Clearwater has proposed something outside of this approach by utilizing two contactors for 1/3 and 2/3 power. Do you have any idea what he is saying when he mentions 3 wires from one contactor and 2 to the other for a total of 5 wires?
 
Probably means he is switching one leg via a separate contactor. Not wiring 5 poles to one element. So instead of a combined 3 pole unit, he is using a 2 pole and a 1 pole. In other words, erase the contactor on the right of your drawing, and split the 3 pole into a 2 pole + a 1 pole.
 
Crazy. I have been rewiring my Brewery from the BCS to BruControl. I have two 24 vdc ball valves that control water flow, one (Firehose) sort of just anywhere I put it and the other to my Big Mac (a 75 gal HLT). I have been tracing the wiring for 3 days because when I turned on my Firehose (Go anywhere hose), it just turned on the Big Mac Valve and Not the Firehose. The Big Mac worked fine. I Finally found an issue with the Valve itself. The Power and the Ground are shorted inside the Big Mac valve although it worked. It seems the Firehose was powering the Big Mac through the ground! Nothing Wrong with my wiring. I thought I had messed the wiring from BruControl Mega. Anyone have any idea why a Valve (CR02) would act like this. It was a US Solid (made in China despite the name).
 
Minor feature requests.

1. When a script errors out it is paused and turns yellow. I have scripts that I pause and resume during brew day. It would be nice if these were visually differentiated more, so I can more quickly tell if a script has crashed vs, is paused.

2. When a script errors out, it is paused and stopped on the offending line. If I click the stop button, the highlighted row goes away and the script scrolls to the very top. It would be nice if a script stays on the last line it was executing, when a script is stopped. This goes for when a script doesn't error out as well. I can always get to the top of a script easily, but unless I remember the line number or exact position in code I can't get back to where the script was executing as easily.
I would like this feature also. Maybe the Line# of the error or pause in the Output Pane as a quick fix?
 
Maybe I'm not clear on the ask, but there are two properties associated with values in elements: value property and displaytext property, the latter of which is a string, and mirrors what is shown in the element. For example, here is how I concatenate the text for my dispenser control's LCD:

Code:
fdisplayinfo = "Ferm: "
fdisplayinfo += "Fermenter Temp" DisplayText
fdisplayinfo += " - "
fdisplayinfo += "Fermenter Control" DisplayText

In my case with the precision issues, I am calculating a value and then trying to concatenate that into a string to display on a global. Here is another example where I am reading the value from my current sensor, multiplying it by 240, and concatenating "W" on the end for a power display value that tracks the current.

With this code, no matter what I set the precision value to, it gets lost when I concatenate that onto a string.
Code:
new string tempStr1
new value temp1

[PowerLoop]
temp1 = 240 * "240V Current" Value
temp1 precision = 0
tempStr1 = temp1
tempStr1 += " W"
"240V Power" Value = tempStr1

print temp1
print tempStr1

sleep 5000
goto "PowerLoop"

stop "Power Update"

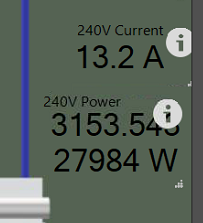
Here is the accompanying output from the 2 print statements in the script above.
precision_print.PNG


And here is what is displayed
power_decimals.PNG


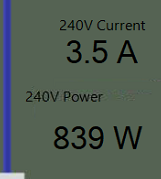
However, I used the suggestion of sending this to a global value with precision 0, then reading that back and concatenating it onto the 240V Power string before writing it to the global string element. This does the trick, but seems rather clunky.

Code:
new string tempStr1
new value temp1

[PowerLoop]
temp1 = 240 * "240V Current" Value
"240V Power Int" Value = temp1
tempStr1 = "240V Power Int" Value
tempStr1 += " W"
"240V Power" Value = tempStr1
sleep 500
goto "PowerLoop"

stop "Power Update"

precision_int_global.PNG
 
Crazy. I have been rewiring my Brewery from the BCS to BruControl. I have two 24 vdc ball valves that control water flow, one (Firehose) sort of just anywhere I put it and the other to my Big Mac (a 75 gal HLT). I have been tracing the wiring for 3 days because when I turned on my Firehose (Go anywhere hose), it just turned on the Big Mac Valve and Not the Firehose. The Big Mac worked fine. I Finally found an issue with the Valve itself. The Power and the Ground are shorted inside the Big Mac valve although it worked. It seems the Firehose was powering the Big Mac through the ground! Nothing Wrong with my wiring. I thought I had messed the wiring from BruControl Mega. Anyone have any idea why a Valve (CR02) would act like this. It was a US Solid (made in China despite the name).
Mia cuppa. A CR02 appears "shorted" after having power applied. I assume this is due to the internal capacitor return the valve to closed. Once I powered the Firehose Valve, it appeared "shorted" between both wires when tested with a continuity tester.
I went back and disconnected all wires. Sure enough, I had some wires crossed. I did think it was odd the a CR02 Valve would appear to have continuity between the legs however. Nice to know.
 
In my case with the precision issues, I am calculating a value and then trying to concatenate that into a string to display on a global. Here is another example where I am reading the value from my current sensor, multiplying it by 240, and concatenating "W" on the end for a power display value that tracks the current.

With this code, no matter what I set the precision value to, it gets lost when I concatenate that onto a string.
Code:
print tempStr1
.........


However, I used the suggestion of sending this to a global value with precision 0, then reading that back and concatenating it onto the 240V Power string before writing it to the global string element. This does the trick, but seems rather clunky.

Code:
new string tempStr1
new value temp1

[PowerLoop]
...

View attachment 675390

This is a general problem with all computing, not just BruControl. For example, a Currency type field has four decimal places although you can only see two. Having the RTD Value retain all its decimals is the same issue. In some cases you would want the values to do that. On the other hand, in these instances, you do not. Therefore clunky. Unfortunately, you would have to re invent Computer Values to suit our needs, but then what about those that want all those trailing decimals? They could not get them back. I will take Clunky.
 
Probably means he is switching one leg via a separate contactor. Not wiring 5 poles to one element. So instead of a combined 3 pole unit, he is using a 2 pole and a 1 pole. In other words, erase the contactor on the right of your drawing, and split the 3 pole into a 2 pole + a 1 pole.
Something like this..? I don't understand how to get the separate 1/3 and 2/3 control without two contactors.

Heat Element Wiring(4).png
 
Last edited:
This is a general problem with all computing, not just BruControl. For example, a Currency type field has four decimal places although you can only see two. Having the RTD Value retain all its decimals is the same issue. In some cases you would want the values to do that. On the other hand, in these instances, you do not. Therefore clunky. Unfortunately, you would have to re invent Computer Values to suit our needs, but then what about those that want all those trailing decimals? They could not get them back. I will take Clunky.

You are missing the forest from the trees. Yes floating point variables will have much higher precision to reduce computational rounding errors and provide maximum range/precision. No need to re invent that. What I am talking about is truncating a number to a certain amount of decimal places for viewing. If I can print the value with a certain precision, why can't I concatenate/cast it into a string with the same precision?
 
Mia cuppa. A CR02 appears "shorted" after having power applied. I assume this is due to the internal capacitor return the valve to closed. Once I powered the Firehose Valve, it appeared "shorted" between both wires when tested with a continuity tester.
I went back and disconnected all wires. Sure enough, I had some wires crossed. I did think it was odd the a CR02 Valve would appear to have continuity between the legs however. Nice to know.

A capacitor will look like a short with transient voltages.

Anyway, this is why we preach "use a schematic". Not sure if you are, and even if you are it can happen... but drawing one then wiring off it makes wiring and debugging thousands times easier. Glad you figured it out!
 
You are missing the forest from the trees. Yes floating point variables will have much higher precision to reduce computational rounding errors and provide maximum range/precision. No need to re invent that. What I am talking about is truncating a number to a certain amount of decimal places for viewing. If I can print the value with a certain precision, why can't I concatenate/cast it into a string with the same precision?

You are right!
 
Yeah, that looks right. Just know you will get 1/3 with the first contactor on, then 3/3 with the second. So you can't get to 2/3.
Can you explain why I won’t get 2/3 with the first on and second off? How is Clearwater achieving this?
 
Can you explain why I won’t get 2/3 with the first on and second off? How is Clearwater achieving this?

If you run the star delta connection on a 12kw element, your element will run at ~3.6Kw (you will have LOW watt density) I run the delta configuration.

First, I think you should consult an electrician familiar with three phase...

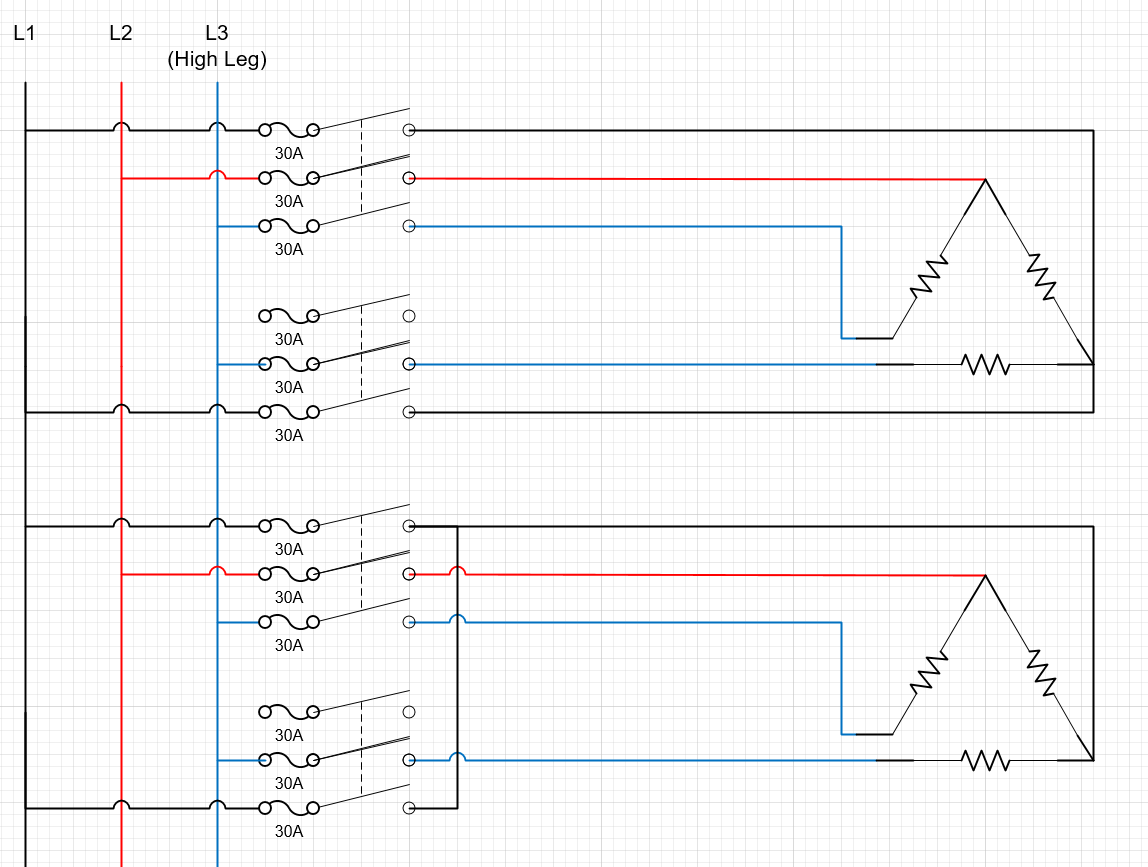
To get 2 elements without powering the 3rd element one has to split the connection, as I mentioned. A competent electrician would take one of the connection bars off and run an extra wire, one from each contactor to each separated lead... when they do this, they essentially have a dual element and a single element that happen to share a single wire(they can run 5 wires and have them totally separate.) They will normally use two 3-pole contactors, but they could use a 2-pole and a 3-pole(I wouldn't)

top one is 5 wires to the element, bottom is 4 wires to the element.

upload_2020-4-13_9-48-17.png
 

Attachments

  • upload_2020-4-13_9-47-41.png
    upload_2020-4-13_9-47-41.png
    136 KB · Views: 3
Back
Top