• Please visit and share your knowledge at our sister communities:
  • If you have not, please join our official Homebrewing Facebook Group!

    Homebrewing Facebook Group

BrewPiLessGx: BrewPiLess with Touched TFT display

Homebrew Talk

Help Support Homebrew Talk:

This site may earn a commission from merchant affiliate links, including eBay, Amazon, and others.
I left this project for a while because I could not get it to work!
Because I saw that there was a new release I wanted to tried it again but it failed again!

I can compile it but in the beginning I got this message:
View attachment 863510
(I'm using Windows so .sh don't work. is this importent?)

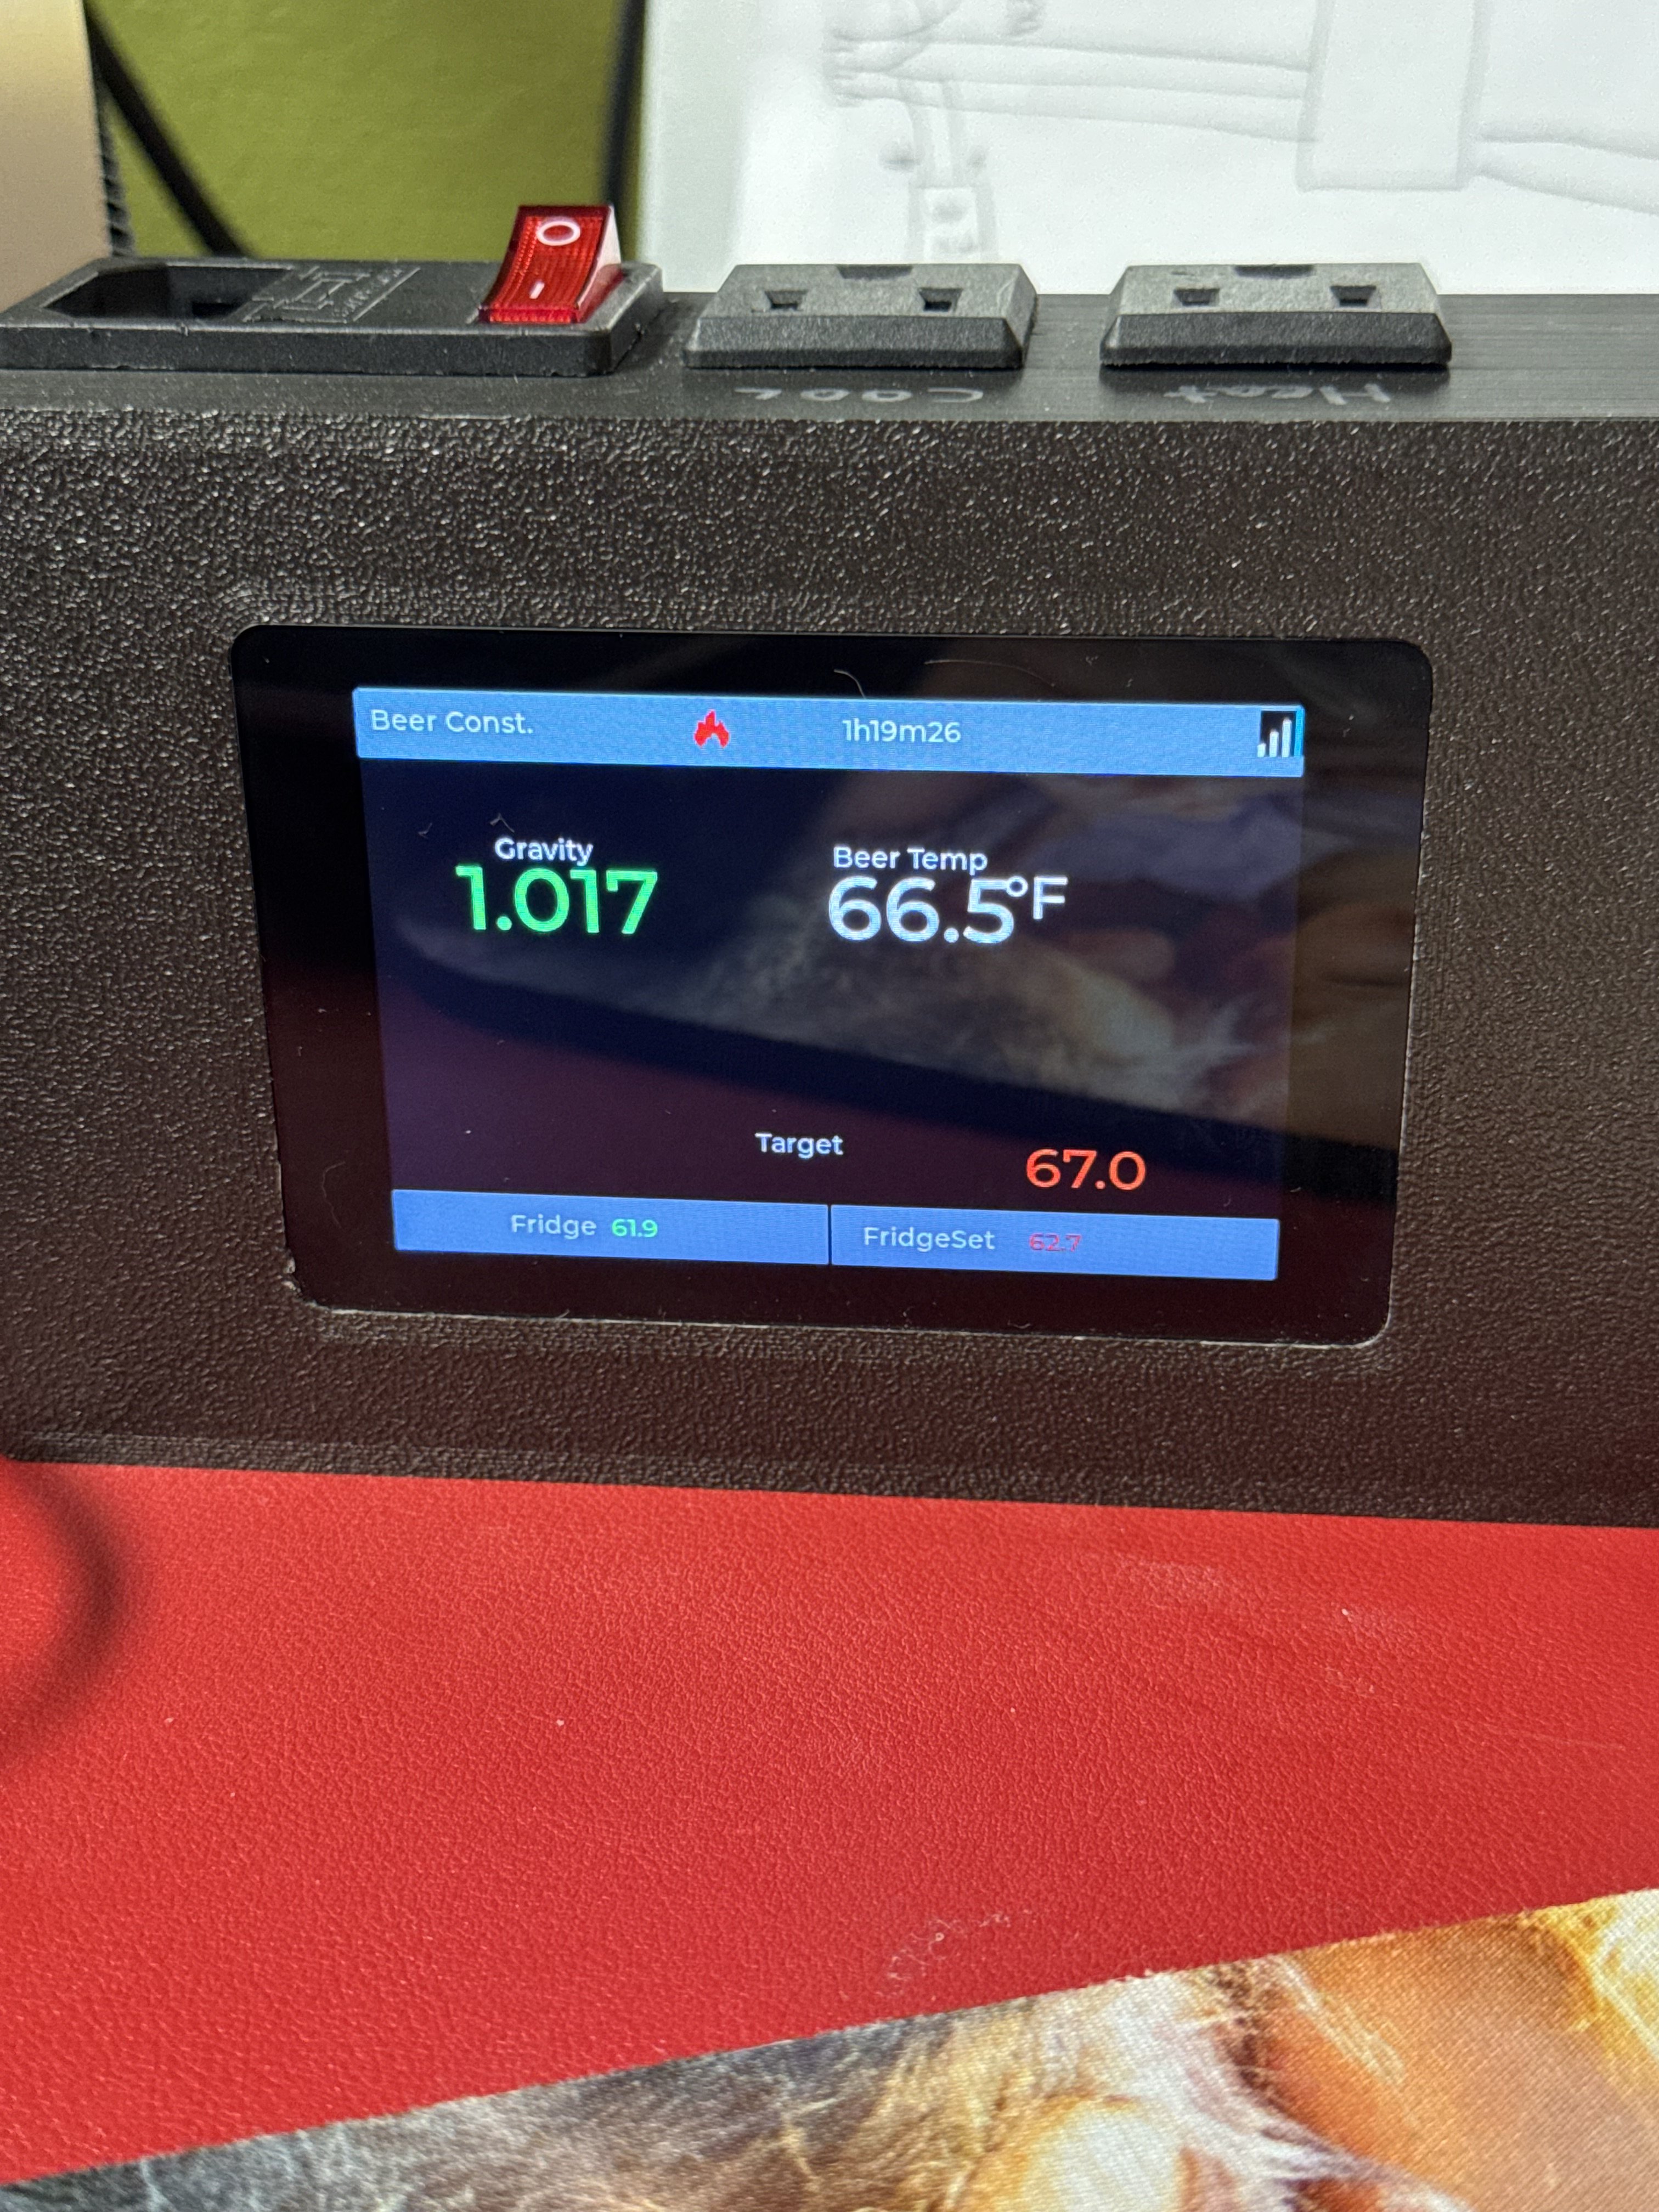
Upload with VS code to my WT32-SC01+ seems to work and after the configuration of the Wifi
I can access it through a webbrowser but then I'm stuck.

Every time that I want to configure the devices or other things I got popups messages:
View attachment 863506
Or sometimes these:
View attachment 863508 View attachment 863509

And in the Terminal Monitor of VSCode I get these messages.
View attachment 863507
It looks like the Littlefs partition is missing or not writable?
And I'm not able to save any of the settings (Devices, Title, LCD auto Off, Screen Saver Timeout, ...).
I think that I'm missing some step to get it working?
As I've already mentioned before that I'm new to PlatformIO but did some other projects with ESD-IDF before and there we can to use menuconfig to configure the ESP32 board (Flashsize, CPU freq, partitions,...) is this also reauired with PlatformIO?

Could someone please just explain in short all the required steps needed to get this working?
Or point me to the location were I can find some documentation?
I also had issues with Windows but VSCode using WSL and VSCode using a remote linux box both worked for me (at least when I compiled with default_envs = ESP32_2432S032C, when I build with lgfx I get a blank screen on my 2432S032C). If you don't find a windows solution and you give WSL a try, you also need to get WSL to see the serial port which requires a little work too. Far easier for me was having a dedicated linux box with the device plugged into it and remoting to it within VSCode on my windows machine. Now I have both WSL and a remote linux box working I could in principle compile quickly on my more powerful WSL box then move the file to my linux box to upload it, but for this project the speed difference isn't so different, maybe for a bigger compile it would be worth it.

After all that I expect someone will now come along with a simple native windows fix... :)
 
Ok in the meantime it looks like it is finaly working!
I think (but not sure) that some configuration is mandatory before you can start working with brewpiless.
First I completed the Installed Device list (enter some devices that are even not connected) then I changed the the username and password to brewpiless (because I had several popups asking me to enter a user and password) and then most of the values in the system tab became prefilled.
Since then I can finally start changing other settings also.
 
I also had issues with Windows but VSCode using WSL and VSCode using a remote linux box both worked for me (at least when I compiled with default_envs = ESP32_2432S032C, when I build with lgfx I get a blank screen on my 2432S032C). If you don't find a windows solution and you give WSL a try, you also need to get WSL to see the serial port which requires a little work too. Far easier for me was having a dedicated linux box with the device plugged into it and remoting to it within VSCode on my windows machine. Now I have both WSL and a remote linux box working I could in principle compile quickly on my more powerful WSL box then move the file to my linux box to upload it, but for this project the speed difference isn't so different, maybe for a bigger compile it would be worth it.

After all that I expect someone will now come along with a simple native windows fix... :)
the error './build.sh' came from the Home kit and like it was mentioned in a previous message the Home kit is not required.
So I think we can ignore that meaasge.
 
My 2432S032C compiled and uploaded fine with the latest version using default_envs = ESP32_2432S032C_lgfx but I get a blank screen. Web access etc works though. Is there a particular version of this board that works with lgfx or is there a setting I need to change? (I thought I used this setting in March but now I'm not sure)
 
Last edited:
My 2432S032C compiled and uploaded fine with the latest version using default_envs = ESP32_2432S032C_lgfx but I get a blank screen. Web access etc works though. Is there a particular version of this board that works with lgfx or is there a setting I need to change? (I thought I used this setting in March but now I'm not sure)
Me. I am using it.
You might want to check "Brightness" setting in System.
 
Me. I am using it.
You might want to check "Brightness" setting in System.
I changed brightness from 255 to 128 and now the screen is visible again (and fantastic!)

I also used the updated skin editor, I like the way it keeps the graphic of the screen "on-screen" while you scroll through the settings. There were a couple of instances where font size needed to be adjusted to get it to display as in the editor but that was a simple tweak. Thanks!
 
Some information about Homekit for people who want to control fermentation during vocation on iPhone's.

The integration of HomeKit is achieved through the esp-homekit-arduino-sdk. Please note that HomeKit support is currently an experimental feature.

One advantage of using HomeKit is that no additional servers or firewall configurations are needed, provided a HomeKit hub such as an Apple TV 4K or HomePod is available. To enable viewing information and controlling temperature on an iPhone, iPad, or even via Siri through a HomePod, the BPLGx system emulates a thermostat, a light sensor, and a carbon dioxide sensor. These devices were chosen for their ability to represent the required range of values:

  • Thermostat: The controlled temperature corresponds to the beer's temperature. Only a constant temperature setting is supported.
  • Light Sensor: The ambient light level is represented by the current specific gravity reading (e.g., 1051 represents 1.051).
  • Carbon Dioxide Sensor: The peak value represents the change in gravity over 24 hours, while the current value reflects the change over 6 hours. Both values are divided by 10 (e.g., 79 indicates a 7.9-point drop).
It's important to note that the ESP32 lacks sufficient memory to run HomeKit alongside all other features. However, the ESP32-S3, equipped with additional PSRAM, may support HomeKit more effectively. I have tested HomeKit on an ESP32-based 24320S032C device, and after 3–5 days of operation, the increasing log size began to prevent the home web page from loading. Therefore, if HomeKit is enabled on an ESP32 device, it is recommended to disable log recording to avoid such issues.
I run a WireGuard VPN server on my Asus router so I can browse my BrewPiLessGx from my phone while away from home. That works well for me. (I do same for my Home Assistant server so I can see the number of pints left in my caskerator, via an esp8266 connected load cell. Not that it changes much while I am away but it is nice to see :) )
 
Thank you to everyone who contributed to this thread, through your trials and tribulations, I was able to get a working setup on a wt-sc01 plus.

I do have a quick question, I’d like to use a background image, but failed to implement it via the json file, I converted the image to a bin file and attempted to use the bg code in the JSON. I am assuming my miss was either on the file format type is there a specific binary format that is needed? Or I did not get the syntax correct for including it. Hoping for some guidance.


Here’s. Couple photos of my setup, I redesigned to fit in a box around 1/2 the size will share some photos once I get it put together.
 

Attachments

  • IMG_0656.jpeg
    IMG_0656.jpeg
    1.4 MB
  • IMG_0658.jpeg
    IMG_0658.jpeg
    1.8 MB
Thank you to everyone who contributed to this thread, through your trials and tribulations, I was able to get a working setup on a wt-sc01 plus.

I do have a quick question, I’d like to use a background image, but failed to implement it via the json file, I converted the image to a bin file and attempted to use the bg code in the JSON. I am assuming my miss was either on the file format type is there a specific binary format that is needed? Or I did not get the syntax correct for including it. Hoping for some guidance.


Here’s. Couple photos of my setup, I redesigned to fit in a box around 1/2 the size will share some photos once I get it put together.
What board are you using? Is it available on any site?
 
Thank you to everyone who contributed to this thread, through your trials and tribulations, I was able to get a working setup on a wt-sc01 plus.

I do have a quick question, I’d like to use a background image, but failed to implement it via the json file, I converted the image to a bin file and attempted to use the bg code in the JSON. I am assuming my miss was either on the file format type is there a specific binary format that is needed? Or I did not get the syntax correct for including it. Hoping for some guidance.


Here’s. Couple photos of my setup, I redesigned to fit in a box around 1/2 the size will share some photos once I get it put together.

Please make sure that the image is converted to v8 format.
Initially background image is used by default, but I found that it consumed too much memory and the loading is slow on ESP32. ESP32S3(Wt32-sc01 plus) works better, though.

I would recommend include the image to the flash binary.
- When converting, select output as "C Array".
- copy the generated .c file into src/skins/
- open the .c file, scroll to the bottom, find something like
Code:
const lv_image_dsc_t THE_IMAGE_NAME = {
...

usually, "THE_IMAGE_NAME" should be the file name of the image.
- open src/skins/embedded_skin.c, around line 61
Code:
static EmbeddedFileImageEntry _imgFiles[]={
{&state_icons_4bit,"istate"}
};

add an entry for your image, like
Code:
static EmbeddedFileImageEntry _imgFiles[]={
{&state_icons_4bit,"istate"},
{& THE_IMAGE_NAME,"bgimg"}
};

- specify the background image as
Code:
 "bg":"I:bgimg",

It is the letter "I"(capital "i").

- build and flash
Got it working, thank you so much!

One note for anyone that following along you need to declare the image in this file "open src/skins/embedded_skin.c"

declaration of testBG.
then creating the reference.
1741232166526.png
 
Guys, how about these two boards, are those suitable for this project?
They have different model numbers, other than that (and price) I don't see big difference.
screenshot-1163.jpg

screenshot-1164.jpg
 
Last edited:
Guys, how about these two boards, are those suitable for this project?
They have different model numbers, other than that (and price) I don't see big difference.
ESP32-24320S028R
^^^^ -> ESP32, obviously
^^^^ -> resolution 240x320
^^ -> I don't know
^^ -> 2.8 inch display
R -> Resistive touch

1. I don't like Resistive touch, you will have to find and port the driver by your self. IMO, capacitive touch works better.
2. I would recommend WT32-SC01 Plus. ESP32-S3 runs faster and has PSRAM. Flasher might be needed for easier to flash, though.
 
Something like this?
screenshot-1165.jpg


Anyway, is there any "manual" how to connect needed components to the board?
 
Last edited:
This isn't a project that's as straightforward as the standard brewpiless.
The software install isn't the same method as the brewpiless and requires configuration, I had to back out of this project.

If I've misunderstood I'm keen to get back on this with a " howto"
 
Something like this?


Anyway, is there any "manual" how to connect needed components to the board?

Yes, and no.

I am still evaluating the configuration and software. Based on the experience I got from BrewPiLess, it's better to do it slowly. Also, instead of writing documents that people usually don't read, I would rather code and test.

Here is the default pin assignment. They are all connected to Extended IO interface.
#define oneWirePin 11
#define PressureAdcPin 10
#define actuatorPin1 12
#define actuatorPin2 13
#define actuatorPin3 14
#define actuatorPin4 21
 
OK, will do that and come after, to be boring here. :D
 
Buy the wtsc01 plus, then it’s pretty straight forward if you do.

hi all, i bought a WT32-SC01+ hoping that the installation process would be pretty straightforward as suggested, but i'm stuck.
after building the firmware (i have almost zero experience with software, but i can follow tutorials) i cannot upload it to the sc01+.
anyone willing to help a lost soul?
 
hi all, i bought a WT32-SC01+ hoping that the installation process would be pretty straightforward as suggested, but i'm stuck.
after building the firmware (i have almost zero experience with software, but i can follow tutorials) i cannot upload it to the sc01+.
anyone willing to help a lost soul?
You need the Debugging tools to upload to this device:
1754064662020.png
 
sooooo, i looked around, find some info and after a bit of trial and error i was able to flash the firmware via usb, without the debugging tool.
to make it work you need to download the espressif flash download tool, configure it for ESP32-S3, workmode Develop and LoadMode USB.

1754118198827.png


select chipInfoDump tab, select the correct com port and baud rate (i had to try a couple of time becouse when was on it's original firmware the pc recognized on a com, after the first chip read fail the com port changed). Keep the terminal window in front, if you see "Enabling default SPI flash mode" you are ready to go!

1754119799867.png


move to SPIDownload tab and, after selecting again the com port and baud rate, click erase for good measure. The erase process take 30 seconds so wait untill you see the finish message

1754120009052.png


load the bootloader.bin at 0x0, partition.bin at 0x8000 and firmware.bin at 0x10000 (these files are in firmware_folder/.pio/build/firmware_name) and start the process.

1754120375374.png


Reboot the esp32 and you are done! :cool:

Now i need to learn how to configure everything in the firmware 😅
 
finished the wiring on a piece of perfboard just to test, and the basic stuff seems to be working as intended.
Is anyone here using this with glycol? I activated the option but don't see anything related like temp set or function like pump or chiller in the device tab
 
Back
Top